Pontiac Wiki Pontiac Wiki

Origin Documentation

Origin Documentation

  • Advertisers
    • Creating an Advertiser
    • Using the Advertiser Tab
    • Edit an Advertiser
  • Audiences
    • ART Audiences
    • Custom Audiences
      • Custom Audiences Overview
      • Custom Audience Limits
      • Custom Audience Expiration
      • Device ID Audience
      • Lat Long Audience
      • Zip Code Audience
      • Creative Audience
      • Subdirectory URL Audience
      • Full URL Audience
    • Third Party Audiences
    • Onboarded Audiences
      • Onboarded Audiences Overview
      • LiveRamp CRM Segments
      • Job Title/Employer Segments
      • Geoframed Commercial Address Segments
    • Contextual AI
    • Remarketing Audience
    • Associate Audience to a Line Item
    • Boolean Logic
  • Bid Recommendations
    • Bid Recommendations by Media Type
    • Bid Recommendations with Audience Segments or Foot Traffic Attribution
  • Creating & Managing Line Items
    • Line Item Parameters
      • Active Box
      • Basic & Advanced Setup
      • Inventory Type
      • KPIs
      • Creative Type
      • Budget Parameters
      • Frequency Parameters
      • Daily Pacing
      • Allow for Cookieless Users
      • Set as Remarketing
      • Bid Data
      • Optimization Schedule
      • CPA Weighting
      • Enable Foot Traffic Reporting
    • Targeting Menu
      • Exchanges
      • Deals
      • Geo
      • Day Parting
      • Site Lists & App Lists
      • Zip Codes
      • Inventory
      • Video
      • Viewability Threshold
      • Operating System
      • Device Models
      • Ads.txt
      • Deal Lists
    • Associate Creatives
    • Associate Conversion Pixels
    • Associate Audiences
    • Managing Line Items
      • Edit a Line Item
      • Clone a Line
      • De-activate a Line Item
      • Lines with Expired Segments or Deals
  • Creative Macros
    • Macros for All Impressions
    • Macros for Video Impressions
    • Macros for Mobile Impressions
    • Privacy Macros
    • Function Macros
    • Macro Implementation Recommendations & Examples
    • Encoding Examples
    • Macro ID Mapping
  • Creatives
    • Creative Specs
      • Banner Specs
      • HTML5 Specs
      • Native Specs
      • Audio Specs
      • Video & CTV Specs
      • Ad Server Tag Specs
    • Creative Upload
      • Creative Upload Process
      • Creative Click URLs
      • Pixeling Creatives
      • HTML5 Upload Error
    • Creative Audit
      • Creative Audit Overview
      • Audit Status
      • Sensitive Categories
      • Creative Flagged as Sensitive
      • Rejected Creatives
      • Creative Re-Audit
    • Editing a Creative
    • Creative Expiration
    • Creative Bulk Upload
    • Creative Screenshot Guide
    • Creative A/B Testing
    • Origin Creative Acceptance Policy
  • CTV & OTT Guide
    • CTV & OTT Overview
    • Open Exchange vs. Deal Inventory
    • CTV Best Practices
      • Overview of CTV Best Practices
      • How to set up CTV using Deals
      • How to set up CTV with Exchanges
    • OTT Best Practices
      • Overview of OTT Best Practices
      • How to set up OTT using Deals
      • How to set up OTT with Exchanges
    • CTV & OTT Creative Specs
      • Pontiac CTV & OTT Specs
      • Publisher Specific CTV & OTT Specs
    • CTV & OTT Measurement and Attribution
    • Buying CTV & OTT through Disney Networks
  • Strategy Guide
    • Strategies Guide Intro
    • Strategies by Media Type
    • Strategies by Inventory Type
  • Foot Traffic Attribution
    • Foot Traffic Attribution Overview
    • Setting Up Foot Traffic Attribution
      • Enabling Foot Traffic
      • Adding Locations for Foot Traffic Attribution
      • Editing & De-activating Locations
    • Foot Traffic Line Item Metrics
    • Foot Traffic Attribution Studies
  • LiveRamp Tutorial
    • LiveRamp Overview
    • LiveRamp Terminology
    • Account Set-up
    • Process Overview
    • LiveRamp File Format
    • Uploading Files to LiveRamp
    • Mapping Process
    • Distributing Files to Xandr
    • Audience Onboarding & Matching
    • Removing Segments that are no longer in use
  • Pixel Creation & Implementation
    • Segment Pixels (Remarketing)
    • Standard Conversion Pixels
    • IP Conversion Pixels
    • Third-Party Pixels (Trackers)
    • Post-Back Pixels
    • Pixel Placement
      • Pixel Placement Overview
      • Placing Pixels with Google Tag Manager
      • Placing Pixels with Shopify
  • Reporting
    • Reporting Time Zone – UTC
    • Reporting Lag
    • Quick Metrics
      • Advertiser Level Metrics
      • Line Item Level Metrics
      • Optimization Breakdowns
      • Creative Metrics
      • Standard Conversion Pixel Metrics
      • IP Conversion Pixel Metrics
      • Audience Metrics
      • Line Item Flight Metrics
      • Real Time Delivery
      • Line Item Performance Metrics
      • Audio/Video Metrics
    • Pacing Report
    • Standard Reporting Dashboard
      • Reporting Dashboard Summary
      • Creatives Reporting
      • Site Domain Reporting
      • Exchange Reporting
      • Device Type Reporting
      • Segment Performance
      • Geo Region Reporting
      • Geo Country Reporting
      • Latitude/Longitude Reporting
    • Custom Reporting
      • Custom Reporting Overview
      • Custom Report Delivery by S3
      • Basic Custom Reports
      • Conversions Report
      • Video & Audio Events Report
      • Lifetime/Billing Report
      • Age & Gender Report
      • IP Conversion Pixel Reports
      • Reach/Frequency Report
      • Full Domain Report
    • Third Party Discrepancies
      • Ad Server & Tracker (3p Pixel) Discrepancies
      • Google Analytics Discrepancies
  • Troubleshooting Campaign Issues
    • New Campaign Not Delivering
    • Improving Campaign Performance
    • Improving Pacing
    • Uneven Delivery
    • Sudden Decrease or Stop in Delivery
    • Overspend with Soft Cap Budgets
    • Brand Safety
    • Bounce Rate
  • UTM Code Implementation
    • UTM Code Overview
    • UTM Code Parameters
    • UTM Code Variables
    • UTM Code Implementation & Reporting
    • Macros as Variables
  1. Home
  2. Origin Documentation

Creating an Advertiser

The Advertiser level in the Pontiac platform represents an individual brand, product or client. This Advertiser will house all of the campaigns for this brand or product and the associated Creatives, Pixels and Audiences.

  1. Select ‘New Advertiser’ and give the Advertiser a name.
  2. Check the ‘Active’ box to set the Advertiser live.
  3. Verify the following details and check each box that applies. If none of these apply, save your Advertiser and continue.
    • GDPR: Check this box if the Advertiser will serve in European countries that are subject to General Data Protection Regulation.
    • Gambling: Check this box if the Advertiser will be used to promote gambling or gambling related services. Download the Gambling Addendum, then review, and sign the addendum. Send this to the Pontiac Team via the Help Center. If checked Advertiser will be restricted to Exchanges that allow this content. Pontiac_Gambling_Addendum

Once you have created an Advertiser, you can click on it’s name to open the Advertiser menu. This is where you will be able to upload Creatives, create Pixels and create Line Items for your campaign.

Using the Advertiser Tab

In the Advertiser tab you will see all of your Advertisers, which can then be expanded to show the Line Items under this Advertiser, by clicking on the arrow on the left-most part of the Advertiser. Line Items can also be further expanded to show the breakdown of Optimizations that were made to the Line. For more information on the metrics displayed in the Advertiser tab see the following pages: Advertiser Level Metrics, Line Item Level Metrics, Optimization Breakdowns.

Filter Status

Use the ‘Filter Status’ dropdown to see your Advertisers that are currently ‘Active’ or to switch to see Advertisers that are ‘Inactive’. If you are not seeing an Advertiser that you are looking for, try switching the Filter Status to ‘Inactive’. If the Advertiser appears with a red box as opposed to a green check, click on the name of the Advertiser to open the Advertiser menu. Select ‘Edit’ and check the ‘Active’ box. This Advertiser should now appear in your ‘Advertiser’ tab when the ‘Filter Status’ is set to ‘Active’, displaying the green Active box.
If all of your Advertisers appear under ‘Inactive’, switch to the ‘Admin’ tab and verify that your account has a positive balance. If funding becomes low in your account, your seat has been deactivated and all Advertisers will appear ‘Inactive’. The platform pauses the campaigns on the account until either a budget is added that is more than the daily spend or the daily spend is lowered so it is less than the budget in your account. To reactivate your Advertisers, either add funds to your account or adjust the Lines to spend less.

Reporting Interval

The default Reporting Interval in the Advertiser tab is ‘Yesterday’. Upon opening the Advertiser tab you will see all metrics for the previous day. To see metrics for a different Reporting Interval, select the desired time frame from the ‘Reporting Interval’. Available options include, ‘Today’, ‘Yesterday’, ‘7 day’, ’30 day’ and ‘Lifetime’. ‘Lifetime’ will display metrics from the start date of the Advertiser or Line, until the current date (with a 3 hour delay). See more on the Reporting Lag here: Reporting Lag.

Edit an Advertiser

To edit an Advertiser, go to the Advertiser tab, click on the name of the Advertiser to open the Advertiser menu and select ‘Edit’. The following screen will open:

Here you can rename your Advertiser, set its status to ‘Active’ or ‘Inactive’, and change the Gambling regulations that the Advertiser operates under. Note that GDPR regulations cannot be changed once an Advertiser is created. If different GDPR settings are needed, you must create a new Advertiser.

ART Audiences

The first step to create an ART audience is to build out an ART report in the ‘ART’ section of the platform under ‘Audience Research’ or ‘Audience Discovery’. Create a lookalike model from an existing audience or build a new audience according to desired demographics or interests. There are two types of reports & audiences that can be created in the ART platform:

Audience Research Audiences:

Select an existing audience to source key demo & interest data to build custom lookalike models. The existing audience data can be pulled from a Pontiac IP Conversion Pixel placed on the Advertiser’s website, or select key geos to build a lookalike model from the demographics & interests of the selected area.

Audience Discovery Audiences:

Select key demo & interest categories to define, locate & build your brand’s ideal target audience. Create the ‘ideal’ user profile for your brand, then locate key target markets to reach this demographic.

Once you have created an Audience Research or Audience Discovery report, the report data can be published as a custom audience for cookieless targeting across all your Pontiac campaigns.

  1. Open the ART report and select the ‘Publish Audience’ button.
  2. Select the threshold for matched zip codes you would like to include in the audience. Filter results to select ‘all results’ or the ‘top 10%’, ‘top 20%’, or ‘top 50%’ depending on the desired reach & scale of the campaign.
  3. Give the Audience a name
  4. Click the ‘Save’ button.

Published audiences will then appear in the ‘Audiences’ tab under the ‘Custom’ section of the ‘ART Audiences’ table. These audiences can be added to any Line Item using the ‘Associate Segments’ button.

On the ART Report, the field ‘Auto Refresh’ will determine the cadence at which the report data will refresh. Interest & Inventory data are updated every 30 days and new data may change report results. If a report is set to auto refresh and the matched zip codes in the results of the report are updated, this will automatically update any published audiences associated to the report.

For more information, see here: ART Documentation

Custom Audiences

Custom Audiences Overview

The Pontiac platform offers a variety of Custom Audience options that allow you to customize your targeting at a more granular level. You can create audiences to target using Device IDs, IP Ranges and IP Addresses, Zip Codes, Lat Long coordinates, and User IDs. 
To create a Custom Audience, go to the ‘Audiences’ tab and select ‘New Custom Audience’. Give the Audience a name and select the type of Audience from the dropdown. Enter the Audience data according to the indicated format. These Audiences will automatically be available to associate to any Line Item. Each seat can have a maximum of 50 updatable custom audiences at a time. These audiences can also only be updated 50 times per day.

Custom Audience Limits

Each seat can have a maximum of 50 updatable custom audiences at a time. If you require more than 50 custom audiences, you can chose to ‘freeze’ certain audiences so that they can no longer be edited. These audiences once ‘frozen’ are still active and can still be used on campaigns. To freeze an audience, open the audience and uncheck the ‘Allow Updates’ box. Only audiences with this box checked will count towards the 50 custom audience limit.

There is also a maximum of 50 updates that can be made to custom audiences per day. Updates include adding or removing data from an existing Custom Audience as well as creating a new Custom Audience. Changing the name of the Audience will not count as an update. Changing the ‘Allow Updates’ status of a Custom Audience will not count as an update.

Custom Audience Expiration

Custom Audiences will expire 180 days after they are created. The expiration date for each Custom Audience is visible in the ‘Audiences’ tab. Once an Audience expires, it will need to be removed from any Active Lines. If an expired Audience is on an Active Line, it will prevent the Line from optimizing and changes made to the Line will not save until the expired Audience is removed.

In most cases the data that is in the Custom Audience does not actually expire. For example Device IDs, Subdirectory URLs, Lat/Longs, etc., are still valid and could still be used on campaigns. In these cases, you can open the Custom Audience and check the active box, then click ‘Save’. This will re-submit the data and extend the expiration date for another 180 days. In some cases with User IDs and IP Addresses, the data may no longer be valid.

For Creative Custom Audiences, each time a user is added to the audience (when the selected creative serves an impression), the end date will be pushed to 180 days from the date the impression was served. This means that Creative Custom Audiences will expire 180 days after the Creatives selected stop serving on a campaign. For this reason, these Audiences cannot be refreshed as they are constantly refreshing if the Creatives are serving and the collected IDs are only valid for 180 days after the impression is served.

Device ID Audience

Each device that a user owns has a unique identification code that can be targeted. A desktop computer, laptop, and phone belonging to the same user will each have a unique Device ID. You can load these ID numbers into Pontiac to deliver campaigns directly to a user’s specific device. This Audience has a limit of 100,000 Device IDs per list. 
In the ‘Custom Audience’ section, enter each Device ID on an individual line, including the corresponding device type prefix, in the following format:
Line format: [Device ID]
Example: 0-123e4567-e89b-12d3-a456-426655440000
Device Type Prefixes:
0 –  IDFA (Apple ID for Advertising)
1 – SHA
2 – MD5
4 – OPENUDID
5 – AAID (Android Advertising ID)
6 – WINDOWSADID (Microsoft Advertising ID)
Once saved, this audience can be associated to any Line Item in the seat. Custom audiences are associated to the campaign in the ‘Audiences’ section of the Line Item creation screen. Select ‘Associate Segments’ and choose the audience from the ‘Custom Audiences’ dropdown.

Zip Code Audience

A Zip Code Audience leverages the national postal code system to target a specific geographical area. This Audience has a limit of 100,000 Zips per list. 
Enter the Zip Code followed by a comma and the Country Code with each entry on an individual line in the following format:
Line format: [Zip Code],[Country Code]
Example: 03102,US
The following are valid Country Codes:

Lat Long Audience

Lat/Long Targeting allows you to target lat/long coordinates and serve ads inside of a small surrounding area. The surrounding area is defined by the Google Plus Codes grid, and only has two pre-determined sizes, stated as a Radius (where Radius is defined from the center of the rectangle to the corner). Options include a Radius of approximately 150 meters or 2251 meters, and may vary slightly depending on the location of the coordinates. It is recommended to start with the 2251 radius, as the smaller radius can be very difficult to scale and may prevent the Line from serving.

Enter each set of coordinates on an individual line in the following format:
Line format: [Latitude],[Longitude],[Radius] (Radius can be either 150 or 2251)
Example: 123.414,-123.424,2251

This Audience has a limit of 100,000 coordinates per list.

Lat Long Audiences & Campaign Scale

These audiences should be used with Mobile In-App and Mobile Web inventory only. Lat/Long targeting relies on mobile GPS data and location services to pinpoint the exact latitude and longitude where the user is located. This data is not typically shared by browsers, so most impressions will be for mobile applications. It is strongly recommended to always include Mobile In-App inventory on Lines targeting Lat/Long Audiences. Note, that approximately 30% of mobile impressions received contain location data that you can target with lat/long segments.

Scaling lat/long campaigns can be difficult as several conditions must be met in order for an impression to be eligible and accessible for targeting:

  • The user must be within the lat/long radius
  • The user must be using a mobile application, or website on a mobile browser that monetizes ad space through the open exchange and has an ad slot up for auction for the creative size that you are using
  • The user must have location services turned on and the mobile application must be sharing the exact lat/long coordinate for the user’s location in the ad call (this is estimated to occur for 30% of impressions)
  • All other targeting parameters set on the Line Item must be met, and you must win the auction

This strategy is only recommended for certain use cases, such as an event, where your target audience is in a very tight geo at the same time. We encourage users to consider incorporating a Geo-framed Custom Audience to retarget visitors that have visited the location at a later date into their strategies as well, as these audiences tend to provide better scale. Read more about these audiences here: Geoframed Commercial Address Segments

Estimating Potential Budget for a Lat/Long Campaign

Here is an example of the recommended math to estimate the potential spend for your lat/long campaign:

  1. Estimate the number of potential users:
    Estimate the number of users that you think will attend the event, or that will be within the geo-fence in a 24-hour period. In this case we will use an event with 1,500 attendees as an example.
    We estimate that 50% of all attendees will use their mobile phones in ad-enabled apps during the event:
    1,500 * 0.5 = 750

  1. Estimate the number of potential impressions available:
    An estimated 30% of those impressions would be targetable by lat/long (location services on and app sharing precise location):
    750 * 0.3 = 225 addressable users

    We will then estimate that these 225 users can be served 3-5 ads as they use the app:
    225 * 3 = 675
    250 * 5 = 1,125

    This would give us an estimated range of 675 – 1,125 potential impressions per day
  2. Estimate the daily budget as a dollar amount:
    In-App inventory typically runs between $6-$12 CPM depending on the App.
    This would give you a daily budget range:
    675/1000 * $6 = $4.05
    1125/1000 * $12 = $13.5

    The estimated daily potential budget would be between $4.05 and $13.50.

This is an estimate and not a guarantee, as there is a lot of room for uncertainty as to the percentage of users that will open ad-enabled apps monetized on the open exchange AND have their location services turned on while they are in the designated geo-fence.

NOTE: any other targeting parameters applied to the Line Item, for example, an app list, frequency capping, OS targeting, day parts, limiting the exchange list, etc. will further limit scale and IS NOT RECOMMENDED.

View the Geo-fence Area on the Google Plus Codes Map

To find the Google Plus Code and see the surrounding target area for a set of lat, long coordinates go to the Google Plus Codes website here: https://maps.google.com/pluscodes/ and select ‘Find your code’ at the bottom of the webpage.
Enter an address into the bar at the top of the screen that says ‘Enter a Plus Code or an address’. Once you enter an address you will see a red box on the map over this location and at the bottom of the screen the Plus Code will appear as seen in the image below.

Select the up arrow to the left of the Plus Code to expand the window like this:

The code next to the first blue ‘pin’ symbol is the Plus Code for this specific lat, long coordinate. In this example, 87G8P2R3+PQ.
By removing the letters following the plus sign (in this case ‘PQ’), you can find the Plus Code for the lat, long coordinate and the surrounding area with a Radius of 150 meters. In this example, 87G8P2R3+.
Copy this Plus Code (87G8P2R3+) into the bar that says ‘Enter a plus code or an address’ at the top of the screen to see the designated lat, long coordinate and the surrounding area on the map with a Radius of 150 meters. 

This red rectangle is the area that you will be targeting by entering [Lat, Long, 150] into the Custom Audience text box. 
If you wish to enlarge this area, target the Plus Code with a Radius of 2251 by entering [Lat, Long, 2251] into the Custom Audience box. To see this area on Google Maps take the code for a Radius of 150, in this example 87G8P2R3+, and change the last two digits before the plus sign to ‘00’. For example, 87G8P200+.

This red rectangle is the area that you will be targeting by entering [Lat, Long, 2251] into the Custom Audience text box.

Creative Audience

This audience collects User IDs, Device IDs or IP Addresses of users that have been served a creative through Pontiac and creates an Audience segment to re-target these users directly. Choose the data you wish to follow, either Device ID, User ID, and/or IP Address.  Then select the Creatives, that once served, will add users to the Audience.

Subdirectory URL Audience

This feature allows you to target up to four subdirectories per domain. Subdirectory URL Targeting ensures your ads serve on all pages within the specified subdirectory path. For example, if you target nytimes.com/section/world/africa, your ads will serve in the World/Africa section, as well as any subsections beneath it.

To set this up, enter each URL on a separate line in the ‘Custom Audience’ text box. Remove ‘https://’ and ‘www.’ if applicable. Each list can contain up to 50,000 URLs.

Full URL Audience

By creating a Full URL Targeting Audience, you can target specific articles or exact pages within a website, with support for up to 20 subdirectories per domain. For example, targeting nypost.com/2020/08/17/didnt-take-long-for-giants-saquon-barkley-to-impress-joe-judge ensures ads will only serve on this exact page, rather than across the broader category subdirectory.

To set up Full URL Targeting, enter each URL on a separate line in the ‘Custom Audience’ text box. Remove ‘https://’ and ‘www.’ if applicable. Each list can contain up to 50,000 Full URLs.

Third Party Audiences

Third-Party Audiences allow highly specific targeting (or anti-targeting) contextually, by demographics, by behavioral characteristics and more. In the ‘Audiences’ tab under ‘Third Party’ you can search through the thousands of segments available by category, type, and provider. 

Most Third-Party Audiences have an additional cost CPM to target the data. The CPM for each Third-Party Audience can be seen in the right-most column of the list of Third-Party segments. When you associate Audiences to a Line Item, add the cost of the most expensive segment to the Bid Data. The Data Costs for associated segments will be included in the all-in media spend for each Line Item.

Once you have found a segment, click the ‘Associate’ button, and send it to the Advertiser this Audience will be used in. This Audience can then be associated to any Line Item under this Advertiser. These can be layered together with Boolean logic to target individual Audiences or a combination of many. To choose between targeting ‘Any’ or ‘All’ between groups, see the section on Boolean Logic here: Boolean Logic.

The following are types of Third-Party segments and examples of how they can be leveraged to enhance campaign performance: 

Behavioral:

Behavioral Third Party Segments can be leveraged to serve your ad to an Audience of users who have demonstrated their specific interests or lifestyles through their web activity by using behavioral segments. For example, to reach users who have been planning a vacation, users in the market for school supplies, or online shoppers searching for new running shoes.

Brand Safety & Viewability:

Brand Safety Third Party Segments can be leveraged to preserve and protect your brand’s integrity by placing your ads on inventory free from potentially hazardous or sensitive content such as drugs, alcohol, firearms, war etc. or utilize industry specific segments to avoid negative industry related content. Viewability Third Party Segments can be utilized to draw more attention to your ad and target pages with high viewability and minimal clutter.

Contextual:

Contextual Third Party Segments can be leveraged to target Audiences that are on websites looking at relevant content. For example, ‘Pets’ contextual advertising can be used to reach users who are currently consuming content related to pets, or ‘Women’s Fashion’ to serve to users browsing articles on that topic.

Demographic:

Demographic Third Party Segments can be leveraged to target Audiences based on demographic factors such as gender and age group. Reduce the risk of running campaigns to uninterested consumers by controlling basic variables, for example, generation, income, and family structure.

Language:

Language segments can be utilized to serve your ad to an Audience of users who are looking at content in over 50 different languages, from Spanish to Macedonian to Thai. 

Weather:

Weather Third Party Segments can be leveraged to serve your ad to an Audience of users based on the weather conditions that they are experiencing in their current location. For example, a sunscreen brand can serve ads to people in “Very Sunny” conditions, or a nasal spray can serve to people in “Allergy Weather.”

Onboarded Audiences

Onboarded Audiences Overview

The ‘Onboarded’ section of the ‘Audiences’ tab is a space to house external data that has been pushed to the platform, allowing you to associate these segments with your campaigns. These segments can be integrated using your CRM data through LiveRamp or leverage the Pontiac Team’s partnerships with Bombora and OnSpot to access intent-based and location-based data.

If you would like to leverage your own relationship with a data provider, reach out through the Help Center for more information on how segments can be onboarded from your partners.

LiveRamp CRM Segments

Through Pontiac’s partnership with LiveRamp, you can convert your CRM data into targetable Audience lists within the Pontiac platform. LiveRamp is a data management platform (DMP) that allows you to upload personally identifiable information (PII) that you have about your Audience and matches this information with User IDs to create an Audience segment.

Audience data can include:

  • Name and Postal Addresses (NAP)
  • Email Addresses
  • Phone Numbers
  • Client Customer IDs (your internal Customer IDs)
    • This functions as an Audience key that allows LiveRamp to delete duplicates in an uploaded file. If there is no Customer ID, LiveRamp will either use the email addresses or NAPs provided.

If you are interested in using LiveRamp to start targeting your CRM data, you will need to sign a LiveRamp user agreement. This agreement can be found in the ‘Admin’ tab under ‘Seat Settings’ in the ‘Addendum’ section. To sign this agreement, check the ‘Accept LiveRamp Addendum’ box at the bottom of the contract and click ‘Submit’. Once you have completed these steps, reach out to the Pontiac Team through the Help Center with the email address you would like to be used for the account. The Pontiac Team will create an account on your behalf using the email address provided. You will then receive an email from LiveRamp with login credentials.

Upload a csv, tsv, or txt file containing PII into LiveRamp, which will match the submitted information with User IDs and allow you to target these individuals across the internet through Pontiac. For instructions on how to upload files to LiveRamp see here: LiveRamp.

Once you have added a segment to distribution for Xandr, email your Account Manager to say that you have pushed a segment. Please provide the Pontiac Team with the segment name and the date you pushed the segment.

Your Onboarded Audience will appear in the ‘Audiences’ tab under ‘On Boarded’. Associate the segment to the Advertiser where you would like to use it, and it will be made available to associate to any Line Item under this Advertiser. LiveRamp segments cost an additional flat CPM of $2. To set the bids, add $2 to the recommended bid ranges for the campaign’s media type. 

Job Title/Employer Segments

Through Pontiac Intelligence you can leverage Bombora Audience Solutions to build custom audiences of users who work at specific companies or specific job titles/roles. For example, you can target ads exclusively to users with the title Marketing Manager or employees of Programmatic Mechanics.

To get started, compile and send the list of job titles or company domains (e.g., cisco.com) to the Pontiac Team through the Help Center. who will then push Companies (using their domain name, ie: cisco.com) or Job Titles to Bombora. The team will process the request and push the segments to Bombora. Within three business days, the segments will be available under the ‘Onboarded’ section of the ‘Audiences’ tab in Pontiac.

Bombora segments carry an additional flat CPM fee, which varies by segment. To set your bids accordingly, add the segment cost (as listed in the ‘Audiences’ tab) to the recommended bid range for your campaign’s media type.

Geoframed Commercial Address Segments

Through our partnership with Onspot Data, you can create Audiences to target users who have visited specific commercial buildings. By using one or hundreds of commercial addresses, we can target ads to users who have visited those locations at any point in the past year. This Audience solution is great for users who want to target people who have visited a specific location or event.  For example, you can target users who have attended a University of Texas football game or those who have visited any Target store across the country.
These Onspot Data-based Audiences can ONLY be used for Mobile In-App campaigns in the United States. They CANNOT be used with CTV, Web (Desktop), or Mobile-Web campaigns.


To create an Audience based on commercial addresses, download and enter the commercial addresses into this excel template: Commercial Address Template. If the zip-4 column does not apply to your addresses, you can leave it blank. Send your completed excel template along with the desired lookback period (choose from last 30 days, last 90 days, or a specific date range within the last year) to the Pontiac Team through the Help Center. After 3 business days, the users from the specified geo locations and time frame will be made available for targeting. They will appear under ‘Onboarded Audiences’ in the platform. OnSpot segments cost an additional flat CPM fee of $2.00. When setting up your campaign bids, add $2.00 to the recommended bid ranges for the campaign’s media type.

Audience Types:
  • Regular: Regular Audience captures mobile IDs seen within the geoframe(s) for the look back period.
  • Lookalike Audience: Lookalike expands reach based on similarities in demographic, location, behavioral and temporal data. This feature expands on the concept of using demographic lookalike audiences by layering on location behavior to further refine the lookalike audience for improved performance. A baseline group in the initial audience is used to identify relevant demographic variables and incorporates similar location behavior to select targets with similar attributes.
  • Household Extension: When building a geoframe based audience a ‘Household Extension’ can also add the devices associated to the households that were seen in the geoframe. Devices such as tablets and gaming units can be added as an extension here.
  • Social Extension: Social audiences are people that are not family members who spend time together on a regular basis – such as friends and co-workers with frequent, meaningful interaction. The base audience is used to find other devices that frequently associate with a member in the base audience. These associations do not include devices that are part of the household extension. ‘Social Extension’ audience combines location, temporal and frequency as primary indicators to build the associations for determining the device linkages.
    Example: Both Madison and Kaitlyn’s Mobile Ad ID’s are observed frequently together at the same playgrounds, restaurants, bars, and malls at the same times on the same days. We determine that they have a social connection based on frequently being seen together. Using frequency and location overlap, we would consider these Mobile Ad ID’s as socially linked and would be included in the ‘Social Extensions’.

Contextual AI

Contextual AI is an AI-based, custom targeting solution that performs deep content analysis to find the best contextual placements for your ads.

Contextual AI uses Natural Language Processing (NLP) to digest the content of articles across the web and understand the text the way a human would. By processing entire websites of content, the AI overcomes the ambiguities in language that over-simplified tools such as keywords can overlook, accurately assigning meaning to the words in context. (For example, does the word ‘Apple’ in this article refer to a company or a fruit?). A neural network produces an embedding vector of the content, allowing full webpages to be indexed for contextual relevance:

Leveraging this rich contextual analysis, Advertisers can build custom lookalike segments from a few sample articles or select from our list of curated contextual segments for over 300 IAB content categories. These segments have an additional cost of a $0.25 CPM that will be added to the all-in cost of media.

To leverage a Custom Contextual segment, follow these steps:

  1. Define your target content:
    • URL Input: Find 4-5 sample articles that represent your brand’s target content. The following are our recommendations for selecting your sample articles:
      • Aim for a minimum of 3-5 example pages per contextual segment. Closer to 10 may provide good results depending on the subject but won’t be necessary in all cases.
      • Choose the number of examples based on how broad or narrow you want to match. If you want to go for something really broad (for example, “current events”, an IAB category), you’ll want a number of examples covering many aspects of such a broad subject (in December of 2022 I might include examples covering inflation, the Ukraine war, midterm elections, twitter, gpt-3, Donald Trump, Joe Biden and the World Cup for example). On the other hand, if you want to get very precise, for example “1960s muscle cars” you can get away with fewer examples.
      • Look for pages that are text-heavy with at least 5 sentences. Low quality pages (e.g. infinite scroll, interactive, or image heavy pages) will have lower performance in the matching process. News articles, blog posts, how-to articles, etc will provide more accurate matches.
    • Text Input: Enter a descriptive paragraph of text about the topic of interest to build a list of contextually relevant URLs for targeting. Text should have a minimum of 50 words and maximum of 500.
  2. Create the Audience: In the ‘Audiences’ tab, select ‘New Contextual Audience’ and enter your sample articles. Using NLP, the sample articles are analyzed to achieve a deep understanding of content and meaning. The algorithm compares your sample articles to millions of URLs across the web to find the closest contextual matches.
    • Once your custom segment has generated, you can review a sample of the matched articles by clicking on the name of the Audience in the ‘Audiences’ tab. Under the ‘Site List‘ section, you will see the URLs for your sample articles. These can be edited at any time if the ‘Allow Updates’ box is checked. Below this section you will see ‘Example Audience Data‘, this is a sample of the matched articles that your ads will target when you use this Audience. Note, this is only a sample and not a complete list of matched URLs. The total number of matched URLs will be displayed under ‘Valid Records’.
  3. Target the Audience on a Line: Matched articles are compiled in a custom segment that can be added to your Line Item under ‘Audiences’ using the ‘Associate Segments’ button. These audience segments contain Full URLs for precise contextual targeting. It is not recommended to layer this segment with any additional inventory or audience targeting as this may restrict campaign scale.

IAB Curated Contextual Segments

In the ‘Audiences’ tab you will find over 300 Contextual AI segments curated by the Pontiac Team for each of the IAB categories. If you click on the name of the segment, you can see the input and the sample output for this segment. The ‘Site List’ section displays the articles that were used to ‘define’ the desired content for the category. The ‘Example Audience Data’ below shows a sample of the matched articles where the ads would serve if this Audience is targeted. This is a sample and not the complete list of URLs contained in the Audience.

Note, these IAB Category segments cannot be edited and they are already available for use across all of your Advertisers at a $0.25 CPM. These can be added in the ‘Associate Segments’ section of the Line Item, under ‘Contextual’.

Remarketing Audience

To create an Audience of users who have previously visited your website for remarketing purposes, you must first create a segment pixel and place it on the Advertiser’s website. For more information on creating this pixel see here: Segment Pixels.

Once created and placed, the remarketing pixel will fire when a user lands on the page and store that User’s ID in an Audience segment. This Audience can then be associated to a Line Item. By associating this Audience to a Line Item, ads will serve on the web only to users who have visited the webpage where the pixel is placed.

The segment pixel can also be associated to a Creative during the Creative upload process. This will cause the pixel to fire and add a user to the Audience segment when they are served the Creative, even if they do not click on the ad or land on the webpage.

Associate Audience to a Line Item

To associate an Audience to a Line Item follow these steps:

  1. Create or select a Line Item and open the Line Item configuration menu.
  2. Scroll down to the ‘Audiences’ dropdown and choose the ‘Associate Segments’ button on the right-hand side.
  3. Choose the blue ‘Add New Group’ button on the right-hand side of the window. A box should appear with the words ‘drag and drop segments to add new group’.
  4. Choose to target ‘Any’ or ‘All’ between groups. See the ‘Boolean Logic’ section for an explanation of these functions.
  5. Find the segments you wish to add on the left-hand side and drag them into the box on the right-hand side.
    • ‘Audiences’: Audiences created with a remarketing pixel under this Advertiser will appear here.
    • ‘Custom Audiences’: Custom Audiences can be created in the ‘Audiences’ tab and will automatically be available to all Advertisers in the seat. Certain custom Audiences will only be available to associate when the correct ‘Inventory Type’ is selected. For example, Lat/Long Audiences can only be used when ‘In-app’ or ‘Open’ is selected as the inventory type.
    • ‘Third-Party Audiences’: For Third-Party Audiences to appear here, open the ‘Audience’ tab and use the blue ‘Associate’ button to associate the selected Audience segment to the Advertiser.
    • ‘Onboarded Audiences’: For Onboarded Audiences to appear here, open the ‘Audience’ tab and use the blue ‘Associate’ button to associate the selected Audience segment to the Advertiser.
  6. These Audiences can be ‘targeted’, or ‘anti-targeted’. To switch to ‘exclude’ or ‘anti-target’ an Audience, select the gray minus sign next to the name of the segment. When you click on the minus symbol it will change from gray to red, indicating that the Audience is now being ‘anti-targeted’. This Line Item will now serve to any user that is NOT in this Audience. In the example below, the Line will serve to anyone who is not in this segment of politically conservative users. If you are only using one Audience, there is no difference in the exclusion feature between ‘any’ and ‘all’. See the Boolean logic section below if you are using multiple Audience segments.
  7. Select the blue ‘Add New Segments’ button at the bottom of the window to save the segment changes and then hit the ‘Submit Changes’ button too save the changes made to the Line Item.
  8. Add the average cost (CPM) for all associated segments to the Bid Data for the Line Item.

Boolean Logic

If you are targeting multiple Audience segments they can be layered together in groups through Boolean logic. To choose ‘Any’ or ‘All’ between groups read the following descriptions of each.

‘All, between segment groups’

If you only have one segment group, the internal group logic will default to OR, meaning that if ANY of the conditions within the group are met the impression will be eligible to serve. For example, below is targeting users found in the ‘Female’ Audience OR ‘Age 20 to 30′.

If you have created multiple segment groups, the intergroup logic will automatically default to AND, meaning that at least one condition must be met in ALL segment groups. For example, below a user would need to be found in one of the two segments in the first grouping AND would need to be found in one segment in each of the other segment groups associated.

‘Any, between segment groups’

If you only have one segment group, the internal logic will default to AND, meaning that ALL the conditions within the group must be met for the creative to be eligible to serve. For example, a user must be found in ‘Female’ AND ‘Age 20 to 30’ for an impression to be served.

If you have created multiple segment groups, the intergroup logic will automatically default to OR, meaning that the conditions of one segment group are to be met OR the conditions of the second group are to be met.

Anti-Targeting
‘All, between segment groups’

By selecting the ‘All’ between segment groups and using the ‘exclude’ feature with multiple Audiences the internal group logic will default to OR. For example, below an impression could server to any user found in the ‘Female’ OR NOT FOUND in the ‘Age 20 to 30’ Audience 

‘Any, between segment groups’

By selecting the ‘All’ between segment groups and using the ‘exclude’ feature with multiple Audiences, the internal logic will default to AND, meaning that ALL the conditions within the group must be met for the creative to be eligible to serve. For example, a user must be found in ‘Female’ AND NOT FOUND in ‘Age 20 to 30’ to be served. 

Bid Recommendations by Media Type

In the Pontiac Platform, you have full control over bidding for all your campaigns. When setting up a Line Item, you can define a Min Bid, Base Bid, and Max Bid for your media. Closing bids reflect the total cost, including any applicable Audience fees or Foot Traffic fees. 

  • Min Bid: The minimum CPM you are willing to enter auctions at. This sets a floor price, preventing lower-quality inventory from being targeted, as the campaign will not attempt to serve impressions below this threshold.
  • Base Bid: The initial bid submitted in an auction. If the final clearing price is lower than the base bid, the system will adjust and bid one cent above the next highest bid to secure the impression efficiently.
  • Max Bid: The maximum CPM you are willing to pay for an impression. If the auction price reaches this threshold, the system will stop bidding on that placement.

Bid pricing typically varies based on the media type and the level of targeting. If you are limiting geographic parameters or targeting Audience segments, bids should be higher than these standard recommendations. 

Audio:

Audio can be bought either through the Open Exchange, or via PMPs. Bids on the Open Exchange typically clear between $10 and $13, whereas PMP Deals are often in the $18 – $25 range. Each PMP will have specific bid recommendations.

CTV:

The typical prices for CTV placements range from $28-40, with premium inventory available at prices over $40. If you are targeting a CTV deal you will be given the CPM floor. We recommend setting your max bid at least $3-$5 above the min. CTV placements on the Open Exchange may sell at a lower CPM, but we recommend using PMP’s as they guarantee fraud-free inventory.  

Display:

Display Bid Prices vary with targeting and Audience data. The standard recommendation for display is a bid between $2-4, but this will increase as targeting becomes more granular.

Native:

Native Bid Prices vary depending on the quality of the sites and inventory, but guidelines are as follows:

  • Format A: Bid between $5.35 and $6.45
  • Format B: Bid between $1.20 and $2.30
  • Format C: Bid between $1.20 and $2.30
  • Format D: Bid between $7.25 and $12.75
Video:

Bids vary for video inventory, but we recommend a bid structure of $6-8.

Bid Recommendations with Audience Segments or Foot Traffic Attribution

All Audience segments have an additional cost CPM that should be added to your bid data. If your base bid is $2.43 and you are targeting an Audience segment with a cost of $2 CPM, you will actually be bidding $0.43 for media. If you are using an Audience segment, add the cost of the segment to the standard recommendation for the media type.  If you are using various Audiences, add the average of all of the Audience costs to the standard recommendation for the media type. Foot Traffic Attribution also has an additional cost of $1.50 CPM. All campaigns receiving Foot Traffic Studies should add $1.50 to the bid recommendation for the media type.

  • LiveRamp CRM segment: Add $2.00 to the recommended bid for the media type
  • Geoframed Onspot segment: Add $2.00 to the recommended bid for the media type
  • Job Title/Employer Bombora segment: Varies based on the segment, add the CPM shown in the ‘Onboarded’ section of the Audiences tab to the recommended bid for the media type
  • Custom Contextual AI segment: Add $2.00-$4.00 to the recommended bid for the media type
  • Other Third-Party Audiences: Add associated CPM to the recommended bid for the media type
  • Foot Traffic Studies:
    • Banner, Native, Audio & Video add $1.50 to the recommended bid for the media type
    • CTV add $4.00 to the recommended bid for the media type

Line Item Parameters

Active Box

Activating or Pausing a New Line Item:

When creating a new Line Item, open the Advertiser under which the Line will fall under and select ‘New Line’. Next to the KPI selection, you will see the ‘Active’ checkbox. To activate the campaign immediately, check this box. To keep it inactive, leave the box unchecked. You can return to these settings at any time to update the activation status.

Activating or Pausing an Existing Line Item:

If your Line Item has already been created and you would like to pause or re-activate the campaign, click on the name of the Line Item to open the Line Item Settings. If you are at the Advertiser level and do not see the Line Item you are looking for, toggle the ‘Active’ dropdown to ‘Inactive’. Then click on the name of the Line Item to open the Line Item Settings. Click the ‘Edit’ button in the top right corner of the screen and select the ‘Active’ box. To pause a campaign, un-check the ‘Active’ box. To re-activate a campaign, check the ‘Active’ box.

Basic & Advanced Setup

When creating a new Line Item, open the Advertiser under which it will be placed and select ‘New Line’. Choose between ‘Basic’ or ‘Advanced’ setup by selecting the corresponding option. Basic mode limits the modifiable parameters for a simplified setup, while Advanced mode provides full customization options.

Inventory Type

When setting up a Line Item, select from the following Inventory Types:

  • Web: This includes desktop & mobile web
  • In-app: This runs on mobile applications
  • CTV: CTV is a specific subset of OTT, defined as premium video content streamed only on televisions that are connected to the internet via Smart TV apps, Game Consoles and Set Top boxes.
  • OTT: OTT is defined here as premium TV content delivered via an internet connection that is streamed on Mobile, Desktop, and Tablet devices ONLY.
  • Open: Open allows for all inventory types and should only be used by advanced programmatic buyers. Exercise caution when using this inventory type to ensure you are getting the desired results. For example, if you apply a Site List, but do not specify ‘Web’ inventory, this will serve on these whitelisted sites and ANY app unless an App List is also applied.

Once Inventory Type is selected and the Line is submitted this cannot be changed.

KPIs

The Pontiac algorithm optimizes your campaign based on the selected Key Performance Indicator (KPI):

  • CTR (Click Through Rate): Select this KPI if your goal is to increase clicks and drive more traffic to a site. Calculation: Clicks ÷ Total Impressions.
  • CPA (Cost Per Acquisition): Select this KPI if you are trying to decrease the cost per conversion on the campaign. Calculation: Campaign Cost ÷ Number of Conversions.
  • vCTR (Viewable Click Through Rate): Select this KPI to increase the number of clicks on viewable ads. Calculation: Clicks ÷ Viewable Impressions.
  • Viewability: Select this KPI to maximize the viewability of your campaign. Per IAB guidelines, an ad is considered Viewable if 50% of the pixels are in-view for 1 second or more. Calculation: Viewable Impressions ÷ Total Impressions Served.
  • VCR (Video Completion Rate): Select this KPI for video campaigns to optimize for completed video views. Calculation: Video Completions ÷ Total Videos Served.
  • Reach: Select this KPI to attempt to spend the entire allocated budget without optimizing to a specific performance metric.

For KPI recommendations by Product see here: Product Offerings & Targeting Strategies.

Creative Type

Each Line Item is limited to serving only one Creative Type, and this selection cannot be changed once the Line is submitted. The available Creative Types are:

  • Banner
  • Video
  • Native
  • Audio

Budget Parameters

  • Budget by Spend: Select ‘Budget by Spend’ and enter the total budget under ‘Lifetime Cost’. Pontiac will automatically calculate and populate the ‘Lifetime Impressions’, ‘Est. Daily Cost’ and ‘Est. Daily Imps’ fields based on the total cost and bid data. You can also enter a daily budget under ‘Est. Daily Cost’ and Pontiac will automatically fill the ‘Lifetime Cost’, ‘Lifetime Impressions’, and ‘Est. Daily Imps’ fields based on the daily cost and bid data.
  • Budget by Impressions: Select ‘Budget by Impressions’ and enter the total number of impressions desired. Pontiac will automatically calculate and populate the ‘Lifetime Cost’, ‘Est. Daily Cost’ and ‘Est. Daily Imps’ fields based on the number of impressions and bid data. You can also enter a daily impression budget under ‘Est. Daily Imps’ and Pontiac will automatically fill the ‘Lifetime Cost’, ‘Lifetime Impressions’, and ‘Est. Daily Cost’ fields based on the daily impressions and bid data.
  • Dynamic Budget Multiplier: This is built in as a pacing function to ensure campaigns stay on target. It allows Pontiac to adjust the daily spend to either catch the campaign back up to perfect pacing, or slow down spend to keep the campaign from spending out too early. This will adjust daily.
  • Budget Multiplier: If you do not utilize the dynamic budget multiplier, you can set your own budget multiplier that will pace out your campaign by multiplying your budget by this number. For example: a $100 budget with a 1.1 budget multiplier, the campaign will pace out to $110. If you are measuring your success of billings via a DoubleClick third-party tag, we recommend using 1.05 or 1.1 as the multiplier. This means you will serve 1.05x or (1.1x) your goal to ensure that you cover the discrepancy against the third-party tag.
  • Soft Cap Budget: This function allows you to remove dynamic budget features to try to maintain stricter daily spend. The platform will attempt to spend the ‘Est Daily Cost’ each day, as opposed to spending to maintain pacing based on the lifetime budget. Actual spend may still exceed the soft cap budget and this function may not work if using ASAP pacing or targeting is too open. 

Frequency Parameters

  • Daily Frequency Cap: The daily frequency cap controls the maximum number of times an individual can be served an ad in a single day. 
  • Lifetime Frequency Cap: The lifetime frequency cap controls the maximum number of times an individual can be served an ad in the lifetime of the campaign. 
  • Dynamic Frequency: The dynamic frequency function allows the platform to adjust frequency caps based on the campaign’s pacing. If a campaign is pacing behind, this will increase the number of times a user can be served an ad. If the campaign is pacing ahead, this will decrease the number of times a user can be served an ad.
  • 2 min Frequency: This will only allow ads to serve once every 2 minutes to an individual user to avoid publishing your ad to a user multiple times on the same site.

Daily Pacing

  • Even Pacing: Impressions will be paced out evenly throughout the day.
  • ASAP Pacing: The campaign will attempt to spend the daily budget as quickly as possible. This will double your bid price and may cause your Line to pace ahead of schedule. Because ASAP pacing will remove the performance focus of the campaign, we only recommend using ASAP pacing for campaigns that are extremely behind on budget and/or nearing the end of the campaign, or for single-day campaigns. 

Set as Remarketing

This box can only be checked when CPA is selected as the KPI. If the campaign is a remarketing campaign select this option, which will require a segment pixel to be attached. 

Allow for Cookieless Users

The ‘Allow for Cookieless Users’ feature ensures that impressions are served to users who may have cookies disabled or in cases where no cookie is shared by the publisher. This allows campaigns to continue running even in environments where cookies are unavailable for targeting. This feature is automatically applied to all CTV, OTT, and In-App Line Items, as requiring cookies in these environments may prevent the campaign from serving.

It is also recommended to enable this feature for streaming Audio campaigns since cookies are often not available for targeting in these environments. For Mobile Web campaigns, enabling the ‘Allow for Cookieless Users’ feature is essential to serve impressions to Safari users, as Safari blocks third-party cookies by default.

Please note that while this feature ensures broader targeting, including users without cookies may impact the accuracy of frequency caps and conversion tracking when cookies are unavailable.

Bid Data

This is where you can control the CPM (cost per 1000 ads) of the campaign. Higher bids will help win more auctions and access higher quality inventory. Closing bids are an ‘all-in’ price and include the Pontiac 20% Software User Licensing Fee and any other relevant fees. 

  • Min Bid: The minimum CPM you are willing to enter auctions at. This sets a floor price, preventing lower-quality inventory from being targeted, as the campaign will not attempt to serve impressions below this threshold.
  • Base Bid: The initial bid submitted in an auction. If the final clearing price is lower than the base bid, the system will adjust and bid one cent above the next highest bid to secure the impression efficiently.
  • Max Bid: The maximum CPM you are willing to pay for an impression. If the auction price reaches this threshold, the system will stop bidding on that placement.

For general bid recommendations see here: Bid Recommendations. 

Optimization Schedule

The optimization schedule allows you to select the days of the week and the frequency at which the Pontiac algorithm will make optimizations to your campaign. To allow the algorithm to learn effectively, it is recommend to start with optimizing only once per week. 

Once your campaign reaches 35-50 clicks per day (if your KPI is CTR) or 35-50 conversions per day (if your KPI is CPA), you can increase the optimization frequency to two to three times a week. This helps the algorithm refine its approach based on more data and improve performance.

CPA Weighting

When CPA is selected as the KPI, a sliding bar labeled ‘CPA Weighting’ will appear next to the optimization schedule. This allows you to adjust the optimization focus between post-click or post-view conversions.

If your conversion pixel uses a hybrid trigger (both click and view), it is recommended to set the weighting to 50/50 to balance the optimization between both types of conversions. This ensures that the algorithm optimizes for both post-click and post-view actions effectively.

Enable Foot Traffic Reporting

Foot Traffic Attribution is a type of Conversion reporting powered by OnSpot, that allows advertisers to track how many users were served an ad unit through Pontiac and then visited a commercial location. When this box is checked the campaign will receive Foot Traffic Attribution Reports. Once selected, the ‘Foot Traffic Reporting’ section will become available to add the addresses that you would like to track. Use the ‘Add Location button’ then follow the steps here to add each location that you would like to track: Adding Locations for Foot Traffic Attribution

Foot Traffic Attribution is only available in the United States at this time. The cost for Foot Traffic Attribution is as follows:

  • $1.50 CPM for Banner, Native, Audio & Video creatives
  • $4.00 CPM for CTV creatives

For campaigns receiving Foot Traffic reports, we recommend adding the associated CPM to the bid recommendations for the media type of the campaign.

Foot Traffic Attribution Reports can be found in the Reporting tab in the ‘Foot Traffic Studies’ section and metrics will also be available in the ‘Foot Traffic Reporting’ and ‘Performance’ sections of the Line Item. Foot Traffic metrics and reports will be updated once daily, on a 3-5 day delay.

See additional information on Foot Traffic Attribution here: Foot Traffic Attribution

Targeting Menu

Exchanges

Select the exchanges that you wish to buy media through. These are inventory sources that your ad will run through (also known as Supply Side Platforms). You can select as many or as few exchanges as you would like. As a starting point, we recommend you run on ALL exchanges, so you have access to the most inventory. To target an exchange, click the green plus button next to the name of the exchange in the list on the left-hand side. This will add this exchange to the campaign. To remove an exchange, click the red minus button next to the name of the exchange in the list on the right-hand side.

Recommended Exchanges by Creative Type:

  • Audio: Use Deals and remove all Exchanges, or use Spotify, Adswizz, Triton Digital Exchanges.
  • Banner: Use all Exchanges, and remove as needed based to performance.
  • CTV: Use Deals and remove all Exchanges.
  • Native A: Use Triplelift, Sharethrough, Microsoft.
  • Native B: Use Taboola.
  • Native C: Use Outbrain.
  • Native D: Use Microsoft.
  • OTT: Use Deals and remove all Exchanges.
  • Online Video: Use all Exchanges, and remove as needed based on performance. Deals are also available.

For more information on how the ad exchange works, see here: How the Ad Exchange Works
See the full list of available exchanges here: Exchanges

Deals

These are private marketplace deals, or PMPs, are a method through which publishers privately grant access to premium inventory to a specific Advertiser or group of Advertisers. These PMPs are still real-time bidding environments in which the highest bid will win the impression, but the bidding will start at a specified price floor as defined by the publisher. You can see the full list of available PMPs in the ‘Inventory’ tab. This Deals list includes the Inventory Type, Media Type, App Type, Content Category, Price Floor and more. The targeted Deals on a Line should match the Inventory Type and Media Type (Creative Type) of the Line Item. For more information on what each column means, see here: Open Exchange vs. Deal Inventory

To request access to a specific PMP, use the ‘Request Access’ button next to the name of the desired PMP. Please allow at least 2 business days for access, with longer turnaround times if many Deals are requested. Once access is granted, the PMP will appear in the ‘Deal’ section of the Targeting Menu on the Line Item. Remove all exchanges from the Line Item targeting and associate the selected Deals using the green plus sign next to the name of the Deal. The Price Floor provides guidance for bidding, but it’s recommended to add at least $5-10 to the price floor for your Max Bid. Since this is still an RTB environment, competitive bids are necessary to achieve scale with premium inventory.

Download a list of PMP Publishers here:

Pontiac-PMP-Publisher-ListDownload

To review the complete details for all available PMPs, please review the ‘Deals’ table in the ‘Inventory’ tab of the platform.

Geo

In the ‘Geo’ tab of the ‘Edit Targeting’ section on the Line Item, you can select Countries, Regions, DMAs, and Cities for where your campaign will be targeted. Below are the key points to setting up Geo targeting:

  • Country Selection: At least one Country must be selected to begin targeting. Once a country is chosen, you can further refine your targeting by adding secondary geographic layers such as Regions, Designated Marketing Areas (DMAs), or Cities. Note that Regions refer to states, provinces, or municipalities.
  • Targeting Funnel: Geo targeting works like a funnel, where the most granular targeting condition must ALWAYS be met for an impression to be served. For instance, if you select a zip code in Miami, along with the Miami DMA and United States as the country, your campaign will only serve in that specific zip code since it’s the most granular level of targeting.
  • Layer Consistency: Each layer of Geo targeting must coincide with the previous layers. If there are conflicts, such as selecting the United States, a New York City DMA, and a Florida zip code, the campaign will not be able to serve because the DMA and zip code are geographically inconsistent.
  • Available DMAs: The following countries support DMAs for targeting.
    • Aland Islands
    • Australia
    • Canada
    • China (Diji Shi cities)
    • Finland
    • France (Departments)
    • Germany (German Nielsen Metro Codes)
    • Korea, Republic of (Si/Gun/Gu)
    • New Zealand
    • Norway
    • Russian Federation (Federal Districts)
    • United Kingdom (ITV Regions)
    • United States (DMAs)

Day Parting

In the ‘Edit Targeting’ section of the Line Item, under the ‘Day Parting’ section, you can select specific times of day and days of the week you would like your campaign to serve.

  • Time Zone Consideration: Day parts target users according to the time zone they are located in when the ad is served. For example, a Line set to serve from 9am to 9pm in the U.S., will start serving at 9am EST to users on the eastern coast, and will start serving to users on the western coast at 9am PST.
  • Multiple Time Zones: To serve ads across the U.S. at the same time in every time zone, you will need to create a separate Line for each time zone and set the day parts accordingly.
  • Selecting Days: If you wish to serve ads on a specific day, check the box next to that day of the week. To stop serving ads on a particular day, simply uncheck the box next to that day.

Site Lists & App Lists

If no site list is attached to your campaign, domain targeting will be open by default.

  • Create Custom Lists:
    • Navigate to the ‘Inventory’ tab.
    • Select ‘New Site List’ or ‘New App List’.
    • Once a list is saved, it will automatically appear under the ‘Site Lists’ or ‘App Lists’ section in the ‘Targeting’ menu of the Line Item.
  • Premade Lists:
    • Pontiac also provides premade site lists and app lists for various categories that you can choose from.
  • Allow List vs. Block List:
    • Allow List (Target): Use this to target specific sites or apps.
    • Block List (Avoid): Use this to avoid specific sites or apps.
  • How to Associate Site or App Lists:
    • Go to ‘Edit Targeting’ within your Line Item.
    • In the ‘Sites Lists’ or ‘App Lists’ tab, select the ‘Allow List’ or ‘Block List’ bubble, depending on your targeting needs.
    • Click the green plus sign next to the list you want to target or avoid,
    • The associated lists will appear on the right side of the screen.

The following are definitions of the default Pontiac Site Lists:

  • Arts and Performance –  Sites of various branches of creative activity, such as painting, music, literature, and dance.
  • Auto – Sites in the automotive industry or sites for people interested in auto.
  • Beauty and Fitness – Sites for inner and outer beauty and health.
  • Books and Literature – Sites for book/literature lovers.
  • Business and Industry – Sites for business minded people.
  • Finance – Sites for financial information, trends, and advice.
  • Food and Drink – Sites for foodies, recipes, and restaurants.
  • Gaming – Sites to play entertaining games on.
  • Health – Sites for fitness, general health, and health trends.
  • Hobbies and Interests – Sites for people who interested in popular extracurricular activities.
  • Home and Garden – Sites for home décor, home maintenance, and sites for outdoor gardening.
  • Internet and Telecom – Includes mostly tech sites and sites for people interested in tech, internet, and telcom.
  • Job and Education – Sites for people who are looking for new jobs or want to further their education.
  • Law and Government – Sites for legal advice or for government information.
  • News – Includes major national news sites.
  • Online Communities – Sites for communities whose members interact with each other primarily via the Internet. Members of the community usually share common interests.
  • People and Society – Includes world culture and pop culture sites.
  • Performance – High performing sites: Premium inventory and High CTRs.
  • Pets and Animals – Sites for pet lovers, pet information, animal lovers, and animal information.
  • Real Estate – Sites for rentals, house listings, and people interested in real estate/market.
  • Reference – Sites for people who are looking for further information. Some sample sites from this list are dictonary.com, usingenglish.com, and howstuffworks.com.
  • Science – Sites for scientists or people interested in science or doing scientific research/experiments.
  • Shopping – Sites for clothing stores, fashion, and fashion trends.
  • Sports – Sites on information on national sport games and sport news.
  • Travel – Sites for vacations and travel tips.
  • World Localities – Sites for local and world news.

The following are the definitions of the default Pontiac App Lists:

  • Auto – Apps for car shopping & reviews.
  • Business & Finance – Apps for business news, finance news, stocks, trading, budgeting tools, currency converters, and crypto.
  • Entertainment – Apps for literature, cinema review, pop culture, and celebrity news & trends.
  • Fitness & Health – Apps for workout plans, fitness guides, meal planning, calorie counters, and step trackers.
  • Food – Apps for food delivery, recipes, cookbooks, and nutrition.
  • Games – Apps for trivia, word search, puzzles, poker & card games, chess, and sudoku.
  • Lifestyle & Shopping – Apps for style, fashion, shopping, and home & garden.
  • Music – Apps for radio, music downloaders, and instruments.
  • News – Apps for national & local news.
  • OTT/CTV – Apps for premium streaming TV for OTT and CTV.
  • Premium – Apps for tier 1 publishers.
  • Sports – Apps for sports news and scores & streaming.
  • Tools & Reference – Apps for weather, calculators, dictionaries, translators, and maps.
  • Travel – Apps for hotels, flights, and travel guides.

Zip Codes

You can target specific zip codes in the United States or other countries through their regional postal code system. By targeting a set of zip codes, a client’s ads will only serve in the most relevant areas. You can use as few zip codes as needed, but keep in mind that a small set of zip codes will limit delivery. These zip codes can be created in either the ‘Audiences’ tab through the custom zip code audience or in the Line Item targeting menu.

To create a list of zip codes in the Line Item targeting menu, follow the below steps:

  • Select the Country: From the dropdown menu, choose the country you want to target.
  • Enter Zip Codes: Paste the zip codes you wish to target into the textbox, separated by commas.
  • Add a Country: To add a country to the dropdown menu, contact your Account Manager via email.

Tip for Better Scale:

  • Expand Zip Targets: If your zip code targeting isn’t scaling effectively, use the ‘Expand Zip Targets’ feature. In the Targeting menu, open the zip code tab, enter a radius in meters, and select ‘Get Zips’. This will find zip codes within this radius from the center point of the zip code/s entered. A window will open showing you the list of zip codes found within this radius. Select ‘Add Zips’ to add the new zip codes to the targeting on the Line Item.

Inventory

When setting up a Line Item, you will select the Inventory Type in the Line Item settings. In the Inventory Targeting tab, you will see the selected Inventory Type appear with a checkbox. Return to the Line Item parameters to change the Inventory type.

Web Inventory: If you selected Web, you can specify the devices you want to target:

  • Desktop
  • Mobile-Web
  • Tablets
  • Or any combination of these

CTV Inventory: If you selected CTV, you can specify the devices to target:

  • TV
  • Game Consoles
  • Set-Top Boxes
  • Or any combination of these

Web & Mobile Operating System:

  • Android
  • Apple iOS
  • Apple Mac
  • Microsoft Windows

CTV Operating System:

  • Roku OS
  • Samsung OS
  • Apple TV
  • Chrome OS
  • Life is Good OS
  • PlayStation OS
  • Unknown

More specific Operating Systems can be chosen in the ‘Operating Systems’ tab.

Video

When Video is selected as the Creative type, a Video tab will appear in the Targeting menu to select Playback Type and Player Size.

Playback Type

  • MidRoll: An instream placement where ad plays during streaming video content.
  • Outstream: An outstream video is placed in non-video environments among other content.
  • PostRoll: An instream placement where ad plays after streaming video content.
  • PreRoll: An instream placement where ad plays before streaming video content.

Player Size

These sizes are publisher defined and do not have exact specifications, however, there are examples of each below for reference.
Large Player Size:


Medium Player Size:

Small Player Size:

Viewability Threshold

If you want your Line item to aim for a specific viewability threshold, check the ‘Enable Viewability Targeting’ box, and enter the viewability threshold you wish to target in the ‘Viewability Target’ area. Note that it is not recommended to deploy this feature for CTV or In-App campaigns as this targeting is not typically available in these environments, and it can prevent the Line from serving.

The viewability is not a guarantee, but rather a benchmark. The platform will determine how likely an impression is to be viewable through pre-bidding technology. Per IAB guidelines, an ad is considered viewable if 50% of the pixels are in-view for 1 second or more. Using a high threshold may limit delivery of the Line. While the IAB benchmark for viewability is 70%, this may limit the number of impressions that can be won causing the campaign to under pace. If using a strict viewability threshold, consider increasing your bid to stay competitive and maintain scale. Balancing viewability and delivery is crucial. Higher thresholds reduce available inventory, potentially leading to under-pacing.

Operating System

Choose from over 200 specific Operating Systems to target. See the full list here: Operating Systems

Operating System targeting can be used, but does come with some limitations. Due to inconsistent naming conventions used by app providers and mobile carriers, OS targeting methods for mobile apps are only available for a small portion of inventory, so targeting these may significantly limit scale. A significant portion of impressions are also from unknown browsers and operating systems, so it is recommended to include ‘Unknown’ to avoid excluding these impressions.

Device Models

Choose to target specific Device Models from over 14,000 offerings. See the full list of Device Models that you can target here: Device Models

Device Model targeting can be used, but comes with some limitations. Due to inconsistent naming conventions used by app providers and mobile carriers, the device type and device make/model targeting methods for mobile apps are only available for a small portion of inventory and may significantly reduce potential scale.

A significant portion of impressions are also from unknown browsers and operating systems, so it is recommended to include ‘Unknown’ to avoid excluding these impressions.

Ads.txt

The Ads.txt filter is a feature that can be used to restrict domains purchased through the platform to only come from sellers which are defined in the publisher’s Ads.txt file. Ads.txt stands for Authorized Digital Sellers and is a project that aims to create transparency in the programmatic advertising ecosystem. In the Ads.txt file, publishers can declare the authorized sellers for their inventory. Ensuring that domains can only be purchased through this list of sellers defined by the publisher, this increases protections against fraudulent inventory and authenticates that the URL passed in the ad call is an accurate representation of the inventory being bought and the seller it is coming from. You can see an example of an ads.txt file here: cnn.com/ads.txt

For more information on the Ads.txt project, visit the IAB website here: https://iabtechlab.com/ads-txt-about

To enable the Ads.txt feature, open the ‘Edit Targeting’ section of a Line Item. In the ‘Ads.txt’ tab, check the box, then ‘Save’ and submit the Line. This feature can only be applied to ‘Web’ inventory and will not affect targeting for Deal inventory or In-App inventory. The Ads.txt file is only applicable to domains sold through the Open Exchange.

Deal Lists

Select from Pontiac Curated Deal Lists, or create your own custom list that can be used across all Advertisers and Lines for a quick and easy set-up process. In the ‘Inventory’ tab under ‘Deal Lists’, you will see the existing Pontiac curated lists. To review the Deals included in these lists, click on the name of the list. Deals included will be listed on the right-hand side of the screen. These lists cannot be edited. You will only be able to see and target the Deals in this list that you have access to. To request access to Deals, use the ‘Request Access’ button where the Deal is listed in the ‘Deal’ table above.

To create your own custom list, go to the ‘Inventory’ tab and select, ‘New Deal List’, then use the green plus button to add Deals to the list. Give the list a name, and ‘Save’. This list will then become available in the ‘Targeting’ menu of all of your Line Items to quickly associate all included Deals.

Associate Creatives

Once you have selected the targeting parameters for your Line Item, you will see a section to associate your Creatives to the Line. Click the ‘Associate Creatives’ button and it will open a window where you should see the names or your Creatives uploaded to this Advertiser on the left-hand side. (For steps to upload Creatives see here: Creative Upload). We recommend associating multiple Creative sizes to the Line when possible to increase access to inventory. To associate a Creative, click on the green plus sign next to the name of the Creative. The Creative will pass from the left-hand side of the screen to the right-hand side to indicate that the Creative is associated.

Associate Conversion Pixels

To track conversions resulting from your advertisement, you must create and place a conversion pixel then associate it to the Line Item. To create and place a conversion pixel see here: Conversion Pixels. Once a Conversion pixel is created at the Advertiser level, it will appear at the Line Item level. To associate the conversion pixel to the Line, select ‘Associate Pixels’ and a window will appear with a list of the conversion pixels under the Advertiser. Click the green plus sign next to the pixel name to associate the pixel to the Line.

Associate Audiences


To associate an Audience to a Line Item follow these steps:

  1. Create or select a Line Item and open the Line Item configuration menu.
  2. Scroll down to the ‘Audiences’ dropdown and choose the ‘Associate Segments’ button on the right-hand side.
  3. Choose the red ‘Add New Group’ button on the right-hand side of the window. A box should appear with the words ‘drag and drop segments to add new group’.
  4. Choose to target ‘Any’ or ‘All’ between groups. See the ‘Boolean Logic’ section below for an explanation of these functions.
  5. Find the segments you wish to add on the left-hand side and drag them into the box on the right-hand side.
    • ‘Audiences’: Audiences created with a remarketing pixel under this Advertiser will appear here.
    • ‘Custom Audiences’: Custom Audiences can be created in the ‘Audiences’ tab and will automatically be available to all Advertisers in the seat. Certain custom Audiences will only be available to associate when the correct ‘Inventory Type’ is selected. For example, Lat/Long Audiences can only be used when ‘In-app’ or ‘Open’ is selected as the inventory type.
    • ‘Third-Party Audiences’: For Third-Party Audiences to appear here, open the ‘Audience’ tab and use the blue ‘Associate’ button to associate the selected Audience segment to the Advertiser.
    • ‘Onboarded Audiences’: For Onboarded Audiences to appear here, open the ‘Audience’ tab and use the blue ‘Associate’ button to associate the selected Audience segment to the Advertiser.
  6. These Audiences can be ‘targeted’, or ‘anti-targeted’. To switch to ‘exclude’ or ‘anti-target’ an Audience, select the gray minus sign next to the name of the segment. When you click on the minus symbol it will change from gray to red, indicating that the Audience is now being ‘anti-targeted’. This Line Item will now serve to any user that is NOT in this Audience. In the example below, the Line will serve to anyone who is not in this segment of politically conservative users. If you are only using one Audience, there is no difference in the exclusion feature between ‘any’ and ‘all’. See the Boolean logic section below if you are using multiple Audience segments.
  7. Select the red ‘Add New Segments’ button at the bottom of the window to save the changes and then submit or save the Line Item.
  8. Add the average cost (CPM) for all associated segments to the Bid Data for the Line Item.

Managing Line Items

Edit a Line Item

To edit a Line Item, enter the Advertiser tab and find the Line Item in question. Click on the name of the Line Item to open the Line Item menu, then click the ‘Edit’ button in the upper right. Make the changes to the Line Item parameters or targeting, then click ‘Submit’ to save the changes.

The following settings cannot be changed once the Line Item is submitted – Inventory Type, Creative Type, Budget type (by spend or by impressions), and Foot Traffic Reporting. The Start Date for the campaign cannot be changed once that date has passed.

Clone a Line

To clone, or create copy, of an existing Line Item, open the Line Item and select ‘Clone’ in the upper right-hand side of the screen. This will create a copy of the Line Item, where you can then edit the settings or make changes to the existing set-up. Give the new version of the Line a name, verify the budgets and the flight dates. Change any other parameters that need to be adjusted, then ‘Submit’ to save the new Line Item.

De-activate a Line Item

To turn ‘off’ or de-activate a Line Item, open the Line Item and select ‘Edit’. Un-check the ‘Active’ box, then click ‘Submit’. A de-activated Line Item will not be eligible to spend or serve impressions. In order to maintain the integrity of the data in the platform, Line Items cannot be deleted, they must be de-activated instead.

Lines with Expired Segments or Deals

At times, Audience Segments and Deals will expire or will no longer be available for use. If you are targeting an Audience segment or Deal on an active Line, the Line will be flagged with a yellow caution symbol as the status. Hover over this symbol to read the caution message. This will indicate whether it is an audience segment or a deal that is expired as well as the ID number for the expired object.

When a Line contains an expired object, the Line will no longer be able to optimize. This includes system updates to daily budgets, frequencies, and other dynamic controls for pacing as well as the optimization splits made by the Pontiac algorithm. You will also be unable to make any edits or changes to the Line item until the expired object is removed. It is recommended whenever you see this flag to immediately remove the expired object.

In the case of custom audiences, these expire 180 days after creation. However, the data within the audience may still be usable. For example, zip codes are data that will not expire. To continue using this audience, you will need to ‘Force Refresh’ the audience to extend the expiration date. To do this, go to the Audiences tab and filter the ‘Status’ to ‘Inactive’. Find the expired Audience, open it, and click the ‘Force Refresh’ button. This will extend the expiration date for another 180 days. In this case you will not need to remove the Audience from the Line, it will automatically update the status.

For Third Party Audiences that expire, it is recommended to look for other audiences in the category to replace the expired audience.

If you are targeting an expired Deal, look through the Deals table for a similar option to replace the expired Deal. New Deals are added to the table each month and Publishers frequently push us new versions of their Deals, so you may be able to find the same Deal with a higher ‘Deal ID’ that can be utilized to replace the expired version.

Creative Macros

A macro is a line of placeholder code located in the HTML tag for third-party ad hosting services, which is filled in when the creative serves. Download the full list of Creative Macros here: Pontiac Creative Macros

Macros for All Impressions

Click Tracking Macros

MACRO DESCRIPTION
${CLICK_URL_ENC}The encoded click tracking URL (only necessary for some third-party ad servers).
${CLICK_URL}

The click tracking URL.

Additional Macros

The macros below may be used in creative URLs or landing page URLs.

MACRODESCRIPTION
${ADV_CODE}The code of the advertiser to which the creative belongs.
${ADV_FREQ}The total number of impressions seen by a user across all advertiser campaigns.
${ADV_ID}The ID of the advertiser to which the creative belongs.
${AGE}The age of the user (if available). Integer or 0.
${AUCTION_ID}The 64-bit character string representing the individual auction that led to the impression.
${BID_PRICE}The first price bid for this impression, as opposed to the price paid after price reduction.
${CACHEBUSTER}A random number string used to limit caching of the URL.
${CPG_CODE}The line item code of the served impression.
${CPG_ID}The line item ID of the served impression.
${CP_CODE}The campaign code of the served impression.
${CP_ID}The campaign ID of the served impression.
${CREATIVE_CODE}The code of the creative served (if available).
${CREATIVE_ID}The creative ID that won the impression.
${CREATIVE_SIZE}The width and height of the creative served (e.g., “300×250”).
${CUSTOM_MODEL_ID}The id of the custom model used in the auction. When no custom model is used, this defaults to 0. This Custom Macro will function for clients in the APB Alpha Test only.
${CUSTOM_MODEL_LAST_MODIFIED}The date and time (in Unix Epoch time) since the custom model that was used in the auction was last modified. If no model was used, this defaults to 0. This Custom Macro will function for clients in the APB Alpha Test only.
${CUSTOM_MODEL_LEAF_NAME}The leaf_name specified in the leaf that determined the winning bid. If no name is specified, or if a model was not used, this defaults to —. (This aligns with the field in the Standard Feed, leaf_name) This Custom Macro will function for clients in the APB Alpha Test only.
${DATACENTER}Data center ID (1 = NYM, 2 = LAX, 3 = AMS, 4 = FRA, 5 = SIN).
${DEAL_ID}The Pontiac Deal ID associated with the winning bid, if applicable. If there is no deal, this will return 0.
${ECP}The publisher-side Estimated Clear Price for the auction.
${GENDER}The gender of the user (if available). Possible values: f (female), m (male), u (unknown).
${HEIGHT}The height of the creative served.
${INV_SOURCE_ID}Deprecated.
${IO_CODE}The insertion order code of the served impression.
${IO_ID}The insertion order ID of the served impression.
${IS_PREVIEW}Used to determine if the impression is from a creative preview (where the value is true, represented as “1”), or if it is generated from a live auction (the value will is false, represented as a “0”). This is useful when comparing reports with third-party ad servers since we only count impressions from live auctions.
${OZONE_ID}Deprecated.
${PMT_RULE_ID}The ID of the payment rule used to price the impression.
${POSTAL_CODE}The postal code of the user.
${PRICE_PAID}The price paid for this impression after price reduction. This is the second price.
${PT1}, ${PT2}, ${PT3}, ${PT4}, ${PT5}, ${PT6}, ${PT7}, ${PT8}, ${PT9}These macros can be populated with arbitrary custom data that you send in using the placement tag query string parameters pt1, pt2, pt3, pt4, pt5, pt6, pt7, pt8, and pt9.
${PUBLISHER_CODE}The code of the publisher selling the impression. Note that this code is available only if the publisher uses a code and has exposed itself for reporting.
${PUBLISHER_ID}The ID of the publisher selling the impression. Note that this ID is available only if the publisher has exposed itself for reporting.
${REFERER_URL_ENC}The encoded referring URL (if available). For mobile app impressions, returns the app store URL (if available).
${REFERER_URL}Deprecated. Use ${REFERER_URL_ENC} instead.
${REM_USER}Is this a remarketing user? Boolean value. 
${RESERVE_PRICE}The reserve price set by the publisher.
${SCHEME}Resolves to the appropriate application protocol (HTTP or HTTPS) depending on the inventory type.
${SEG_CODES}The codes for the segments belonging to the winning buyer, or that the buyer has access to, in this user’s cookie (in order of last seen time). If the user is in more than 15 of your accessible segments, this macro will only return the first 15 (ordered by most recently seen segment to oldest segment).
${SEG_IDS}The IDs of the segments belonging to the winning buyer, or that the buyer has access to, in this user’s cookie (in order of last seen time). If the user is in more than 15 of your accessible segments, this macro will only return the first 15 (ordered by most recently seen segment to oldest segment).
${SELLER_MEMBER_ID}The member ID of the member selling the impression.
${SITE_ID}The ID of the site (placement group) the impression is being served on.
${SSP_DATA}Required for Server Side Conversion Pixel calls.
${TAG_CODE1}The integration code set on the placement.
${TAG_CODE2}The additional integration code set on the placement.
${TAG_ID}The Pontiac placement ID that initiated the bid request.
${TIMESTAMP}The UNIX timestamp for the auction.
${USER_AGENT_ENC}The encoded user agent string from the request’s HTTP header.
${USER_AGENT}The user agent string from the request’s HTTP header. User agent often identifies such information as the application, operating system, and software vendor acting on behalf of the user (e.g., “Mozilla/5.0 (Macintosh; U; Intel Mac OS X 10.5; en-US; rv:1.9.0.4) Gecko/2008102920 Firefox/3.0.4″).
${USER_CITY}The character string of the user’s city.
${USER_COUNTRY}The character string of the user’s country.
${USER_ID}The Pontiac 64-bit character string representing the user for the impression.
${USER_IP}The IP address of the user.
${USER_STATE}The character string of the user’s state or region. In the USA: 2 letter abbreviation. Outside of USA: the URL encoded user’s country followed by the user’s region ID (FIPS 10-4 or Pontiac-generated). 

For example, the region surrounding Riva, Latvia is LV%3A25 (encoding for LV:A25) 
${USE_COOKIES}Allowed values are 0 or 1. This is used for third-party creatives. If 0, you can use this macro to ask the hosting ad server not to set cookies on the user viewing the impression.
${WIDTH}The width of the creative served.

Macros for Video Impressions

MACRODESCRIPTION
${VIDEO_CONTEXT}The context of the video ad. Allowed values include: 0: In-stream unknown1: In-stream pre-roll2: In-stream mid-roll3: In-stream post-roll4: Out-stream
${VIDEO_PLAYBACK_METHOD}How the video was played. Allowed values include: 0: Unknown1: Auto-play, sound-on2: Auto-play, sound-off3: Click-to-play4: Mouse-over5: Auto-play, sound unknown
${VIDEO_PLAYER_WIDTH}The size of the video player, expressed as player width in pixels.
${VIDEO_PLAYER_HEIGHT}The height of the video player, expressed in pixels.

Macros for Mobile Impressions

MACROSDESCRIPTION
${CARRIER_ID}The Pontiac integer representing the mobile carrier ID.
${DEVICE_AAID}The Android advertising identifier, when the impression is from an Android device.
${DEVICE_APPLE_IDA}The Apple advertising identifier, when the impression is from an Apple device.
${DEVICE_IFA}The unique identifier representing the device.
${DEVICE_IFA_TYPE}The type of identifier represented by the ${DEVICE_IFA}. Possible values include:AAID (Android Advertising ID/Google)
IDFA (Identifier for Advertising/Apple)
AFAI (Amazon Fire ID)
RIDA (Roku ID)
OPENUDID
TIFA (Tizen Identifier for Advertising (Samsung Ad ID))
VIDA (Vizio Advertising ID)
LGUDID (LG Unique Device ID)
${DEVICE_IFA_TYPE} should be used in conjunction with ${DEVICE_IFA}, and this setup is recommended over individual device macros specific to each IFA type. These macros are applicable to both mobile and CTV device types.
${DEVICE_MAKE_ID}The Pontiac integer representing the ID of the make of the mobile device (e.g., 26).
${DEVICE_MD5}The MD5-encrypted unique identifier representing the mobile device.
${DEVICE_MODEL_ID}The Pontiac integer representing the ID of the mobile device model (e.g., 301).
${DEVICE_ODIN}The ODIN-encrypted unique identifier representing the mobile device.
${DEVICE_OPENUDID}The OPENUDID-encrypted unique identifier representing the mobile device.
${DEVICE_SHA1}The SHA1-encrypted unique identifier representing the mobile device.
${DEVICE_WIN_ID}The Windows Ad ID for the device on which this impression occurred (if applicable).
${EXT_APP_ID}The external identifier for the application requesting the impression. This is useful only for impressions from mobile apps.
${GEO_LAT}The latitude of the user’s location, when GPS data is available from a mobile device. Expressed in the format “snn.ddd,snn.ddd” (e.g., +12.345 or -45.123), where south is represented as negative. There can be a maximum of 5 decimal places of precision.
${GEO_LON}The longitude of the user’s location, when GPS data is available from a mobile device. Expressed in the format “snn.ddd,snn.ddd” (e.g., +12.345 or -45.123), where west is represented as negative. There can be a maximum of 5 decimal places of precision.
${SUPPLY_TYPE}This macro will be populated with a numeric value that denotes the supply type of the impression. Allowed values include: 0: web1: mobile web2: mobile app3: facebook sidebar4: toolbar

Privacy Macros

MACRODESCRIPTION
${GDPR_APPLIES}Designates whether GDPR regulations are applied. It specifically indicates whether the user is located in a GDPR impacted country, or if we have a GDPR-required signal passed with the request. 
Possible values include:0 for no
1 for yes
${GDPR}This is an alias for ${GDPR_APPLIES}, and behaves in the same manner.
${GDPR_CONSENT_STRING}This macro specifies the IAB GDPR consent string. If the GDPR applies, it will contain a list of user-approved vendors based on the IAB GDPR Transparency and Consent Framework. For more information, see IAB GDPR Transparency and Consent Framework.
${GDPR_CONSENT}This macro is an alias for ${GDPR_CONSENT_STRING}, and behaves in the same manner.
${XANDR_DOMAIN}Dynamically retrieves the appropriate Xandr domain based on the cookie consent settings included in the TCF string. If the user has cookies enabled from their browser settings but has:not given consent for their cookies to be included in the TCF string, the adnxs-simple.com domain will be used to prevent the browser from attaching cookies to subsequent ad calls.
given consent for their cookies to be included in the TCF string, the adnxs.com domain will be used to pass cookies in the header of each ad call.
${GPP_SID}Designates whether a section (i.e. regulatory framework) of the Global Privacy Platform should be applied. Specifically, it indicates whether the user is located in a country affected by legislation covered by the GPP.
${GPP_STRING_XXXXX*}This is the IAB Global Privacy Platform (GPP) string. If a section of the GPP applies, then this will contain framework-dependent information reflecting the consent elections of the user.

Function Macros

A function macro performs a function on another macro. Function macros can be used in combination with any other creative macro, including custom macros although if they are not recognized at render time, they will not be translated and the function will not be called. 

Pontiac currently supports the {$URL_ENC} function macro, which can be used for a variety of  purposes related to encoding. A key use case is when a URL needs to be passed from ad server to ad server via a creative macro, and due to the presence of unsupported characters in  standard URL formatting, must be encoded at various steps of the process. 

The macro takes the following form: 

${URL_ENC(${MACRO_NAME},#)} 

where ${MACRO_NAME} is the macro to be encoded and # is the integer 1, 2, or 3, representing the number of times to encode the contents. Note that more than three encodings are not supported.  

Each encoding corresponds to a step in the redirect chain, as well as how a given third-party click tracker works with the macro. Double encoding will usually be needed for final destination URLs when a second ad server is involved, and triple encoding for a third ad server. 

To determine whether you will need to use single, double, or triple encoding, you should check with your third-party click tracker and then test your URL_ENC macro to ensure it works. If your macro is not working, one consequence of this may be link breakage, which will result in users  not reaching the intended destination URL. 


Macro Implementation Recommendations & Examples

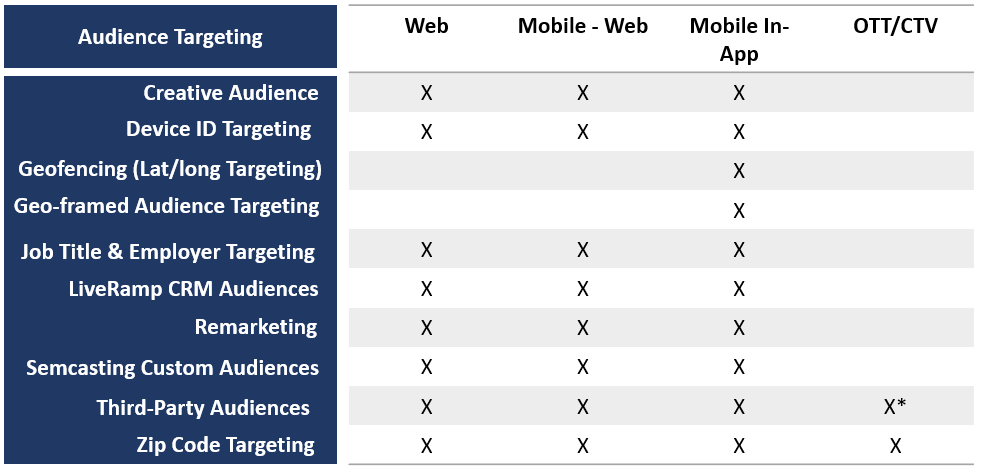
Click Tracking: For Pontiac to track clicks properly when utilizing third-party creative tags, the Click Macro will need to be properly inserted into the tag. Below are examples for the common ad servers. If your ad server is not included here, contact your third-party server for the location where the macro should be placed. The macro is: ${CLICK_URL}

Cache-busting: The cache-buster macro helps to ensure that impressions are more accurately counted as it guarantees that a fresh call is made to the ad server each time the tag is called. If this macro is not implemented it is more likely that you will see larger discrepancies between Pontiac reporting and the reporting in your ad server. Below are examples of the macro placement in tags for common ad servers. If your ad server is not included here, contact your third-party server for the location where the macro should be placed. The macro is: ${CACHEBUSTER}

All examples on this page were provided Xandr or by Pontiac clients. Pontiac cannot guarantee that these examples represent the current implementation or that changes have not been made by those third-party servers that may cause these macros not to function. The proper placement of all macros should be provided by your third-party server.

Examples by Ad Server for Ad Server Tag Banners:

AdForm:

<script language="javascript" src="http://track.adform.net/adfscript/?bn=123456;click=${CLICK_URL}"></script>
<noscript>
<a href="${CLICK_URL}http://track.adform.net/C/?bn=123456;C=0" target="_blank">
<img src="http://track.adform.net/adfserve/?bn=123456;srctype=4;ord=${CACHEBUSTER}" border="0" width="930" height="180" alt=""/>
</a>
</noscript>

AdGear:

<script type="text/javascript" language="JavaScript">
(function() {
ADGEAR_SOURCE_CLICKTRACKER = "${CLICK_URL}";
ADGEAR_SOURCE_CLICKTRACKER_EXPECTS_ENCODED = false;
ADGEAR_SOURCE_CLICKTRACKER_IS_ENCODED = false;
ADGEAR_SOURCE_CLICKTRACKER_IS_DOUBLE_ENCODED = false;
var randomnum = "{CACHEBUSTER}";
var agref = "";
var proto = "http:";
if (!agref.match(/^https?/i)) agref = "";
if (window.location.protocol == "https:") proto = "https:";
if (randomnum.substring(0,2) == "__") randomnum = String(Math.random());
document.writeln('<scr' + 'ipt type="text/ja' + 'vascr' + 'ipt" s' + 'rc="' +
proto + '//d.adgear.com' + '/impressions/ext/p=' +
'1234' + '.js?AG_R=' + randomnum +
(agref === "" ? "" : ("&AG_REF=" + encodeURIComponent(agref))) +
'"></scr' + 'ipt>');
})();
</script>

AdInterax:

<SCRIPT>adx_U_555555="";adx_D_55555="${CLICK_URL}";adx_I_555555="";</SCRIPT>

<SCRIPT
SRC="http://mi.adinterax.com/js/denvernp,atencio_300X_seren,C=XXXXX,P=XXXXX/ad2.js?q=55555555" LANGUAGE="JavaScript"></SCRIPT>

<NOSCRIPT><A HREF="${CLICK_URL}http://tr.adinterax.com/re/denvernp,atencio_300X_seren,C=XXXXXX ,P=XXXXX/0/0/tc,c:noscript/http://www.johnatencio.com/search?q=new+heart&x=16&y=9"><IMG SRC="http://tr.adinterax.com/re/XXXXXX,atencio_300X_seren,C=John_atencio,
P=Scott/0/0/in,ti/http://mi.adinterax.com/customer/XXXXXXX/0/300x250_FL_newart.jpg?adxq=1282775581" BORDER=0></A></NOSCRIPT>

Adition:

<!-- BEGIN ADITIONTAG -->
<script type="text/javascript" src="http://imagesrv.adition.com/js/adition.js"></script>
<script type="text/javascript" src="http://ad1.adfarm1.adition.com/js?wp_id=12345&kid=12345&clickurl=${CLICK_URL}"></script>
<noscript><a href="${CLICK_URL}http://ad1.adfarm1.adition.com/click?sid=12345&ts=${CACHEBUSTER}">
<img src="http://ad1.adfarm1.adition.com/banner?sid=12345&kid=12345&ts=${CACHEBUSTER}" border="0"></a></noscript>
<!-- END ADITIONTAG -->

AdShuffle:

<iframe allowTransparency="true" frameborder="0" scrolling="no"
marginheight="0" marginwidth="0" topmargin="0" leftmargin="0" width="728"
height="90"
src="http://this.content.served.by.adshuffle.com/p/kl/01/234/r/56/7/8/abdef/ghijkl/view.html?${CACHEBUSTER}&ASTPCT=${CLICK_URL}"></iframe>

Adtech:

<!--IFRAME Tag (General Redirect) // Page: 728x90 //  -->
<IFRAME WIDTH="728" HEIGHT="90" SCROLLING="No" FRAMEBORDER="0" MARGINHEIGHT="0" MARGINWIDTH="0" SRC="http://adserver.adtech.de/adiframe|3.0|1234|1234|0|1234|ADTECH;AdId=1234;BnId=-1;;target=_blank;misc=[timestamp];rdclick=${CLICK_URL}"><script language="javascript" src="http://adserver.adtech.de/addyn|3.0|1234|1234|0|1234|ADTECH;AdId=1234;BnId=-1;;loc=700;target=_blank;misc=[timestamp];rdclick=${CLICK_URL}"></script><noscript><a href="http://adserver.adtech.de/adlink|3.0|1234|1234|0|1234|ADTECH;AdId=9479763;BnId=-1;;loc=300;misc=[timestamp]" target="_blank;AdId=9479763;BnId=-1;"><img src="http://adserver.adtech.de/adserv|3.0|1234|1234|0|1234|ADTECH;loc=300;misc=[timestamp]" border="0" width="728" height="90"></a></noscript></IFRAME>
<!-- End of IFRAME Tag --> 

Atlas (New):

<script src='http://ad.atdmt.com/i/a.js;p=11002201227900;cache=${CACHEBUSTER}?click=${CLICK_URL_ENC}'></script><noscript><iframe frameborder='0' scrolling='no' marginheight='0' marginwidth='0' topmargin='0' leftmargin='0' allowtransparency='true' height='250' width='300' src='http://ad.atdmt.com/i/a.html;p=11002201227900;cache=${CACHEBUSTER}?click=${CLICK_URL_ENC}'></iframe></noscript>

Previous:

<iframe src="http://view.atdmt.com/CNT/iview/1234567890/direct;wi.160;hi.600/01${CACHEBUSTER}?click=${CLICK_URL}" frameborder="0" scrolling="no"
marginheight="0" marginwidth="0" topmargin="0" leftmargin="0" allowtransparency="true" width="160" height="600">
<script language="JavaScript" type="text/javascript"> document.write('<a href="${CLICK_URL}http://clk.atdmt.com/CNT/go/1234567890/direct;wi.160;hi.600/01/"
target="_blank"><img src="http://view.atdmt.com/CNT/view/195860978/direct;wi.160;hi.600/01/${CACHEBUSTER}"/></a>');
</script><noscript><a href="${CLICK_URL}http://clk.atdmt.com/CNT/go/195860978/direct;wi.160;hi.600/01/" target="_blank"><img border="0"
src="http://view.atdmt.com/CNT/view/1234567890/direct;wi.160;hi.600/01/${CACHEBUSTER}" /></a></noscript></iframe>

DoubleClick:

<script language="JavaScript" src="http://ad.doubleclick.net/adj/1234.567.890/;net=123456;sz=728x90;click=${CLICK_URL};ord=${CACHEBUSTER}?"
type="text/javascript"></script><noscript><a href="${CLICK_URL}http://ad.doubleclick.net/jump/1234.567.890/;net=123456;sz=728x90;ord=${CACHEBUSTER}?"
target="_blank"><img src="http://ad.doubleclick.net/ad/1234.567.890/;net=123456;sz=728x90;ord=${CACHEBUSTER}?" width="728" height="90" border="0"
alt=""></a></noscript>

DoubleClick (New Ins Tag):

Note: The DoubleClick ‘ins’ type tag will not need the Cachebuster macro.

<ins class='dcmads' style='display:inline-block;width:728px;height:90px'
   data-dcm-placement='N3241.163472.EXAMPLEAD/B8852666.112976410'
   data-dcm-rendering-mode='script'
   data-dcm-https-only
   data-dcm-click-tracker=${CLICK_URL}>
 <script src='//www.googletagservices.com/dcm/dcmads.js'></script>
</ins>

EyeReturn:

<script type="text/javascript" src="http://voken.eyereturn.com/?144857&click=${CLICK_URL}&params=${CACHEBUSTER}"></script>

Fetchback:

<script language='javascript' type='text/javascript' src='http://imp.fetchback.com/serve/fb/adtag.js?tid=47476&type=widesky&clicktrack=${CLICK_URL_ENC}'></script>

Flashtalking:

<script language="Javascript1.1" type="text/javascript">
var ftClick = "${CLICK_URL}";
var ftX = "";
var ftY = "";
var ftZ = "";
var ftContent = "";
var ft160x600_OOBclickTrack = "";
var ftRandom = Math.random()*1000000;
var ftBuildTag1 = "<scr";
var ftBuildTag2 = "</";
var ftTag = ftBuildTag1 + 'ipt language="javascript1.1" type="text/javascript" ';
ftTag += 'src="http://servedby.flashtalking.com/imp/55555;55555;201;js;MediaIQ;Sky160x600/?click='+ftClick+'&ftx='+ftX+'&fty='+ftY+'&ftadz='+ftZ+'&ftscw='+ftContent+'&cachebuster='+ftRandom+'" id="ftscript_160x600" name="ftscript_160x600"';
ftTag += '">' + ftBuildTag2 + 'script>'; document.write(ftTag);
</script>
<noscript>
<a href="${CLICK_URL}http://servedby.flashtalking.com/click/55555;55555;0;209;0/?url=232492" target="_blank">
<img border="0" src="http://servedby.flashtalking.com/imp/55555;55555;205;gif;MediaIQ;Sky160x600/?CB=${CACHEBUSTER}"></a>
</noscript>

Integral Ad Science:

Additional Macro: The macro IS_PREVIEW should be included at the end of the fw.adsafeprotected.com URLs to ensure that the creative previews properly in audit. If this macro is not included, the tag will be rejected in the audit process.

<script language="JavaScript" type="text/javascript" src="http://fw.adsafeprotected.com/rjss/at/53729/573929/CAT/jview/101010101/direct/01/${CACHEBUSTER}?click=${CLICK_URL}&adsafe_preview=${IS_PREVIEW}">
</script><noscript><a href="${CLICK_URL}http://clk.atdmt.com/CAT/go/101010101/direct/01/" target="_blank"><img border="0" src="http://fw.adsafeprotected.com/rfw/at/53729/573930/CAT/view/101010101/direct/01/${CACHEBUSTER}?adsafe_preview=${IS_PREVIEW}" /></a></noscript>
<IFRAME SRC="http://fw.adsafeprotected.com/rjsi/dc/54321/123456/adi/N1068.151790.ABCDE/B6797568.72;sz=160x600;click=${CLICK_URL};ord=${CACHEBUSTER}?adsafe_preview=${IS_PREVIEW}" WIDTH=160 HEIGHT=600 MARGINWIDTH=0 MARGINHEIGHT=0 HSPACE=0 VSPACE=0 FRAMEBORDER=0 SCROLLING=no BORDERCOLOR='#000000'>
<SCRIPT language='JavaScript1.1' SRC="http://fw.adsafeprotected.com/rjss/dc/54321/455394/adj/N1068.151790.ABCDE/B6797568.72;abr=!ie sz=160x600;click=${CLICK_URL};ord=${CACHEBUSTER}?adsafe_preview=${IS_PREVIEW}">
</SCRIPT>
<NOSCRIPT>
<A HREF="${CLICK_URL}http://ad.doubleclick.net/jump/N1068.151790.ABCDE/B6797568.72;abr=!ie4;abr=!ie5;sz=160x600;ord=${CACHEBUSTER}?">
<IMG SRC="http://fw.adsafeprotected.com/rfw/dc/54321/455392/ad/N1068.151790.ABCDE/B6797568.72;abr=!ie4;abr=!ie5;sz=160x600;ord=${CACHEBUSTER}?adsafe_preview=${IS_PREVIEW}" BORDER=0 WIDTH=160 HEIGHT=600 ALT="Advertisement"></A>
</NOSCRIPT>
</IFRAME>

Sizmek:

<script src="http://bs.serving-sys.com/BurstingPipe/adServer.bs?cn=rsb&c=12&pli=1234567&PluID=0&w=728&h=90&ord=${CACHEBUSTER}&ifrm=-1&ucm=true&ncu=$$${CLICK_URL_ENC}$$">
</script><noscript><a href="${CLICK_URL}http%3A//bs.serving-sys.com/BurstingPipe/BannerRedirect.asp%3FFlightID%3D1234567%26Page%3D%26PluID%3D0%26Pos%3D1234"
target="_blank"><img src="http://bs.serving-sys.com/BurstingPipe/BannerSource.asp?FlightID=1234567&Page=&PluID=0&Pos=1234" border=0 width=728
height=90></a></noscript>

MediaPlex:

<script type="text/javascript" src="http://altfarm.mediaplex.com/ad/js/12345-678901-23456-7?mpt=${CACHEBUSTER}&mpvc=${CLICK_URL_ENC}"></script>
<noscript><a href="${CLICK_URL}http://altfarm.mediaplex.com/ad/nc/12345-678901-23456-7?mpt=${CACHEBUSTER}">
<img src="http://altfarm.mediaplex.com/ad/nb/12345-678901-23456-7?mpt=${CACHEBUSTER}" alt="Click Here" border="0"></a></noscript>
<IFRAME SRC="http://b3.mookie1.com/2/abcdefg/hijkl/123456/Banner/300/1${CACHEBUSTER}@x90" WIDTH=0 HEIGHT=0 MARGINWIDTH=0
MARGINHEIGHT=0 HSPACE=0 VSPACE=0 FRAMEBORDER=0 SCROLLING=no BORDERCOLOR="#000000"></IFRAME>

Open Ad Stream (24/7):

<script LANGUAGE="JavaScript1.1"
SRC="http://oasn04.247realmedia.com/RealMedia/ads/adstream_jx.ads/XXXXX/XXXXX/XXXXX/XXXXX/300/1${CACHEBUSTER}@x90?${CLICK_URL}">
</script>

PointRoll:

<script type="text/javascript">
function pr_swfver(){
var osf,osfd,i,axo=1,v=0,nv=navigator;
if(nv.plugins&&nv.mimeTypes.length){osf=nv.plugins["Shockwave Flash"];if(osf&&osf.description){osfd=osf.description;v=parseInt(osfd.substring(osfd.indexOf(".")-2))}}
else{try{for(i=5;axo!=null;i++){axo=new ActiveXObject("ShockwaveFlash.ShockwaveFlash."+i);v=i}}catch(e){}}
return v;
}
var pr_d=new Date();pr_d=pr_d.getDay()+"|"+pr_d.getHours()+":"+pr_d.getMinutes()+"|"+-pr_d.getTimezoneOffset()/60;
var pr_postal="";
var pr_data="";var pr_ies="";

var pr_redir="${CLICK_URL}$CTURL$";

var pr_nua=navigator.userAgent.toLowerCase();
var prHost=(("https:"==document.location.protocol)?"https://":"http://");var pr_sec=((prHost=='https://')?'&secure=1':'');
var pr_pos="",pr_inif=(window!=top);
if(pr_inif){try{pr_pos=(typeof(parent.document)!="unknown")?(((typeof(inDapIF)!="undefined")&&(inDapIF))||(parent.document.domain==document.domain))?"&pos=s":"&pos=x":"&pos=x";}
catch(e){pr_pos="&pos=x";}if(pr_pos=="&pos=x"){var pr_u=new RegExp("[A-Za-z]+:[/][/][A-Za-z0-9.-]+");var pr_t=this.window.document.referrer;
var pr_m=pr_t.match(pr_u);if(pr_m!=null){pr_pos+="&dom="+pr_m[0];}}else{if(((typeof(inDapMgrIf)!="undefined")&&(inDapMgrIf))||((typeof(isAJAX)!="undefined")&&(isAJAX))){pr_pos+="&ajx=1"}}}
if(pr_postal!=""){var przipmatch=/^\d{5}$/;if(przipmatch.test(pr_postal)){pr_pos+="&postal="+pr_postal;}}
if((pr_data!="")&&(pr_data.indexOf("&")<0)){pr_pos+="&data="+pr_data;}
if((pr_ies!="")&&(pr_ies.indexOf("&")<0)){pr_pos+="&ies="+pr_ies;}
var pr_s="ads.pointroll.com/PortalServe/?pid=xxxx&flash="+pr_swfver()+"&time="+pr_d+"&redir="+pr_redir+pr_pos+pr_sec+"&r="+Math.random();
document.write("<scr"+"ipt type='text/javascript' src='"+prHost+pr_s+"'></scr"+"ipt>");
</script>

Project Sunblock:

When previewing Project Sunblock tags, please ensure you deselect Serve in iFrame as this will stop the tags previewing in our UI and you will be unable to test click-tracking.

<script type='text/javascript'>
    var _sblq = _sblq || [];
    (function() {
        var s = document.getElementsByTagName('script'), s0 = s[0], adElement = s[s.length-1];
        var sl = Math.random().toString(36).substring(2);
        _sblq.push([sl, 'setClickUrl', '${CLICK_URL}']);
        _sblq.push([sl, 'displayAd', adElement,300, 1234]);
        var sb = document.createElement('script'); sb.type = 'text/javascript'; sb.async = true; sb.defer = true;
        sb.src = ('http:'==document.location.protocol ? "http:" : "https:")+'//js.sblk.io/sb.js';
        s0.parentNode.insertBefore(sb, s0);
    })();
</script>
<noscript><img src='//api.sblk.io/request.gif?campaign_id=000&ad_id=0000' width='1' height='1'></noscript>

SmartAdServer:

<SCRIPT LANGUAGE="JavaScript1.1" SRC="http://ww856.smartadserver.com/call/adj/306890/2591652/CLIENT.campaign/600x300/${CACHEBUSTER}/no?${CLICK_URL}"></SCRIPT>

<NOSCRIPT><a href="${CLICK_URL}http://ww856.smartadserver.com/call/jumpi/306343/2591652/CLIENT.campaign/600x300/${CACHEBUSTER}/no?" target="_blank">
<img src="http://ww856.smartadserver.com/call/adi/306890/2591343/CLIENT.campaign/600x300/${CACHEBUSTER}/no?" border="0"></a></NOSCRIPT>

Trade Doubler:

<script type="text/javascript">
var uri = 'http://impde.tradedoubler.com/imp?type(iframe)g(18906306)a(1838453)preurl(${CLICK_URL})' + new String (Math.random()).substring (2, 11);
document.write('<iframe src="'+uri +'" width="160" height="600" frameborder="0" border="0" marginwidth="0" marginheight="0" scrolling="no"></iframe>');
</script>

Traffiq:

<iframe src="http://ads.traffiq.com/ad.imp?pid=1234&oid=5678&rand=${CACHEBUSTER}/?pclk=${CLICK_URL}" width="728" height="90"
frameborder="0" marginheight="0" marginwidth="0" scrolling="no" topmargin="0" leftmargin="0"> </iframe>

Weborama:

<a href="${CLICK_URL}http://gae.solution.weborama.fr/fcgi-bin/dispatch.fcgi?a.A=cl&a.si=54&a.te=56&a.ra=__RANDOM__&a.im=1&g.lu=" target="_blank">
<img src="http://gae.solution.weborama.fr/fcgi-bin/dispatch.fcgi?a.A=im&a.si=54&a.te=56&a.he=600&a.wi=160&a.ra=__RANDOM__&a.hr=R" width="160" height="600"></a>

Yield Manager:

<IFRAME FRAMEBORDER=0 MARGINWIDTH=0 MARGINHEIGHT=0 SCROLLING=NO WIDTH=300 HEIGHT=250 SRC="http://ad.yieldmanager.com/st?ad_type=iframe&ad_size=300x250&section=XXXXXXX&pub_redirect_unencoded=1&pub_redirect=${CLICK_URL}"></IFRAME>

Zedo:

<script language="JavaScript" src="http://d7.zedo.com/jsc/d3/fl.js?n=809&c=1839/1740&s=704&d=14&w=728&h=90&l=${CLICK_URL}&z=${CACHEBUSTER}"></script> <noscript><a href="http://yads.zedo.com/ads2/r?n=809;c=1839/1740;s=704;x=3584;u=j;z=${CACHEBUSTER}" target="_blank"><img

 border="0" width="728" height="90" src="http://yads.zedo.com/ads2/x?n=809;c=1839/1740;s=704;x=3584;u=j;z=${CACHEBUSTER}" alt="Click here"></a> </noscript>

ViralGains Odyssey:

<iframe src = 'https://odc-wsb.viralgains.com?lineItemId=1234abcd&vendorId=1234abcd&creativeId=1234abcd&cachebuster=${VG_CACHEBUSTER}&clickURLEnc=${CLICK_URL_ENC}' width='xxx' height='yyy' frameborder='0' marginheight='0' marginwidth='0' target='_blank' scrolling='no'></iframe>

Encoding Examples

To encode click URL once: 
${URL_ENC(${CLICK_URL},1)} 
If http://Pontiac.media is passed as the click URL,  
using ${URL_ENC(${CLICK_URL},1)} to single encode the URL would result in http%3A%2F%2FPontiac.media populating the creative. 

To encode media URL once: 
${URL_ENC(${MEDIA_URL},1)} 

To encode media URL twice: 
${URL_ENC(${MEDIA_URL},2)} 

To encode a custom macro called ADFORMAT once: 
${URL_ENC(#{ADFORMAT},1)}

Macro ID Mapping

When using the Pontiac Macros, the IDs returned for Advertisers, Line Items, Creatives and Pixels will be Exchange IDs. To match these IDs to the Pontiac IDs, you must download the ‘Get Macro ID Mapping’ for your seat. To find this doc, open an Advertiser and select ‘New Creative’. Switch the dropdown to ‘Ad Server Tag Banner’ and you will see the following:

Click ‘Get Macro ID Mapping’ to download an excel with the IDs for your seat. This will download an excel with the IDs that looks like the following:

Creative Specs

Banner Specs

File Format JPG, PNG, GIF
Max File Size 150 kb max*
Unit Sizes Download the full list here: Banner-Sizes
The platform will allow an upload up to 300kb, but overage fees will apply on Creatives over 150kb.


While all of the above banner sizes can be utilized, we recommend including several of the best performing sizes from the list below on every campaign. If the banner size that you are looking to use is not available in the platform, reach out through the Help Center. Estimated turnaround for this request is one month.

Best Performing Banner Sizes for Desktop InventoryBest Performing Banner Sizes for Mobile Inventory
300 x 250300 x 250
160 x 600320 x 50
728 x 90 728 x 90
320 x 480320 x 480
300 x 600300 x 50
970 x 250320 x 100

If your banner file is greater than the 150kb limit try using a compressor such as this one compressjpeg.com to decrease the weight of your Creative.

HTML5 Specs

Max ad length :30 seconds & cannot animate after the 3rd rotation
File Format Zip file – must contain an index.html file which must reside in the root of the zip file and not in a sub folder. Index.html must be complete and valid HTML document and not an HTML fragment.
Max file size 150 kb max*
Click tracking requirements Must implement IAB clickTag to click track in Pontiac. Download instructions below.
*The platform will allow an upload up to 300kb, but overage fees will apply on Creatives over 150kb.

See instructions for setting up Click Tracking for HTML5 Creatives here:

Implementing-IAB-clickTag-for-HTML5Download

Native Specs

Native Format A

Title 25 character max
Body 300 character max
Call to Action25 character max
Icon aspect ratio 1:1
Image aspect ratio 1.91:1
Image size 1200×627
Image file size 200kb max
Image file formatJPG, GIF, PNG
Click URL URL landing page (matches “sponsored by” brand)
Sponsored by: 25 character max
Placement Triplelift, LiveIntent*, Sharethrough, Microsoft, MSN
*body must be less than 90 characters for LiveIntent

Native Format B

Title 60 Character Max (35-45 preferred)
Image size 1000×750
Image file size 150kb max
Image file formatJPG, GIF, PNG
Click URL URL landing page (matches “sponsored by” brand)
Sponsored by: 40 character max
Placement Taboola

Native Format C

Title 60 Character Max (40 preferred)
Image Aspect Ratio1.91:1
Image size 1200×627
Image file size 200kb max
Image file formatJPG, GIF, PNG
Click URL URL landing page (matches “sponsored by” brand)
Sponsored by: 25 character max
Placement Outbrain
Native Format D:
Title 25 Character Max
Body300 Character Max
Icon Aspect Ratio1:1
Click URL URL landing page (matches “sponsored by” brand)
Sponsored by: 25 character max
Placement Microsoft Outlook, MSN, EDGE

Audio Specs

Open Exchange Audio:

Length:15 seconds or :30 seconds or :60 seconds
File FormatMP3
File Size1MB
Bit rateAt least 128 kbps bit rate / 44100 Hz sample rate

Spotify Audio File:

Length:15 seconds or :30 seconds
File FormatMP3
File Size1MB
WAV bit rate16-bit 44.1 kHz
MP3 bit rateAt least 192 kbps

Video & CTV Specs

Hosted Video:

Max ad length60 seconds
File format VAST 4.0, MP4
Max file size 100 MB
Unit size Matches player size selected
Resolution 1280×720 (1.77 Aspect Ratio Recommended)
Video Bit Rate 2500kbps Maximum
Frame Rate Min of 14 FPS (30 FPS recommended)

CTV:

Max ad length:15 seconds or :30 seconds
File format VAST 4.0, MP4
Max file size 100 MB
Unit size 1080×1920
Min Resolution 1280×720 (sometimes notated as 720p)
Min Bit Rate 2,000 kbps
Frame Rate 24-25 or 29-30 FP
3rd party tracking1×1 tracking pixels accepted
CodecH.264

Ad Server Tag Specs

Banner Sub TypeiFrame, Raw HTML
Click tracking requirementsMust include AppNexus’ macro ${CLICK_URL} to track clicks in Pontiac
Video & Audio file formatVAST 4.0

To use an ad server tag, reach out through the Help Center to request access. Ad server tag requests are approved on a case by case basis. Please allow 2 business days for this request to be processed. You must include AppNexus’ macro ${CLICK_URL} to ensure that clicks are properly tracked in Pontiac. For additional macros see here: Creative Macros

Creative Upload

Creative Upload Process

To upload a Creative, go to the Advertisers tab and click on the name of the Advertiser under which you would like to upload the Creative. Select ‘New Creative’ and select the type of Creative that you will be uploading. A preview of the Creative should appear in the green ‘Preview’ box. Ensure that the Creative does not extend outside this preview box. Complete all relevant fields, then click ‘Save’. Each Creative Type has a max file size as indicated in the Creative Specs. Creatives that exceed the max file size will incur Creative Overage Fees as indicated in our Pricing here: Pricing

Creative Click URLs

The Click URL entered for each Creative is the landing page the user will be taken to when they click on the Creative.

As a part of the Creative Audit process, the branding represented in the Creative will be validated against the branding of the Click URL to ensure that they match. If you are using a Click URL for a site that does not represent your branding, such as Amazon or another third-party marketplace, check the box ‘Enter Alternative Brand URL for Audit’ and enter a URL that contains the same branding represented in your ad. The audit team will use this URL to validate the branding represented in the creative. This will not be used as the landing page for the creative, it is only for audit purposes.

This is an example of what this would look like in the upload process:

To incorporate UTM Codes into your Click URL read more info here: UTM Code Implementation

Pixeling Creatives

If you would like to associate a Third-Party Pixel to a Creative, switch to the ‘Third-Party Pixels’ tab and click the green plus next to the pixel. This pixel must be added under ‘Third Party Pixels’ in the Advertiser settings before the Creative upload. See more information on Third Party Pixels here: Third-Party Pixels (Trackers).  If you are uploading a Video or Audio Creative this tab will be called ‘Trackers’ and the pixel can be added at the time of the Creative upload.


Remarketing Pixels can also be added to the Creative in the ‘Segments’ tab at the time of Creative upload. Click the green plus next to the name of the pixel to associate it to the Creative. This will add any user that is served your Creative into this Remarketing segment. This pixel must be created in the Advertiser settings before the Creative upload. See Remarketing Pixels for more information here: Segment Pixels (Remarketing).

HTML5 Upload Error

“Zip package must contain single html file named index.html which must reside in the root of the zip file and not in a subfolder. Index.html should be a complete and valid HTML document including the entities <html><head><body>) and not an HTML fragment. All external resources must be secure (https)”

If you are receiving the above error when uploading an HTML5 creative, it may be due to one of the following:

  1. The index.html file is in a folder inside your zip folder. This file must be in the root of the zip file and not a subfolder. In which case you should extract the necessary files from the folder and re-zip them so that they reside in the root of the zip folder.
  2. The html file is not named ‘index.html’. In which case you should rename this file, then re-try the upload.
  3. The folder was zipped using a Mac and there are hidden files (.DS_store files and _MACOSX folder) within the zip folder that are causing the upload to fail. There are two ways to resolve/prevent this:
    • Use the the zip command in the Mac Terminal to compress the assets, instead of the Mac ‘compress’ function, for example:
      • zip -r -X html5_300x250.zip html5_300x250
    • You can still use the Mac ‘compress’ function, as long as you do not open the new zip folder before uploading it to Pontiac. These hidden files are only added when you open the folder and browse the content.

Creative Audit

Creative Audit Overview

The Creative audit process takes one business day from the time you upload a Creative. Before uploading any Creatives read the Pontiac Intelligence Creative Acceptance Policy here: 

Pontiac-Creative-Acceptance-Policy-3Download

Pontiac Intelligence reserves the right to reject any Creative unit at its discretion, and subsequently suspend the account without advanced warning. If your account is suspended, you will be notified in writing and an investigation will take place within three business days. Pontiac Intelligence is unable to change the audit results of Xandr/AppNexus & RiskIQ. Audit results can only be changed by resolving the issue that caused a Creative to be rejected or flagged as sensitive.

Audit Status

Creative audit results will be displayed under ‘Audit Status’ next to the name of the Creative, in the ‘Creatives’ section of the Advertiser or Line. Audit status will be indicated by a symbol; a yellow triangle for ‘audit pending’, a green check box for ‘passed audit’, a green triangle for ‘marked as sensitive’ and a red box for ‘rejected’. Hover over this symbol to view additional information about the audit status.

Sensitive Categories

The following are categories that could trigger a sensitive flag:

  • Alcoholic Beverages and References
  • Adult Store (must lead to a landing page without nudity or toys)
  • Paraphernalia, Pharmaceuticals and Supplements (usually accepted, but is reviewed on a case-by-case basis)
  • Social Issues / makes claims 
  • Weight Loss
  • Sexual Health
  • Affiliate Offers
  • Consumer Loans
  • Online Games
  • Gambling & Online Gambling – See ‘Gambling Advertising’ below
  • Firearms and Weapons (Sporting Goods stores, education, accessories) 
  • Tabloid / Advertorial (cannot infringe on copyrights) 
  • Underwear / Lingerie
  • Strip Club / Gentlemen’s Club
  • Dating

The following is the full list of Creative types that could trigger a sensitive flag:

  • Creatives stating ‘Price Match Guarantee’
  • Travel Deterrent
  • Unsubstantiated Rare
  • Underwear/Lingerie
  • Unaccredited Online Universities
  • Strip Club/ Gentlemen’s Club
  • Tabloid/ Advertorial
  • Creative has non-functional elements
  • Offer Not Actionable on Landing Page
  • Misleading Claims – Beauty and Cosmetics
  • Sexual Toys and Accessories
  • Firearms and Weapons: Services and Education
  • Firearms and Weapons: Gun Accessories
  • Firearms and Weapons: Sporting Goods Stores
  • Online Games – Weapons / Violence
  • Pharmaceuticals – Graphic Imagery
  • Alcohol – Prohibited Content
  • Alcohol – Online Sales
  • Cosmetic Procedure Nudity
  • Moderate Nudity
  • Plastic Surgery
  • Cosmetic Procedures
  • Birth Control or Fertility Products
  • Abortion
  • Paternity Test
  • HIV home tests
  • Clinical Trial Recruitment
  • Medical Devices
  • Dating – Sexually Explicit
  • Gambling – Country approved operator
  • Gambling – Online Cash Game
  • Gambling – Mahjong
  • Software or System update
  • Unbranded Creative
  • Mobile App Downloads
  • Horoscope or Astrology
  • Download/Watch/Play Button
  • Rotating Creative
  • Undefined Borders
  • Mild or Suggestive Profanity
  • Sweepstakes
  • Gambling – Educational or tools
  • Gambling – Penny auctions
  • Gambling – Non-government lottery
  • Gambling – Casino advertising gambling
  • Gambling – Scratch card site
  • Gambling – Sports betting
  • Gambling – Online gambling
  • Mimics Facebook Interface
  • Un-disclosed subscription services
  • Pharmaceuticals – Steroid-like supplements
  • Pharmaceuticals – Herbal supplements
  • Pharmaceuticals – Non-prescription
  • Implies personal characteristics of user
  • No privacy policy
  • Misleading personalization
  • Blood/Gore
  • Generic Creative (Creative content does not match landing page)
  • Creative is a game
  • survey popup
  • Fake Closing Action
  • Flashing and Strobing
  • Quizzes and Surveys
  • is cookie targeted
  • is remarketing
  • is behaviorally targeted
  • Alcoholic Beverages and References
  • Toolbars
  • Gambling – Other
  • Firearms and Weapons
  • Sexually Suggestive
  • Get Rich Quick
  • Sexual References
  • Misleading Claims
  • Free Giveaways
  • Consumer Loans
  • Affiliate Offers
  • Ringtones/Mobile Subscriptions
  • Sexual Health
  • Weight Loss
  • Religion
  • Pharmaceuticals and Supplements
  • Online Games
  • Dating
  • Context Link Providers

Creative Flagged as Sensitive

Creative audit results will be displayed under ‘Audit Status’ next to the name of the Creative, in the ‘Creatives’ section of the Advertiser or Line. A Creative flagged as sensitive will display a green triangle. Hover over this symbol to view additional information about the audit status.
If one of your Creatives is flagged as ‘Sensitive’, this content is allowed on the platform, but the Line Item will be restricted to the sensitive publishers that allow this type of content. Any exchanges that you selected to target will be ‘grayed’ out and only the exchanges allowing sensitive content will be targeted. This may restrict both delivery and performance of your campaign as these exchanges typically contain lower quality inventory and can also include fraud. Audit results can only be changed by resolving the issue that caused the Creative to be flagged as sensitive. If you think your Creative was flagged incorrectly, email your Account Manager.

The following sensitive flags will require specific actions to activate the campaign:

  • Sensitive, gambling: Under ‘Edit Advertiser’ select the box next to ‘Gambling’ to download the gambling addendum or download it here: Gambling Addendum. Sign the addendum and send it to your account manager. The Creative does NOT need to be re-audited or edited and the Advertiser will be restricted to sensitive publishers.
  • Sensitive, mobile app downloads: The Advertiser’s website is required to be submitted with the Creative upload for audit purposes. In the event that the click URL used for the Creative opens an app store to prompt a mobile app download, the ‘Alternative Brand URL for Audit’ field should be checked in the upload process to enter the Advertiser’s website for audit. If this is not completed and the only URL submitted with the Creative is for the click URL for mobile app download, the Creative will be rejected.

The following sensitive flag can be removed by following these steps:

  • Sensitive, lack of branding: The Creative should be changed to have clear branding present. The Creative will need to be re-uploaded and saved. By selecting ‘save’ after uploading the new Creative it will be sent to audit and this process may take up to 24 hours to complete.  

Rejected Creatives

Creative audit results will be displayed under ‘Audit Status’ next to the name of the Creative, in the ‘Creatives’ section of the Advertiser or Line. If your Creative is rejected, a red box will appear here. Hover over this symbol to view additional information about the audit status.
Pontiac Intelligence is unable to change the audit results of Xandr/AppNexus & RiskIQ. Audit results can only be changed by resolving the issue that caused the Creative to be rejected. If you think your Creative was rejected incorrectly, reach out to the Pontiac Team through the Help Center.

  • Rejected, Does not display properly: First check to see if there is a preview of the Creative in the green preview box in Pontiac and verify that the Creative fits in the designated area. If it does not fit correctly in the box you may have chosen the incorrect Creative size. You can edit the size then select ‘Save’. The Creative will be sent to audit and this process may take up to one business day to complete.
  • Rejected, Fails to render: If you are using an ad server tag, verify that the code you uploaded in Pontiac renders on your end. Check with your ad server that the tag is active and available. Email your Account Manager for additional help.
  • Rejected, Creative brand does not match Creative landing page: The brand displayed in the ad should match the brand of the website that the ad is driving users to. In order for this Creative to be accepted, you must change the brand displayed in the Creative, or change the Click URL to drive to this brand’s website. If you are driving to a third-party marketplace or other page that does not depict your branding, such as Amazon, check the ‘Use Alternative Mobile Click Url’ and enter a URL that contains the same branding represented in your ad. The audit team will use this URL to validate the branding represented in the creative. This will not be used as the landing page for the creative. Once you have edited the Creative details, ‘Save’ and close the Creative upload window. The Creative will be sent to audit and this process may take up to one business day to complete
  • Rejected, Creative does not click through properly: Your Creative will be rejected if the Creative is clicked and does not open a landing page, if the Creative is clicked and a landing page opens, but no content loads or if the Creative is clicked and a landing page loads, but an error keeps any content from being displayed. In any of these cases you must either update the landing page and then click ‘Reaudit’ or change the Click URL for the Creative and click ‘save’. The Creative will be sent to audit and this process may take up to one business day to complete.
  • Rejected, Malicious: Your account will be suspended, you will be notified in writing and an investigation will take place within three business days. Pontiac clients who upload ads deemed malicious will lose access to the platform and forfeit deposited funds.

Creative Re-Audit

To re-audit a Creative open the Advertiser and select the Creative’s name under the ‘Creatives’ menu. You cannot re-audit a Creative at the Line Item level, but rather you must be at the Advertiser level.  

Selecting the ‘Reaudit Creative’ button at the bottom of the ‘Creative’ window will send the Creative to re-audit and this process may take up to one business day to complete. This should only be used if there have been no changes made to the Creative or the Click URL. For example, if your Creative was flagged because the landing page does not have a Privacy Policy, in this case you need to make changes to the landing page and not to the Creative, then select ‘Reaudit Creative’. 

Selecting ‘Reaudit Creative’ will not save any changes you have made to the Creative and the Creative will be re-audited as it was prior to any changes. If you would like to make changes to the Creative or the Click URL you must then select ‘Save’, which will automatically send the updated Creative to audit.

Editing a Creative

Once a Creative has been submitted and audited, follow the steps below to edit it:

  • Navigate to the Advertiser tab.
  • Click on the name of the Advertiser where the Creative is located.
  • Select the Creative’s name under the ‘Creatives’ menu.

Editable fields without reaudit:

  • Creative Name
  • Active/Inactive Status

Changes that require reaudit (may take up to 24 hours):

  • Size
  • Click URL
  • Image File

Note: The Creative type cannot be edited at any time. You can only change the ‘Name’ and the ‘Active’ status of a Creative without sending the Creative to audit and paying additional fees. You also cannot edit a Creative at the Line Item level; you must make changes at the Advertiser level.

Save vs. Readuit:

  • To submit changes, click ‘Save’ which will automatically send the Creative for reaudit.
  • Selecting ‘Reaudit Creative’ will reaudit the Creative without saving any changes you have made.

If you do not see the Creative that you are looking for in the Advertiser menu, try switching the ‘Filter Status’ to ‘Inactive’. If the Creative appears under ‘Inactive’ and you would like to re-activate it, click on the Creative name to open the Creative Settings and check the ‘Active’ box. If the Creative is expired, see this section: Creative Expiration.

Creative Expiration

If a Creative unit is inactive for 45 days, it will expire. You will receive an email notification before the expiration date. If you run this Creative before the expiration date it will not need to be re-audited. Once a Creative expires the ‘Active’ symbol will change from a green box to a red box.

To use a Creative after it has expired, go to the Advertiser tab and click on the name of the Advertiser where the Creative is located to open the Advertiser menu. Select the Creative’s name to open the Creative Settings. If you do not see the Creative here, try changing the ‘Filter Status’ to ‘Inactive’. Select the Creative’s name to open the Creative Settings, check the ‘Active’ box and click ‘Resubmit for Audit’. This will send the Creative to audit and this process may take up to 24 hours to complete.

Creative Bulk Upload

If you frequently upload a large quantity of Banners at one time under a single Advertiser, email your Account Manager to request access to this feature. All Creatives uploaded through this feature must be uploaded to the same Advertiser. This feature cannot be used to upload Creatives to multiple Advertisers. This feature can only be used for Banner creatives at this time.

Once access is granted, a new button will appear at the Advertiser level next to ‘New Creative’ that says, ‘Creative Bulk Upload’. You will then need to create and upload a CSV file with the details of each Creative. If the Creative type is a tag, the tag will be entered into the CSV. If the Creative type is an image you will also need to create and upload a zip folder that contains these images.

The following are the steps to create the CSV:

  1. Create a new Excel file that will be later saved as a CSV file (with extension .csv). This can also be accomplished in a text editor.
  2. Insert the following Headers/Columns
    • Creative Name: The Creative in the Pontiac platform.
    • Data: This can denote the location of the Creative in the zip file if the Creative type is “image”. If the Creative type is “thirdParty”, this is where the third-party tag goes in. Example below (2).
    • Size: Creative size, e.g: 300×250, 300×600, 320×50, etc
    • Click URL: Landing page for the Creative
    • Creative Type: Can take values “thirdParty” or “image”.
    • Line Ids: ID(s) of the lines you would like this Creative attached to after being bulk uploaded.
    • Third Party Creative Sub-Type: Optional field for Creative type thirdParty. Can take values “iFrame” or “rawHTML”. This can be omitted if the Creative type is not “thirdParty”.
  3. Example of what the Excel row/record should look like (note the last character is comma(,) without specifying the third-party Creative sub-type):

pontiacCreativeName1,BRAND-logo1.jpg,300×250,https://pontiac.media,image,6004 6005,

pontiacCreativeName2,<ins class=’dcmads’ style=’display:inline-block;width:728px;height:90px’ data-dcm-placement=’N6563.157895.INVESTINGCHANNEL/B9315081.133810598′ data-dcm-rendering-mode=’iframe’ data-dcm-https-only data-dcm-click-tracker=${CLICK_URL}> <script src=’https://www.googletagservices.com/dcm/dcmads.js’></script></ins>,728×90,https://pontiac.media,thirdParty,6004,

    • Note the second row above is a thirdParty Creative type and is only being associated to one line (6004). If you don’t need the Creatives associated to a line you can omit the line id and only put a comma (,).

  1. Click File -> Save -> Select CSV (Comma-Separated Values) -> name it CreativeBulkMap.csv
  2. Upload this CSV file to Pontiac, along with the zip archive containing the Creatives if they are images.

Download an example CSV file here:  Bulk upload sample CSV

Creative Screenshot Guide

For some Advertisers or Brands, screenshots or screen ‘mockups’ of what their Creative will look like on the websites where it is running may be an important deliverable to better understand their campaigns. These can easily be created utilizing images of the Creatives and website screenshots:

  1. Take screenshots of all your creatives. Here are examples of what you want from each screenshot:
  1. Take screenshots of the websites that you want the ads to be display on and the matching ad sizes. See ‘Placements’ below to see where some of the most common ad sizes can be found on the pages. Follow these tips to get great website screenshots:
    • Make sure your screenshots are clean and include the URL, but do not include tabs etc.
    • Make sure the page has fully loaded, check the loading bar in the bottom left corner to verify. If there’s a video on the page, wait for the video to load and exclude the pre-roll where applicable.
    • Do not include any negative or controversial news. Topics can include but are not limited to politics, chronic disease, death, inappropriate clothing, and controversial topics.
    • 160×600 ads are harder to find but they are almost always on the mail domains:
    • Try to find articles that are “on brand.” For example, do not place an ad for a nursing home on bodybuilding.com.
    • Do not place ads on a page with other competing or conflicting brands. For example, if you are placing an ad for a pharmaceutical company, make sure there are no other ads for anything pharmaceutical related.
  1. Copy and paste your creatives on the website screenshots and fully cover up ads. SAVE final product as a new image:

Desktop Placements:

Mobile Placements:

Creative A/B Testing

In order to A/B test Creatives you will have to set-up a Line Item for each Creative and use the Creative Custom Audience to create an Audience segment that tracks users who have seen each ad. On each Line Item you will then ANTI-TARGET the Audiences that have seen the OTHER Creatives to ensure that users are only seeing one of the Creatives. 

  1. Upload each Creative that you would like to test 
  2. Go to the ‘Audiences’ tab, ‘New Custom Audience’ and select ‘Creative Audience’ from the dropdown
  3. Check the ‘Device ID’, ‘IP Address’ and ‘User ID’ boxes
  4. Name the Audience after one of the Creatives and select the green plus sign next to that Creative (it will move from the left side to right side indicating that this Audience will collect users that have seen this Creative)
    For example: name the Audience ‘Creative A’ and click green plus next to  ‘Creative A’. Name a second Audience ‘Creative B’ and click green plus next to ‘Creative B’
  5. Create a line for each Creative and Anti-target all of the Audiences of users who have seen OTHER Creatives.
    For example: create a Line and associate Creative A as the Creative the Line will serve, then under Audiences,  ‘Associate segments’, create a new group and drag over all of the Audiences for the other Creatives. Click the minus sign next to the Audience to exclude/anti-target it. Switch to ‘all’ to make sure that the logic is OR between the segments as shown below.

Origin Creative Acceptance Policy

Download the full Origin Platform Creative Acceptance Policy here:

Pontiac-Creative-Acceptance-Policy-3Download

Please thoroughly review all Creative Policies before uploading Creative. All Creative units uploaded will be subject to the Pontiac Intelligence creative audit process as well as any additional SSP, publisher, media owner or other creative approval processes that may apply in the acquisition of ad space.

Pontiac Intelligence reserves the right to reject any creative unit at its discretion, and subsequently suspend the account without advanced warning. If your account is suspended, you will be notified in writing and an investigation will take place within three business days.  If at any point your ad tags are flagged as malicious, your account balance will be forfeited to Pontiac and will not be refundable.

In addition to Pontiac Intelligence’s content policies, certain sellers have additional policies that apply to buyers of those sellers’ inventory and certain data providers have additional policies that apply to buyers of those data providers’ data. Pontiac Intelligence clients wishing to purchase such inventory or data are responsible for understanding and adhering to any such additional policies. Pontiac shall have no liability or responsibility of any kind if a third-party declines to serve any Ads proposed by a Pontiac user, regardless of whether the ads meet the Pontiac Ad Standards or are approved by Pontiac, and users agree to indemnify and hold harmless Pontiac from any losses arising from a third-party’s decision not to serve a user’s ads. 

Prohibited Content

The following content is prohibited across all Pontiac products. Any ad unit flagged under one of these categories will be blocked from serving on the platform and may result in account suspension or forfeiture.

  • Profanity, Hate Speech or Defamatory Language
  • Graphic or excessive violence
  • Pornography, Nudity, Obscenities, or other ‘Adult’ Content
  • Inappropriate content (at our discretion)
  • Sale of, or instructions for creating, guns, bombs, ammunition, or weapons
  • Discussing or promoting sale of federally illegal drugs, including marijuana, illegal pharmaceuticals, and other schedule 1 drugs.
  • Malware, privacy and security violations
  • Broken Ads or blank creative
  • Enabling or Permitting Piracy
  • Charging for government forms and services
  • Misappropriation of Copyright, Trademark, Trade Secret, or Patent
  • Executes or Downloads Files without User Interactions
  • Causing degradation of site performance (ex: excessive animation, weight)
  • Illegal Material or Content
  • Misleading or sensationalized messaging, content, or images
  • Pop ups or any ad or landing pages that spawn them.
  • Content that intends to, or does, induce user action through misleading appearance or behavior, including, but not limited to, creatives that mimic video players, functional buttons, errors or warnings about viruses, missing codecs, and corrupt disks.
  • Displaying fake errors to induce user action, or messaging that implies knowledge of a user’s computer or operating system.
  • Creatives must not rotate brands or advertisers.
  • The landing page must match brand of the advertisement.
  • The landing page must contain a privacy policy.

Pontiac Origin Platform Creative Policy:

In addition to the Pontiac platform audit, all creative units uploaded to the Origin platform go through the Xandr/AppNexus & RiskIQ audit review processes, the result of which will be reflected next to each creative in the platform. In addition to the above list of prohibited content, the following content is not allowed on the Origin platform:

Prohibited Content:

  • Politics, including for election related content including election canvassing and election polls, political parties, candidates, and ballot measures is not allowed. Fundraising for political candidates, parties, PACs, and ballot measures is not allowed.
  • Tabloid / Advertorial
  • Strip Club / Gentlemen’s Club
  • CBD, marijuana, drug paraphernalia, narcotics, psychotropic drugs, or toxic drugs
  • Tobacco, Vaping, and Smoking Products
  • Prohibited advertiser categories (ex: casual dating, illegal gambling, adult, etc.)
  • Creative brand does not match Click URL/landing page brand
  • Global and publisher competitive and low-quality exclusions (CE)
  • Non-user-initiated audio (initiated on click and must have integrated audio controls)
  • Firearms and Weapons

Sensitive Categories

Advertisements which exhibit any of the following properties are allowed on the platform but restricted to publishers who have approved this type of content. These ad units will be flagged in the platform as Sensitive. If ANY of a Line Item’s ad units are flagged as Sensitive, then the entire Line is restricted to the sensitive publishers.

  • Alcoholic Beverages and References (Advertising must contain proper health warnings and responsible drinking messaging)
  • Gambling & Online Gambling – See ‘Gambling Advertising’ below
  • Adult Store (must lead to a landing page without nudity or toys)
  • Pharmaceuticals and Supplements (usually accepted, but is reviewed on a case-by-case basis)
  • Social Issues / makes claims
  • Weight Loss
  • Sexual Health
  • Affiliate Offers
  • Consumer Loans
  • Online Games
  • Underwear / Lingerie
  • Dating

Alcohol Policy: https://about.ads.microsoft.com/en-us/policies/restricted-categories/alcohol

Gambling Advertising

A separate Gambling Addendum must be signed prior to the launch of any Gambling advertising.  If you are running Gambling Advertising, as defined below, please follow the prompts inside the Pontiac Intelligence platform and follow the steps as instructed.  If prompts are not automatically generated, you must reach out to your Account Manager and request the Gambling Addendum via email.

With respect to any campaign executed via the Pontiac Platform, “gambling ad” means the following: 

  • Any type of advertisement that promotes, directly or indirectly, online (internet and mobile) and offline (land-based or “bricks and mortar” casinos, betting shops, card rooms or other gambling establishments) gambling, gaming, betting or wagering of any kind, whether for cash prizes or other things of value, including but not limited to casino games, poker, sports betting (whether individual or parlay wagering), pari-mutuel wagering or “betting pools” (including horse racing, dog racing, and jai alai), lotteries, raffles, sweepstakes, penny auctions, and fantasy sports. 
  • Any type of advertisement that otherwise relates in any way to the foregoing activities, including advertisements for promotional products, services or materials, including education, “learn to play,” “practice” and other free simulation sites affiliated with online or offline gambling or wagering sites or facilities

Prohibited Countries 

Notwithstanding any other provision in this policy, Pontiac prohibits gambling ads of any kind targeted to serve in the following countries and any other country where gambling or the advertisement of gambling is illegal

  • Albania
  • Algeria
  • American Samoa
  • Andorra
  • Antigua and Barbuda
  • Argentina
  • Armenia
  • Aruba
  • Azerbaijan
  • Bahamas
  • Bahrain
  • Bangladesh
  • Barbados
  • Belgium
  • Belize
  • Benin
  • Bolivia
  • Botswana
  • Brazil
  • Brunei
  • Bulgaria
  • Burkina Faso
  • Cameroon
  • Central African Republic
  • Chile
  • Comoros
  • Colombia
  • Cook Islands
  • Costa Rica
  • Cote d’Ivoire
  • Cyprus
  • Democratic Republic of Congo
  • Djibouti
  • Dominica
  • Dominican Republic
  • Ecuador
  • Egpyt
  • El Salvador
  • Eritrea
  • Ethiopia
  • Faroe Islands
  • Fiji
  • Gabon
  • Georgia
  • Greenland
  • Grenada
  • Guam
  • Guatemala
  • Guinea
  • Guinea-Bissau
  • Guyana
  • Haiti
  • Honduras
  • Hong Kong
  • India
  • Indonesia
  • Iraq
  • Israel
  • Italy
  • Jamaica
  • Japan
  • Krygystan
  • Latvia
  • Lesotho
  • Libia
  • Liechtenstein
  • Macao SAR
  • Madagascar
  • Malawi
  • Malaysia
  • Maldives
  • Malta
  • Marshall Islands
  • Mauritania
  • Mauritus
  • Moldova
  • Monaco
  • Mongolia
  • Namibia
  • Nauru
  • Nepal
  • Niger
  • Nigeria
  • Niue
  • North Macedonia
  • Northern Mariana Islands
  • Oman
  • Pakistan
  • Palau
  • Panama
  • Paraguay
  • Peru
  • Philippines
  • Puerto Rico
  • Qatar
  • Republic of Congo
  • Russia 
  • Rwanda
  • Saint Kitts and Nevis
  • Saint Lucia
  • Saint Vincent and the Grenadines
  • Samoa
  • San Marino
  • Saudi Arabia (KSA)
  • Senegal
  • Seychelles
  • Sierra Leone
  • Singapore 
  • Sri Lanka
  • Suriname
  • Taiwan
  • Tajikistan
  • Tanzania
  • Thailand
  • The Gambia
  • Togo
  • Tokelau
  • Tonga
  • Trinidad and Tobago
  • Tunisia
  • Turkey
  • Tuvalu
  • Uganda
  • United Arab Emirates
  • United States Virgin Islands
  • Uruguay
  • Vanuatu
  • Vatican City
  • Venezuela
  • Vietnam
  • Yemen
  • Zambia
  • Zimbabwe

Restrictions on Gambling Ads 

Pontiac generally permits gambling ads to be targeted to serve in jurisdictions other than those above where such ads are not prohibited so long as Pontiac users, on behalf of themselves and the advertisers whose ads they are trafficking, comply with the following requirements: 

  • The ad complies with all applicable laws, rules and regulations in any jurisdiction where the client’s ad targets to serve.  
  • The buyer and the advertiser currently hold all required licenses, permits, registrations, waivers, consents or other governmental approvals (collectively, “licenses”) to operate in the jurisdictions in which the ad is served and in any other jurisdictions in which you and the advertiser operate. 
  • The buyer and the advertiser are in compliance and agree to remain in compliance with all applicable laws and the terms of all applicable licenses. 
  • The buyer and the advertiser agree not to serve gambling ads targeted to serve in any jurisdiction specifically prohibited by this policy, as such may be updated from time to time. 
  • The buyer is approved by AppNexus/Xandr to serve gambling ads. 
  • The buyer acknowledges that approval does not guarantee that ads can be served; Pontiac and AppNexus/Xandr reserve the right to conduct appropriate due diligence on the buyer and/or the advertiser and, in each of their sole and absolute discretion, may prohibit any ad from serving for any reason whatever. 

Pontiac shall have no liability or responsibility of any kind if AppNexus/Xandr decline to serve gambling ads or any other Ads proposed by a Pontiac user, regardless of whether the ads meet the Pontiac Ad Standards or are approved by Pontiac, and users agree to indemnify and hold harmless Pontiac from any losses arising from AppNexus/Xandr’s decision not to serve a user’s gambling ads.  

To “target ads to serve in a country” or “jurisdiction”, for purposes of this gambling addendum, means to target advertising based on the geographic location of an Internet user (according to the IP address associated with the requesting browser). 

Government-Sponsored Lotteries 

Advertising for government-sponsored lotteries is permitted, so long as the ads comply with the following requirements: 

  • The advertiser is a government entity or agency, such as a state, provincial or national lottery commission or authority, or a licensee or agent contractually authorized to operate or advertise lottery games on behalf of a government entity. 
  • The lottery ads must only target the jurisdiction that controls the lottery commission or authority, or in which the government-sponsored lottery is authorized. 
  • The lottery ads otherwise comply with all applicable laws, rules, regulations. 
  • Under no circumstances should gambling ads be targeted to children.  

Children’s Privacy

Laws in various jurisdictions regulate the collection and use of data from or about children, including based on activity on Child Sites. By Child Site we mean a site or app that is directed to or intended for children under (i) the age of 13 if the user is located in the US, (ii) the age required for parental consent, as determined by the laws of the Member State in which the child resides, if the child is located if the EEA, or (iii) the age defined by the laws or regulations of the given jurisdiction if the child is located outside the US and EEA.

In the US, the Children’s Online Privacy Protection Act of 1998 (COPPA) regulates the online collection and use of personal information from or about children. Under US Federal Trade Commission (FTC) rules implementing COPPA, it is prohibited (i) to create or update a user profile based on an activity (such as a click or a visit) on a child-directed site or app and/or (ii) to deliver an ad based on prior online activity to a user on a Child Site.

In the EEA, the General Data Protection Regulation (EU) 2016/679 (GDPR) regulates the processing of personal data from or about children. Under the GDPR, the processing of the personal information of a child is prohibited where the child is younger than 16 (or the age required for parental consent as determined by the laws of the Member State in which the child resides) unless consent is given or authorized by the holder of parental responsibility of the child.

For COPPA or other applicable laws, rules, and regulations, including GDPR, Xandr regulates the collection and use of data on Child Sites:

  • Ads served on sites identified as child-directed on the Xandr platform may not be targeted based on prior online activity, i.e. behaviorally targeted or retargeted. Contextual ads may continue to be served on Child Sites. Targeting an ad based on prior online activity to a Child Site is prohibited.
  • In connection with your use of the Pontiac Intelligence platform, you may not:
  • Associate any behavioral or interest-based information about an impression from a Child Site with a user or unique identifier.
  • Target an ad based on prior online activity to a user on a Child Site.
  • Create segments specifically targeting children under the age of 13 without parental consent.
  • Collect or use personal identifiers or other personal information, e.g. cookie IDs, IP addresses, device IDs, or precise geolocation information, related to impressions on Child Sites.

Identifying Child Sites

  • Pontiac Intelligence, during its standard inventory auditing process (i.e., for sites submitted for Pontiac Intelligence audit), will use reasonable procedures designed to identify and categorize Child Sites.
  • Pontiac Intelligence provides configuration parameters for sellers to self-identify Child Sites.

Third-Party Seller Policies 

In addition to Pontiac Intelligence’s content policies, certain sellers have additional policies that apply to buyers of those sellers’ inventory and certain data providers have additional policies that apply to buyers of those data providers’ data. Pontiac Intelligence clients wishing to purchase such inventory or data are responsible for understanding and adhering to any such additional policies. These links to third-party policy documents are offered below as a convenience. However, these links are not guaranteed by Pontiac Intelligence to be up to date or all inclusive. Other policies and Sellers not listed may apply. 

Ad Inventory Seller Policies

Microsoft:

  • Creative Acceptance Policy: http://advertising.microsoft.com/creative-acceptance-policy
  • For Xandr policies regarding buying ad Inventory from Microsoft (including Windows Apps Inventory), see  Additional Microsoft Inventory Policies . 

Google (AdX):

  • http://www.google.com/support/adxbuyer/bin/topic.py?topic=22149
  • http://www.google.com/intl/en/adxbuyer/guidelines.html

Verizon Media (AOL & Yahoo):

https://adspecs.verizonmed

CTV & OTT Overview

As streaming services have become widely adopted and methods for consuming TV content have drastically changed, the terms OTT and CTV have become exceedingly popular in the advertising world. But with this growing popularity the terms have become ambiguous as players in the industry began to use them interchangeably and the lines between them became blurred. This guide is intended to provide clarity into the industry definitions, Pontiac terminology, and best practices for implementing both CTV and OTT campaigns through the Pontiac Platform.

CTV vs OTT vs Video

OTT is TV content delivered to a device via an internet connection. OTT is defined as a delivery method and content type (premium TV content delivered via internet) and can be streamed on any device (TVs or mobile devices or desktops). OTT is considered premium digital video, and it is the highest-quality format available programmatically, with completion rates as high as 90%. For example, this could be a user watching Hulu on their phone, desktop, OR on their Smart TV.

CTV is a sub-set of OTT Video, where the OTT content is delivered specifically on TELEVISIONS connected to the internet. CTV is defined by the device type and includes – smart TVs, gaming consoles, and set-top boxes. An example of this would be a user watching Hulu on their TV.

Video is the creative type for all OTT and CTV. All OTT and CTV campaigns are Video, but not all Video is OTT or CTV. Online Video (OLV) can also run across other websites and apps within content that is not considered OTT and on Devices that are not considered CTV. For example, a video ad in the Candy Crush app on a mobile device.

Pontiac Platform Terminology

Despite the technical definitions above, it is commonly understood in the industry that CTV refers to any OTT across TVs, and ‘OTT’ is typically used to refer to other ‘non-CTV’ OTT content. For this reason and for the purposes of the Pontiac Platform, ‘CTV’ as an ‘Inventory Type’ refers to OTT content that runs across connected television devices – Smart TVs, Game Consoles, and Set Top Boxes. The ‘Inventory Type’ ‘OTT’ will refer to all other OTT content that is not CTV, that being content streamed on other devices – Mobile Phones, Tablets, Desktops and Laptops.

Open Exchange vs. Deal Inventory

On the Pontiac platform, there are two inventory sources that can be used to purchase CTV/OTT ads, through the Open Exchange or through PMPs. PMPs, or private marketplace deals, are a method through which publishers privately grant access to premium inventory to a specific Advertiser or group of Advertisers. The Open Exchange refers to inventory monetized through exchanges or ‘SSPs’ in an open marketplace where buyers/Advertisers are granted equal opportunities to bid on and purchase this inventory.

Deal (PMP) Inventory

Pontiac makes over 2,000 Deals from a wide variety of Publishers and content categories available directly in the platform. Pontiac strongly recommends running all OTT and CTV campaigns through PMPs as they provide exclusive access to premium, fraud-free inventory. To browse available Deals, open the Pontiac Platform and navigate to the ‘Inventory’ tab. Under ‘Deals’ you will see the full list of available public deals. The ‘Network’, ‘App/Channel’ and ‘Programming’ will give you an idea of where the ad will serve and what the content type is. These PMPs are still real-time bidding environments in which the highest bid will win the impression, but the bidding will start at a specified price floor as defined by the publisher, this can also be seen in the ‘Inventory’ tab for each Deal. Select from Pontiac’s curated Deal lists, or create a custom Deal list with all of the relevant Deals to your Advertiser, easily allowing you to create many Lines with the same list of Deals.

The following information will be available for each Deal in the ‘Inventory’ tab:

Inventory Type

  • OTT: The Deal can be used for OTT Inventory, with Mobile, Desktop, and Tablets as the device types.
  • CTV: The Deal can be used for CTV Inventory, with TVs, Game Consoles and Set Top Boxes as the device types.
  • OTT/CTV: The Deal can be used for OTT or CTV Inventory, with Mobile, Desktop, Tablet, TVs, Game Consoles and Set Top Boxes as the device types.
  • OLV: ‘Online Video’, these are ‘non-OTT’, ‘non-CTV’ video placements. They may be outstream, or instream, across websites and applications that are not considered OTT content. See Device Type column for additional guidance.

Device Type

  • CTV: Should be targeted to Smart TVs, Game Consoles & Set-top boxes
  • Mobile & Desktop: Can be used for Mobile Devices, Tablets, & Desktop
  • Mobile: Can only be used with Mobile Devices and Tablets
  • Desktop: Can only be used with Desktop or Laptop Devices
  • All: Can be used for any OTT including Smart TVs, Game Consoles & Set-top boxes, Mobile Devices, Tablets, & Desktop

App Types:

  • SVOD (Subscription based video on demand)
    • The user enters into an agreement for subscription that grants them access to the service, typically this allows them to watch with no limits until the agreement or subscription is cancelled. The best example of an SVOD service is Hulu.
  • AVOD (Advertisement based video on demand)
    • Ad-based video on demand is a free service that allows users to log in and watch videos that contain ads. YouTube is the best example of AVOD.
  • TVE (TV Everywhere)
    • TV Everywhere requires a cable or satellite subscription to access the on-demand content. This is both SVOD and AVOD. CBS Now, AMC Networks, A&E are examples.
  • vMVPDs (Virtual Multichannel Video Programming Distributor)
    • (e.g) SlingTV, Pluto, Xumo, etc are Linear OTT services that provides premium programming from multiple channels & some digital pure play channels like Newsy, Cheddar, etc.  These services can be either subscription + advertising supported, or advertising supported only.
  • PPDs (Pure Play Digitals)
    • Apps that have emerged in the OTT space, Newsy, Cheddar, The Roku Channel, etc are apps that originated in the digital space and have no tie to traditional TV. 

Formats:

  • Live: The video content is live TV, with no specified duration.
  • Long Form: The video content is equal to 8 mins or longer in duration.
  • Short Form: The video content is shorter than 8 minutes in duration.

Open Exchange Inventory

There are several reasons that Pontiac recommends running CTV and OTV campaigns through Deals as opposed to the Open Exchange. In the publisher waterfall, PMPs will be higher priority, and may also provide access to inventory that may otherwise be inaccessible as many premium publishers for streaming content may choose to monetize exclusively through Deals. Deals also provide additional information as to the type of app, format of the content, the channels included, etc. Open Exchange inventory is also at a much higher risk for fraud, including CTV App or Inventory spoofing.

If you would like to run through the Open Exchange, we strongly recommend targeting an app list to qualify the inventory as ‘premium streaming TV content’. Without a specified app list, the Line can run through any apps on the device types selected and there is no guarantee that those apps are for premium streaming content. To qualify the inventory as OTT or CTV, you need to target a list of apps with OTT/CTV content (for example, targeting the Hulu app), OR select CTV and OTT Deals from the Inventory tab.

To create a custom app list, go to the ‘Inventory’ tab and enter the app domains you would like to target. For example, in the Custom App List box enter ‘com.slingtv.ctv.aetv.roku’ to target the A&E Network on Roku devices. You must then add the App List to the Line and include ‘Roku’ in the targeted Operating Systems.

CTV Best Practices

Overview of CTV Best Practices

CTV is a specific subset of OTT, defined as content streamed only on televisions that are connected to the internet via Smart TV apps, Game Consoles and Set Top boxes.

The following is an overview of the best practices for setting up a successful CTV campaign on the Pontiac platform:

  1. Run through Deals as opposed to the Open Exchange, as this will allow for premium, fraud free placements.
    • Deal access can be requested in the ‘Inventory’ tab, then associated to the Line under ‘Targeting’. Select Deals with ‘Inventory Types’ that are ‘CTV’ or ‘OTT’. To ensure the Line only serves through selected Deals, DO NOT ASSOCIATE ANY EXCHANGES.
  2. Do not add frequency caps. Although Frequency Capping is available for CTV lines, it is often inaccurate and will severely limit scale as many CTV publishers do not consistently pass device IDs and user IDs across platforms.
  3. Enable the ‘Allow for Cookieless Users’ box. Cookies are not typically available across CTV devices, and requiring them may prevent lines from serving.
  4. Target ‘Instream’ Inventory by selecting ‘PreRoll’, ‘MidRoll’ and ‘PostRoll’ video playback types.
  5. It is only recommended to use audiences from the providers TruAudience (Tru Optik), Lotame and Comscore. While these audiences are intended for CTV, they may still limit scale.

How to set up CTV using Deals

  1. Request Access to Deals and Create or Select a Deal List:
    • The first step in setting up a successful CTV campaign is to select the PMPs or ‘Deals’ that the Line will target. Read more on Deal Inventory here: Open Exchange vs. Deal Inventory
    • For CTV Lines, select Deals with the Inventory Type ‘CTV’ or ‘OTT/CTV’. As a best practice we recommend selecting and targeting every Deal that fits your campaign’s needs. There is no limit to the number of Deals that can be associated to the Line and due to the premium nature of this inventory the auctions can be very competitive. Selecting many Deals will increase the ability of the Line to scale. Additionally, for content that most closely mimics a linear TV experience, we recommend focusing on Deals with the formats ‘Live’ and ‘Long Form’ as this will display your ad either during live shows or full episodes. You can also select from pre-set ‘CTV’, ‘Long Form CTV’ and ‘CTV – Full Episode’ Deals lists or create your own custom Deal List that can easily be added to multiple Lines. In the ‘Inventory’ tab, request access to the Deals you would like to use. Deal access will be approved in 1-2 business days and from there the Deals can be associated with a Line Item for targeting.
  1. Upload Creative:
    • If you do not yet have an Advertiser created for this campaign, first create the Advertiser. Then open the Advertiser and upload one or more Creatives that meet the OTT/CTV Specs, see here: Pontiac CTV & OTT Specs
    • The Creative will need to pass the Creative Audit which may take up to 24 hours.
  1. Set-up a Line Item:
    • Under the Advertiser, create a Line Item following these recommendations:
    • Inventory Type: CTV
    • Platform KPIs: Reach or VCR
    • Frequency Caps: Because device IDs and user IDs are not always available, frequency-capped CTV video campaigns can be more challenging to scale than desktop and mobile campaigns. For this reason, we recommend setting caps to 0.
    • Bid Strategy: The PMPs are real-time bidding environments with a specified price floor as defined by the publisher. This is the minimum CPM bid required to enter the auction. These auctions can be very competitive and typically, PMPs will clear somewhere between 40-80% higher than the Deal Price Floor. Closing CPMs are on average in the $30-60 range, with the most premium inventory running between $60-100 CPMs. Closing CPMs will vary greatly according to the caliber of publishers and inventory selected, where the PMP falls in the publisher waterfall, the level of competition, the format (Live, Short Form etc), the time of year and more. In general, we recommend using the price floors for guidance and adding an additional 40-50% to start the bidding. If you are not achieving the desired scale, continue to increase bids.
    • Allow for Cookieless Users: Enable this feature, Cookies are not typically available across CTV devices, and requiring them may prevent lines from serving.
    • Foot Traffic Attribution: This is available for CTV at a $4 CPM, add this additional cost to your bid CPM.
    • Exchanges: Remove ALL Exchanges.
    • Deals: Select the CTV Deals that you would like to purchase inventory through, or in the ‘Deal List’ tab, add Pontiac Curated Deal Lists or your own Custom Deal List to associated all Deals within that list.
    • Geo Targeting: Zip Code, DMA, State, or Country
    • Device Types: Leave the Device Types set to ‘TVs’, ‘Game Consoles’ and ‘Set Top Boxes’.
    • Operating Systems: Leave all operating systems selected
    • Video Playback: Select from ‘PreRoll’, ‘MidRoll’, and ‘PostRoll’, recommended to include all three. Do NOT select ‘Outstream’.
    • Video Size: Do not select a size.
    • Viewability Threshold: NOT AVAILABLE
    • Ads.txt: NOT AVAILABLE
    • Creative: Associate a Creative that meets the OTT/CTV Specs.
    • Audience Targeting: It is only recommended to use audiences from the providers TruAudience (Tru Optik), Lotame and Comscore. These can be found by filtering by ‘Provider’ in the Audience tab. Associate the selected audience to the Advertiser, then to the Line Item under ‘Associate Segments’. Keep in mind that these audiences are intended for CTV, but they may still limit scale.
    • Conversion Pixels: The standard ‘Conversion Pixel’ cannot be used. To track online conversions driven by a CTV Line, you can use an IP Conversion pixel. Read more here: IP Conversion Pixels

How to set up CTV with Exchanges

  1. Create an App List (Optional)
    • If you would like to run through the Open Exchange, it is highly recommended that you target an app list to specify the apps/channels where you would like the Line to run. For CTV, if you do not supply an app list, the Line will run may be able to run on TV apps that are not strictly for streaming TV content. For example, TV Weather apps.
    • To create a custom CTV app list, go to the ‘Inventory’ tab and enter the app domains you would like to target. For example, in the Custom App List box enter ‘com.slingtv.ctv.aetv.roku’ to target the Roku A&E app. You must then add the App List to the Line.
  1. Upload Creative
    • If you do not yet have an Advertiser created for this campaign, first create the Advertiser. Then open the Advertiser and upload one or more Creatives that meet the OTT/CTV Specs, see here: Pontiac CTV & OTT Specs
    • The Creative will need to pass the Creative Audit which may take up to 24 hours.
  1. Set up a Line Item
    • Under the Advertiser, create a Line Item following these recommendations:
    • Inventory Type: CTV
    • Platform KPIs: Reach or VCR
    • Frequency Caps: Because device IDs and user IDs are not always available, frequency-capped CTV video campaigns can be more challenging to scale than desktop and mobile campaigns. For this reason, we recommend setting caps to 0.
    • Bid Strategy: Closing CPMs are typically in the $20-40 range. However, this will vary greatly according to the caliber of the publishers and inventory being targeted. We recommend starting with bids in this range, and if you are not achieving the desired scale, continue to increase bids.
    • Allow for Cookieless Users: Enable this feature, Cookies are not typically available across CTV devices, and requiring them may prevent lines from serving.
    • Foot Traffic Attribution: This is available for CTV at a $4 CPM, add this additional cost to your bid CPM.
    • Exchanges: Include the Exchanges through which you would like to purchase inventory. Under the ‘CTV/OTT’ Exchange category you will find the predominately CTV based Exchanges. It is recommended to select exchanges from this section.
    • Geo Targeting: Zip Code, DMA, State, or Country
    • App List: If you created an app list to target, associate this list to the Line as an ‘Allow’ list.
    • Device Types: Leave the Device Types set to ‘TVs’, ‘Game Consoles’ and ‘Set Top Boxes’.
    • Operating Systems: Leave all operating systems selected
    • Video Playback: Select from ‘PreRoll’, ‘MidRoll’, and ‘PostRoll’, recommended to include all three. Do NOT select ‘Outstream’.
    • Video Size: Do not select a size.
    • Viewability Threshold: NOT AVAILABLE
    • Ads.txt: NOT AVAILABLE
    • Creative: Associate a Creative that meets the OTT/CTV Specs.
    • Audience Targeting: It is only recommended to use audiences from the providers TruAudience (Tru Optik), Lotame and Comscore. Associate the selected audience to the Advertiser, then to the Line Item under ‘Associate Segments’. Keep in mind that these audiences are intended for CTV, but they may still limit scale.
    • Conversion Pixels: The standard ‘Conversion Pixel’ cannot be used. To track online conversions driven by a CTV Line, you can use an IP Conversion pixel. Read more here: IP Conversion Pixels

OTT Best Practices

Overview of OTT Best Practices

OTT is defined here as TV content delivered via an internet connection that is streamed on Mobile, Desktop, and Tablets ONLY.

The following is an overview of the best practices for setting up a successful OTT campaign on the platform:

  1. Run through Deals as opposed to the Open Exchange, as this will allow for premium, fraud free placements. Deal access can be requested in the ‘Inventory’ tab, then associated to the Line under ‘Targeting’. To ensure the Line only serves through selected Deals, DO NOT ASSOCIATE ANY EXCHANGES.
  2. Do not add frequency caps. Although Frequency Capping is available for OTT lines, it is often inaccurate and will severely limit scale as many OTT publishers do not consistently pass device IDs and user IDs across platforms.
  3. Enable the ‘Allow for Cookieless Users’ box. Cookies are not consistently passed by OTT/CTV publishers, and requiring them may prevent lines from serving.
  4. Target ‘Instream’ Inventory by selecting ‘PreRoll’, ‘MidRoll’ and ‘PostRoll’ video playback types.
  5. It is only recommended to use audiences from the providers TruAudience (Tru Optik), Lotame and Comscore. While these audiences are intended for OTT, they may still limit scale.

How to set up OTT using Deals

  1. Selecting Deals for an OTT Campaign
    • The first step in setting up a successful OTT campaign is to select the PMPs or ‘Deals’ that the Line will target. Read more on Deal Inventory here: Open Exchange vs. Deal Inventory
    • For OTT Lines, select Deals with the Inventory Type ‘OTT’ or ‘OTT/CTV’. As a best practice we recommend selecting and targeting every Deal that fits your campaign’s needs. There is no limit to the number of Deals that can be associated to the Line and due to the premium nature of this inventory the auctions can be very competitive. Selecting many Deals will increase the ability of the Line to scale. Additionally, for content that most closely mimics a linear TV experience, we recommend focusing on Deals with the formats ‘Live’ and ‘Long Form’ as this will display your ad either during live shows or full episodes. You can also use the pre-set ‘OTT Mobile/Desktop’ Deals lists. In the ‘Inventory’ tab, request access to the Deals you would like to use. Deal access will be approved in 1-2 business days and from there the Deals can be associated with a Line Item for targeting.
  1. Upload Creative
    • If you do not yet have an Advertiser created for this campaign, first create the Advertiser. Then open the Advertiser and upload one or more Creatives that meet the OTT/CTV Specs, see here: Pontiac CTV & OTT Specs
    • The Creative will need to pass the Creative Audit which may take up to 24 hours.
  1. Set up Line Item
    • Under the Advertiser, create a Line Item following these recommendations:
    • Inventory Type: OTT
    • Platform KPIs: Reach or VCR
    • Frequency Caps: Because device IDs and user IDs are not always available, frequency-capped CTV video campaigns can be more challenging to scale than desktop and mobile campaigns. For this reason, we recommend setting caps to 0.
    • Bid Strategy: The PMPs are real-time bidding environments with a specified price floor as defined by the publisher. This is the minimum CPM bid required to enter the auction. These auctions can be very competitive and typically PMPs will clear somewhere between 40-80% higher than the Deal Price Floor. Closing CPMs are on average in the $20-40 range. However, this will vary greatly according to the caliber of publishers and inventory selected, where the PMP falls in the publisher waterfall, the level of competition, the format (Live, Short Form etc), the time of year and more. In general, we recommend using the price floors for guidance and adding an additional 40-50% to start the bidding. If you are not achieving the desired scale, continue to increase bids.
    • Allow for Cookieless Users: Enable this feature, Cookies are not consistently passed by OTT/CTV publishers, and requiring them may prevent lines from serving.
    • Foot Traffic Attribution: This is available for OTT at a $4 CPM, add this additional cost to your bid CPM.
    • Exchanges: Remove ALL Exchanges
    • Deals: Select one of the ‘OTT’ Curated Deals lists or hand select Deals with the ‘OTT’ or ‘OTT/CTV’ Inventory type that meet your needs.
    • Geo Targeting: Zip Code, DMA, State, or Country
    • Device Types: Leave the Device Types set to ‘Mobile Phones’, ‘Tablets’, ‘Desktops & Laptops’
    • Operating Systems: Leave all operating systems selected.
    • Video Playback: Select from ‘PreRoll’, ‘MidRoll’,and ‘PostRoll’, recommended to include all three. Do NOT select ‘Outstream’.
    • Video Size: Do not select a size.
    • Viewability Threshold: NOT AVAILABLE
    • Ads.txt: NOT AVAILABLE
    • Creative: Associate a Creative that meets the OTT/CTV Specs.
    • Audience Targeting: It is only recommended to use audiences from the providers TruAudience (Tru Optik), Lotame and Comscore. These can be found by filtering by ‘Provider’ in the Audience tab. Associate the selected audience to the Advertiser, then to the Line Item under ‘Associate Segments’. Keep in mind that these audiences are intended for OTT, but they may still limit scale.
    • Conversion Attribution: The standard ‘Conversion Pixel’ cannot be used. To track online conversions driven by a CTV Line, you can use an IP Conversion pixel. Read more here: IP Conversion Pixels

How to set up OTT with Exchanges

  1. Create an App List (Optional)
    • If you would like to run through the Open Exchange, it is highly recommended that you target an app list to specify the apps/channels where you would like the Line to run. For OTT, if you do not supply an app list, the Line will run on ANY mobile/desktop application and will not be restricted to streaming TV content. For example, Mobile Games, Weather apps, News apps etc.
    • To create a custom OTT app list, go to the ‘Inventory’ tab and enter the app domains you would like to target. For example, in the Custom App List box enter ‘571711580’ to target the Apple A&E app. You must then add the App List to the Line.
  1. Upload Creative
    • If you do not yet have an Advertiser created for this campaign, first create the Advertiser. Then open the Advertiser and upload one or more Creatives that meet the OTT/CTV Specs, see here: Pontiac CTV & OTT Specs
    • The Creative will need to pass the Creative Audit which may take up to 24 hours.
  1. Set up Line Item
    • Under the Advertiser, create a Line Item following these recommendations:
    • Inventory Type: OTT
    • Platform KPIs: Reach or VCR
    • Frequency Caps: Because device IDs and user IDs are not always available, frequency-capped CTV video campaigns can be more challenging to scale than desktop and mobile campaigns. For this reason, we recommend setting caps to 0.
    • Bid Strategy: Closing CPMs are typically in the $15-25 range. However, this will vary greatly according to the caliber of the publishers and inventory being targeted. We recommend starting with bids in this range, and if you are not achieving the desired scale, continue to increase bids.
    • Allow for Cookieless Users: Enable this feature, Cookies are not consistently passed by OTT/CTV publishers, and requiring them may prevent lines from serving.
    • Foot Traffic Attribution: This is available for OTT at a $4 CPM, add this additional cost to your bid CPM.
    • Exchanges: Include the Exchanges through which you would like to purchase inventory. Under the ‘CTV/OTT’ Exchange category you will find the predominately CTV based Exchanges. It is recommended to select exchanges from this section.
    • App List: If you created an app list to target, associate this list to the Line as an ‘Allow’ list.
    • Geo Targeting: Zip Code, DMA, State, or Country
    • Device Types: Leave the Device Types set to ‘Mobile Phones’, ‘Tablets’, ‘Desktops & Laptops’
    • Operating Systems: Leave all operating systems selected.
    • Video Playback: Select from ‘PreRoll’, ‘MidRoll’,and ‘PostRoll’, recommended to include all three. Do NOT select ‘Outstream’.
    • Video Size: Do not select a size.
    • Viewability Threshold: NOT AVAILABLE
    • Ads.txt: NOT AVAILABLE
    • Creative: Associate a Creative that meets the OTT/CTV Specs.
    • Audience Targeting: It is only recommended to use audiences from the providers TruAudience (Tru Optik), Lotame and Comscore. These can be found by filtering by ‘Provider’ in the Audience tab. Associate the selected audience to the Advertiser, then to the Line Item under ‘Associate Segments’. Keep in mind that these audiences are intended for OTT, but they may still limit scale.
    • Conversion Attribution: The standard ‘Conversion Pixel’ cannot be used. To track online conversions driven by a CTV Line, you can use an IP Conversion pixel. Read more here: IP Conversion Pixels

CTV & OTT Creative Specs

Pontiac CTV & OTT Specs

Max ad length:15 seconds or :30 seconds
File format VAST 4.0, MP4
Max file size 100 MB
Unit size 1080×1920
Min Resolution 1280×720 (sometimes notated as 720p)
Min Bit Rate 2,000 kbps
Frame Rate 24-25 or 29-30 FP
3rd party tracking1×1 tracking pixels accepted
CodecH.264

VPAID is not supported for OTT placements, and FLV, WebM and VPAID media types will not be eligible to serve on OTT inventory.

Publisher Specific CTV & OTT Specs

While Pontiac provides general specs for OTT and CTV creatives, each individual publisher may have their own requirements. It is the responsibility of the Advertiser to understand and comply with the requirements for the inventory they are attempting to buy.

Disney Specs:

The following specs apply to Disney properties including ABC, ESPN, Freeform, FXHulu, National Geographic, Disney-Hulu Cross Portfolio. While these are the general specs, it is recommended that all Creatives go through the QA process prior to launch to ensure that the meet any additional network or Deal specific requirements. For more info, see here: Buying CTV & OTT through Disney Networks

DHXP-Digital-Video-SpecsDownload

CTV & OTT Measurement and Attribution

Reporting available for OTT and CTV campaigns, includes key metrics such as Video Completion Rates, % Viewed Quartiles, and Spend per Video Complete. Reporting is also available by Deal, Device Type, and App, providing insight into where each impression was served.

While standard conversion attribution is not available for CTV and OTT due to the cookieless nature of these environments, Pontiac has developed proprietary attribution solutions that can be used to register both digital and physical conversions. Through the IP Conversion Pixel, Advertisers can attribute a website visit, online purchase or other action to a CTV campaign via the IP address of the user. Read more here: IP Conversion Pixels

Through Pontiac’s integrated Foot Traffic Report attribution, Advertisers can also measure lift in Foot Traffic at physical stores or locations from CTV or OTT campaigns. Read more here: Foot Traffic Attribution

Both attribution technologies as well as video completion rate reporting can be used to measure the effectiveness of CTV and OTT efforts on the Pontiac platform.

Buying CTV & OTT through Disney Networks

It is recommended that all Advertisers looking to run Hulu, or other Disney Networks, reach out to the Pontiac team via the Help Center as Disney has an approval process required to be eligible to run on across their Deals. All Creatives should be run through their QA process to ensure that they meet the specific specs for the Deal. We recommend a 2 week lead time to run through Disney Networks.

The following are Networks under the Disney umbrella:

  • ABC
  • ESPN
  • Freeform
  • FX
  • Hulu
  • National Geographic
  • Disney-Hulu Cross Portfolio

To get started creating a custom Deal or using an existing Pontiac-Disney deal, reach out to the Pontiac team through the Help Center and provide the following information:

  • Network of Interest (“I want to advertise on…ESPN, Hulu, DHXP, etc.”)
  • Flight Dates
  • Estimated Budget
  • Advertiser Name
  • Advertiser Landing Page URL
  • Tags/Creative Assets so we can QA ahead of launch

Creatives should meet the Disney specs listed here: Publisher Specific CTV & OTT Specs

Note that while these are the standard specs, requirements may vary between networks or by Deal, and all Creatives should be sent through the Disney QA process to ensure that they meet the required specs before launch.

Strategies Guide Intro

The Pontiac DSP offers a wide variety of granular targeting tools that enable Advertisers to better reach their target Audience and subsequently maximize their ad spend. Given how different types of inventories, data, and media interact, there are some complexities as to how targeting parameters and features can be combined and layered on a Line Item (inventory, geo, audience targeting). The following Strategies Guide provides insight into creating intelligent and functional targeting on your Line Items according to your media type and KPIs.

Strategies by Media Type

*For OTT/CTV, it is only recommended to use audiences from the providers TruAudience (Tru Optik), Lotame and Comscore

Strategies by Inventory Type

*For OTT/CTV, it is only recommended to use audiences from the providers TruAudience (Tru Optik), Lotame and Comscore.

Foot Traffic Attribution Overview

Foot Traffic Attribution is a type of Conversion reporting powered by OnSpot, that allows advertisers to track how many users were served an ad unit through Pontiac and then visited a commercial location. Utilizing Mobile Advertising IDs and the GPS systems of these mobile devices, OnSpot registers the users who were served your ad and their mobile device subsequently is seen at the location that you are tracking. Foot Traffic Reporting is only available in the United States at this time.

When ads are served across CTV and Web inventory, a household extension that utilizes the IP addresses is used to connect the TVs, Desktops, Laptops etc., with the mobile devices from the same household. The GPS systems of mobile devices from that household will then be used to register users from a household that saw your ad, then subsequently visited the location that you are tracking. Each line can track up to 200 locations.

The cost for Foot Traffic Attribution is as follows:

  • $1.50 CPM for Banner, Native, Audio & Video creatives
  • $4.00 CPM for CTV creatives

For campaigns receiving Foot Traffic reports, we recommend adding the CPM to the bid recommendations for the media type of the campaign. 

Setting Up Foot Traffic Attribution

Enabling Foot Traffic

In the Pontiac platform you can opt to receive Foot Traffic Attribution reporting when setting up a Line Item. Check the ‘Enable Foot Traffic’ box then proceed to the section below under ‘Foot Traffic Reporting’ and select the ‘Add Location’ button to start adding the locations you would like to track.

Foot Traffic Attribution is only available in the United States at this time. The cost for Foot Traffic Attribution is set according to the Media Type. For campaigns receiving Foot Traffic reports, we recommend adding the associated cost CPM to the bid recommendations for the media type of the campaign.

Adding Locations for Foot Traffic Attribution

There are 4 methods by which you can add locations to a Line Item for Foot Traffic Attribution. Once you have enabled Foot Traffic Attribution and set the lookback window, click the ‘Add Location’ button that appears under the Foot Traffic section of the menu.

The location can be added through one of these methods:

  1. Address
  2. Lat Long
  3. Geofence
  4. Bulk Address Upload

Address

Enter a commercial address that you would like to monitor for Foot Traffic Conversions and include a custom radius in meters. The Address based method will convert the commercial address to a lat/long coordinate, then utilize this radius to create an area around that coordinate that will be utilized to track Foot Traffic. Once you save, the address will be validated by Google Maps. If the validation status appears as ‘Invalid’, try using one of the other methods to add the location.

The Address method is best for Foot Traffic Areas that are defined by a single commercial address. In commercially dense locations, or to track a ‘unit’ within a larger building this method is not recommended. The Geofence method will allow for more accurate definition and control of the desired area. This will ensure that other buildings, or sections of the building in proximity to the desired location are not captured in the Foot Traffic Area.

If an Address is showing 0 ‘Average Daily Visitors’ after several days on the Line, this may indicate that the address is invalid, and Foot Traffic cannot be registered via the Address method. It is recommended to de-activate this location and to add the location via Geofence.

Lat Long

Use the map to find the desired location, then click to drop the pin on the map. Give the location a name and enter a custom radius in meters. This radius will be used to create an area around that coordinate to track Foot Traffic.

Geofence

The Geofence method enables maximum customization of the area to be tracked for Foot Traffic Studies. Give the location a name. Enter the address in the search bar, or navigate on the map to find the desired location. The area to be tracked can then be drawn as a polygon. Click on the map to create each end point of the polygon and define the area to be tracked. This is great for buildings with odd shapes, or in cases where the location cannot be defined by the building. For example, a car dealership with an extra-large parking lot can create a custom geofence that includes both the building and all their car lots to ensure that all relevant traffic is captured.

If you make a mistake in drawing the polygon, use the ‘Reset Map Shape’ button to erase any points drawn on the map.

Bulk Address Upload

Bulk Upload is available to enter locations as commercial addresses. This method is recommended for Line Items with many locations that can each be defined by a commercial address. Up to 200 addresses can be uploaded through the Bulk Upload at one time.

To Bulk upload addresses you will need to create a CSV file. The addresses must be entered in the following format with no column headers:

Location Name, Building Number, Street Address, City, State, Postal Code, Active Status

If you would like the location to be Active the ‘Active Status’ column should have a 1. If you would like the location to be Inactive the ‘Active Status’ should have a 0. In this example shown below, all of the addresses will be active except ‘The Shops NYC’.

Save the file as a CSV with no column headers and upload it by clicking the ‘Bulk Upload’ button under ‘Foot Traffic Reporting’. Double check before submitting the Line Item that all the addresses look correct. 

If an Address is showing 0 ‘Average Daily Visitors’ after several days on the Line, this may indicate that the address is invalid, and Foot Traffic cannot be registered via the Address method. It is recommended to de-activate this location and to add the location via Geofence.

Editing & De-activating Locations

Foot Traffic Addresses cannot be edited once the Line Item has been submitted. If you need to change the details of the address you will need to deactivate the address and enter the new address as a separate entry.
To deactivate a location previously entered for Foot Traffic Reporting, open the Line Item and expand the ‘Foot Traffic Reporting’ section to view the entered addresses. The ‘Location Name’ should appear as a hyperlink. Click on the Location Name to open the Location Settings window and un-check the ‘Active’ box, then click ‘Save’ and ‘Submit Changes’ to the Line Item.

Foot Traffic Line Item Metrics

At the Line Item level the Foot Traffic reporting section will display two metrics, ‘Attributed Visitors’ and ‘Average Daily Visits’.

Attributed Visitors will display the number of users who were served an ad from this campaign and subsequently visited this location during the selected reporting interval. These are Foot Traffic Conversion driven by this campaign. The ‘Foot Traffic Lookback’ is 30 days.

Average Daily Visitors will display the average number of total visitors recorded at this location per day within selected reporting interval. This is used to indicate if the address entered is correct and tracking visitors and will be displayed as a range. In the above example this metric indicates that in the last 30 days there were on average 50-500 visitors at this location each day. If 0 visitors are seen at this location, there may be an issue with tracking devices at this address. If this location was added using the ‘Address’ method, it is recommended to try adding this location as a Lat/Long coordinate or custom Geofence.

If the location was added as a Lat/Long coordinate or custom Geofence and the location is registering 0 ‘Average Daily Visitors’, reach out through the Help Center for assistance in troubleshooting this issue.

Foot Traffic Attribution Studies

Foot Traffic Attribution Reports can be found in the Reporting tab in the ‘Foot Traffic Studies’ section. Each morning a new report will generate with the visitor data for the date three days prior to the current date. For example, the report containing visitor data for the 1st of the month will generate on the 4th of the month. Reports will generate daily for the flight dates of the campaign and for 30 days after the campaign ends.

The ‘Foot Traffic Lookback’ is 30 days. This will be the attribution window for the Foot Traffic Studies, and is the number of days after viewing the ad that a visit to the location would be counted as a conversion. For example, if a user views an ad then visits the store 31 days after they saw the ad, this would not count as a conversion.

The visitor count displayed in these reports is ‘unique’ visitors. Multiple visits by the same Device ID will only be registered once on a given day, but may be registered if they return on a different day. 
Reports will contain the following information:

  • Date
  • Line ID
  • Line Name
  • Location ID
  • Location Name
  • Visitors Count

A ‘visitor’ is counted as any mobile device that was served the ad and then the device was subsequently seen within the area being tracked. For CTV and Web inventory this ‘visitor’ is a mobile device associated to a household of the device the ad was served on (ie. TV, Desktop etc). This ‘visitor’ count relies on mobile GPS tracking and is limited to the accuracy and precision of the device’s location services. It is possible that a visitor could be counted by walking by or driving by the location.

LiveRamp Tutorial

LiveRamp is a data management platform (DMP) that allows you to upload personally identifiable information (PII) that you have about your audience. This can include:

  • Name and postal addresses (NAP)
  • Email addresses
  • Phone numbers
  • Client customer IDs (your internal customer IDs)
    • This functions as an audience key that allows LiveRamp to delete duplicates in an uploaded file. If there is no customer ID, LiveRamp will use either the email addresses or NAPs provided.

You can upload a csv, tsv, or txt file containing information into LiveRamp, which will match the submitted information with cookies and allow you to target these individuals across the Internet through Pontiac.
We recommend clients allow for a two-week lead time when working with LiveRamp. The maximum number of records allowed per seat at any given time is 300,000.

LiveRamp Overview

LiveRamp is a data management platform (DMP) that allows you to upload personally identifiable information (PII) that you have about your audience. This can include:

  • Name and postal addresses (NAP)
  • Email addresses
  • Phone numbers
  • Client customer IDs (your internal customer IDs)
    • This functions as an audience key that allows LiveRamp to delete duplicates in an uploaded file. If there is no customer ID, LiveRamp will use either the email addresses or NAPs provided.

You can upload a csv, tsv, or txt file containing information into LiveRamp, which will match the submitted information with cookies and allow you to target these individuals across the Internet through Pontiac.
We recommend clients allow for a two-week lead time when working with LiveRamp. The maximum number of records allowed per seat at any given time is 300,000. Please do no not send any files or screenshots of files containing PII through the Help Center or to anyone on the Pontiac team. 

LiveRamp Terminology

  • File: A set or list of PII uploaded to LiveRamp as a CSV, TSV or TXT file. Each file uploaded will be converted into an Onboarded audience in Pontiac.
  • Audience: In the LiveRamp dashboard, an ‘Audience’ is a folder to which files with the same type of PII and column headers can be uploaded. Your first Audience folder will be created for you when the account is created. The folder will be ‘mapped’ based on the column headers of the first file uploaded. All subsequent files uploaded to an Audience will need to contain the same column headers. Notify your Account Manager if you need a new Audience folder created for a different type of data.
  • Mapping: This process is done manually by the LiveRamp team to determine which PII identifiers are in each column of the file, allowing the data to be properly ingested.
  • Matching: The process of matching personally identifiable information (PII) to the cookies for that individual, allowing them to be targeted on the open web.
  • Distribution: The publishing process through which data is delivered to Xandr and subsequently made available for targeting in Pontiac.
  • Records: The number of unique individuals in a file. There is a maximum of 300,000 distributed records per LiveRamp account at any given time.

Account Set-up

  1. To start using a LiveRamp account, all Pontiac users will need to sign a LiveRamp user agreement. This agreement can be found in the ‘Admin’ tab under ‘Seat Settings’ in the ‘Addendum’ section. To sign this agreement, check the ‘Accept LiveRamp Addendum’ box at the bottom of the contract and click ‘Submit’. By checking this box, you are agreeing to the terms of the agreement.
  2. Once you have completed these steps, reach out through the Help Center with the email address you would like to be used for the account. The Pontiac Team will create an account on your behalf using the email address provided.  Once your account is set up, you will receive an email from LiveRamp asking you to follow a link for creating a Password. After establishing your Password, you will be able to sign into LiveRamp with your email address and new password.

You can download and review the LiveRamp addendum here: LiveRamp Addendum

Process Overview

We recommend clients allow for at least a two-week lead time when working with LiveRamp.

  • 1-2 days to upload the files:
    • Once you upload the file there will be a delay in this file showing up in the Audience folder, it may take up to 48 hours to appear.
  • 5-8 days for the files to be mapped:
    • This is a manual process, so this stage can take some time. Typically, this takes 5-8 days for the first file in an Audience, but it is usually quicker for subsequent files.
  • 1-2 days for distribution to Xandr:
    • Once mapping is completed you will get a notification email to distribute the audience. Select the file(s) that you wish to send to Xandr. After you have selected your desired files, select ‘Add to Distribution’ at the bottom of the page and notify your Account Manager. It will take 1-2 days for the segment to appear in Xandr.
  • 1-2 days for the file to be onboarded, matched & fully populated in Pontiac:
    • Once the segment appears in Xandr, your Account Manager will onboard the audience to Pontiac. While the audience will be available to associate to a Line, it may still be in the matching stage and could take an additional 1-2 days to fully populate in Xandr/Pontiac.

LiveRamp File Format

Files uploaded to LiveRamp must be 500MB or smaller and a CSV, TSV or TXT with no spaces in the File Name. There are 3 types of PII that can be uploaded:

  1. Emails
  2. Phone numbers
  3. Name and Postal address

You can include one, two, or all three of these. But if you want to use Name and Postal address you must include all of the columns listed under ‘Name and postal address’ below (full name and full address).
Use the following column headers to identify the type of PII in your file:
Name and postal address:

  • FIRSTNAME
  • LASTNAME
  • ADDRESS1
  • ADDRESS2 (optional)
  • CITY
  • STATE
  • ZIP
  • ZIP4 (optional)

Plaintext email address:

  • EMAIL1
  • EMAIL2
  • EMAIL3

MD5 hashed email address:

  • MD5EMAIL1
  • MD5EMAIL2
  • MD5EMAIL3

SHA-1 hashed email address:

  • SHA1EMAIL1
  • SHA1EMAIL2
  • SHA1EMAIL3

SHA-256 hashed email address:

  • SHA256EMAIL1
  • SHA256EMAIL2
  • SHA256EMAIL3

Plaintext phone number:

  • PHONE1
  • PHONE2
  • PHONE3

SHA-1 hashed phone number:

  • SHA1PHONE1
  • SHA1PHONE2
  • SHA1PHONE3

Customer ID (used to de-duplicate rows):

  • CCID

See a sample 100 rows of fake data here: Sample File

Uploading Files to LiveRamp

(1-2 Days)

  1. Once you have signed into your account, you should be brought to this page:
  1. You are now ready to upload data files into the audience your AM created for you. From the Homepage (which you can access by clicking on the triangle symbol next to ‘Connect’ in the upper-left corner, pictured above), select ‘Upload a File’ and follow the prompt.
  2. Within the File Upload page, select the name of your audience from the drop-down ‘Upload to an Audience’ menu. Your first Audience folder will be created for you when the account is created. Each file uploaded to an Audience must contain the same data columns, as this is mapped for matching with the first file. If you need to upload files with different columns, your Account Manager can create additional Audience folders for you.
  1. Once you have selected the audience, a box will appear prompting you to either drag in or select the appropriate file. You should proceed to upload the desired csv, tsv, or txt.
  2. Once you select your file, click ‘Upload File’ in the ‘Upload Status’ window to begin processing.
  3. Once ‘Upload Status’ says the file upload is complete, you will have the option to select a button that says, ‘Go to Audience’. If you click this immediately after uploading, another tab will open in your window to bring you to the ‘Manage’ page for that audience. You will likely not see any segments listed within the audience as can take 24-48 hours for the newly uploaded segment to appear.

Mapping Process

(5-8 Days)

The first file uploaded to each audience is mapped to determine which data points are in each column of the document so that the PII can be properly ingested. This is a manual process completed by LiveRamp and it can take up to 5-8 days.

LiveRamp will send you an email when your file has been mapped and is ready for distribution. If you see delays in this process that exceed 8 days, let your Account Manager know and they will contact LiveRamp support to try to expedite this process.


Distributing Files to Xandr

 (1-2 Days)

  1. In order to publish your segment(s), you must configure Xandr as a destination. This only needs to happen once.  From the menu, select ‘Data Out  – ‘Active Destinations’ ‘New Destination Account’.
  2. You will be brought to a page listing many possible destinations. Use the search bar to look up ‘Xandr Invest’.
  1. When you hover over the icon, you will be prompted to ‘Activate’ the destination.
  1. You will be brought to a page titled ‘Configure Properties’. In the ‘Destination Specific Settings’, enter the client ID ‘3344’.
  2. After you have set up Xandr as a destination, you will be able to push your audience segment to distribution. Select ‘Active Destinations’ from ‘Data Out’ in the sidebar.
  1. Select ‘Manage’ from within the Xandr box
  2. Select the file(s) that you wish to send to Xandr. After you have selected your desired files, select ‘Add to Distribution’ at the bottom of the page. From distribution, it will take 1-2 days for the segment to appear in Xandr.


Audience Onboarding & Matching

 (1-2 Days)

  1. Once you have added a segment to distribution for Xandr, reach out to the Pontiac Team through the Help Center to say that you have pushed a segment. Please provide the segment name.
  2. The Pontiac Team will inform you when the file has been onboarded to your Pontiac seat.
  3. You will now have access to your audience Segment within the Pontiac console. Your audience will be located within the Audiences tab under ‘On Boarded.’

Note, while the segment may be available in Pontiac rather quickly, the file may still be in the matching process and the segment may take 1-2 days to fully populate in Xandr/Pontiac.

Removing Segments that are no longer in use

Any segments that are no longer being used in the Pontiac console or in LiveRamp should be removed from distribution. Your Account Manager will send a friendly reminder at the end of each month, reminding you to remove the segments that are no longer being used. The maximum number of records allowed per seat at any given time is 300,000.

To remove the segments from distribution, click on the out section in LiveRamp, and then click the ‘Manage’ button in Xandr Invest. There you will see all your segments that have been uploaded. Click the box next to the segment that you wish to remove from distribution. At the bottom, there will be a green button that states, remove from distribution. Once you click ‘remove,’ the process will be complete.

Pixel Creation & Implementation


Segment Pixels (Remarketing)

A segment pixel is an HTML code placed on the Advertiser’s website to collect the User ID of the individuals that visit the page where they are placed. These User IDs are collected in an audience in the platform that you can then target in remarketing campaigns. 

To create a segment pixel, open the Advertiser and click ‘New Segment’ on the right-hand side of the ‘Audiences’ dropdown. Give the segment a name and set the ‘Days to live’ as the number of days that you would like users to remain in this segment. If a user is not seen again in this time frame, they will be removed from the segment after the selected number of days. Per IAB, the maximum time the user can remain in the segment is 90 days. Click save and wait a few minutes for the pixel to generate. Your pixel will appear in your list of audiences under the Advertiser and when you click the name of the pixel you will see the following window:

Copy the ‘Pixel URL JS’ or ‘Pixel URL Img’ and place it on your website. It can be placed anywhere, but we recommend placing it in the header. For maximum Audience size, it is recommended to place the pixel to fire on all pages.

Once the pixel is placed it will start to register loads for the visitors to the page where it is placed. Keep in mind that your Remarketing Audience size will be determined by the number of users that visited the page AFTER the pixel is placed. As a rule of thumb we recommend a 1-2 week lead time between placing the pixel and launching a Remarketing campaign, but the ideal lead time to achieve the desired scale will vary depending on site traffic and campaign budget.

To reference the current Audience Size for a Remarketing Segment, metrics are visible in the Advertiser for pixel loads. For more information on the metrics displayed for Remarketing Pixels see here: Audience Metrics.

To target this Audience, associate it to a Line Item under ‘Audiences’. See steps on associating an Audience here: Associate Audience to a Line Item

Standard Conversion Pixels

Conversion pixels are codes that when fired, allow for the tracking of an event on your webpage. The standard conversion pixels utilize cookies to attribute a user that has seen an ad from your campaign and subsequently completed the desired action. These are placed on pages where Pontiac will ultimately try to drive users. Usually this is a purchase ‘Thank you’ page, and this pixel will fire whenever a user completes a transaction. These can be used to track micro conversions on your site as well, such as newsletter signups, meeting requests and more. 
To create a conversion pixel, open the Advertiser and click ‘New Conversion Pixel’ on the right-hand side of the ‘Conversion Pixels’ dropdown. Give the pixel a name and fill in the following required fields:

Trigger Type:
  • Click: This pixel will only fire when a user clicks the ad and immediately completes a conversion.
  • View:  This pixel will only fire when a user views an ad and completes a conversion. View will also count for users that click, do not immediately convert, but return to the domain and convert at a later time.
  • Hybrid: This pixel will fire on both click AND view. Reporting can be broken out to examine click vs view.
Post View Expiration Days:

The number of days between a user being served the ad and then completing a conversion for a transaction to be counted as a valid post-view conversion attributable to the Pontiac ad. This is the ‘attribution window’ for post-view conversions.

Post Click Expiration Days:

The number of days between a user clicking on an ad and the user completing a conversion for the transaction to be counted as a valid post-click conversion attributable to the Pontiac ad. This is the ‘attribution window’ for post-click conversions.

Minimum Minutes Per Conversion:

Minimum duration of time during which a user can complete a conversion before registering another conversion.
Wait a few minutes for the pixel to generate. Your pixel will appear in the Advertiser menu, under the conversion pixel dropdown, and when you click the name of the pixel you will see the following window:

Copy the ‘Pixel URL Img’ or ‘Pixel URL JS’ and place it on your website on the page that the user will see after completing a conversion. For more information on the metrics displayed for Conversion pixels, see here: Conversion Pixel Metrics. 

Query String Macros

Once the conversion pixel generates you will have the option to add in query string macros. Click on the name of the pixel and check the boxes next to ‘Order id’ and ‘Value’. This will add the macros into the pixel which can then be copied and placed on the landing page after a conversion. Speak with your web developer to swap in the values that you would like to pass in. For example, ${ORDER_ID} must be replaced by the actual order ID and ${REVENUE} must be switched out for the actual value of the conversion when firing this pixel.

  • Order_ID: Allows the platform to track the exact order ID number of a transaction generated from a Pontiac ad.
  • Value: Allows the platform to track the exact value of a transaction generated from a Pontiac ad.

IP Conversion Pixels

With the IP based pixel, a client can place this on their website and attribute online actions (browsing a page, loading the shopping cart, purchases) to CTV or Streaming Audio campaigns run through the Pontiac platform. Typically, pixels are based on third party cookies which work on browsers, and these do not allow for attribution for CTV and Streaming Audio campaigns. Pontiac IP Conversion Pixels are a proprietary and privacy safe attribution solution for CTV & Streaming Audio that utilizes the user’s IP Address to track website traffic and online purchases driven by your campaigns.

To create an IP Conversion Pixel, enter the Pontiac platform and create or open an Advertiser. Once inside the Advertiser, click the ‘New Pixel’ button and enter a name for the IP Conversion Pixel. Wait for 30-60 seconds for the pixel to generate, then click back on the name of the pixel to view the code. Place this pixel on your website, then associate it to the Line Item where you wish to track conversions.

If you wish to track an action such as a purchase, this pixel should be placed on the page the user will see once the transaction is completed, ie. the ‘Thank you’ page. If you want to register any website visit as a conversion (ie. a user that sees your CTV ad, then goes to your homepage), you can place the pixel in the header to fire on all pages, or one specific page you wish to measure.

Note that you are able to share the IP Conversion Pixel with the RTB/CTV Platform, create an origin audience, and create a CTV audience by selecting the boxes. You can also track Order ID, Order Amount, Client IP, Consumer ID, and Track chrome conversions (only available for campaigns running in the CTV platform) using this pixel by selecting the boxes for these values once the pixel has generated. This will add the parameters and placeholders for the values to the pixel. Work with your web developer to dynamically replace these placeholders with the intended values. These values can then be pulled in Custom Reporting to gather additional insight about conversions driven by your campaigns & optimize towards ROAS.

IP conversion pixels have a standard lookback of 30 days in the metrics under the Advertiser. This means that the user must complete the desired action within 30 days of seeing the ad for it to count as a conversion. If you would like to pull reporting with a custom lookback window, this can be done in Custom Reporting using the IP Conversion Custom Report. You can select from ‘5’, ‘7’, ’15’ or ’30’ day as the lookback.

IP based conversion reporting will not appear in the ‘Conversions’ or ‘CPA’ metrics on the Line Item, they will be reported separately as ‘IP Conversions’. For metrics in the Advertiser and Campaign screens, a conversion will be attributed to each Line Item that contributed to the action. For example, if a user sees an ad from 2 lines under a campaign and then completes one purchase, this will be counted as a conversion attributed to both Line Items, appearing as 2 conversions on the Campaign when aggregated.

If you would like to see unique conversions under an advertiser or campaign, you can run a custom ‘IP Conversion Rate’ report without selecting the ‘Line ID’ dimension. These are uniques on the selected date/s. For uniques across a campaign flight, run an ‘IP Path to Conversion Report’ and de-duplicate the hashed IP address across all dates.

For more information on the metrics available for the IP Conversion Pixel, see here: IP Conversion Pixel Metrics

Third-Party Pixels (Trackers)

Third-Party pixels, or ‘trackers’ allow the attachment of trackers to your ads from external providers allowing you to call external servers at the time that the ad is rendered on a page. This allows Advertisers to collect data and real time stats about the ad being served.
For Video Creatives, only the Image URL format can be used and these are added directly in the Creative Upload process.

For other Creative types follow these steps to add the Tracker:

  1. To use a pixel from an external provider, enter the Advertiser menu by clicking on the name of the Advertiser that this pixel will help track, and select ‘New Third Party Pixel’. 
  2. Select the code type of the pixel. 
  3. Enter the pixel code into the content box and save it. 
  4. These pixels MUST then be associated to each Creative that you wish to track.  While uploading or editing a specific Creative, you will notice a tab for ‘Third-Party Pixels’ or ‘Trackers’. Select the third-party pixel that you desire to attach to the Creative and save the Creative.
Pixel Formats:
  • Raw-js
  • URL-html
  • URL-js
  • URL-image
Formats supported by Creative Type:
  • Video & Audio: Image URL
  • Native: Image URL, JavaScript URL
  • Banner: Image URL, HTML URL. JavaScript URL, Raw JavaScript
Invalid Javascript Error:

If you are entering a Third-Party pixel in raw-js and receive the error ‘Valid JavaScript code required’, we recommend using this tool to validate the JavaScript in the tag: Online Javascript Validator – BeautifyTools.com

Post-Back Pixels

Otherwise known as ‘server-side’ pixels, post-back pixels are used for tracking mobile app installs. You will need to work with a third-party mobile attribution partner such as HasOffers, AD-X (Criteo), Appsflyer, Flurry, Singular, TapStream, Kochava, etc. Post-back conversion attribution pixels allow attribution servers to callback to the Pontiac conversion pixel and attribute mobile app installs that stem from Pontiac campaigns. 

Note post-backing can only be done with hosted creatives on the platform and not for third-party tags, as the ${SSP_DATA} macro needs to be populated by the creative’s ad server.

  1. Create an Advertiser in Pontiac, then create a Standard Conversion Pixel.
    (Appsflyer specific note: You will need to make sure that the Conversion Pixel Name in Pontiac is the same as the SDK event name in Appsflyer. Otherwise, the conversion will not be passed to Pontiac.)
  2. Once you create the conversion pixel, provide the pixel ID to the Third-Party Vendor, this is the number string following ‘id=’ in the pixel code.
    For example: <img src=https://secure.adnxs.com/px?id=1234567&t=2 width=”1″ height=”1″ />, the ID would be 1234567
  3. If the Third-Party Vendor prompts you to select an origin platform for the pixel, select ‘Appnexus’ or ‘Xandr’.
  4. The server-side pixel (post-back URL) is below, replace the ‘XXXXXXX’ with the Pixel ID from part 2. The [SSPDATA] will also need to be replaced with your third-party vendor’s click id macro.
    http://sspx-router.adnxs.net/sspx?id=XXXXXXX&sspdata=[SSPDATA]
    If your vendor requests just the endpoint, enter the following: http://sspx-router.adnxs.net/sspx and you will need to provide the parameter &sspdata, this will need to be populated by their click ID macro.
  5. The Third Party Vendor should provide you with a URL template that they will use to track conversions. You may want to add additional macros to the URL if you wish to collect additional data, all Pontiac macros can be found here: Creative Macros
    The URL you get from the Third-Party Vendor must use the macro ${SSP_DATA} as the click ID. This click ID will be used in the “post-back” call the vendor makes to report a successful app install. If this macro is not included in the URL, Pontiac will not be able to record the conversion.
    For example:
    http://wetrackinstalls.com/serve?action=click&publisher_id=[publisher_id]&site_id=[site_id]&offer_id=[offer_id] &odin=${DEVICE_ODIN}&open_udid=${DEVICE_OPENUDID}&ios_ifa=${DEVICE_APPLE_IDA}&ref_id=${SSP_DATA}
  6. Set the landing page of the creative (the click URL) to the URL provided by the Third Party Vendor.
  7. Add the Pontiac conversion pixel to your Line Item to attribute conversions from this campaign.

Pixel Placement

Pixel Placement Overview

The type of pixel (URL JS or URL Img) indicates on which webpage each pixel should be placed. There are a variety of scenarios which determine whether one uses the HTML or the URL.

  1. Advertiser has a relationship with an ad server which has placed ‘Floodlight’ tags on the pages. In this option, the trafficker should follow the instructions provided by the ad server to ‘piggyback’ or add the Pixel URL to the appropriate floodlight.
  2. When interacting with the HTML on the website, the pixel should be placed directly in the source code in the header or the body. This is a screen shot of the HTML code after the pixel has been added:


The pixel should be placed on the pages of your website according to the campaign goal and the event or user group that you are trying to track.

  1. General Remarketing – the segment pixel should be placed to fire on all pages to reach users that land on any page.
  2. Remarketing to Converted Users – the segment pixel should only be placed on the page the user lands on AFTER a conversion event took place, for example a ‘Thank You’ page.
  3. Remarketing to users that viewed a specific product or page – the segment pixel should only be placed on the specific page you want to track.
  4. Conversion Tracking – the standard conversion pixel or IP conversion pixel should be placed on the page the user lands on AFTER a conversion event took place, for example a ‘Thank You’ page.
  5. Creating an Audience for ART insights – the IP conversion pixel should be placed according to the insights you would like to pull. If you would like an insight report about ALL users that land on your website, the pixel should be placed on all pages. If you would like an insight report about only converted users or only users that visited a specific page, place the pixel to only fire on the page those users will land on.

If you have any questions regarding specific pixel placement, reach out through the Help Center.

Placing Pixels with Google Tag Manager

Once you have created a pixel in Pontiac:

  1. Log in to your Google Tag Manager account.
  2. Select your website’s container and click Add a new tag.
  3. Click Custom HTML Tag and enter a name for your tag.
  4. Go to Events Manager and select Add Event.
  5. Select Install code manually.
  6. Copy the pixel from Pontiac. (we recommend using URL img version of the pixel)
  7. Return to Google Tag Manager and paste the code in the HTML container.
  8. Click the Advanced Settings dropdown and select Once per page under Tag firing options.
  9. For Remarketing pixels under ‘Fire On’, select ‘All Pages’. For Conversion pixels under ‘Fire On’, select the landing page a user will be brought to AFTER converting.
  10. Click Create Tag.

Placing Pixels with Shopify

If you use Shopify for e-commerce transactions, the Pontiac conversion pixel can be placed on the Shopify order status page to track conversions and attribute them to your Pontiac campaigns. Review this Shopify Guide Add Conversion Tracking to your Order Status Page and follow the steps to place the pixel. To track order ID and order revenue from these transactions add in query string macros to the Pontiac pixel before it is placed. See more here: Query String Macros

Reporting


Reporting Time Zone - UTC

All Pontiac metrics and reports are displayed in Coordinated Universal Time (UTC). Ads are served to users based on the time zone of their location and then reported in UTC. The User Time Offset can be pulled in log level reports to determine the time that the ad was served in the user’s time zone. To change your reporting time zone, go to the ‘Admin’ tab and select the ‘Seat Settings’ button. Under the ‘Preferences’ section select the desired time zone from the dropdown list. This will change the time zone for reporting and metrics in your seat, however it will not change the time zone for billing. Funds will be deducted from your seat balance in according to spend in UTC for the DSP platform and according to spend in EST for the DOOH platform.

Reporting Lag

Most metrics displayed in the Pontiac platform are updated hourly with a 3 hour delay. The only metrics available in Real Time can be seen by clicking into a Line Item, below the Line Item Flight Metrics. Here you will see a Real Time breakdown of impressions served in 15 minute increments, allowing you to verify that your Line is serving.  If you require additional Real Time metrics, you can request these from your Account Manager.

Quick Metrics

Advertiser Level Metrics


Under the ‘Advertiser’ tab you will see a list of all of the ‘Active’ Advertisers in your seat with their associated quick metrics. To see ‘Inactive’ Advertisers filter status to ‘All’ or ‘Inactive’. These metrics are updated hourly with a 3 hour delay, except for the IP Convs which are updated once a day for the previous day.

Choose your ‘Reporting Interval’ and evaluate the following metrics at a glance:

  • Lines: The number of lines under this Advertiser.
  • Imps: Impressions served during the selected Reporting Interval.
  • Total Spend: Dollar amount this Advertiser has spent across all Lines during the selected Reporting Interval.
  • Clicks: Number of clicks across all Lines during the selected Reporting Interval.
  • Convs: Number of conversions (total of both post-view and post-click) across all Lines during the selected Reporting Interval.
  • IP Convs: Number of conversions registered by the IP Conversion Pixel across all Lines during the selected Reporting Interval. IP Conversion data is not available for the ‘Today’ interval. This metric is updated once a day for the previous day.

Line Item Level Metrics

In the ‘Advertiser’ tab each Advertiser can be expanded by clicking the arrow on the far left next to the green or red box. This will display all of the Line Items under the Advertiser and their associated quick metrics. These metrics are updated hourly with a 3 hour delay, except for the IP Convs which are updated once a day for the previous day.

Choose your ‘Reporting Interval’ and evaluate the following metrics at a glance:

  • Budget Type: Either impressions or spend.
  • Daily Budget: This will display either the dollar amount or the number of impressions that the Line will attempt to spend each day.
  • Total Budget: This will display either the dollar amount or the number of impressions that the Line will attempt to spend in the lifetime of the campaign.
  • Start Date
  • End Date
  • Splits: The number of optimizations that has been made to the Line Item.
  • Imps: Impressions served during the selected Reporting Interval.
  • Total Spend: Dollar amount this Line has spent during the selected Reporting Interval.
  • Clicks: Number of clicks this Line has received during the selected Reporting Interval.
  • Convs: Number of conversions (total of both post-view and post-click) this Line has received during the selected Reporting Interval. These are registered using the standard Conversion Pixel.
  • CPM: Cost per 1,000 ads.
  • CTR: Click through rate, this is the number of clicks divided by number of impressions during the selected Reporting Interval.
  • CPC: Cost per click, this is the total spend divided by the number of clicks during the selected Reporting Interval.
  • CPA: Cost per acquisition, this is the total spend divided by the number of conversions during the selected Reporting Interval.
  • IP Convs: Number of IP conversions this Line has received during the selected Reporting Interval. These are registered using the IP Conversion Pixel. This metric is not available for the ‘Today’ time interval. IP Convs are updated once a day for the previous day.

Optimization Breakdowns

The platform outlines all optimizations made, including all of the details that the AI more heavily targets or stops targeting, the dates that each change is made, and the amount of your Line’s budget that is reallocated toward the change. Users can see exactly when optimizations were made, including budget reallocation and details about the exchanges, locations, sellers, and placements that the sub-line exclusively targets or block lists. Through this, we guarantee full transparency in addition to quality. These metrics are updated hourly with a 3 hour delay.
Under the ‘Advertiser’ tab each Line Item can be expanded to display the optimization breakdown by clicking the arrow on the far left next to the green or red box. 

Choose your ‘Reporting Interval’ and evaluate the following metrics for each optimization:

  • Opt Base: This is the starting point for the campaign.
  • % Budget: For each optimization made to the campaign a % of the budget will be shown that is allocated to this change.
  • N_N_N_N:
    • N1 is Geo: Specific region this campaign targets (State/Province)
    • N2 is Domain: URL Domain. The domain(s) that the specific optimization is targeting
    • N3 is Exchange: Which exchanges this optimization is looking to buy through
    • N4 is Placement: The placement ID of where the campaign will serve on the specific domain

Creative Metrics

By clicking on the name and opening the specific page for an Advertiser or Line Item you can see quick metrics for each Creative. Creatives with a red box are inactive and Creatives with a green check-mark are active. By evaluating metrics at the Creative level, you can make decisions and optimize your campaign to serve the Creatives with the best performance. For example, if one Creative accounts for 70% of impressions, but only 10% of clicks, overall campaign performance may improve if you remove this Creative. These metrics are useful for A/B testing of different Creatives and provide valuable insight into the effectiveness of a Creative. These metrics are updated hourly with a 3 hour delay.

Choose your ‘Reporting Interval’ and evaluate the following metrics at a glance:

  • Audit Status: The audit status of each Creative will be displayed with a symbol. Hovering over this symbol will display a text box with additional details as to the status of this Creative, a yellow triangle for ‘audit pending’, a green check box for ‘passed audit’, a green triangle for ‘marked as sensitive’ and a red box for ‘rejected’. For more info on the audit process see here: Creative Audit.
  • Total Imps: The impressions this Creative has served during the selected Reporting Interval.
  • Total Spend: The dollar amount spent to serve this Creative during the selected Reporting Interval.
  • Total Clicks: The number of clicks this Creative has received during the selected Reporting Interval.
  • Total PcConvs: The number of post-click conversions this Creative has driven during the selected Reporting Interval.
  • Total PvConvs: The number of post-click conversions this Creative has driven during the selected Reporting Interval.
  • CTR: Click through rate, this is the number of clicks this Creative received divided by number of impressions this Creative has served during the selected Reporting Interval.

Standard Conversion Pixel Metrics

By opening the specific page for an Advertiser or Line Item you can see quick metrics for your Conversion pixels. These metrics are updated hourly with a 3 hour delay.

Choose your ‘Reporting Interval’ and evaluate the following metrics at a glance:

  • Trigger Type: Depending on how the pixel was configured this will display whether this pixel is triggered by a view, a click or a hybrid of both.
  • Total Loads: The number of times the pixel has been triggered in the selected Reporting Interval, this includes conversions that were not driven by Pontiac.
  • Total Convs: The number of conversions registered as a result of a Pontiac Ad in the selected Reporting Interval.
  • Total PcConvs: The number of post-click conversions registered as a result of a Pontiac ad in the selected Reporting Interval.
  • Total PvConvs: The number of post-view conversions registered as a result of a Pontiac ad in the selected Reporting Interval.

IP Conversion Pixel Metrics

At the Advertiser level, IP Conversion metrics will include conversions from ALL Line Items under this Advertiser, even if the pixel was not associated to the Line. If the pixel is associated to a Line Item, you can see metrics for that Line Item by opening the Line. Detailed reporting can be pulled in the Reporting tab under Custom Reports.

IP conversion pixels have a standard lookback of 30 days in the metrics under the Advertiser. This means that the user must complete the desired action within 30 days of seeing the ad for it to count as a conversion. If you would like to pull reporting with a custom lookback window, this can be done in Custom Reporting using the IP Conversion Custom Report. You can select from ‘5’, ‘7’, ’15’ or ’30’ day as the lookback.

Choose your ‘Reporting Interval’ and evaluate the following metrics at a glance:

  • Attributed Impressions: The number of impressions served by Pontiac campaigns to users that then converted.
  • Total Convs: The number of conversions, or unique actions that were driven by this campaign. A conversion event will be defined according to the pixel placement. For example, if the pixel is placed on all web pages, a conversion event would equal a page visit. If the pixel is placed on the ‘Thank you’ page after a purchase, then a conversion event would equal a purchase.
  • Total Loads: Total Loads will indicate the number of times the pixel has fired on the page, this is the number of users (not only those driven by Pontiac) that have visited the page in the selected time interval. If the pixel is showing 0 loads, this may indicate the pixel is not properly placed or firing correctly.
  • Uniques: The total number of unique visitors to the web page where the pixel is placed in the reporting interval selected.

To pull additional metrics or information from your IP Conversion Pixel, see here: IP Conversion Pixel Report

Audience Metrics

By clicking on the name and opening the specific page for an Advertiser you can see quick metrics for your First-Party Audience segments. These metrics are updated hourly with a 3 hour delay.

Choose your ‘Reporting Interval’ and evaluate the following metrics at a glance:

  • Type: ‘First Party’ indicates an Audience housed in the Pontiac platform, ‘Third-Party’ and ‘Onboarded’ indicate data from an external provider.
  • Total Loads:  This is the number of times the Remarketing pixel has been triggered during the selected Reporting Interval. This indicates the number of times the page where the pixel is placed has been loaded/viewed.
  • Avg. Daily Uniques: This will display the average number of daily unique visitors to the page where the pixel is placed within the selected Reporting Interval.
  • Avg. New Users: This is the average number of visitors per day that were new visitors to the site in the last 30 days.

Line Item Flight Metrics


Upon clicking on and opening a Line Item you will see a section called ‘Flight Metrics’ above the configuration menu. This section will display metrics for the line from start date to ‘yesterday’, changing the Reporting Interval will not change these metrics. These metrics are updated hourly with a 3 hour delay.

Choose your ‘Reporting Interval’ and evaluate the following metrics at a glance:

  • Clicks: The number of clicks in the lifetime of the Line.
  • Budget Type: Either imp or spend depending on how the Line was configured.
  • Daily Budget: This will display either the dollar amount or the number of impressions that the Line will attempt to spend each day. This daily budget will incorporate your budget multiplier to estimate daily budget.
  • Split Count: The number of optimizations that have been made to the Line.
  • Pacing: This is the % of the Line’s budget that has been spent compared to the ideal pacing based on the set budget and flight dates. Ideally a Line should pace between 90-110%. For tips to improve pacing see here: Improving Pacing.
  • Total Imps Served: The total number of impressions that the Line has served to date.
  • Spend: Total dollar amount the Line has spent to date.
  • Measured Imps: Number of impressions that are measured for viewability by the publisher from start date to ‘yesterday’.
  • Viewable Imps: Number of impressions that were registered as viewable from start date to ‘yesterday’. This means that 50% of the Creative was viewable for at least 1 second. Edit the Line Targeting parameters to include a viewability threshold to improve viewability.
  • Post Click Convs: The total number of post-click conversions driven by this Line from start date to ‘yesterday’.
  • Post View Convs: The total number of post-view conversions driven by this Line from start date to ‘yesterday’.
  • Last Opt Date: This is the date of the most recent optimization made to the Line Item.
  • Performance: This will display the performance of the Line Item in relation to the selected KPI. If you are optimizing to CTR, performance will display the lifetime CTR for the Line. If you are optimizing to CPA, performance will display the lifetime CPA in dollars.

Real Time Delivery


The Real Time Delivery chart below the Line Item Flight Metrics displays impressions for the Line Item in Real Time. This chart breaks down delivery into 15 minute increments, allowing you monitor pacing throughout the day. (NOTE: This will only be available for Creatives uploaded AFTER Jan 25, 2021)

Line Item Performance Metrics

Inside a Line Item, under the ‘Performance’ dropdown, you can see detailed metrics for the Line Item broken out by date. The metrics for the current date will be updated on a 3-hour delay, except for ‘IP Conversions’ and ‘Foot Traffic Attributed Visitors’. IP Conversions are updated each day for the previous day. Foot Traffic metrics are on a 3-5 day delay.

Choose your ‘Reporting Interval’ and evaluate the following metrics at a glance:

  • Imps: Impressions served on this date.
  • Clicks: The number of clicks that occurred on the impressions served this date.
  • PcConv: The number of post-click conversions that occurred on this date. A post-click conversion indicates a user that clicked on an ad served through Pontiac and then completed a transaction within the ‘post-click’ expiration window as defined during the configuration of the conversion pixel.
  • PvConvs: The number of post-view conversions that occurred on this date. A Post-View Conversion is generated by a user that viewed an ad served through Pontiac, and later completed a transaction within the ‘post-view’ expiration window as defined during the configuration of the conversion pixel.
  • Total Spend: Total dollar amount spent on this date.
  • CPA: The ‘cost-per-acquisition’ for this date. This metric is calculated by dividing the total spend by the total number of conversions (both post-view and post-click) and indicates the cost per conversion.
  • CPC: The ‘cost-per-click’ for this date. This metric is calculated by dividing the total spend by the total number of clicks on that date.
  • CTR: ‘Click through rate’, this is the number of clicks divided by number of impressions on this date.
  • VCTR: ‘viewable click through rate’, This is calculated by dividing the number of clicks by the total number of VIEWABLE impressions for this date.
  • View Measured Imps: Number of impressions that are measured for viewability by the publisher on this date.
  • Viewed Imps: Number of impressions that were registered as viewable. This means that 50% of the Creative was viewable for at least 1 second. Edit the Line Targeting parameters to include a viewability threshold to improve viewability.
  • IP Conversions: IP Conversions registered on this date. IP Conversions will not appear for the current date. These numbers are updated once a day for the previous day’s metrics. Read more about IP Conversions here: IP Conversion Pixel
  • Foot Traffic “Attributed Vistors”: Foot Traffic visitors registered on this date at one of the Foot Traffic addresses or geo-frames entered. Foot Traffic visits will be reported in UTC, regardless of the timezone for the account. Foot Traffic metrics are on a 3-5 day delay. In this field a ‘—’ will indicate that the data has not yet been processed, while a ‘0’ will indicate that the data has been processed, but there were no visitors for that day. Read more about Foot Traffic Reporting here: Foot Traffic Attribution

Audio/Video Metrics

In the Line Item screen under the standard ‘Performance’ chart and metrics, there will be an additional section for Audio and Video Line Items with completion quartile metrics. These metrics are on a 3 hour delay.

Choose your ‘Reporting Interval’ and evaluate the following metrics at a glance:

  • Spend per Complete: Total Spend divided by the number of 100% video or audio completions. This is the cost for each completion on this date.
  • 25% Complete: The number of users that viewed or listened to at least 25% of the ad on this date.
  • 50% Complete: The number of users that viewed or listened to at least 50% of the ad on this date.
  • 75% Complete: The number of users that viewed or listened to at least 70% of the ad on this date.
  • 100% Complete: The number of users that viewed or listened to 100% of the ad, these are video or audio completions on this date.
  • Completion Rate: The percentage of viewers or listeners who watched or listened to the entire video or audio clip. Calculation: (Number of viewers or listeners who completed the video or audio clip / Total number of viewers or listeners who started the video or audio clip ) * 100
  • Skips: The number of users that skipped the ad on this date.
  • Starts: The number of users that started viewing or listening to the ad on this date.

Pacing Report

The Pacing tab in the platform is a comprehensive report designed to facilitate the management of many campaigns at once, making any potential issues easily identifiable at a glance. From pacing to performance, the Pacing report summarizes all key metrics for each Line Item in your seat. Check for a pulse on all your active campaigns, identify associated pixels that are not properly firing, and assess pacing issues for all your Advertisers in one consolidated report. This report is updated each day at 6 am EST.

Check the ‘In Range’ box and ‘Update’ to filter the Lines in the report to those with current dates.

  • In Range: Check this box and update the report to filter to show only the Line items with current dates.
  • Line Item Status: The status of the Line Item, red indicates inactive and green indicates active. A yellow triangle indicates an issue with the Line, hover over the symbol to read the warning message and address the issue. Potential issues may include:
    • Expired Audience Segments on the Line
    • Expired Deals on the Line
    • No Creative associated
  • Advertiser Status: The status of the Advertiser that the Line is under, red indicates inactive and green indicates active. An active Line under an inactive Advertiser will not be eligible to serve.
  • Daily Budget: The Daily Budget for the Line. If the Line is budgeted by impressions, this metric will display the daily budget in impressions. If the Line is budgeted by spend, this metric will display the daily budget in dollars with a $ sign. Note, this may change from day to day according to dynamic budget features employed and Line pacing.
  • Yesterday Spend: The total dollar amount spent the previous day.
  • Yesterday Imps: The total number of impressions served the previous day.
  • Daily Pacing: ((Total budget – less delivered to date)/# days remaining) / yesterday’s delivery.
    • This metric is intended to indicate whether the campaign is pacing to spend out the remaining budget if it continues with spend as seen the previous day.
  • Lifetime Pacing: Total spend to date/((Total budget/ lifetime flight days) x # active days to date)
    • This metric is intended to compare the current pacing of the Line to perfect pacing over the lifetime of the campaign.
  • Flight Dates: This will show the start date and end date for the Line Item.
  • CPM: This is the lifetime CPM (cost per 1,000 impressions) in dollars for the Line from start date to ‘yesterday’.
  • CTR: This is the lifetime click through rate for the Line from start date to ‘yesterday’.
  • Conversions: This is the lifetime number of conversions driven by the Line from start date to ‘yesterday’.
  • Viewability: The overall % viewability for the Line, calculated as view confirmed impressions divided by impressions delivered. This is for the lifetime of the Line from start date to ‘yesterday’.
  • Pulse Today: This will flag a green check mark if the line was actively delivering impressions in the 24 hours prior to the report being updated. A yellow caution symbol will appear if the Line has not delivered any impressions in the 24 hours prior to the report being updated.
  • Remarketing Loads: If there is remarketing pixel associated to the Line as an Audience, this will flag a green check mark if the pixel has loads. A yellow caution symbol will appear if the pixel does not have loads. This is to indicate whether there may be issues with the pixel, if it does not have loads it may be incorrectly placed on the Advertiser’s website. The Line cannot serve to a Remarketing Audience with 0 loads.
  • Conversion Loads: If there is a standard conversion pixel associated to the Line, this will flag a green check mark if the pixel has loads. A yellow caution symbol will appear if the pixel does not have loads. This is to indicate whether there may be issues with the pixel, if it does not have loads it may be incorrectly placed on the Advertiser’s website. Note: this does not apply to IP Conversion pixels.

Standard Reporting Dashboard

Reporting Dashboard Summary

The Pontiac Intelligence Reporting Dashboard allows you to evaluate a single Line Item, or all of the Line Items under an Advertiser across all important metrics for a Reporting Interval of ‘today’, ‘yesterday’, ‘7 days’ or ‘30 days’ or ‘month to date’. In the ‘Reporting’ tab select the Advertiser, Line Item and Reporting Interval, then select ‘Update Reporting’. These metrics are updated hourly with a 3 hour delay.

The reporting tile at the top shows the report data, impressions, clicks, spend, conversions, and CPM for the chosen reporting interval. The first graph in the summary allows you to select 2 metrics and view a breakdown for each day in the lifetime of a campaign or Advertiser. You can also filter to show only days with data or choose to show all days.

The ‘Volume By Hour’ bar displays impressions on a scale from low volume in blue to high volume in red, displaying how impression volume and spend vary throughout the day. This information displays in Coordinated Universal Time (UTC).

Below the volume by hour chart you can see top apps, top sites and top exchanges by volume of impressions.

This summary also includes metrics for the top Creatives in your campaign for a quick comparison of impressions, clicks and spend.

The last section of the summary is an interactive map shaded by volume of impressions. Hover over a spot on the map to see metrics for a state or country.

Creatives Reporting

This section displays a chart that visualizes the total number of impressions for each Creative, along with a second metric of your choice (Total Clicks, Total Pc Conversions, Total Pv Conversions or Total Spend). You can view metrics for each Creative by name or group them by size to easily compare performance across all of your Creatives. Below the chart, a detailed data table provides all relevant Creative metrics, which can be downloaded as a CSV file by clicking the black down arrow next to the search bar.

Site Domain Reporting

This section displays a chart that visualizes the total number of impressions for each site domain, along with a second metric of your choice (Total Clicks, Total Pc Conversions, Total Pv Conversions or Total Spend). Domain reporting can be used to determine high performing sites to create a new site list or to identify and then anti-target inventory with low performance. Below the chart, all of the data is available in a table that can be downloaded as a CSV file by clicking the black down arrow next to the search bar.

Exchange Reporting

This section will display a chart with the number of impressions bought through each Exchange, along with a second metric of your choice (Total Clicks, Total Pc Conversions, Total Pv Conversions or Total Spend). This section is valuable for making manual optimizations to your campaigns by evaluating the performance across each Exchange and removing the Exchanges with poor performance. Below the chart, all of the data is available in a table that can be downloaded as a CSV file by clicking the black down arrow next to the search bar.

Device Type Reporting

This section will display a chart with the number of impressions by Device Type, along with a second metric of your choice (Total Clicks, Total Pc Conversions, Total Pv Conversions or Total Spend). Below the chart, all of the data is available in a table that can be downloaded as a CSV file by clicking the black down arrow next to the search bar.

Segment Performance

This section will display a chart with the number of impressions by Audience segment, along with a second metric of your choice (Total Clicks, Total Pc Conversions, Total Pv Conversions or Total Spend). Below the chart, all of the data is available in a table that can be downloaded as a CSV file by clicking the black down arrow next to the search bar. This provides insight into who your campaign is serving impressions to and which segments are converting.

Geo Region Reporting

Geo Region Map

Geo Region Graph

This section can be shown as a Map or as a Graph. The map is only available for campaigns served in the United States and the Region will be by state. Metrics for regions in other countries will be shown in the table below the map. The graph will compare impressions by region along with a second metric of your choice (Total Clicks, Total Pc Conversions, Total Pv Conversions or Total Spend). Below the graph, all of the data is available in a table that can be downloaded as a CSV file by clicking the black down arrow next to the search bar.

Geo Country Reporting

Geo Country Map

Geo Country Graph

This section can be shown as a map or as a graph and will break-out impressions by Country along with a second metric of your choice (Total Clicks, Total Pc Conversions, Total Pv Conversions or Total Spend). Below the graph, all of the data is available in a table that can be downloaded as a CSV file by clicking the black down arrow next to the search bar.

Latitude/Longitude Reporting

This section will pin the exact location of each impression on a map. Click on the pin to see the exact latitude and longitude where the impression was served.

Custom Reporting

Custom Reporting Overview

Custom reports can be scheduled for automatic delivery at daily, weekly, or monthly intervals, to either by Email, FTP or S3. Choose between a basic custom report, a conversion report, video & audio events report, lifetime/billing report, age and gender report, reach and frequency report or an IP conversion pixel report. Once you have selected the desired dimensions and metrics, click save and allow the platform a few minutes to generate the report. This report will appear under the Custom Reporting dropdown for download, or for automated reports, will be sent to your email, FTP, or S3 bucket. The Lifetime/Billing report will match the metrics in the platform for spend and is the basis for billing. Daily spend in this report will match the amount charged to the account each day. All other custom reports are compiled using incremental data and may show slight variances in total spend.

These reports allow you to customize all the dimensions and metrics you wish to evaluate, but are limited to 500,000 rows for the downloadable excel file. Automated custom reports delivered via email, FTP, S3 or Google Cloud storage are limited to 10,000,000 rows. If your report exceeds the maximum number of returnable records, there will be a yellow caution symbol next to the name of the report with an error stating that the data is incomplete. The report will still run and will return the first 500,000 rows, but the data will not be complete for the selected dates & parameters. If you need to receive additional data, you can reach out through the Help Center, separate the report into multiple reports, or limit the dimensions selected to decrease the number of rows.

Custom Reports will remain downloadable in the platform for 30 days. Expired reports must be ‘Rerun’ at a later date, however and it is possible that certain data points will no longer be available. 

Custom Report Delivery by S3

Setting up Pontiac Scheduled reports delivery in AWS S3 requires:

  1. Creating a bucket in AWS S3
  2. Setting up the report in Pontiac

These are the steps to create a sample report:

Creating a bucket in AWS S3 to receive Pontiac scheduled reports:

    1. In AWS S3 click Create Bucket
    1. Chose a bucket name that is available and the desired AWS Region.
    2. Change Object Ownership to ACLs enabled.
    3. Uncheck Block all public access field and check “I acknowledge that the current settings might result in this bucket and the objects within becoming public”.
    4. Click Create bucket.
    5. Navigate to the newly created bucket and click Create folder with the output path that we chose in Pontiac (“output-path”). Confirm to create the folder.

    Setting up the report in Pontiac

    1. Go to Reporting tab and then click New Custom Report.
    2. Check the box for Schedule Automated Report and fill out the desired details in the Custom Report tab like Advertiser ID, start and end date and select the desired metrics and dimensions.
    3. Go to Scheduled Reports tab and check Deliver by S3 box.
    4. In the expandable section fill out the Bucket field with the AWS S3 Bucket name. Example: S3-test-bucket.
    5. Fill out the Path field with a desired output path location and file name (To include the date macro use dateInt (YYYYMMDD) like xxx/filename-%dateInt% otherwise your file will be overwritten each day). Example: output-path/Pontiac-reports.csv or output-path/Pontiac-reports-%dateInt%.csv
    6. Click View security policy and copy the full text area.
    7. Go to Amazon AWS S3 and modify permissions for the bucket we chose earlier. In the Permissions tab click Edit and paste the policy text from earlier and Save.
    8. Back in Pontiac reports screen click Verify and wait for a successful confirmation message.

    Basic Custom Reports

    The Basic Custom Report allows you to choose from any of the following Dimensions and Metrics to create a detailed customized report that meets your needs.
    Dimensions:

    • Date
    • Advertiser
    • Line
    • Creative ID
    • Creative Size
    • Region/Date
    • DMA
    • Zip Code
    • Exchange
    • Browser
    • Operating System
    • Site Domain
    • App
    • Device Type 
    • Device MAke
    • Device Model 
    • Carrier
    • Deal ID
    • App ID
    • App Name

    Metrics:

    • Impressions 
    • Clicks
    • Post-Click Conversions
    • Post-View Conversions
    • Spend
    • View Measured Impressions
    • View Confirmed Impressions

    If Region/State is selected for countries outside of the United States, the report will return a numerical code that corresponds to the Region/State. Use this Region Mapping doc to map the numerical code to the Region/State where the impression was served: Region Mapping

    Conversions Report

    A conversion report is great for Advertisers looking to track conversions and attributed revenue. If the query string macros for ‘Order Id’ and ‘Revenue’ were added at the time the conversion pixel was generated, this report can be used to view this information.
    Dimensions:

    • Date
    • Pixel
    • Order Id (client populated)
    • Line

    Metrics:

    • Post-Click Revenue
    • Post-View Revenue
    • Post-Click Conversions
    • Post-View Conversions

    Video & Audio Events Report

    For campaigns running video ads, the video events report provides detailed metrics for percent completion. Choose from the Dimensions and Metrics listed below to customize your report.

    Dimensions:

    • Date
    • Line Item ID
    • Creative ID
    • Player Size
    • Advertiser
    • Exchange
    • Site Domain
    • App
    • Timestamp
    • Deal ID
    • Video Context
    • Supply Type

    Metrics:

    • Video Started
    • Had Error
    • Hit 25 Percent
    • Hit 50 Percent
    • Hit 75 Percent
    • Completed 
    • Spend

    Lifetime/Billing Report

    The lifetime report will display the dimensions and metrics of your choosing for the lifetime of an Advertiser and Line Item. This report is the basis for Pontiac Billing and will match the amount charged to the account each day as ‘daily spend’. 
    Dimensions:

    • Date
    • Advertiser
    • Advertiser Name
    • Line
    • Line Name
    • Creative Id (Creative reporting is only available going back to 12/11/2019)
    • Creative Name (Creative reporting is only available going back to 12/11/2019)
    • Hour of day (Hourly reporting is only available going back to 6/18/2020)

    Metrics:

    • Impressions 
    • Clicks
    • Post-Click Conversions
    • Post-View Conversions
    • Spend
    • View Measured Impressions
    • View Confirmed Impressions

    Age & Gender Report

    The Age and Gender Custom Report will provide a demographic breakdown across age and gender as a percentage of impressions served.
    Dimensions:

    • Age
    • Gender

    Metrics:

    • Percentage

    IP Conversion Pixel Reports

    This report can be used to pull detailed metrics from the IP Conversion Pixel, including the dates when the conversions took place and the dates when the impressions were served to those users. There are three types of reports that can be pulled from IP Conversion Pixel data, the ‘Path to Conversion’ report, the ‘Conversion Only’ report and the ‘Conversion Rate’ report.

    Path to Conversion Report

    The ‘Path to Conversion’ report provides data on the IP conversions registered as well as on the impressions served through Pontiac campaigns to those users that converted. This report can be utilized to see the entire pathway to conversion from each impression the user viewed to the action they completed on your website.

    The column ‘imp_time’ will indicate when the impression was served through Pontiac to a user that visited or converted on the site where the pixel is placed. The total number of ‘imp_times’ indicates the number of impressions that were served to users that then converted, this will correspond to the ‘Attributed Imps’ field in the IP Conversion Pixel metrics under the Advertiser.

    The ‘conv_time’ column will indicate the time the action or conversion took place on the site. The total number of unique ‘conv_times’ is the total number of unique conversions or visits that were driven by your campaign. This will correspond to the ‘Total Convs’ field in the IP Conversion Pixel metrics under the Advertiser.

    IP conversion pixels have a standard lookback of 30 days in the metrics that are displayed under the Advertiser. This means that the user must complete the desired action within 30 days of seeing the ad for it to count as a conversion. If you would like to pull reporting with a custom lookback window, this can be done in this report. Select from ‘5’, ‘7’, ’15’ or ’30’ from the ‘Lookback window’ dropdown .

    Report Dimensions:

    • Pontiac pixel Id
    • Conversion time
    • Imp Time
    • IP Address
    • Zip Code
    • Site Domain
    • Exchange
    • Region/State
    • Auction id
    • User id
    • Advertiser
    • Line
    • Device Type
    • Date
    • Creative Id
    • Order ID*
    • Order Value*

    *(work with your web developer to dynamically pass these values on IP pixel)

    Page Visits Report

    The ‘Page visits’ report will only provide data on ALL page visits or loads for this pixel. ‘Visit Time’ indicates the time of the page visit. This is not a Conversion event attributed to your campaign, it is total page visits independent of media served.

    Report Dimensions:

    • Pontiac pixel Id
    • Page visit – A page visit registered by the IP pixel. This is independent of media served and is not attributed to Pontiac campaigns.
    • IP Address
    • Zip Code
    • Region/State
    • Advertiser
    • Date (yyyyMMdd)
    • Date (M/d/yyyy)

    Conversion Rate Report

    Analyze conversion rate day over day to track the effectiveness of your ads with the ‘Conversion Rate Report’. To calculate conversion rate for each day, divide ‘Conversions’ by ‘Imps’.

    Report Dimensions:

    • Date
    • Imps
    • Unique site visitors
    • Conversions
    • Pixel Id
    • Line Id

    Reach/Frequency Report

    The Reach/Frequency report is designed to provide data on the number of unique users that were reached by a campaign. Select the Advertiser, Line Item/s, and date range, then run the report to view the following metrics:

    • Unique User IDs
    • Unique Device IDs
    • Unique IP Addresses
    • Impressions served

    Full Domain Report

    For Web campaigns running Banner, Ad server tag banner or HTML5 creatives, the full domain custom report can be used for insight into the full URL pathway where ads were served. This report provides full transparency on the exact article of your ad placements including the following metrics & dimensions:

    Dimensions:

    • Date
    • Timestamp
    • Site Domain
    • Full Domain
    • Line
    • Region/State
    • Country
    • DMA
    • Zip Code

    Metrics:

    • Impressions
    • Clicks
    • Conversions
    • Post-Click Conversions
    • Post-View Conversions (View-Thru)
    • Spend

    Note: full URL may not be reported for all impressions

    Third Party Discrepancies

    Ad Server & Tracker (3p Pixel) Discrepancies

    It is very common to see discrepancies in reporting between Pontiac and a Third-Party Provider, whether it be through Creative Tags or Third-Party Pixels (trackers). The following steps to investigate and troubleshoot a discrepancy:

    1. Double-check that the time timezone in the Pontiac report matches the timezone in the third-party report. The Pontiac default timezone is UTC, but you can verify the timezone for your seat in the ‘Admin’ tab under ‘Seat Settings’.
    2. Verify that the reports you’re comparing contain data from the same date range.
    3. Make sure you know how each ad server counts the activity you’re comparing (impressions or clicks). Pontiac counts an impression when the creative is rendered. For video ads, an impression takes place when the first frame of the video is loaded. If the third-party counts their impressions differently (for example, when a third-party imp tracker loads on the page) the numbers are not directly comparable.
    4. Verify that the objects for which you’re pulling data (for example a Line Item, Creative, or Advertiser) are specified and match in both reports.
    5. Apply different reporting dimensions to see if you can isolate the discrepancy to a specific object such as a creative, exchange, or domain.
      • If you are able to isolate the discrepancy to a Creative, there may be an issue in the Creative implementation. Verify with your ad server the Macro placement and the proper implementation of the tag/tracker.
      • If you are able to isolate the discrepancy to an exchange or domain, it would be recommended to either remove the exchange or block the domain if possible.
    6. Calculate the discrepancy percentage using the formula (1 – (Pontiac Report/3rd Party Report)) x 100. If the discrepancy is less than 10% (15% for mobile), it’s considered expected variation.

    Google Analytics Discrepancies

    It is common to see discrepancies when comparing Pontiac metrics to Google Analytics. This could occur for any of the following reasons:

    Impression, Click & Conversion Discrepancies:

    • Post View Activity: Google Analytics does not report any POST VIEW activity. Everything in Google Analytics is click based traffic. 
    • UTC: All Pontiac metrics are displayed in UTC. If you do not pull reporting from third-party sources in UTC, the metrics will differ. 

    Pixel Load Discrepancies:

    • Firefox and Safari: pixels no longer work (they disallowed third-party pixels).  
    • Bounce Rate: pixels take a second to load and will not fire for people who bounce. The higher the bounce rate the bigger the discrepancy will be. To fix this, place the pixel in the header and use the secure.adnxs.com domain

    Improving Bounce Rate
    These are the recommended steps to decrease bounce rate and improve the quality of traffic: 

    1. Focus on Desktop traffic. Mobile In-App and Mobile Web tend to have higher bounce rates.
    2. Try targeting only the Google AdExchange.
    3. Add creative macros to your UTM source to run a report in Google Analytics and determine which sources of inventory have had the highest bounce rate. This will help to determine which exchanges are providing highest quality inventory, and which are contributing most to the bounce rate.
      First, add this to your URL: UTM_Medium=${SELLER_MEMBER_ID}The Click URL should look like: http://www.clientwebsite.com/UTM_Source=Pontiac&UTM_Medium=${SELLER_MEMBER_ID} Then you can run a report by Medium in Google Analytics to view bounce rate by Exchange, and remove the exchanges that are contributing most to the bounce rate. You will also need to use the mapping provided in Pontiac to know which SELLER_MEMBER_ID correlates with the Pontiac Exchange ID. See the Seller Id Mapping here: Pontiac_Seller_ID_Mapping
      For additional information on UTM Code implementation see here: UTM Code Implementation

    New Campaign Not Delivering

    If you have set a Line Item live, but it has not delivered any impressions, review the following recommendations to troubleshoot.

    1. If you have just set the campaign live, remember that there is a 3-hour delay in the Pontiac platform for most metrics.
      If you have just launched the campaign and need to know if it has begun serving, you can open the Line Item to see Real Time Delivery below the Line Item Flight Metrics. This is the only Real Time information about your campaign. See more information on Real Time Delivery here: Real Time Delivery. For more information on the reporting delay see here: Reporting Lag.
    2. Is your account disabled for low funding?
      If you see a yellow triangle next to the ‘Amin’ tab, your account may be low on funds. Open the ‘Admin’ tab and check your current balance. The platform pauses the campaigns on the account and restricts access to certain features until either a budget is added that is more than the daily spend or the daily spend is lowered so it is less than the budget in your account. To reactivate your account, either increase your budget or adjust the Lines to spend less.
    3. Are the active boxes checked for both the Advertiser and the Line Item?
      If you do not see the Advertiser that you are looking for, try toggling the ‘Active’ dropdown to display Advertisers that are inactive. If the Advertiser appears when you switch to view ‘Inactive’ click on the Advertiser’s name and open the Advertiser menu. Select ‘Edit’, check the ‘Active’ box and ‘Save’. In the ‘Advertiser’ tab next to the name of the specific Advertiser you should see a green box with a check mark, this indicates that the Advertiser is active. If you see a red box, the Advertiser is ‘inactive’.
      Then check the Line Item, where you should see a green check box next to the ID number for the Line to indicate that the Line Item is ‘active’. If you see a red box, the Line Item is ‘Inactive’. Click on the Line Item’s name to open the Line Item menu and select ‘Edit’. Check the ‘Active’ box then select ‘Submit Changes’.
    4. Are the Line Item Flight Dates set correctly?
      In the Advertiser tab, expand the Advertiser by clicking the arrow at the left most part of the screen, allowing you to view the Line Items under the Advertiser. You will see a ‘Start Date’ and ‘End Date’ for the campaign. Verify that these dates correspond with the dates in which the campaign should be running. If these dates are incorrect or you would like to extend the end date, click the name of the Line Item to open the Line Item Settings. Select the ‘Edit’ button and change the start date or end date by clicking the calendar icon and then selecting the desired date. If the start date has already passed, you will not be able to change it. However, you can de-activate the Line Item until the date that you would like the Line to begin serving again.
    5. Have the associated Creatives passed the Creative Audit?
      Select the Advertiser or Line Item to open the associated menu and expand the ‘Creatives’ section. Next to the name and ID of each Creative you will see two symbols. The left-most symbol indicates the ‘active’ or ‘inactive’ status of the Creative. If this symbol is a red box, under the Advertiser menu, click on the Creative name to open the window to edit the Creative. Check the ‘Active’ box and ‘Save’. The second symbol under ‘Audit Status’, will display the results of the Creative Audit process. This process takes up to 24 hours, so if you have just uploaded your Creatives you will see a yellow triangle indicating ‘audit pending’. The Line will not be able to serve until at least one of the associated Creatives is approved. Upon approval the symbol will change to a green check box. If the Creative is marked as sensitive you will see a green triangle and rejected Creatives will have a red box. For more information on the Creative Audit process see here: Creative Audit.
    6. If the Creative Type is ‘Banner’ are you using common banner sizes?
      Using multiple Creative sizes on a Line Item can increase access to inventory. We recommend using several of the most common banner sizes for the inventory type. You can find a list of the most common sizes in our Banner specs here: Banner Specs
    7. Do all Audience segments associated have loads in them?
      If you are targeting a Remarketing Audience or Third-Party Audience segments, it is important to ensure that this Audience has active users. If there are no active users, the campaign cannot serve. To check the loads for a Remarketing segment open the Advertiser menu and expand the Audience section to view the Audience metrics. You should see ‘Total Loads’, ‘Avg Daily Uniques’, and ‘Avg Monthly Uniques’. If your Remarketing segment is showing 0 ‘Loads’, there may be an issue with the pixel placement. Reach out through the Help Center to check your pixel placement.
      If these are Third-Party segments, they will not show loads in the platform. Reach out through the Help Center to check the metrics for these Audiences. If the Audience does not contain an adequate number of users or the segment is expired, the Pontiac Team can help recommend similar Audiences with a larger user pool.
    8. If you are targeting multiple Audiences, does the Boolean Logic make sense?
      If you are using several Audience segments, open the Line Item menu and look at the green box/boxes that contain the Audiences you are targeting. If there is an ‘And’ between the segments or groups of segments, this is restricting delivery to ONLY serve to individuals who belong to ALL of these segments or groups of segments. You can edit the logic by editing the Line and selecting ‘Associate Segments’. This will open the Audiences window where you can modify targeting to ‘Any’ or ‘All’ between segment groups. For more information see here: Boolean Logic.
    9. Are the geo restrictions too tight or conflicting?
      First, ensure that none of your geo parameters are conflicting, for example, if the Country you selected is ‘Mexico’, but the Lat Long Audience that you are targeting contains coordinates in the United States. If any of your geo parameters are conflicting your campaign cannot serve. If the geographic area that you are targeting is too small, delivery of your campaign could also be restricted. If you are using zip codes, try using the ‘Expand Zip Targets’ feature. By adding additional zip codes within a tight radius you may achieve better scale and still stay in the target area. In the Targeting menu, open the zip code tab. Enter a radius in meters and select ‘Get Zips’. This will find zip codes within this radius from the center point of the zip code/s entered. A window will open showing you the list of zip codes found within this radius. Select ‘Add Zips’ to add the new zip codes to the targeting on the Line Item. If you are using a Lat Long Audience try expanding the Radius from 150m to 2251m. This should expand the potential Audience size and increase delivery.
    10. Are the bids set too low?
      Higher bids will help win more impressions and will also improve the quality of the inventory. If you are utilizing targeting tools this will decrease your potential audience size. If you are targeting an Onboarded Audience or a Third-Party Audience with an additional cost, we recommend that you add the associated price of the most expensive segment to your base and max bids to ensure that you can win impressions. The closing CPM will include the cost of the Audience data, so if your base bid is $2.43 and you’re targeting an Audience with a cost of $2.00, you would really be bidding $0.43 for the media. See our general bid recommendations here: Bid Recommendations.
    11. If you are using a site list or app list, are there accessible ad slots available?
      It is possible that the sites or apps that you are targeting do not have ads on them, have limited traffic, the ad slots are not available through the open exchange or the available ad sizes differ from the sizes you are using. As a general rule of thumb you can enter the site domain into your browser followed by ‘/ads.txt’  to see a page detailing sellers through which ads on this domain can be purchased. For example, www.yahoo.com/ads.txt. If you see ‘appnexus.com’ followed by RESELLER, on this list, then the site may be accessible through Pontiac. This does not guarantee that you will be able to serve on this site, that the ad sizes you are trying to use match the available slots on the site, nor that you will win the auctions for this site. The only way to know for sure if you can access these sites or apps is by testing it. You can try incremental increases in the bids to see at what CPM these sites might clear or expanding your site list with similar sites.  If you are not achieving the desired scale, but would like to target contextually a custom contextual segment could be a good alternative. Read more on this option here: Custom Contextual Targeting
    12. It is important to strike a balance between targeting and scale. If you are utilizing multiple targeting parameters on the same Line (Geo targets, Audience data, Site/App lists etc.) you may be ‘over-targeting’ and restricting the Line from serving. Try removing or expanding one or more of the targeting parameters to see if the Line begins to serve.

    Improving Campaign Performance

    As a rule of thumb, a campaign needs to run between 2-8 weeks to be running at optimal performance and become a positive investment. Algorithms learn over time to only serve ads to users likely to convert. While this may be frustrating, it is true for all DSP’s. Essentially the algorithms need to “learn” the way to find good users to serve ads to. They learn from “events” such as clicks or purchases. 
    While the Pontiac algorithm will optimize many variables automatically, there are several manual optimizations that you can also try to improve campaign performance.

    1. Check Viewability
      If you are seeing impressions, but your CTR is unsatisfactory it could be because you are serving impressions with low viewability. If the ads are not visible, it is highly unlikely that users will interact with them. In the flight metrics of a Line item you can quickly compare the total impressions served to the number of viewable impressions. To see more about Line Item Flight Metrics see here: Line Item Flight Metrics. If a high percentage of impressions are not viewable this will impact CTR. In the targeting menu of the Line item, you can add a viewability threshold to restrict the algorithm from bidding on impressions that are unlikely to be viewable. This may restrict delivery, affecting the pacing of your campaign, but it should improve performance. Smaller Banner sizes and Native Ads also tend to have higher viewability.
    2. Increase Bids
      Higher bids help to win higher quality inventory, resulting in improved performance. If you are targeting an Onboarded Audience or a Third-Party Audience with an additional cost, we recommend that you add the associated price of the most expensive segment to your base and max bids to ensure that you can win impressions. The closing CPM will include the cost of the Audience data, so if your base bid is $2.43 and you’re targeting an Audience with a cost of $2.00, you would really be bidding $0.43 for the media. See our general bid recommendations here: Bid Recommendations.
    3. Evaluate Exchange Performance
      Enter into the Reporting tab and select the Advertiser and Line you wish to evaluate and update the report. Scroll down to the ‘Exchanges’ section. In this section you can evaluate each Publisher through which your ad has been served and the corresponding CTR. Campaign performance can be increased by removing Exchanges with low performance. To remove an exchange open the Line Item Targeting settings and in the ‘Exchanges’ tab select the red ‘minus’ sign next to the Exchange name. The Exchange should move from the right side of the window to the left and appear with a green plus sign next to the name. This indicates that you are no longer buying through this exchange. For information on Pontiac Exchange reporting see here: Exchange Reporting. 
    4. Evaluate Site Domain Performance
      Enter into the Reporting tab and select the Advertiser and Line you wish to evaluate and update the report. Scroll down to the ‘Site Domain’ section. In this section you can evaluate each Site that the ad has been published on and the corresponding CTR. Performance could be increased by creating a site list with the high performing sites, or by creating a ‘block list’ of sites with poor performance that you wish to avoid. By visiting the sites in the list, you can further evaluate the quality of a site and determine whether to block list this domain. For more information on Site Domain Reporting and creating custom Site lists see the following pages: Site Domain Reporting, Site List Targeting.
    5. Evaluate Audience Segment Performance
      Enter into the Reporting tab and select the Advertiser and Line you wish to evaluate and update the report. Scroll down to the ‘Segment Performance’ section. In this section you can evaluate performance by each Audience segment being targeted. If you are targeting several Third-Party Audiences, it is important to evaluate the performance by each segment. This will allow you to remove any segments that are not performing and to direct more of the budget towards high performing audiences. For more information on Segment Performance Reporting see the following page: Segment Performance
    6. Evaluate Creative Performance/ Update Creative Assets
      If the Exchanges and Site Domains where your ads are being placed appear to be high quality, but your ad is still not receiving the desired amount of user interaction, it could be the appearance or wording of the Creative that is limiting performance. We recommend running A/B tests with different Creatives to test performance as well as trying a variety of different Creative sizes. In the Reporting tab, metrics are readily available by Creative. This information can be used for manual optimization, to remove low performing Creatives and to direct more of the budget towards high performing ones. For example, if a Creative has received 70% of the budget, but only 5% of the clicks, this Creative should be removed from the campaign. See more information about Pontiac Creative reporting here: Creatives Reporting.
      If you would like additional help with your Creatives, Pontiac Intelligence offers Creative services for an additional fee. If you are interested in having your ads created by the Pontiac team, reach out through the Help Center.
    7. Evaluate and Update your Landing Page
      The landing page is an important aspect of driving Conversions. If your ads are performing well on CTR, but aren’t generating Conversions, this could indicate a landing page issue. Traffic is being driven to your site, but once on the page they are not converting. For E-commerce we recommend displaying a specific product in the ad and driving users directly to the page for this specific product.
    8. Test New Targeting Strategies
      If you have manually optimized your campaign and still do not feel as though you are getting the desired results, it may be time to try a new targeting or placement strategy. You can read about all products and targeting strategies available through the Pontiac platform here: Product Offerings & Targeting Strategies. Reach out through the Help Center for recommendations based on the Advertiser brand, target audience, and specific KPI goals.

    Improving Pacing

    If you are unsatisfied with the scale of your campaign or your Line Items are pacing below 80%, we recommend evaluating the following potential issues or obstacles to delivery and making changes to your campaign accordingly. 

    1. Dynamic Budget Multiplier
      Applying the Dynamic Budget Multiplier to your Line will allow the Pontiac Platform to adjust daily budgets to catch up the pacing. To turn on the Dynamic Budget Multiplier, open the Line item, select ‘Edit’, check the ‘Allow Dynamic Budget Multiplier’ box and submit changes.
    2. Dynamic Frequency
      Applying Dynamic Frequency to your Line will allow the Pontiac Platform to increase or decrease the daily and lifetime frequency caps based on pacing. If your Line is pacing behind, this feature will increase the frequency that each user can see your ad allowing the Line to increase delivery. To turn on Dynamic Frequency, open the Line item, select ‘Edit’, check the ‘Allow Dynamic Frequency’ box and submit changes.
    3. Increase Bids
      Higher bids will help win more impressions and will also improve the quality of the inventory. If you are targeting an Onboarded Audience or a Third-Party Audience with an additional cost, we recommend that you add the associated price of the most expensive segment to your base and max bids to ensure that you can win impressions. The closing CPM will include the cost of the Audience data, so if your base bid is $2.43 and you’re targeting an Audience with a cost of $2.00, you would really be bidding $0.43 for the media. See our general bid recommendations here: Bid Recommendations.
    4. Remarketing Audience size
      If this is a remarketing campaign, the size of the audience may be restricting delivery. It takes some time after the pixel is placed on the website to build a substantial remarketing Audience. If the remarketing pixel was recently placed, it is normal for delivery to be limited and additional changes do not need to be made at this time. To check the loads for a Remarketing segment open the Advertiser menu and expand the Audience section to view the Audience metrics. You should see ‘Total Loads’, ‘Avg Daily Uniques’, and ‘Avg Monthly Uniques’. If your Remarketing segment is showing 0 ‘Loads’ after it has been placed for several days, there may be an issue with the pixel placement. Reach out through the Help Center for assistance in checking pixel placement.
      You can increase your remarketing segment size by launching a simultaneous prospecting campaign, driving new users to your website who will then be added to this Audience. Additionally, you can add the segment pixel into the Creatives of your prospecting campaign to further increase your audience size by also adding users into the pool who see your ads, but don’t click on them or land on your website.
    5. Third-Party Audience Loads
      If you are using Third-Party Audiences reach out through the Help Center to check the metrics for these Audiences. If the Audience does not contain an adequate number of users, your Account Manager can recommend similar Audiences with more users that should improve delivery.
    6. Custom or On Boarded Audience Size
      Appropriate targeting will help make your campaign stronger. However, keep in mind, if the targeted pool is too small, the scale of your campaign will be limited. It is important to strike a balance between targeting and Audience size.
    7. Multiple Audience Segments
      If you are using several audience segments, open the Line Item menu and look at the green box/boxes that contain the Audiences you are targeting. If there is an ‘And’ between the segments or groups of segments, this is restricting delivery to ONLY serve to individuals who belong to ALL of these segments or groups of segments. Layering several Audiences in this manner could severely restrict the size of your potential Audience and will limit impressions served. You can edit the logic by editing the Line and selecting ‘Associate Segments’. This will open the Audiences window where you can modify targeting to ‘Any’ or ‘All’ between segment groups. For more information see here: Boolean Logic.
    8. Geo Targeting
      Geo-targeting is a valuable strategy to reach your desired Audience, however, if the geographic area that you are targeting is too small, delivery of your campaign could be restricted. If you are using zip codes, try using the ‘Expand Zip Targets’ feature. By adding additional zip codes within a tight radius you may achieve better scale and still stay in the target area. In the Targeting menu, open the zip code tab. Enter a radius in meters and select ‘Get Zips’. This will find zip codes within this radius from the center point of the zip code/s entered. A window will open showing you the list of zip codes found within this radius. Select ‘Add Zips’ to add the new zip codes to the targeting on the Line Item. If you are using a Lat Long Audience try expanding the Radius from 150m to 2251m. This should expand the potential Audience size and increase delivery.
    9. Site lists/App lists
      It is possible that the sites or apps that you are targeting do not have ads on them, have limited traffic, the ad slots are not available through the open exchange or the available ad sizes differ from the sizes you are using. As a general rule of thumb you can enter the site domain into your browser followed by ‘/ads.txt’  to see a page detailing sellers through which ads on this domain can be purchased. For example, www.yahoo.com/ads.txt. If you see ‘appnexus.com’ followed by RESELLER, on this list, then the site may be accessible through Pontiac. This does not guarantee that you will be able to serve on this site, that the ad sizes you are trying to use match the available slots on the site, nor that you will win the auctions for this site. The only way to know for sure if you can access these sites or apps is by testing it. You can try incremental increases in the bids to see at what CPM these sites might clear or expanding your site list with similar sites.  If you are not achieving the desired scale, but would like to target contextually a custom contextual segment could be a good alternative. Read more on this option here: Custom Contextual Targeting
    10. Sensitive Creatives
      If one of your Creatives is flagged as ‘Sensitive’, this content is allowed on the platform, but the Line Item will be restricted to the sensitive publishers that allow this type of content. Any exchanges that you selected to target will be ‘grayed’ out and only the exchanges allowing sensitive content will be targeted. This may restrict both delivery and performance of your campaign as these exchanges typically contain lower quality inventory and can also include fraud. Audit results can only be changed by resolving the issue that caused the Creative to be flagged as sensitive. If you think your Creative was flagged incorrectly, reach out through the Help Center. 
    11. It is important to strike a balance between targeting and scale. If you are utilizing multiple targeting parameters on the same Line (Geo targets, Audience data, Site/App lists etc) you may be ‘over-targeting’ and restricting the Line from serving. Try removing or expanding one or more of the targeting parameters to see if the Line begins to serve.

    Uneven Delivery

    The Pontiac system is designed to push scale and will try to win all available impressions within the targeting parameters on the Line Item to try to hit the daily and lifetime budgets.  The system is not designed to limit impressions by hour or spread them out evenly throughout the day, but to win impressions as they are seen to ensure that the desired scale can be reached. With very open, or ‘un-targeted’ campaigns, this means that the system may encounter all necessary impressions to meet the Line’s daily budget within a short window in the morning. There are a few changes that can be made to the Line Item set-up to move towards a more even distribution of delivery throughout the day:

    1. Tight Frequency Caps: Remove the ‘Dynamic Frequency’ control if it has been applied and decrease the ‘Daily Frequency Cap’ and ‘Lifetime Frequency Cap’.
    2. Apply 2 min frequency:  Check the box ‘Enable 2 min freq’. This will control for multiple ads being shown to the same user either on the same page or within a 2-minute timeframe. Reducing the frequency to the same users will help to spread out the impressions over time.
    3. Tighten exchange lists: If the Line is serving through all exchanges, you can tighten the targeting by removing any poor performing exchanges.
    4. Tighten or add site/app list: If the Line is open with no inventory targeting, you can tighten the targeting by adding either a site/app list or a block list. Review the sites and apps where the Line is serving and block poor performing inventory, or set-up a targeting list to only serve on the top performers.
    5. Tighten the geo: If you are targeting at the Country or State level, try to home in on DMAs or Zip Codes that are performing well to tighten the geo targeting.
    6. Decrease bids: Your Line may be winning out the impressions very quickly because you are over-bidding for the media type or targeting parameters selected. Review our bid guidance here: Bid Recommendations

    Keep in mind that all the above suggestions are intended to slow down the delivery or the campaign to spread out impressions more evenly throughout the day. We recommend testing these changes one at a time and evaluating the affects that they have on delivery and scale. Implementing these changes may limit the achievable scale for the Line and prevent the Line from hitting it’s daily or lifetime budget. As you make changes, continue to monitor reporting and delivery to adjust Line parameters as needed.  

    Sudden Decrease or Stop in Delivery

    There are several reasons that a Line Item could see a sudden decrease or stop in delivery. While there may not always be a straightforward explanation, below are the main reasons this may happen as well as some suggestions to troubleshoot. If you take these steps to troubleshoot and the Line Item is still not delivering after 24 hours of making all changes, reach out through the Help Center for additional assistance.  
    Reasons this may happen: 

    1. Platform optimizations restrict the inventory being targeted
      The Pontiac algorithm will make changes to your campaign to improve performance on the selected KPI on the days selected in the ‘Optimization Schedule’. These changes can include a block list of domains and exchanges that are not performing well. Each optimization creates campaign splits with certain percentages of the daily budget. Sometimes these optimizations take a large percentage of the budget and block certain sites or exchanges that have had lower performance. It is possible that these optimizations can hurt scale if a large percentage of the impressions being won were on these sites or through these exchanges.
    2. Increased competition for the targeted inventory
      While the line was previously winning inventory with the set bids and targeting, this is not a guarantee that it will continue winning with this set-up. On the open exchange and in real-time bidding situations, closing CPMs can be unpredictable and can fluctuate greatly depending on the level of competition and the size of the players involved. If other campaigns are launched or increase their bids, especially against the same audiences, deals, or inventory lists, it is possible that increased competition could cause a Line Item to stop winning.  
    3. Changes on the publisher side 
      Pontiac connects Advertisers with publisher inventory being monetized through SSPs. Publishers use a variety of strategies to monetize available inventory and any change in Pontiac’s position in the waterfall could affect current Line Items and the inventory available. Changes to a publisher’s monetization strategy, such as monetizing more inventory through direct deals or increasing their price floor can lead to a decrease in delivery for Pontiac campaigns. Note, the Pontiac team has no visibility into any changes that could be occurring on the Publisher side. 
    4. Unexplained anomalies 
      The Pontiac team is committed to taking all necessary steps to uncover and resolve any issues with active campaigns as quickly as possible. However, as with most technology, there is always a possibility that there could be unexplained anomalies that cause a Line Item to stop delivering. While some cases may be unexplainable, our team will continue to investigate these issues and work with you to troubleshoot.  

    Steps to Troubleshoot: 

    1. Increase the max bid
      There are several potential scenarios that would lead to the inventory clearing at a higher CPM including, but not limited to, increased competition or an increased price floor on the publisher end. As visibility into these issues is limited, we always recommend increasing the max bid as one of the first steps in troubleshooting limited delivery.
    2. Set ‘KPI’ to ‘Reach’
      A breakdown of these optimizations can be seen at the bottom of the Line Item page, including the date the optimization was made, the percentage of the budget and the change made. Look for optimizations with dates that correlate to the date the Line Item delivery dropped off. If these optimizations took a very large percentage of the budget and block listed sites or exchange, it is possible that this optimization is hurting delivery as the campaign may have been delivering a large percentage of impressions to this inventory. The optimizations can be removed by changing the campaign ‘KPI’ to ‘Reach. This will remove all optimizations from the Line and the Line will no longer make optimizations going forward. The Line Item will instead focus on reaching the desired scale either in impressions or budget. As optimizations are removed suddenly from the Line Item, there may be a slight decrease in performance as the Line ramps to scale, but you can also make manual optimizations to improve performance going forward. For more information on making manual optimizations see here: Improving Campaign Performance
    3. Clone the Line Item
      In the case of an anomaly with the platform technology, the issue may be with the actual object of the Line Item and not the Line Item configuration. In this case cloning the Line and saving it as a completely new Line may resolve the issue. To do this use the ‘Clone’ button, update the Line Item name, flight dates and Lifetime Budget or Impressions to be the remaining budget for the Line Item, then submit. Turn the previous Line Item to inactive to avoid overspend.  
    4. Expand Line Item Targeting
      There are several ways that you can try to open the targeting on the Line Item. This could be adding additional sites or apps to your inventory targeting lists, including additional deals, adding additional Third-Party audiences, or expanding the geo. Removing certain targeting parameters entirely may also help to troubleshoot whether or not one or more of these parameters may be the cause of the issue.  

    Overspend with Soft Cap Budgets

    Enabling ‘Soft Cap Budgets’ will help the line cap at a specified budget, but is not a guarantee.  It is possible that a Line Item configured with a ‘Soft Cap’ budget will spend more than the allocated budget. This happens because the bidders are placing simultaneous bids on ad slots in order to win impressions, while updates for spend are slightly delayed. This allows the bidders to continue bidding although the soft cap budget may have already been met. By the time the spend for the Line Item is updated, it is possible the Line has already spent more than the allocated budget. This is most typical with Lines that have small budgets and/or open targeting. 
    If this is happening for one of your Line Items, there are several steps that you can take to try to combat this overspend and limit delivery. These steps are not guaranteed to restrict the Line to the exact Soft Cap Budget amount, however, they should help to limit spend as well as improve campaign performance. 

    1. Remove Exchanges with Low Performance
      Enter into the Reporting tab and select the Advertiser and Line you wish to evaluate and update the report. Scroll down to the ‘Exchanges’ section. In this section you can evaluate each Publisher through which your ad has been served and the corresponding CTR. Campaign performance can be increased and spend restricted by removing Exchanges with low performance. To remove an exchange open the Line Item Targeting settings and in the ‘Exchanges’ tab select the red ‘minus’ sign next to the Exchange name. The Exchange should move from the right side of the window to the left and appear with a green plus sign next to the name. This indicates that you are no longer buying through this exchange. For information on Pontiac Exchange reporting see here: Exchange Reporting. 
    2. Add Geographic Targeting/Restrictions
      Geographic targeting is available by Country, Region, DMA, Zip Code or Latitude and Longitude. Restricting the geographic areas where the campaign will serve will limit the number of available impressions and thereby help to limit delivery. By selecting regions or areas most relevant to campaign, this will also help to ensure that you are reaching your target Audience. See more information on Zip Code or Lat/Long Audiences here: Zip Code Audience, Lat Long Audience
      If you would like to keep the geographic targeting relatively open, we recommend visiting the Reporting tab and evaluating the performance of each region or country then removing the lowest performing areas. This will also help to boost campaign performance for your selected KPI. See additional information on Geo Reporting on the following pages:
      Geo Region Reporting, Geo Country Reporting
    3. Add Audience Targeting
      Targeting a specific Audience will limit the available users that can be served your ad and therefore restrict delivery. By targeting across behavioral, contextual or demographic variables you can also limit your viewers to those most likely to be interested in your good or service. Pontiac offers a wide variety of Audience solutions including Remarketing segments, Third-Party Audiences and Onboarded Audience integrations including onboarded CRM data, custom contextual segments and geo-framed Audience segments. See all of our Audience solutions here: Audiences.
    4. Add a Site ‘Allow List’ from Top Performing Sites
      Enter into the Reporting tab and select the Advertiser and Line you wish to evaluate and update the report. Scroll down to the ‘Site Domain’ section. In this section you can evaluate each Site that the ad has been published on and the corresponding CTR. By selecting the highest performing sites and creating a site list, you can serve only on these sites and effectively limit spend as well as improve performance. You could also create a custom site list of websites with contextually relevant content to the campaign or those most likely to be visited by your target Audience. In the ‘Inventory’ tab we also have created several pre-built site lists with high performing domains that are named by content category. For more information on Site Domain Reporting and creating custom Site lists see the following pages: Site Domain Reporting, Site List Targeting.
    5. Add a Viewability Threshold
      In the Line Item Targeting settings there is a feature to enable a Viewability Threshold. If this feature is enabled the platform will determine how likely an impression is to be viewable through pre-bidding technology, and will only bid on ad slots deemed above the threshold. Per IAB guidelines, an ad is considered viewable if 50% of the pixels are in-view for 1 second or more. This will limit available impressions restricting the spend of the Line Item and it could also greatly improve performance as your ads are more likely to be viewed by the user. For more information on the Viewability Threshold see here: Viewability Threshold
    6. Remove Creatives with Low Performance
      In the Reporting tab, metrics are readily available by Creative. This information can be used for manual optimization, to remove low performing Creatives and to direct more of the budget towards high performing ones. For example, if a Creative has received 70% of the budget, but only 5% of the clicks, this Creative should be removed from the campaign. See more information about Pontiac Creative reporting here: Creatives Reporting.

    Brand Safety

    Brand Safety is the practice of helping advertisers steer clear of any inventory or placements that could cause harm to a clients brand. Brand Safe measures should be taken when you are trying to ensure that your ads on not being shown on any unwanted inventory. For example, you can layer ‘Safe from Gambling’ brand safe segments on your campaigns to make sure your ads are not displaying on any content where there is gambling.

    Providers to use:

    • Double Verify
    • IAS
    • comScore

    There are many ways to approach adding brand safe measures on your campaigns:

    • Adding third party brand safety/ anti-fraud segments (Double Verify & IAS)
    • Allow/Block Lists – Either targeting specific sites that you know are brand safe or telling a campaign to exclude a certain batch of sites that you know not to be brand safe.
    • Contextual Keyword Targeting – Similar to Allow & Block Lists, you can choose to target or anti target a group of keywords on your campaigns.
    • Ads.txt Feature has been included at the targeting level within a line item. This feature tells the platform to only target inventory that is sanctioned by the sellers providing them. This feature does not apply to any In-App inventory.

    Bounce Rate

    These are the recommended steps to decrease bounce rate and improve the quality of traffic: 

    1. Focus on Desktop traffic. Mobile In-App and Mobile Web tend to have higher bounce rates.
    2. Try targeting only the Google AdExchange.
    3. Add creative macros to your UTM source to run a report in Google Analytics and determine which sources of inventory have had the highest bounce rate. This will help to determine which exchanges are providing highest quality inventory, and which are contributing most to the bounce rate.
      First, add this to your URL: UTM_Medium=${SELLER_MEMBER_ID}The Click URL should look like: http://www.clientwebsite.com/UTM_Source=Pontiac&UTM_Medium=${SELLER_MEMBER_ID} Then you can run a report by Medium in Google Analytics to view bounce rate by Exchange, and remove the exchanges that are contributing most to the bounce rate. You will also need to use the mapping provided in Pontiac to know which SELLER_MEMBER_ID correlates with the Pontiac Exchange ID. See the Seller Id Mapping here: Pontiac_Seller_ID_Mapping
      For additional information on UTM Code implementation see here: UTM Code Implementation

    Pixel Load Discrepancies:

    Pixels take a second to load and will not fire for people who bounce. The higher the bounce rate the bigger the discrepancy will be. To fix this, place the pixel in the header and use the secure.adnxs.com domain

    UTM Code Implementation


    UTM Code Overview

    UTM codes, or Urchin Tracking Modules, are pieces of code that can be added to the end of your click URL in order to track certain dimensions of your digital advertising campaigns in your analytics reports. Utilizing URLs with unique UTM variables for each campaign or creative allows website traffic to be categorized in Google Analytics for in-depth performance analysis across source, medium, campaign and content. 

    UTM Code Parameters

    Parameters are the different dimensions that can be tracked in analytics reports. The following are the parameters that can be used to track aspects of Pontiac campaigns:

    1. Traffic Source:
      &utm_source
    2. Medium:
      &utm_medium
    3. Campaign Name:
      &utm_campaign
    4. Content:
      &utm_content

    UTM Code Variables

    To create the click URL you will need to assign a unique variable to each parameter. These variables will appear in Google Analytics reports for all users that arrived on your website by clicking on this URL . Variables can contain numbers, letters, hyphens, ‘+’ signs and periods.

    1. Traffic Source
      Example: &utm_source=PONTIAC
      If you are running simultaneous advertising efforts across various platforms, this parameter will allow you to distinguish which traffic arrived through Pontiac vs. Facebook, LinkedIn etc.
    2. Medium
      Example: &utm_medium=display
      When running a report by medium, compare performance between organic, paid, search, etc or by media type ie. banner, video, native.
    3. Campaign Name
      Example: &utm_campaign=NameofLineItem
      If you are running more than one Line Item in Pontiac, this will allow you to differentiate which campaign is driving the traffic. For example, &utm_campaign=Remarketing and &utm_campaign=Prospecting
    4. Content
      Example: &utm_content=Creative1-300×600
      The content variable can be used to differentiate between different creatives, creative sizes, or creative types.

    UTM Code Implementation & Reporting

    Once you have created variables for each parameter they must be added to the end of the URL. Manually add parameters and variables or use the Google URL Builder here: https://ga-dev-tools.appspot.com/campaign-url-builder/
    Example:
    Take the website https://pontiac.media and add the above variables: https://pontiac.media?utm_source=PONTIAC&utm_medium=display&utm_campaign=Remarketing&utm_content=Creative1-300×600
    When you upload creatives to the Pontiac platform, use the new URL with UTM parameters & variables as the click URL. You can then view reporting broken out by these variables in Google Analytics. 
    In the Google Analytics dashboard, use the ‘Acquisitions’ -> ‘All Traffic’ -> ‘Source/Medium’ report to see where traffic on your site is coming from. Traffic driven by a campaign with the above click URL would appear in this report as  ‘Pontiac / display’.

    Macros as Variables

    Additional information can be passed through to Google Analytics utilizing Pontiac Macros as the variable in the UTM code. This will allow dynamic information to be passed through for each impression. See the full list of macros here: Creative Macros
    This will further breakdown reporting by each variable passed through the macro. One recommended use case is to implement the Seller Member ID macro as a variable for medium to evaluate exchange performance across the additional stats provided by Google Analytics such as ‘Bounce Rate’, ‘Avg session Duration’ and ‘Pages visited per session’. 
    By implementing the following – &utm_medium=${SELLER_MEMBER_ID} you can view a breakdown of Pontiac traffic by each exchange through which the impressions were purchased.
    For example: https://pontiac.media?utm_source=PONTIAC&utm_medium=${SELLER_MEMBER_ID}
    The following would display as line items in the source/medium report and give you data for traffic by exchange ID:
    ‘Pontiac / 357’
    ‘Pontiac / 280’
    ‘Pontiac / 273’
    These Seller Member IDs must be mapped to Pontiac Exchange IDs utilizing the the Seller Id Mapping here: Pontiac_Seller_ID_Mapping
    The report above would indicate that this traffic was driven by Pontiac ads purchased through OpenX, Microsoft Advertising Exchange and Verizon Media Exchange (O&O). You can then compare the bounce rates, average session duration and more to evaluate quality of the traffic and optimize campaigns accordingly. 

    © 2025 Pontiac Wiki Sec · All Rights Reserved · Developed by RDK

    • Contact Us
    • Privacy Policy
    • Terms & Conditions
    • Pontiac.media