Adding Locations for Foot Traffic Attribution
There are 4 methods by which you can add locations to a Line Item for Foot Traffic Attribution. Once you have enabled Foot Traffic Attribution and set the lookback window, click the ‘Add Location’ button that appears under the Foot Traffic section of the menu.
The location can be added through one of these methods:
- Address
- Lat Long
- Geofence
- Bulk Address Upload
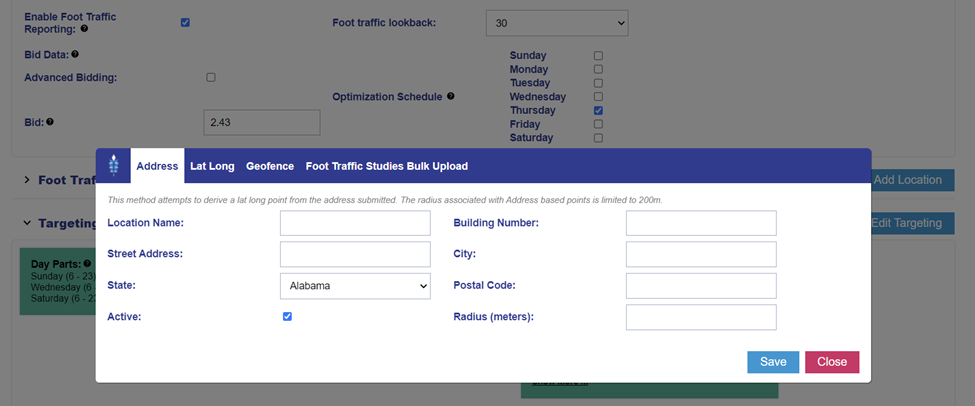
Address
Enter a commercial address that you would like to monitor for Foot Traffic Conversions and include a custom radius in meters. The Address based method will convert the commercial address to a lat/long coordinate, then utilize this radius to create an area around that coordinate that will be utilized to track Foot Traffic. Once you save, the address will be validated by Google Maps. If the validation status appears as ‘Invalid’, try using one of the other methods to add the location.
The Address method is best for Foot Traffic Areas that are defined by a single commercial address. In commercially dense locations, or to track a ‘unit’ within a larger building this method is not recommended. The Geofence method will allow for more accurate definition and control of the desired area. This will ensure that other buildings, or sections of the building in proximity to the desired location are not captured in the Foot Traffic Area.
If an Address is showing 0 ‘Average Daily Visitors’ after several days on the Line, this may indicate that the address is invalid, and Foot Traffic cannot be registered via the Address method. It is recommended to de-activate this location and to add the location via Geofence.
Lat Long
Use the map to find the desired location, then click to drop the pin on the map. Give the location a name and enter a custom radius in meters. This radius will be used to create an area around that coordinate to track Foot Traffic.
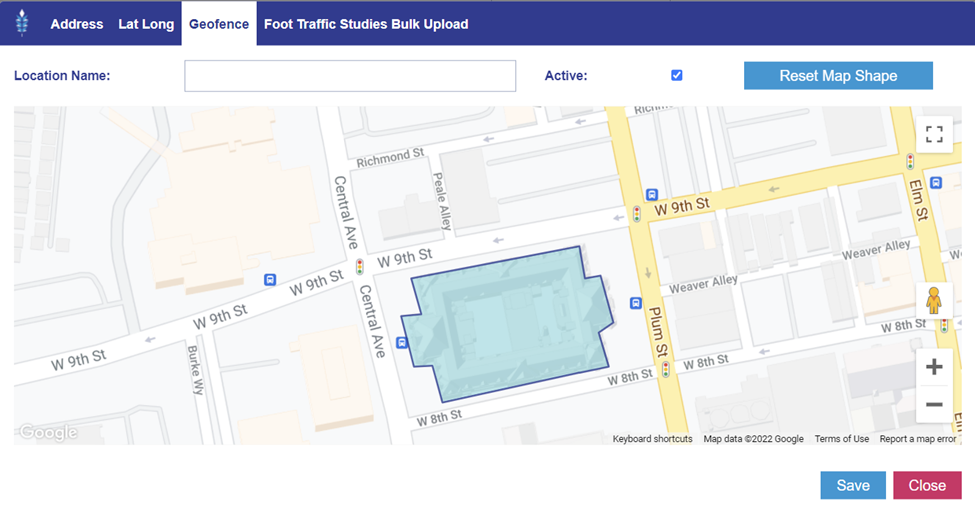
Geofence
The Geofence method enables maximum customization of the area to be tracked for Foot Traffic Studies. Give the location a name. Enter the address in the search bar, or navigate on the map to find the desired location. The area to be tracked can then be drawn as a polygon. Click on the map to create each end point of the polygon and define the area to be tracked. This is great for buildings with odd shapes, or in cases where the location cannot be defined by the building. For example, a car dealership with an extra-large parking lot can create a custom geofence that includes both the building and all their car lots to ensure that all relevant traffic is captured.
If you make a mistake in drawing the polygon, use the ‘Reset Map Shape’ button to erase any points drawn on the map.
Bulk Address Upload
Bulk Upload is available to enter locations as commercial addresses. This method is recommended for Line Items with many locations that can each be defined by a commercial address. Up to 200 addresses can be uploaded through the Bulk Upload at one time.
To Bulk upload addresses you will need to create a CSV file. The addresses must be entered in the following format with no column headers:
Location Name, Building Number, Street Address, City, State, Postal Code, Active Status
If you would like the location to be Active the ‘Active Status’ column should have a 1. If you would like the location to be Inactive the ‘Active Status’ should have a 0. In this example shown below, all of the addresses will be active except ‘The Shops NYC’.

Save the file as a CSV with no column headers and upload it by clicking the ‘Bulk Upload’ button under ‘Foot Traffic Reporting’. Double check before submitting the Line Item that all the addresses look correct.
If an Address is showing 0 ‘Average Daily Visitors’ after several days on the Line, this may indicate that the address is invalid, and Foot Traffic cannot be registered via the Address method. It is recommended to de-activate this location and to add the location via Geofence.