Pontiac Wiki Pontiac Wiki

Pixel Creation & Implementation

Pixel Creation & Implementation

  • Segment Pixels (Remarketing)
  • Standard Conversion Pixels
  • IP Conversion Pixels
  • Third-Party Pixels (Trackers)
  • Post-Back Pixels
  • Pixel Placement
    • Pixel Placement Overview
    • Placing Pixels with Google Tag Manager
    • Placing Pixels with Shopify
  1. Home
  2. Origin Documentation
  3. Pixel Creation & Implementation

Segment Pixels (Remarketing)

A segment pixel is an HTML code placed on the Advertiser’s website to collect the User ID of the individuals that visit the page where they are placed. These User IDs are collected in an audience in the platform that you can then target in remarketing campaigns. 

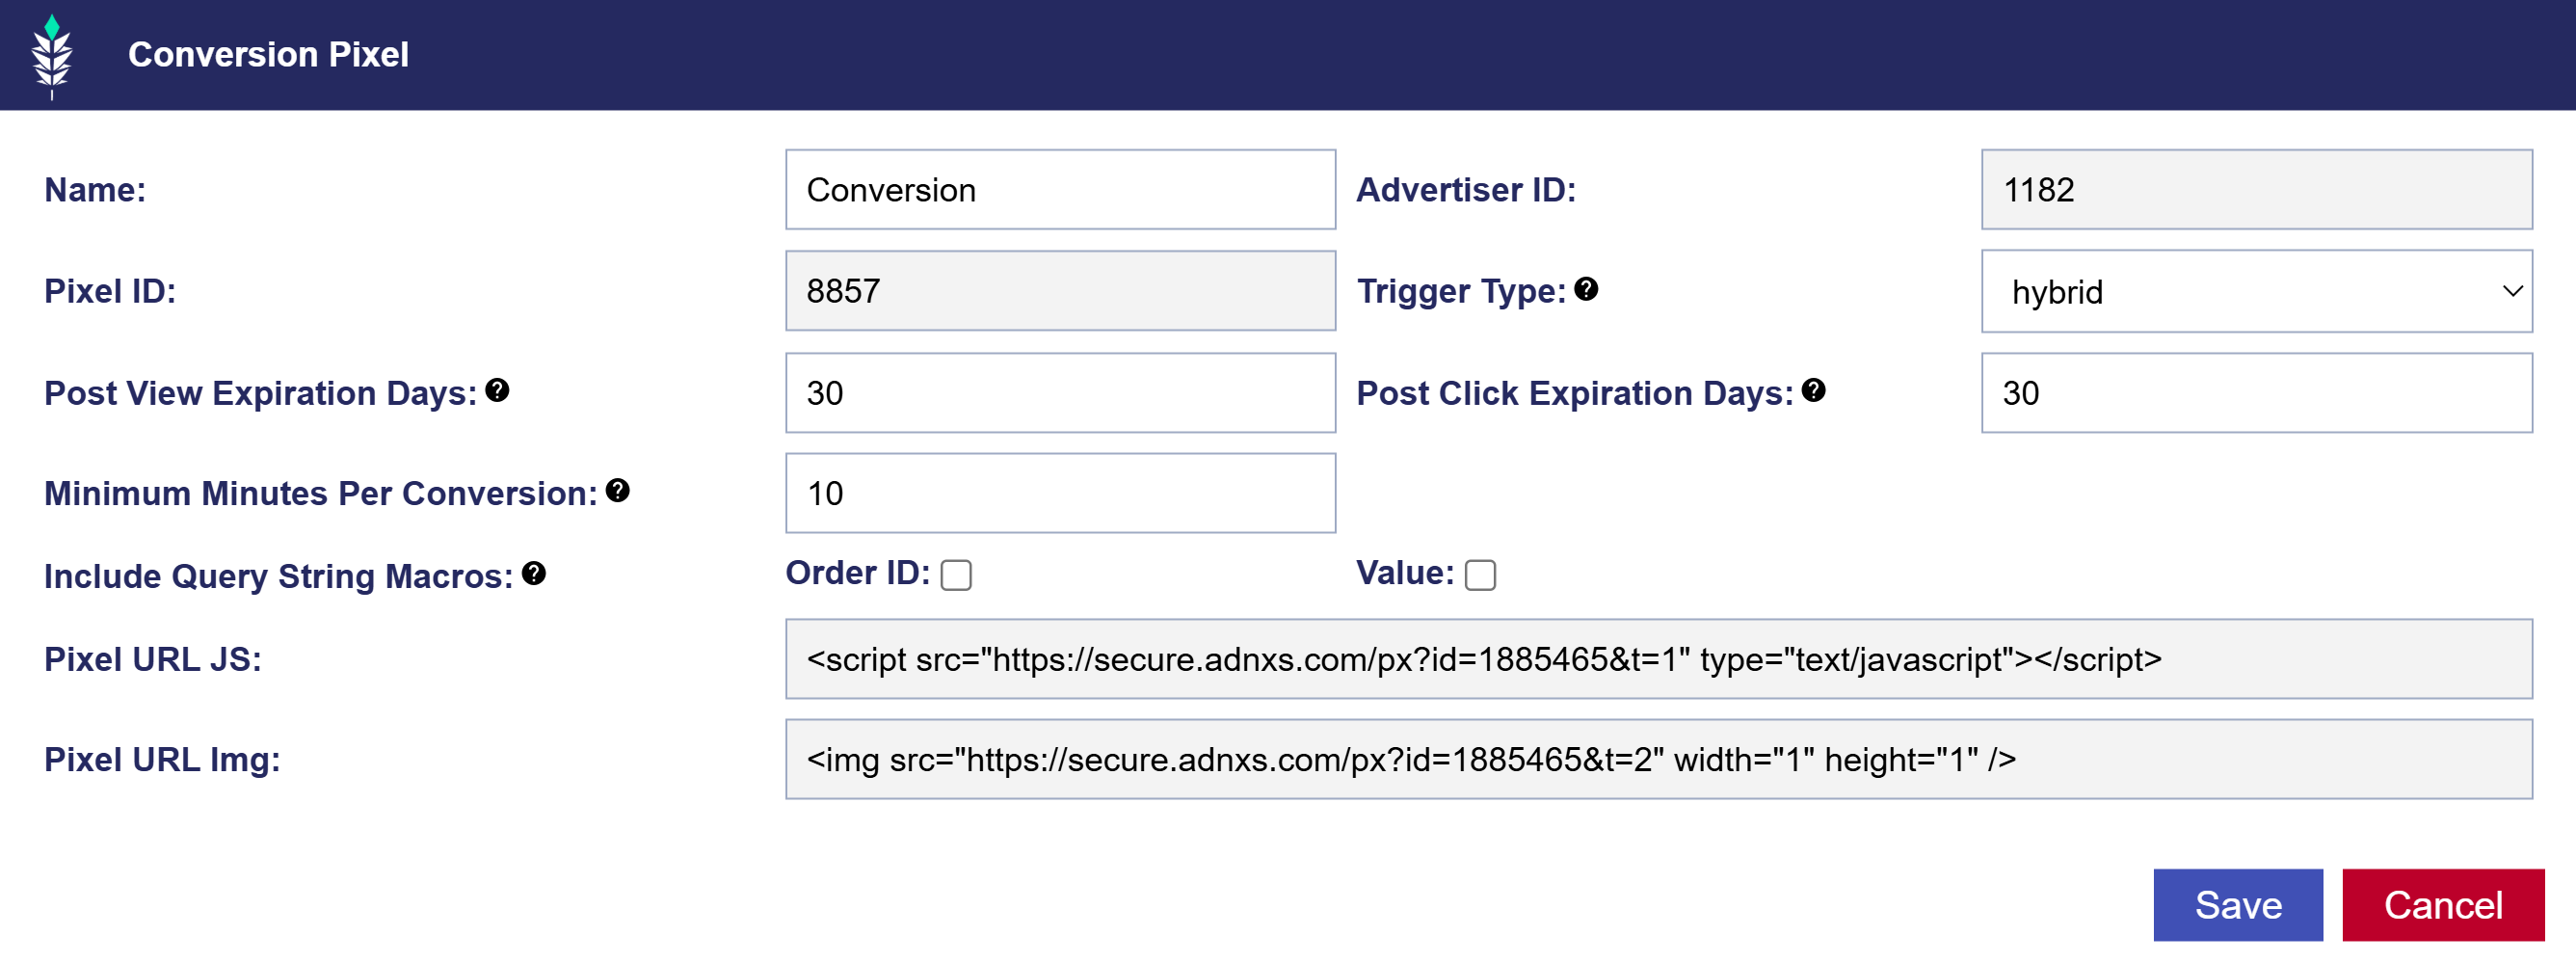
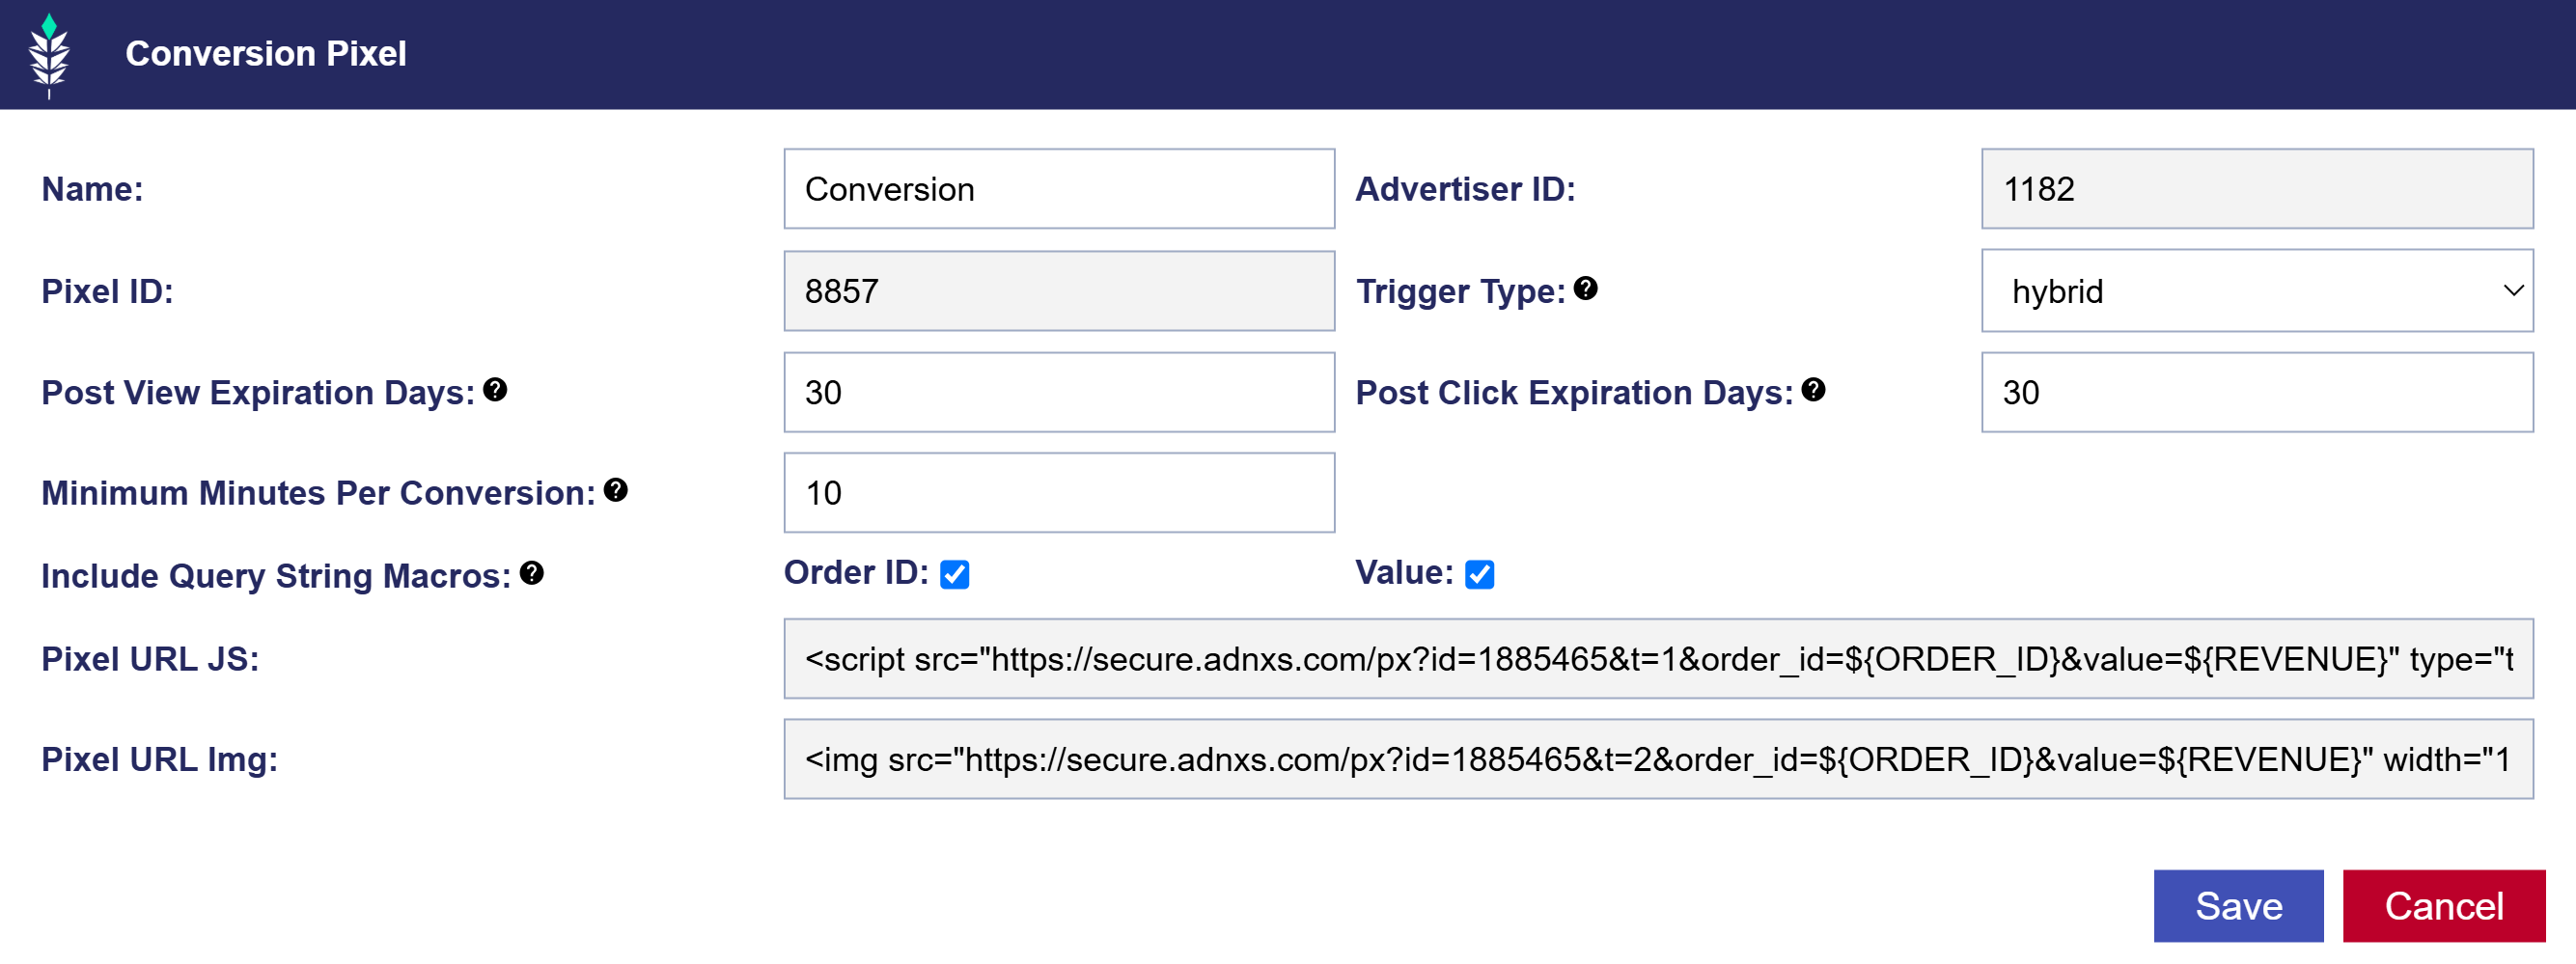
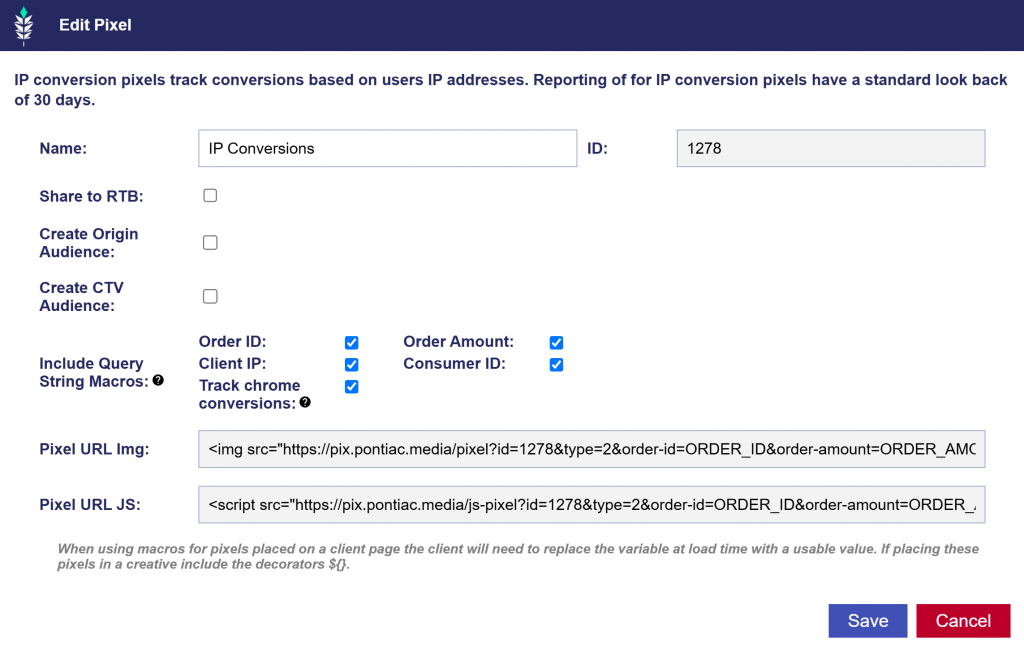
To create a segment pixel, open the Advertiser and click ‘New Segment’ on the right-hand side of the ‘Audiences’ dropdown. Give the segment a name and set the ‘Days to live’ as the number of days that you would like users to remain in this segment. If a user is not seen again in this time frame, they will be removed from the segment after the selected number of days. Per IAB, the maximum time the user can remain in the segment is 90 days. Click save and wait a few minutes for the pixel to generate. Your pixel will appear in your list of audiences under the Advertiser and when you click the name of the pixel you will see the following window:

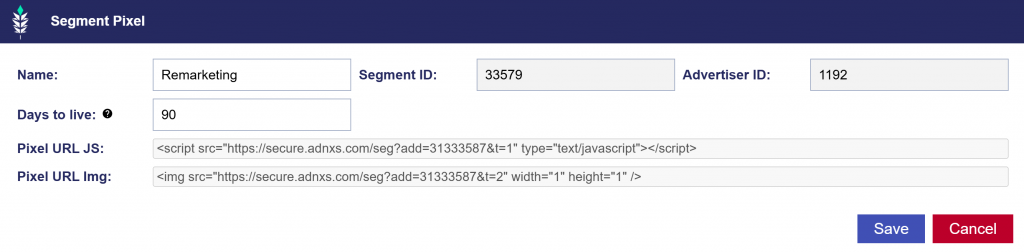
Copy the ‘Pixel URL JS’ or ‘Pixel URL Img’ and place it on your website. It can be placed anywhere, but we recommend placing it in the header. For maximum Audience size, it is recommended to place the pixel to fire on all pages.

Once the pixel is placed it will start to register loads for the visitors to the page where it is placed. Keep in mind that your Remarketing Audience size will be determined by the number of users that visited the page AFTER the pixel is placed. As a rule of thumb we recommend a 1-2 week lead time between placing the pixel and launching a Remarketing campaign, but the ideal lead time to achieve the desired scale will vary depending on site traffic and campaign budget.

To reference the current Audience Size for a Remarketing Segment, metrics are visible in the Advertiser for pixel loads. For more information on the metrics displayed for Remarketing Pixels see here: Audience Metrics.

To target this Audience, associate it to a Line Item under ‘Audiences’. See steps on associating an Audience here: Associate Audience to a Line Item

Standard Conversion Pixels

Conversion pixels are codes that when fired, allow for the tracking of an event on your webpage. The standard conversion pixels utilize cookies to attribute a user that has seen an ad from your campaign and subsequently completed the desired action. These are placed on pages where Pontiac will ultimately try to drive users. Usually this is a purchase ‘Thank you’ page, and this pixel will fire whenever a user completes a transaction. These can be used to track micro conversions on your site as well, such as newsletter signups, meeting requests and more. 
To create a conversion pixel, open the Advertiser and click ‘New Conversion Pixel’ on the right-hand side of the ‘Conversion Pixels’ dropdown. Give the pixel a name and fill in the following required fields:

Trigger Type:
  • Click: This pixel will only fire when a user clicks the ad and immediately completes a conversion.
  • View:  This pixel will only fire when a user views an ad and completes a conversion. View will also count for users that click, do not immediately convert, but return to the domain and convert at a later time.
  • Hybrid: This pixel will fire on both click AND view. Reporting can be broken out to examine click vs view.
Post View Expiration Days:

The number of days between a user being served the ad and then completing a conversion for a transaction to be counted as a valid post-view conversion attributable to the Pontiac ad. This is the ‘attribution window’ for post-view conversions.

Post Click Expiration Days:

The number of days between a user clicking on an ad and the user completing a conversion for the transaction to be counted as a valid post-click conversion attributable to the Pontiac ad. This is the ‘attribution window’ for post-click conversions.

Minimum Minutes Per Conversion:

Minimum duration of time during which a user can complete a conversion before registering another conversion.
Wait a few minutes for the pixel to generate. Your pixel will appear in the Advertiser menu, under the conversion pixel dropdown, and when you click the name of the pixel you will see the following window:

Copy the ‘Pixel URL Img’ or ‘Pixel URL JS’ and place it on your website on the page that the user will see after completing a conversion. For more information on the metrics displayed for Conversion pixels, see here: Conversion Pixel Metrics. 

Query String Macros

Once the conversion pixel generates you will have the option to add in query string macros. Click on the name of the pixel and check the boxes next to ‘Order id’ and ‘Value’. This will add the macros into the pixel which can then be copied and placed on the landing page after a conversion. Speak with your web developer to swap in the values that you would like to pass in. For example, ${ORDER_ID} must be replaced by the actual order ID and ${REVENUE} must be switched out for the actual value of the conversion when firing this pixel.

  • Order_ID: Allows the platform to track the exact order ID number of a transaction generated from a Pontiac ad.
  • Value: Allows the platform to track the exact value of a transaction generated from a Pontiac ad.

IP Conversion Pixels

With the IP based pixel, a client can place this on their website and attribute online actions (browsing a page, loading the shopping cart, purchases) to CTV or Streaming Audio campaigns run through the Pontiac platform. Typically, pixels are based on third party cookies which work on browsers, and these do not allow for attribution for CTV and Streaming Audio campaigns. Pontiac IP Conversion Pixels are a proprietary and privacy safe attribution solution for CTV & Streaming Audio that utilizes the user’s IP Address to track website traffic and online purchases driven by your campaigns.

To create an IP Conversion Pixel, enter the Pontiac platform and create or open an Advertiser. Once inside the Advertiser, click the ‘New Pixel’ button and enter a name for the IP Conversion Pixel. Wait for 30-60 seconds for the pixel to generate, then click back on the name of the pixel to view the code. Place this pixel on your website, then associate it to the Line Item where you wish to track conversions.

If you wish to track an action such as a purchase, this pixel should be placed on the page the user will see once the transaction is completed, ie. the ‘Thank you’ page. If you want to register any website visit as a conversion (ie. a user that sees your CTV ad, then goes to your homepage), you can place the pixel in the header to fire on all pages, or one specific page you wish to measure.

Note that you are able to share the IP Conversion Pixel with the RTB/CTV Platform, create an origin audience, and create a CTV audience by selecting the boxes. You can also track Order ID, Order Amount, Client IP, Consumer ID, and Track chrome conversions (only available for campaigns running in the CTV platform) using this pixel by selecting the boxes for these values once the pixel has generated. This will add the parameters and placeholders for the values to the pixel. Work with your web developer to dynamically replace these placeholders with the intended values. These values can then be pulled in Custom Reporting to gather additional insight about conversions driven by your campaigns & optimize towards ROAS.

IP conversion pixels have a standard lookback of 30 days in the metrics under the Advertiser. This means that the user must complete the desired action within 30 days of seeing the ad for it to count as a conversion. If you would like to pull reporting with a custom lookback window, this can be done in Custom Reporting using the IP Conversion Custom Report. You can select from ‘5’, ‘7’, ’15’ or ’30’ day as the lookback.

IP based conversion reporting will not appear in the ‘Conversions’ or ‘CPA’ metrics on the Line Item, they will be reported separately as ‘IP Conversions’. For metrics in the Advertiser and Campaign screens, a conversion will be attributed to each Line Item that contributed to the action. For example, if a user sees an ad from 2 lines under a campaign and then completes one purchase, this will be counted as a conversion attributed to both Line Items, appearing as 2 conversions on the Campaign when aggregated.

If you would like to see unique conversions under an advertiser or campaign, you can run a custom ‘IP Conversion Rate’ report without selecting the ‘Line ID’ dimension. These are uniques on the selected date/s. For uniques across a campaign flight, run an ‘IP Path to Conversion Report’ and de-duplicate the hashed IP address across all dates.

For more information on the metrics available for the IP Conversion Pixel, see here: IP Conversion Pixel Metrics

Third-Party Pixels (Trackers)

Third-Party pixels, or ‘trackers’ allow the attachment of trackers to your ads from external providers allowing you to call external servers at the time that the ad is rendered on a page. This allows Advertisers to collect data and real time stats about the ad being served.
For Video Creatives, only the Image URL format can be used and these are added directly in the Creative Upload process.

For other Creative types follow these steps to add the Tracker:

  1. To use a pixel from an external provider, enter the Advertiser menu by clicking on the name of the Advertiser that this pixel will help track, and select ‘New Third Party Pixel’. 
  2. Select the code type of the pixel. 
  3. Enter the pixel code into the content box and save it. 
  4. These pixels MUST then be associated to each Creative that you wish to track.  While uploading or editing a specific Creative, you will notice a tab for ‘Third-Party Pixels’ or ‘Trackers’. Select the third-party pixel that you desire to attach to the Creative and save the Creative.
Pixel Formats:
  • Raw-js
  • URL-html
  • URL-js
  • URL-image
Formats supported by Creative Type:
  • Video & Audio: Image URL
  • Native: Image URL, JavaScript URL
  • Banner: Image URL, HTML URL. JavaScript URL, Raw JavaScript
Invalid Javascript Error:

If you are entering a Third-Party pixel in raw-js and receive the error ‘Valid JavaScript code required’, we recommend using this tool to validate the JavaScript in the tag: Online Javascript Validator – BeautifyTools.com

Post-Back Pixels

Otherwise known as ‘server-side’ pixels, post-back pixels are used for tracking mobile app installs. You will need to work with a third-party mobile attribution partner such as HasOffers, AD-X (Criteo), Appsflyer, Flurry, Singular, TapStream, Kochava, etc. Post-back conversion attribution pixels allow attribution servers to callback to the Pontiac conversion pixel and attribute mobile app installs that stem from Pontiac campaigns. 

Note post-backing can only be done with hosted creatives on the platform and not for third-party tags, as the ${SSP_DATA} macro needs to be populated by the creative’s ad server.

  1. Create an Advertiser in Pontiac, then create a Standard Conversion Pixel.
    (Appsflyer specific note: You will need to make sure that the Conversion Pixel Name in Pontiac is the same as the SDK event name in Appsflyer. Otherwise, the conversion will not be passed to Pontiac.)
  2. Once you create the conversion pixel, provide the pixel ID to the Third-Party Vendor, this is the number string following ‘id=’ in the pixel code.
    For example: <img src=https://secure.adnxs.com/px?id=1234567&t=2 width=”1″ height=”1″ />, the ID would be 1234567
  3. If the Third-Party Vendor prompts you to select an origin platform for the pixel, select ‘Appnexus’ or ‘Xandr’.
  4. The server-side pixel (post-back URL) is below, replace the ‘XXXXXXX’ with the Pixel ID from part 2. The [SSPDATA] will also need to be replaced with your third-party vendor’s click id macro.
    http://sspx-router.adnxs.net/sspx?id=XXXXXXX&sspdata=[SSPDATA]
    If your vendor requests just the endpoint, enter the following: http://sspx-router.adnxs.net/sspx and you will need to provide the parameter &sspdata, this will need to be populated by their click ID macro.
  5. The Third Party Vendor should provide you with a URL template that they will use to track conversions. You may want to add additional macros to the URL if you wish to collect additional data, all Pontiac macros can be found here: Creative Macros
    The URL you get from the Third-Party Vendor must use the macro ${SSP_DATA} as the click ID. This click ID will be used in the “post-back” call the vendor makes to report a successful app install. If this macro is not included in the URL, Pontiac will not be able to record the conversion.
    For example:
    http://wetrackinstalls.com/serve?action=click&publisher_id=[publisher_id]&site_id=[site_id]&offer_id=[offer_id] &odin=${DEVICE_ODIN}&open_udid=${DEVICE_OPENUDID}&ios_ifa=${DEVICE_APPLE_IDA}&ref_id=${SSP_DATA}
  6. Set the landing page of the creative (the click URL) to the URL provided by the Third Party Vendor.
  7. Add the Pontiac conversion pixel to your Line Item to attribute conversions from this campaign.

Pixel Placement Overview

The type of pixel (URL JS or URL Img) indicates on which webpage each pixel should be placed. There are a variety of scenarios which determine whether one uses the HTML or the URL.

  1. Advertiser has a relationship with an ad server which has placed ‘Floodlight’ tags on the pages. In this option, the trafficker should follow the instructions provided by the ad server to ‘piggyback’ or add the Pixel URL to the appropriate floodlight.
  2. When interacting with the HTML on the website, the pixel should be placed directly in the source code in the header or the body. This is a screen shot of the HTML code after the pixel has been added:


The pixel should be placed on the pages of your website according to the campaign goal and the event or user group that you are trying to track.

  1. General Remarketing – the segment pixel should be placed to fire on all pages to reach users that land on any page.
  2. Remarketing to Converted Users – the segment pixel should only be placed on the page the user lands on AFTER a conversion event took place, for example a ‘Thank You’ page.
  3. Remarketing to users that viewed a specific product or page – the segment pixel should only be placed on the specific page you want to track.
  4. Conversion Tracking – the standard conversion pixel or IP conversion pixel should be placed on the page the user lands on AFTER a conversion event took place, for example a ‘Thank You’ page.
  5. Creating an Audience for ART insights – the IP conversion pixel should be placed according to the insights you would like to pull. If you would like an insight report about ALL users that land on your website, the pixel should be placed on all pages. If you would like an insight report about only converted users or only users that visited a specific page, place the pixel to only fire on the page those users will land on.

If you have any questions regarding specific pixel placement, reach out through the Help Center.

Placing Pixels with Google Tag Manager

Once you have created a pixel in Pontiac:

  1. Log in to your Google Tag Manager account.
  2. Select your website’s container and click Add a new tag.
  3. Click Custom HTML Tag and enter a name for your tag.
  4. Go to Events Manager and select Add Event.
  5. Select Install code manually.
  6. Copy the pixel from Pontiac. (we recommend using URL img version of the pixel)
  7. Return to Google Tag Manager and paste the code in the HTML container.
  8. Click the Advanced Settings dropdown and select Once per page under Tag firing options.
  9. For Remarketing pixels under ‘Fire On’, select ‘All Pages’. For Conversion pixels under ‘Fire On’, select the landing page a user will be brought to AFTER converting.
  10. Click Create Tag.

Placing Pixels with Shopify

If you use Shopify for e-commerce transactions, the Pontiac conversion pixel can be placed on the Shopify order status page to track conversions and attribute them to your Pontiac campaigns. Review this Shopify Guide Add Conversion Tracking to your Order Status Page and follow the steps to place the pixel. To track order ID and order revenue from these transactions add in query string macros to the Pontiac pixel before it is placed. See more here: Query String Macros

© 2025 Pontiac Wiki Sec · All Rights Reserved · Developed by RDK

  • Contact Us
  • Privacy Policy
  • Terms & Conditions
  • Pontiac.media