Pontiac Wiki Pontiac Wiki

Foot Traffic Attribution

Foot Traffic Attribution

  • Foot Traffic Attribution Overview
  • Setting Up Foot Traffic Attribution
    • Enabling Foot Traffic
    • Adding Locations for Foot Traffic Attribution
    • Editing & De-activating Locations
  • Foot Traffic Line Item Metrics
  • Foot Traffic Attribution Studies
  1. Home
  2. Origin Documentation
  3. Foot Traffic Attribution

Foot Traffic Attribution Overview

Foot Traffic Attribution is a type of Conversion reporting powered by OnSpot, that allows advertisers to track how many users were served an ad unit through Pontiac and then visited a commercial location. Utilizing Mobile Advertising IDs and the GPS systems of these mobile devices, OnSpot registers the users who were served your ad and their mobile device subsequently is seen at the location that you are tracking. Foot Traffic Reporting is only available in the United States at this time.

When ads are served across CTV and Web inventory, a household extension that utilizes the IP addresses is used to connect the TVs, Desktops, Laptops etc., with the mobile devices from the same household. The GPS systems of mobile devices from that household will then be used to register users from a household that saw your ad, then subsequently visited the location that you are tracking. Each line can track up to 200 locations.

The cost for Foot Traffic Attribution is as follows:

  • $1.50 CPM for Banner, Native, Audio & Video creatives
  • $4.00 CPM for CTV creatives

For campaigns receiving Foot Traffic reports, we recommend adding the CPM to the bid recommendations for the media type of the campaign. 

Enabling Foot Traffic

In the Pontiac platform you can opt to receive Foot Traffic Attribution reporting when setting up a Line Item. Check the ‘Enable Foot Traffic’ box then proceed to the section below under ‘Foot Traffic Reporting’ and select the ‘Add Location’ button to start adding the locations you would like to track.

Foot Traffic Attribution is only available in the United States at this time. The cost for Foot Traffic Attribution is set according to the Media Type. For campaigns receiving Foot Traffic reports, we recommend adding the associated cost CPM to the bid recommendations for the media type of the campaign.
Adding Locations for Foot Traffic Attribution

There are 4 methods by which you can add locations to a Line Item for Foot Traffic Attribution. Once you have enabled Foot Traffic Attribution and set the lookback window, click the ‘Add Location’ button that appears under the Foot Traffic section of the menu.

The location can be added through one of these methods:

  1. Address
  2. Lat Long
  3. Geofence
  4. Bulk Address Upload

Address

Enter a commercial address that you would like to monitor for Foot Traffic Conversions and include a custom radius in meters. The Address based method will convert the commercial address to a lat/long coordinate, then utilize this radius to create an area around that coordinate that will be utilized to track Foot Traffic. Once you save, the address will be validated by Google Maps. If the validation status appears as ‘Invalid’, try using one of the other methods to add the location.

The Address method is best for Foot Traffic Areas that are defined by a single commercial address. In commercially dense locations, or to track a ‘unit’ within a larger building this method is not recommended. The Geofence method will allow for more accurate definition and control of the desired area. This will ensure that other buildings, or sections of the building in proximity to the desired location are not captured in the Foot Traffic Area.

If an Address is showing 0 ‘Average Daily Visitors’ after several days on the Line, this may indicate that the address is invalid, and Foot Traffic cannot be registered via the Address method. It is recommended to de-activate this location and to add the location via Geofence.

Lat Long

Use the map to find the desired location, then click to drop the pin on the map. Give the location a name and enter a custom radius in meters. This radius will be used to create an area around that coordinate to track Foot Traffic.

Geofence

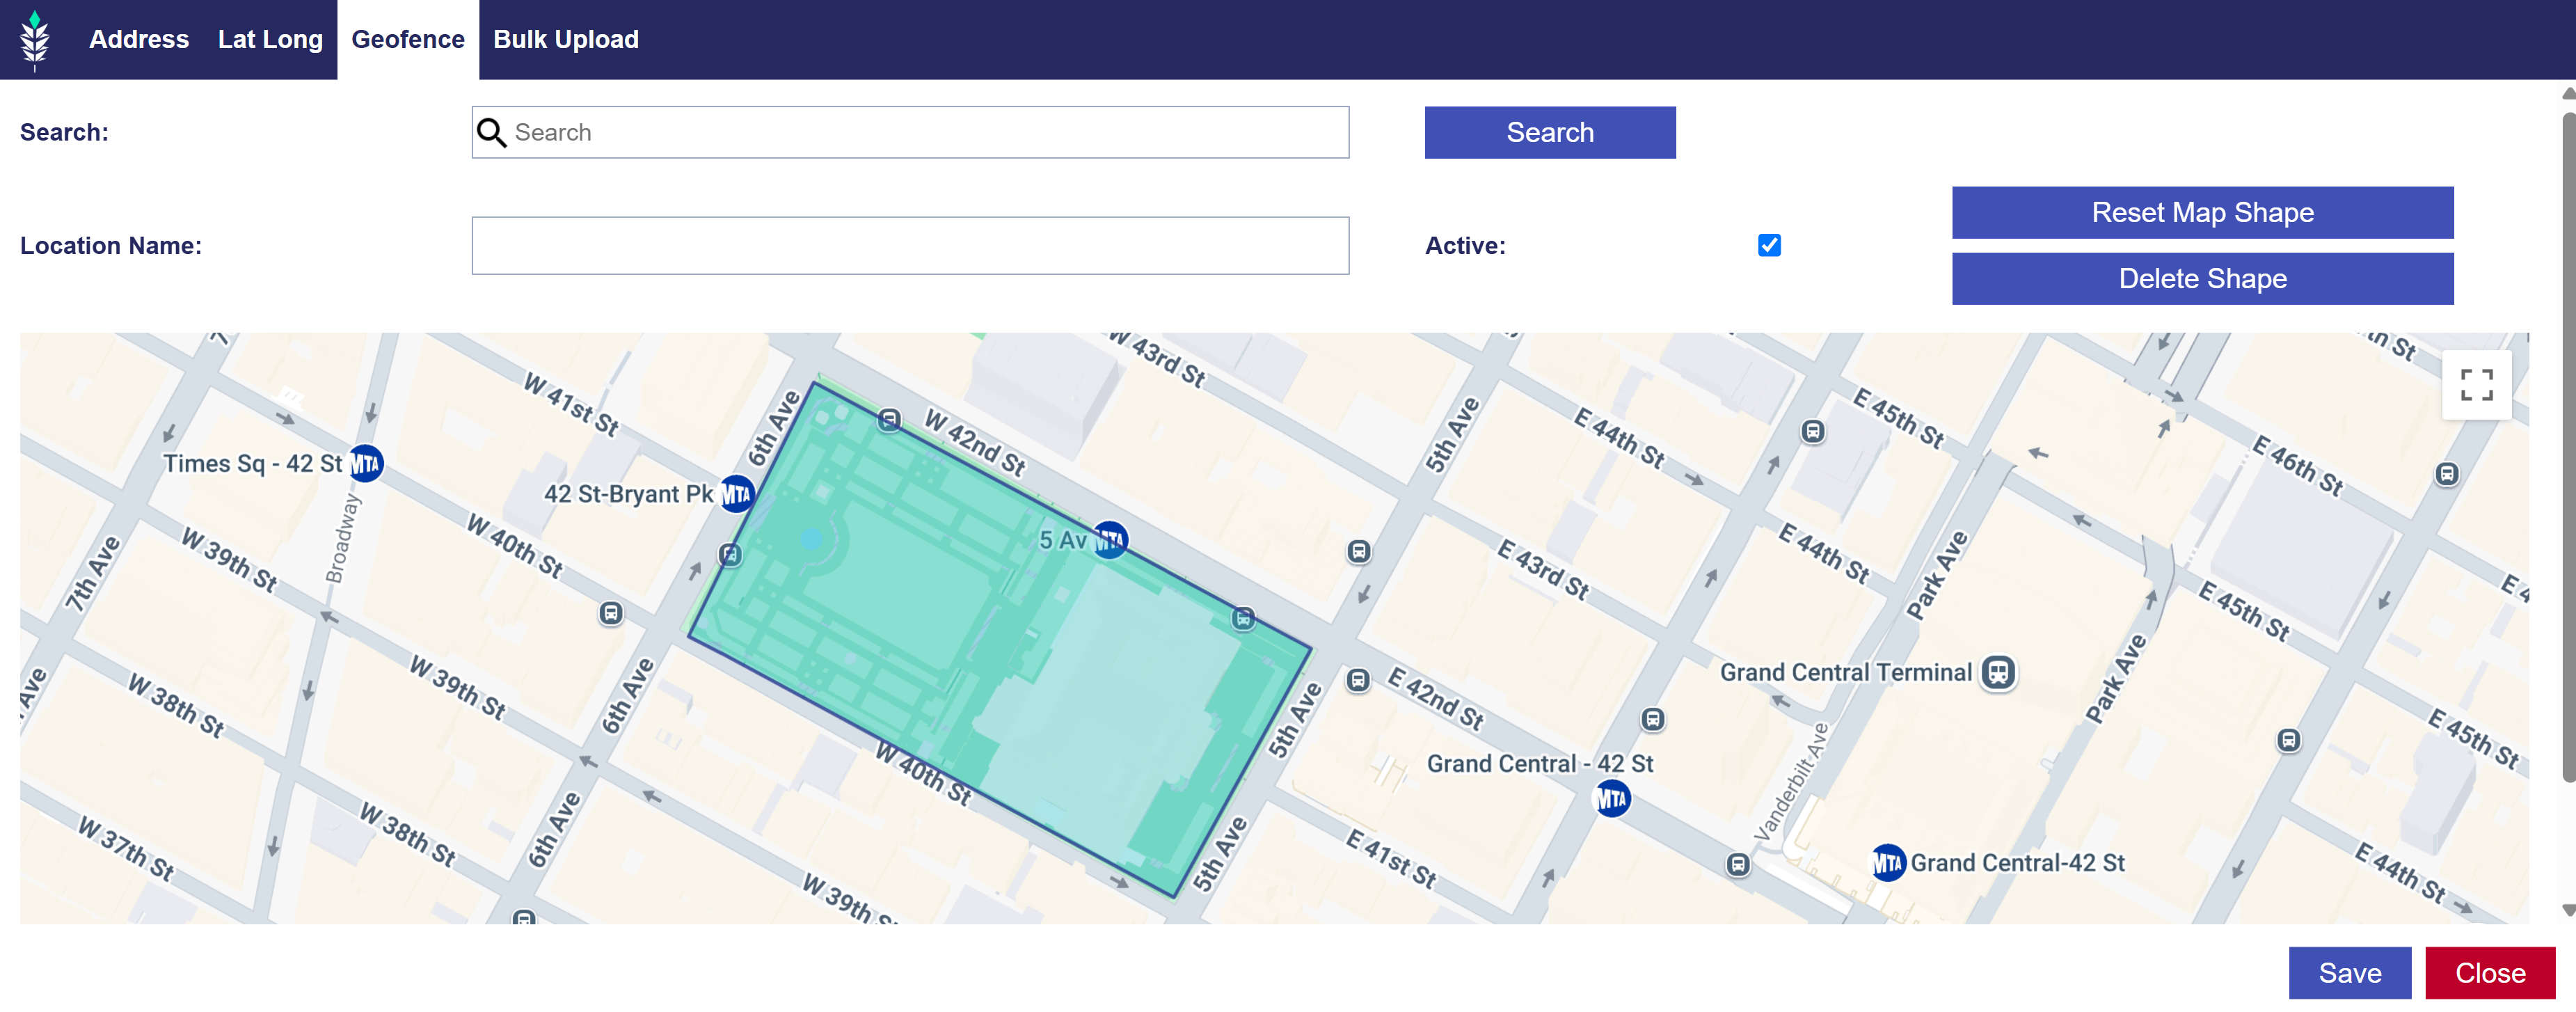
The Geofence method enables maximum customization of the area to be tracked for Foot Traffic Studies. Give the location a name. Enter the address in the search bar, or navigate on the map to find the desired location. The area to be tracked can then be drawn as a polygon. Click on the map to create each end point of the polygon and define the area to be tracked. This is great for buildings with odd shapes, or in cases where the location cannot be defined by the building. For example, a car dealership with an extra-large parking lot can create a custom geofence that includes both the building and all their car lots to ensure that all relevant traffic is captured.

If you make a mistake in drawing the polygon, use the ‘Reset Map Shape’ button to erase any points drawn on the map.

Bulk Address Upload

Bulk Upload is available to enter locations as commercial addresses. This method is recommended for Line Items with many locations that can each be defined by a commercial address. Up to 200 addresses can be uploaded through the Bulk Upload at one time.

To Bulk upload addresses you will need to create a CSV file. The addresses must be entered in the following format with no column headers:

Location Name, Building Number, Street Address, City, State, Postal Code, Active Status

If you would like the location to be Active the ‘Active Status’ column should have a 1. If you would like the location to be Inactive the ‘Active Status’ should have a 0. In this example shown below, all of the addresses will be active except ‘The Shops NYC’.

Save the file as a CSV with no column headers and upload it by clicking the ‘Bulk Upload’ button under ‘Foot Traffic Reporting’. Double check before submitting the Line Item that all the addresses look correct. 

If an Address is showing 0 ‘Average Daily Visitors’ after several days on the Line, this may indicate that the address is invalid, and Foot Traffic cannot be registered via the Address method. It is recommended to de-activate this location and to add the location via Geofence.

Editing & De-activating Locations

Foot Traffic Addresses cannot be edited once the Line Item has been submitted. If you need to change the details of the address you will need to deactivate the address and enter the new address as a separate entry.
To deactivate a location previously entered for Foot Traffic Reporting, open the Line Item and expand the ‘Foot Traffic Reporting’ section to view the entered addresses. The ‘Location Name’ should appear as a hyperlink. Click on the Location Name to open the Location Settings window and un-check the ‘Active’ box, then click ‘Save’ and ‘Submit Changes’ to the Line Item.

Foot Traffic Line Item Metrics

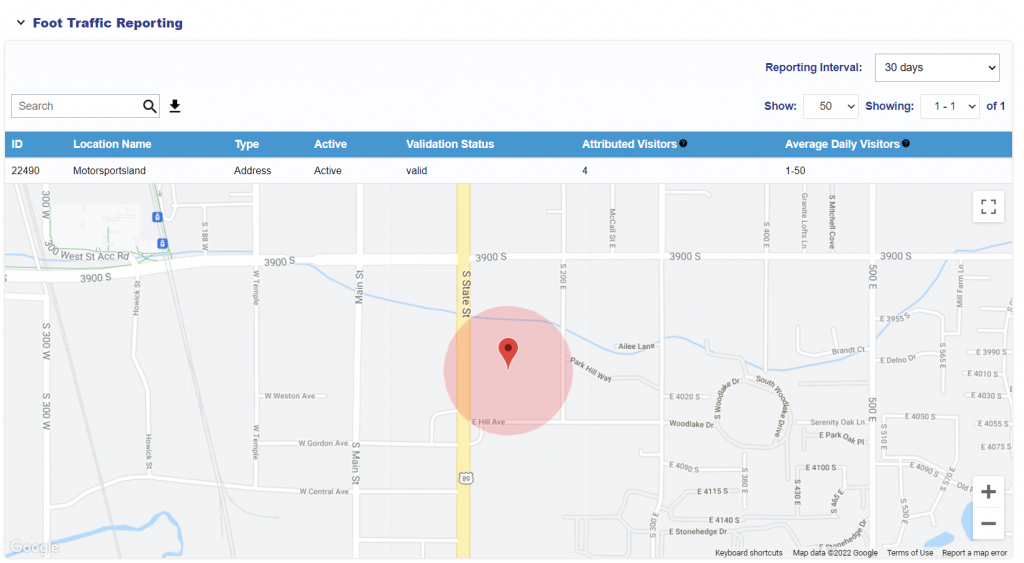
At the Line Item level the Foot Traffic reporting section will display two metrics, ‘Attributed Visitors’ and ‘Average Daily Visits’.

Attributed Visitors will display the number of users who were served an ad from this campaign and subsequently visited this location during the selected reporting interval. These are Foot Traffic Conversion driven by this campaign. The ‘Foot Traffic Lookback’ is 30 days.

Average Daily Visitors will display the average number of total visitors recorded at this location per day within selected reporting interval. This is used to indicate if the address entered is correct and tracking visitors and will be displayed as a range. In the above example this metric indicates that in the last 30 days there were on average 50-500 visitors at this location each day. If 0 visitors are seen at this location, there may be an issue with tracking devices at this address. If this location was added using the ‘Address’ method, it is recommended to try adding this location as a Lat/Long coordinate or custom Geofence.

If the location was added as a Lat/Long coordinate or custom Geofence and the location is registering 0 ‘Average Daily Visitors’, reach out through the Help Center for assistance in troubleshooting this issue.

Foot Traffic Attribution Studies

Foot Traffic Attribution Reports can be found in the Reporting tab in the ‘Foot Traffic Studies’ section. Each morning a new report will generate with the visitor data for the date three days prior to the current date. For example, the report containing visitor data for the 1st of the month will generate on the 4th of the month. Reports will generate daily for the flight dates of the campaign and for 30 days after the campaign ends.

The ‘Foot Traffic Lookback’ is 30 days. This will be the attribution window for the Foot Traffic Studies, and is the number of days after viewing the ad that a visit to the location would be counted as a conversion. For example, if a user views an ad then visits the store 31 days after they saw the ad, this would not count as a conversion.

The visitor count displayed in these reports is ‘unique’ visitors. Multiple visits by the same Device ID will only be registered once on a given day, but may be registered if they return on a different day. 
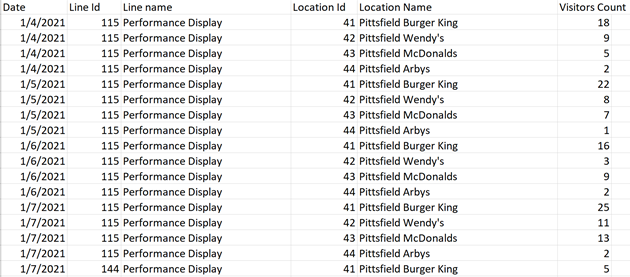
Reports will contain the following information:

  • Date
  • Line ID
  • Line Name
  • Location ID
  • Location Name
  • Visitors Count

A ‘visitor’ is counted as any mobile device that was served the ad and then the device was subsequently seen within the area being tracked. For CTV and Web inventory this ‘visitor’ is a mobile device associated to a household of the device the ad was served on (ie. TV, Desktop etc). This ‘visitor’ count relies on mobile GPS tracking and is limited to the accuracy and precision of the device’s location services. It is possible that a visitor could be counted by walking by or driving by the location.

© 2025 Pontiac Wiki Sec · All Rights Reserved · Developed by RDK

  • Contact Us
  • Privacy Policy
  • Terms & Conditions
  • Pontiac.media