Lines are used to execute media buying strategies within a Campaign. While the Campaign organizes a group of strategies under a shared budget and flight structure, the Line controls the execution of media delivery and spend.
Each Campaign must contain at least one active Line in order to deliver impressions. Multiple Lines can be created under a single Campaign to separate strategies by inventory source, optimization model, audience, geography, device, bidding approach, or media channel.
Depending on Campaign configuration, settings such as targeting, creatives, audiences, pixels, pacing, and frequency controls may either be managed globally at the Campaign level or configured independently at the Line level. Campaign-level settings act as shared controls and additional filters across all associated Lines.
Because the Line controls media execution, proper setup of targeting, pacing, bidding, and inventory selection is critical to campaign delivery and performance optimization. When targeting is applied at both the Campaign and Line levels, targeting is evaluated using an intersection model, meaning impressions must satisfy all conditions applied at both levels in order to be eligible to serve.
Campaign-level targeting should be used for settings that apply universally across all Lines, while Line-level targeting should be used for strategy-specific execution. For example, a Campaign may broadly target the United States, while individual Lines target specific states, DMAs, ZIP codes, audiences, inventory types, or devices. If targeting settings conflict between levels, impressions may become ineligible and delivery may be limited.
Best Practices:
Use Campaign-level targeting only for settings that should apply universally across all Lines.
Use Line-level targeting for strategy-specific targeting and optimization.
Apply targeting at one level whenever possible unless the intent is to intentionally narrow eligible inventory through intersection filtering.
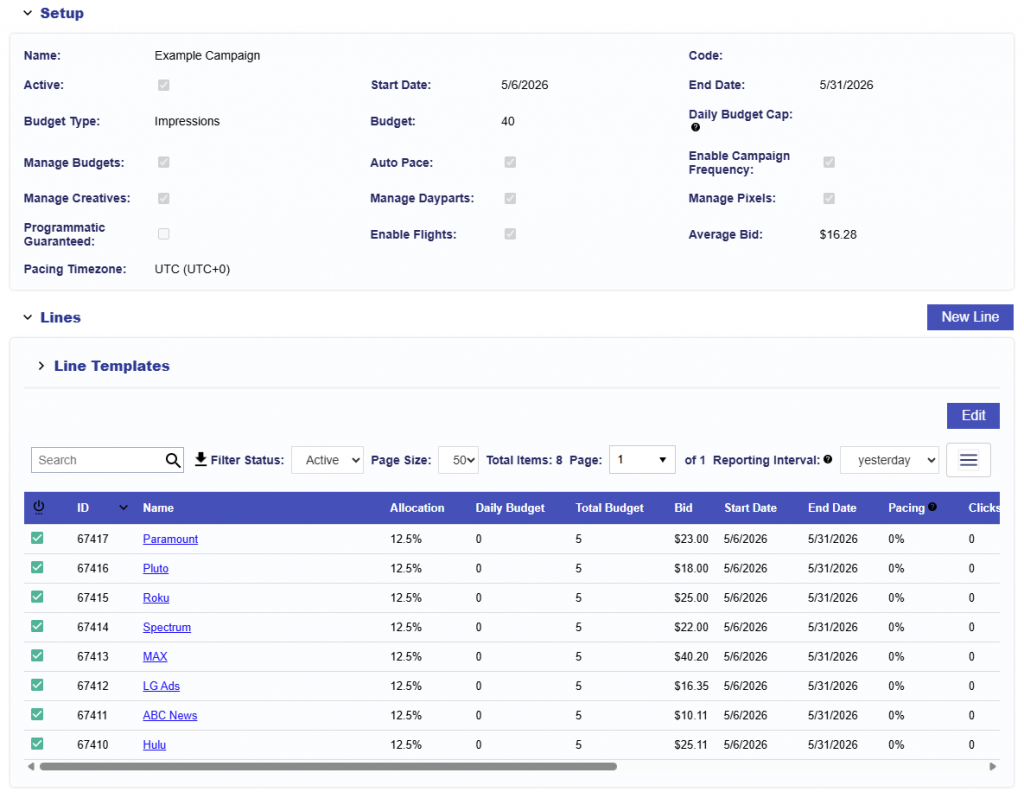
Line Setup
All campaigns must have at least 1 line item created under them, or they will not deliver impressions. The campaign object can control the budget of associated lines, but the Line is used to execute the spend.
To create a new Line, follow these steps:
Go to the selected Advertiser and Campaign where you want to create the new Line.
Navigate to the Lines dropdown section within the Campaign’s dashboard.
Select the ‘New Line’ button to begin the creation process.
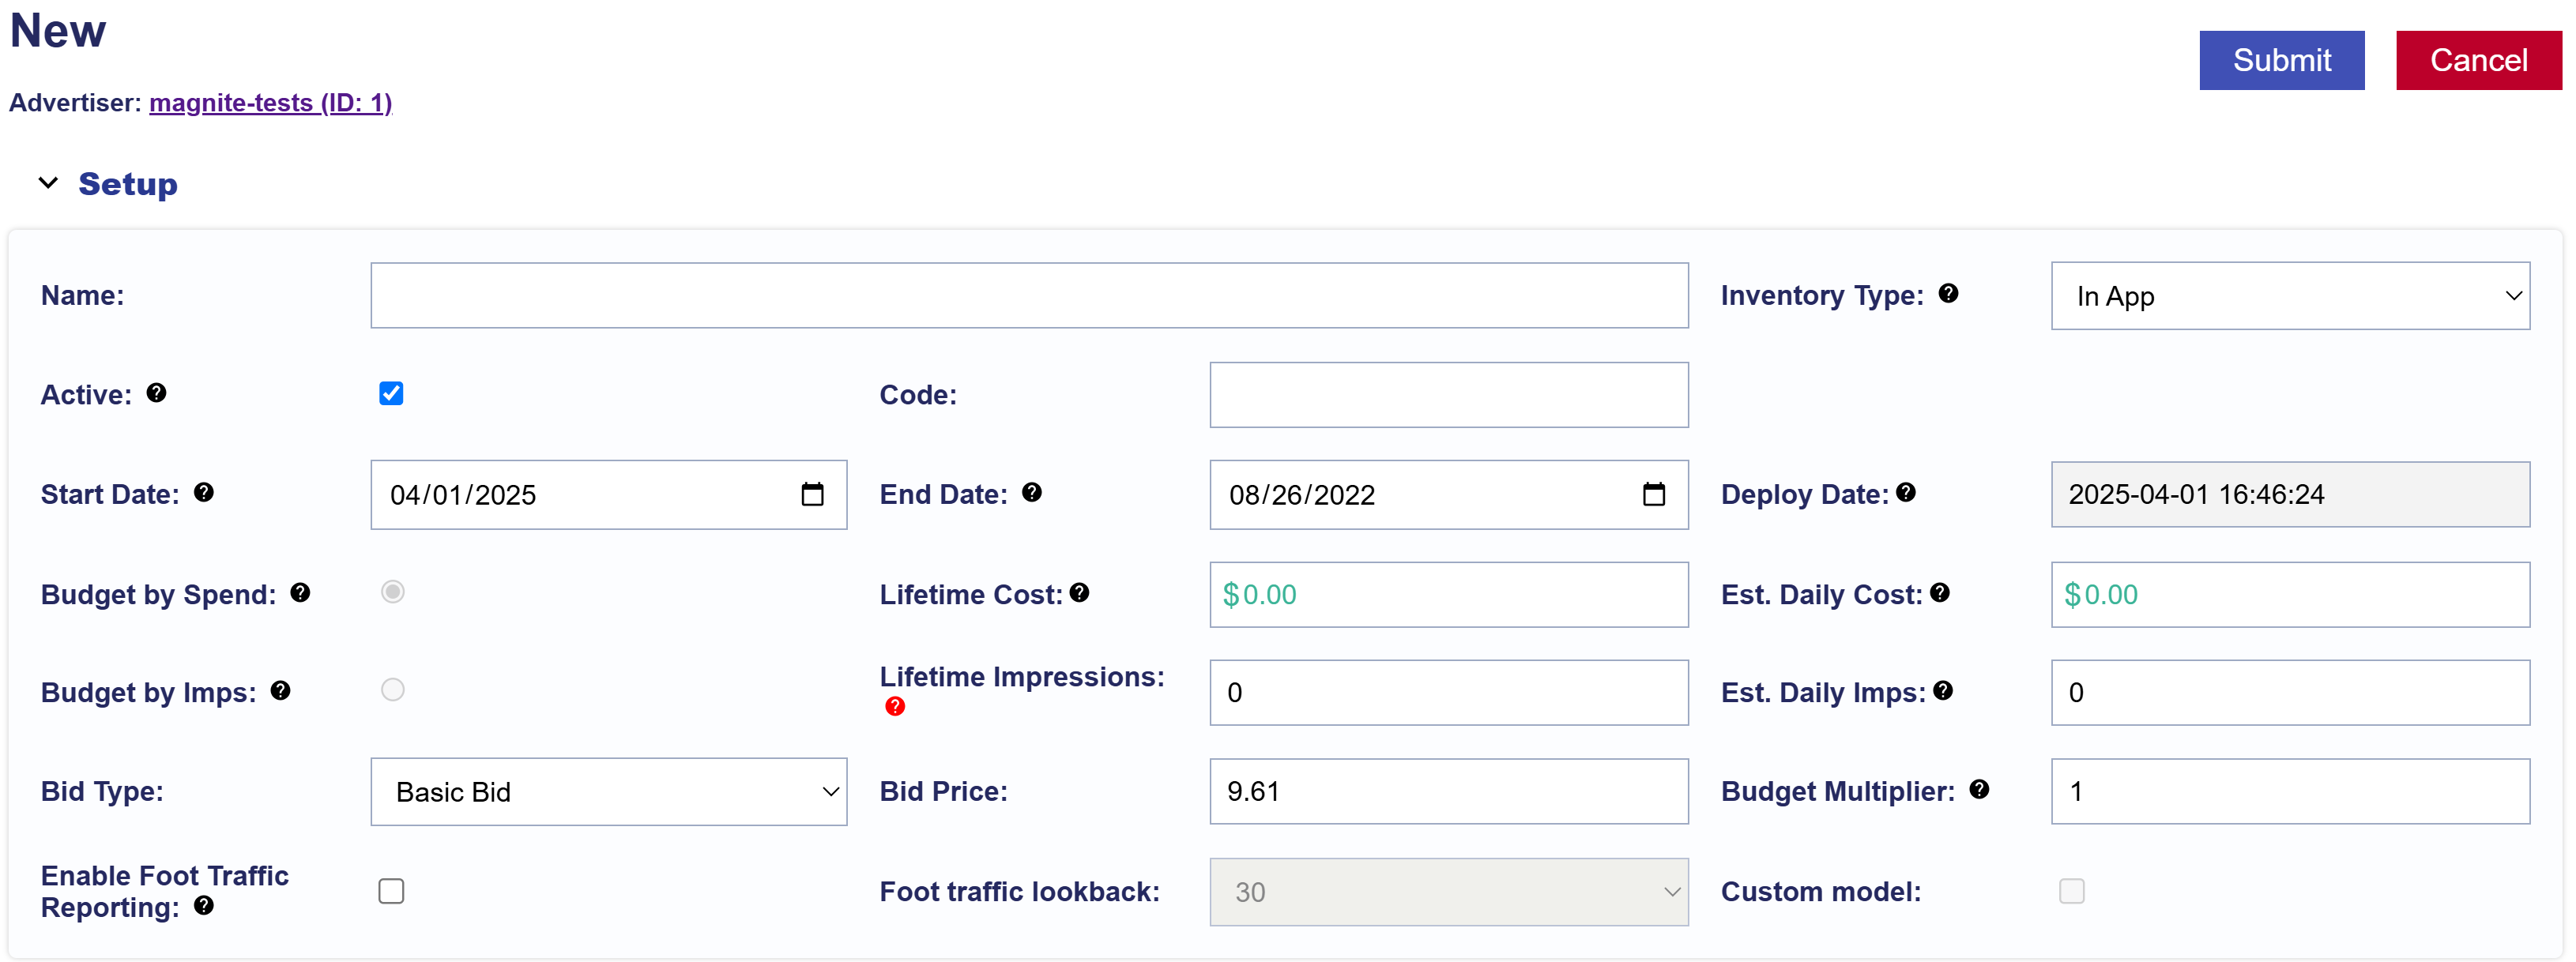
Setup
Name: Enter a unique name for your new Line to identify it easily.
Code: Optional and for reporting purposes.
Active Status: The ‘Active’ box is automatically checked, but uncheck it if you want to create an Inactive Line.
Select Start and End Dates for your Line if not managed at Campaign Level.
Deploy Date: Read-only field that shows the date the Line Item was created.
Budget: Line’s budget by spend. Inherited from the Campaign Level or set at the Line Level.
Lifetime Cost: The total cost for the Line based on serving dates and bids.
Est. Daily Cost: The estimated daily spend if the budget is perfectly distributed and delivers evenly across the selected flight dates. This is not the actual Daily Budget.
Budget by Imps: Line’s budget by imps. Inherited from the Campaign Level or set at the Line Level.
Lifetime Impressions: The approximated total number of impressions the Line will serve in it’s lifetime.
Est. Daily Imps: The estimated daily impressions if the budget is perfectly distributed and delivers evenly across the selected flight dates. This is not the actual Daily Budget.
Bid Type:
Basic Bid: Standard bid price applied across all inventory of the Line.
Bid at Floor Price: The maximum bid price and CPM floor allowed for an auction.
Advanced Bid Controls: A feature that allows setting a maximum bid price for Deals, giving more control over bid adjustments and spending limits.
Bid Price: The bid price determines how much you are willing to spend based on the selected bid type. For Advanced Bid Controls, set a Default Bid Price and custom bid prices. Deals must be associated at the Campaign and Line level to allow for custom bid prices. When new Deals are added to the Line if a custom bid is not set, the bid price will default to the value set in the Default Bid Price field on the Line.
Budget Multiplier: This feature allows the user to specify a multiplier on the daily budget. For example, setting a 1.1 multiplier will allow the Line to adjust the daily budget up to 110% of its typical daily budget. The new daily spend is calculated as Budget Multiplier x Daily Budget = New Daily Spend. Keep in mind, the daily budget may adjust based on pacing, and the actual daily spend could exceed the set multiplier.
Budget Allocation: Seamlessly distribute spend across Lines by applying weighted allocations. Requires Manage Budgets to be enabled at the Campaign level.
Enable Foot Traffic Reporting: Opt-in to include foot traffic data tracking for your Line.
Foot Traffic Lookback: Set the time window for tracking foot traffic data.
Custom Model: Reach out through the Help Center or to your Account Manager if you plan to use a custom model for your Campaigns and the Pontiac team will assist you.
Enable Line Frequency: This option sets a frequency cap for your Line, determining how often an ad is shown to the same individual user within a specified time frame. You can set the recency, which controls the minimum amount of time between ads shown to the same user.
Note that frequency capping is done using IP addresses and can severely limit spend.
Continue to the other sections to complete Line setup.
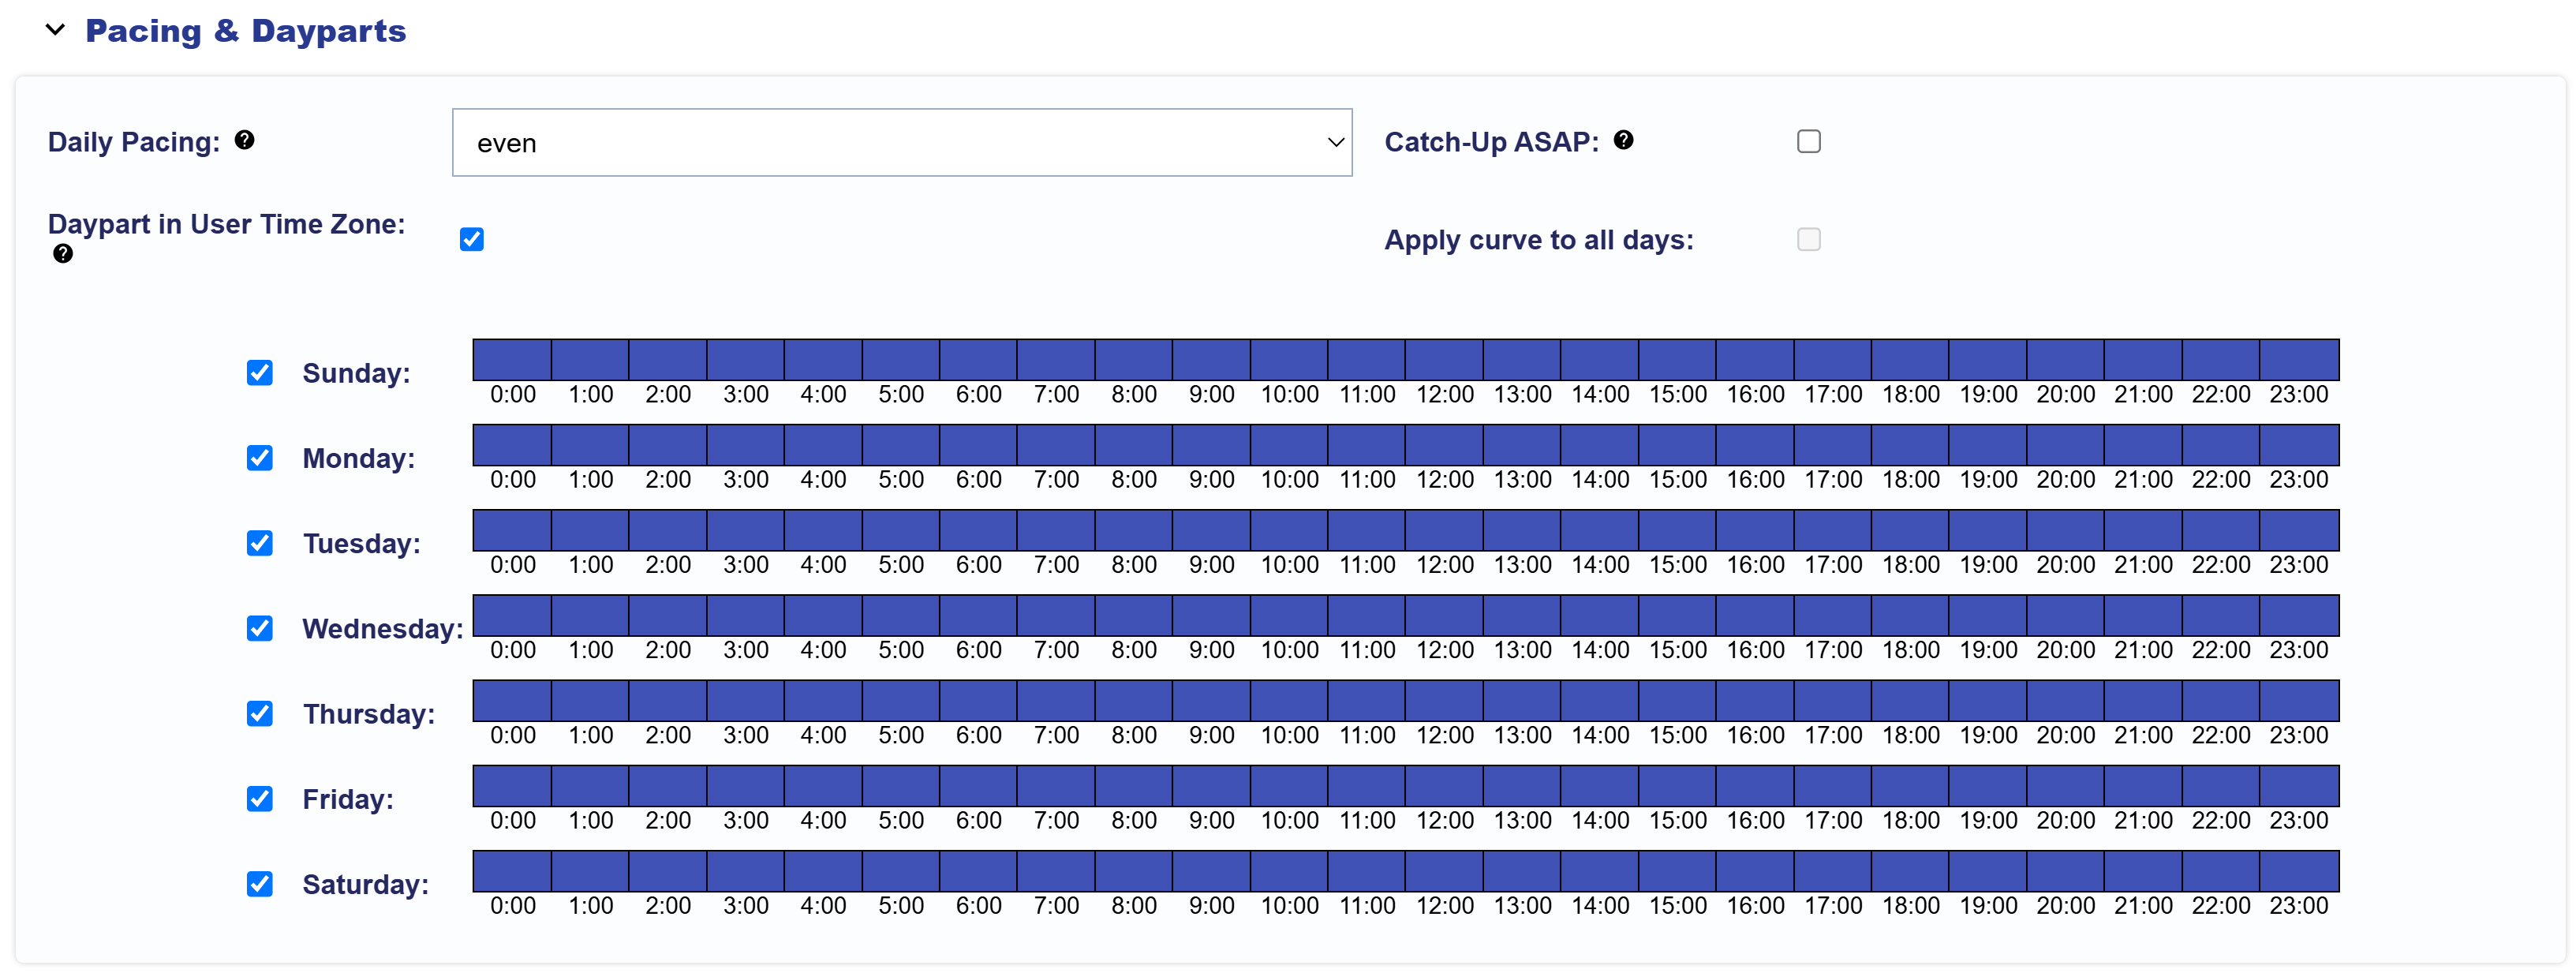
Line Pacing & Dayparts
On the Line Level, you can configure the following settings:
Daily Pacing Type:
Even: Spends both the daily and lifetime budgets as evenly as possible.
ASAP: Spends the daily budget as quickly as possible and will spend the lifetime budget evenly.
Primetime: Allocates the daily budget based on weighted ‘prime’ times of day.
Custom: Customize pacing by selecting weights for specific hours, days, and hours per day.
Enable ‘Apply curve to all days’ for custom weights to apply across all days.
If disabled, set custom weights for each hour of each day individually.
Catch-up ASAP: Opt in or out to allow unspent budget to catch up quickly. This will override the daily budget and daily pacing type selected to spend as quickly as possible until the Campaign or Line reaches 100% pacing. Once the Campaign or Line has caught up on any underspent budget, it will return to the selected daily pacing model.
Daypart in User Time Zone: If applied, dayparts will filter impressions according to the user’s timezone. If unchecked, dayparts will filter impressions according to the pacing timezone selected.
Line Frequency & Recency
If the ‘Enable Line Frequency’ feature is checked in the Line Setup, the Frequency & Recency section will become available for the Line.
In the Frequency & Recency section users can configure the following settings:
Line Frequency: Sets a frequency cap for how often an ad is shown to the same individual user within a specified time frame. 0 will allow for unlimited impressions.
Time Frame Days: Choose the time frame for the frequency cap.
1-14 days
Line Recency: Sets the minimum allowable amount of time between ads shown to an individual user.
None
1 minute
5 minutes
15 minutes
30 minutes
1 hour
6 hours
Campaign Frequency: Sets a frequency cap for how often an ad is shown to the same individual user within a specified time frame.
Time Frame Days: Choose the time frame for the frequency cap.
1-14 days
Campaign Recency: Sets the minimum allowable amount of time between ads shown to an individual user.
None
1 minute
5 minutes
15 minutes
30 minutes
1 hour
6 hours
Cap By:
IP (default): Caps impressions at the household level based on a user’s IP address. Commonly used for CTV environments.
IFA: Caps impressions at the device level using an Identifier for Advertising (IFA). Typically used in app-based environments where cookies are not supported (e.g., mobile and CTV apps).
Cookies (EU only): Caps impressions at the browser level using cookies. Available in EU-supported web environments where cookie-based tracking is permitted.
IFA-Ip: It applies frequency and recency caps using the most reliable identifier available for each impression.
When an IFA is available, the cap is applied at the device level using the IFA.
This prevents the same device from receiving additional impressions even if its IP changes, such as when moving between Wi-Fi, cellular networks, or hotspots.
When an IFA is not available, the cap is applied using the IP address.
This helps maintain stronger device-level frequency control where possible while still applying a fallback cap to impressions that do not include an IFA.
For example:
Line Frequency: 10
Time Frame Days: 1
Line Recency: 30 minutes
Cap By: Ip
This means, for this Line, the ad will be shown up to 10 times per user within a 1-day window, with a minimum of 30 minutes between each ad shown to the same IP Address.
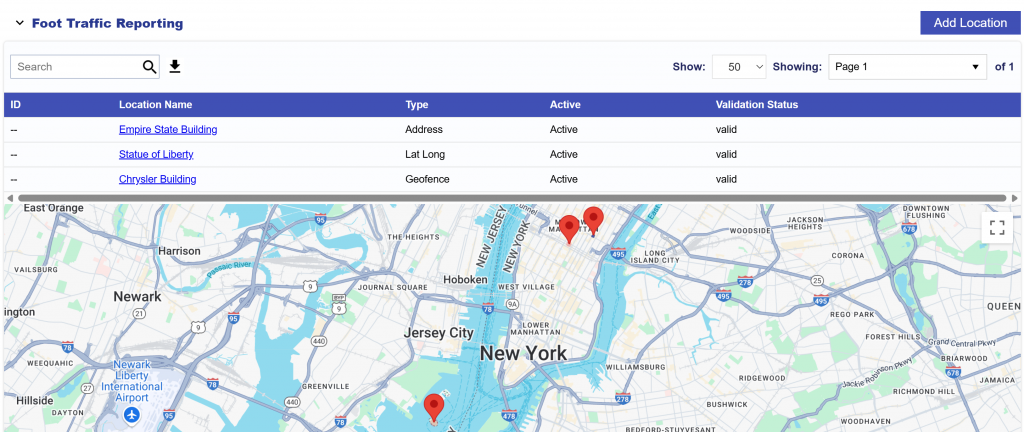
Line Foot Traffic Reporting
On the Line Level, users can add Foot Traffic Reporting by enabling the feature in the Setup section of the Line. This feature tracks whether users who were served your ads visited specific commercial addresses. Add Addresses in the expandable below. Foot Traffic Reports will generate in the Reporting tab. This feature costs an additional $4.00 CPM for CTV Creatives. This CPM should be added to the bid data.
Ways to Add a Location:
Address
Latitude Longitude (Lat Long)
Geofence
Bulk Upload
Below are the instructions for setting up a new location using each method.
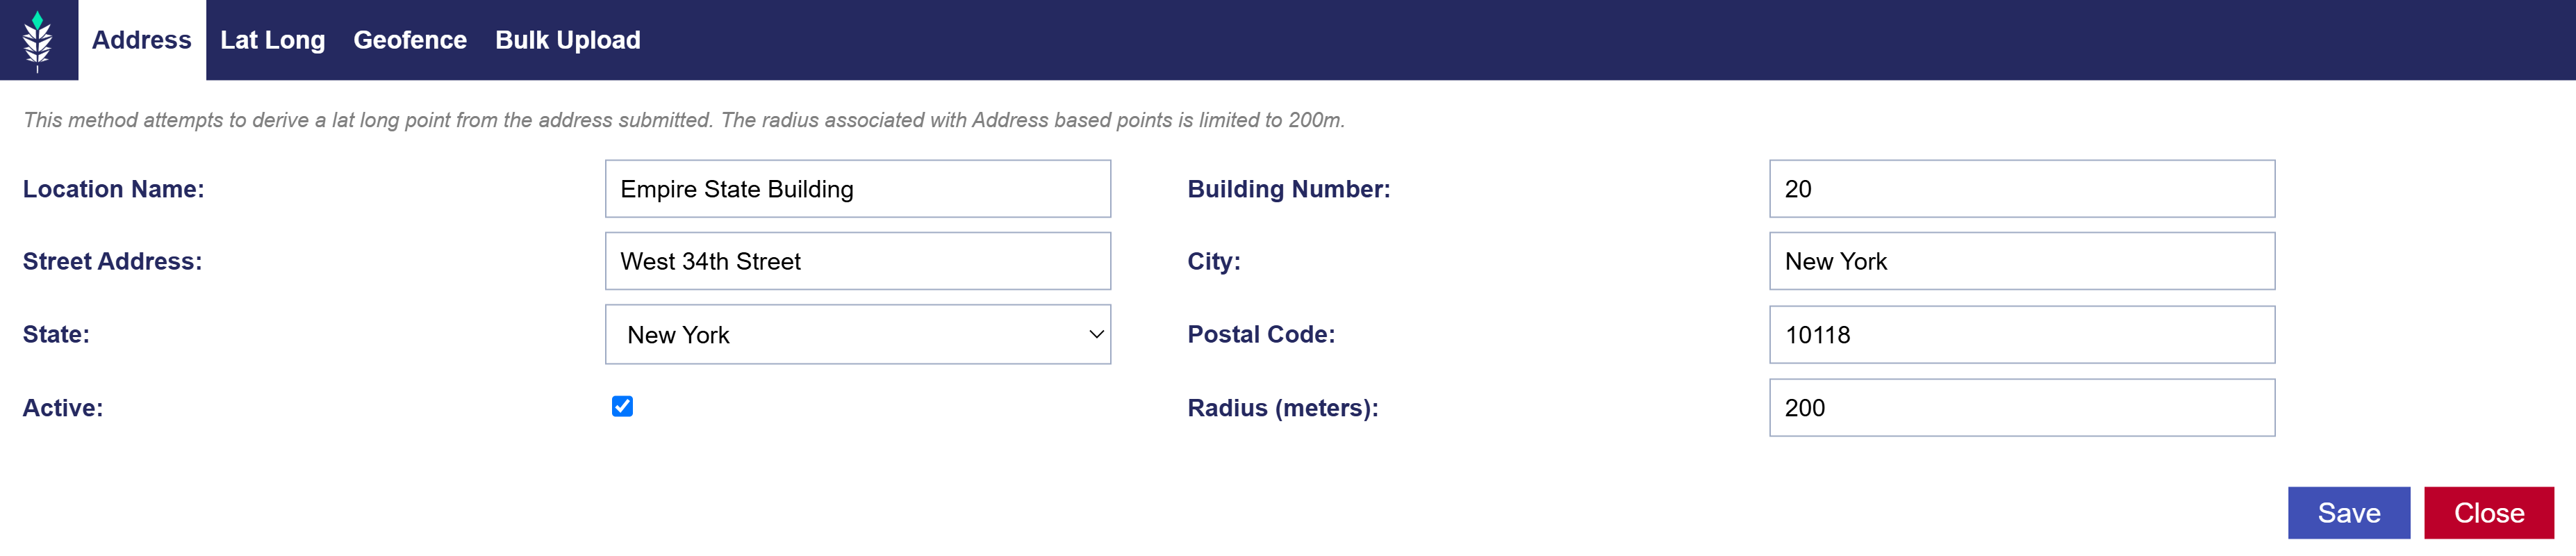
Address
The Address method attempts to derive a Lat Long point from the address submitted. The radius associated with Address based points is limited to 200m.
Follow these steps to add a location using the Address method:
Enable Foot Traffic Reporting in Line Setup.
Navigate to the Foot Traffic Reporting dropdown section.
Select ‘Add Location’.
Enter the following details:
Location Name
Street Address
State
Active Status
Building Number
City
Postal Code
Radius (meters)
Click ‘Save’.
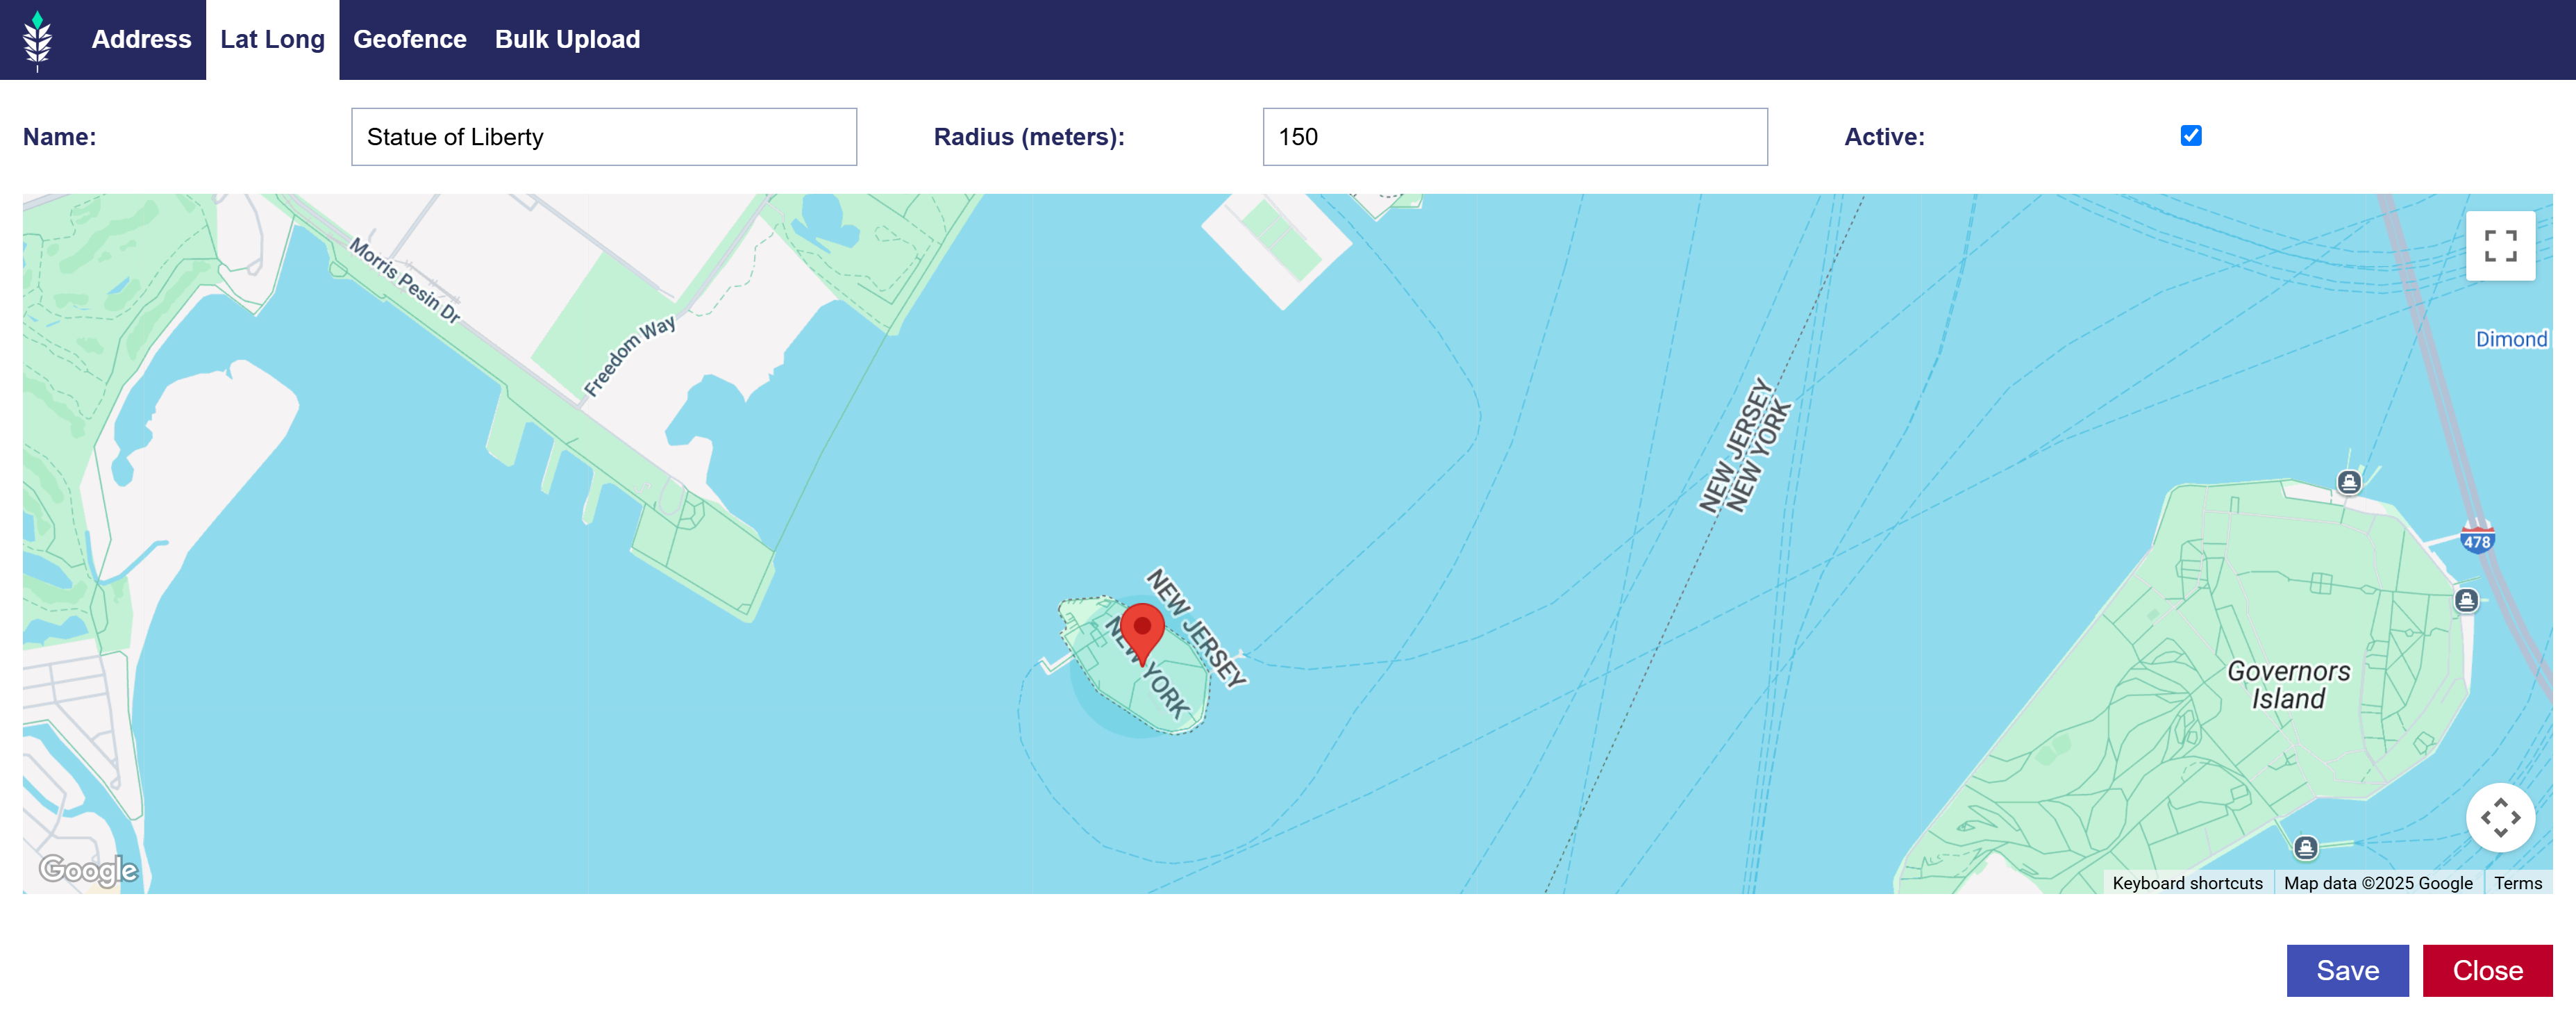
Lat Long
Follow these steps to add a location using the Lat Long method:
Enable Foot Traffic Reporting in Line Setup.
Navigate to the Foot Traffic Reporting dropdown section.
Select ‘Add Location’.
Click the ‘Lat Long’ tab on the window pop up.
Give location a name.
Use the map to select your Lat Long point.
Click ‘Save’.
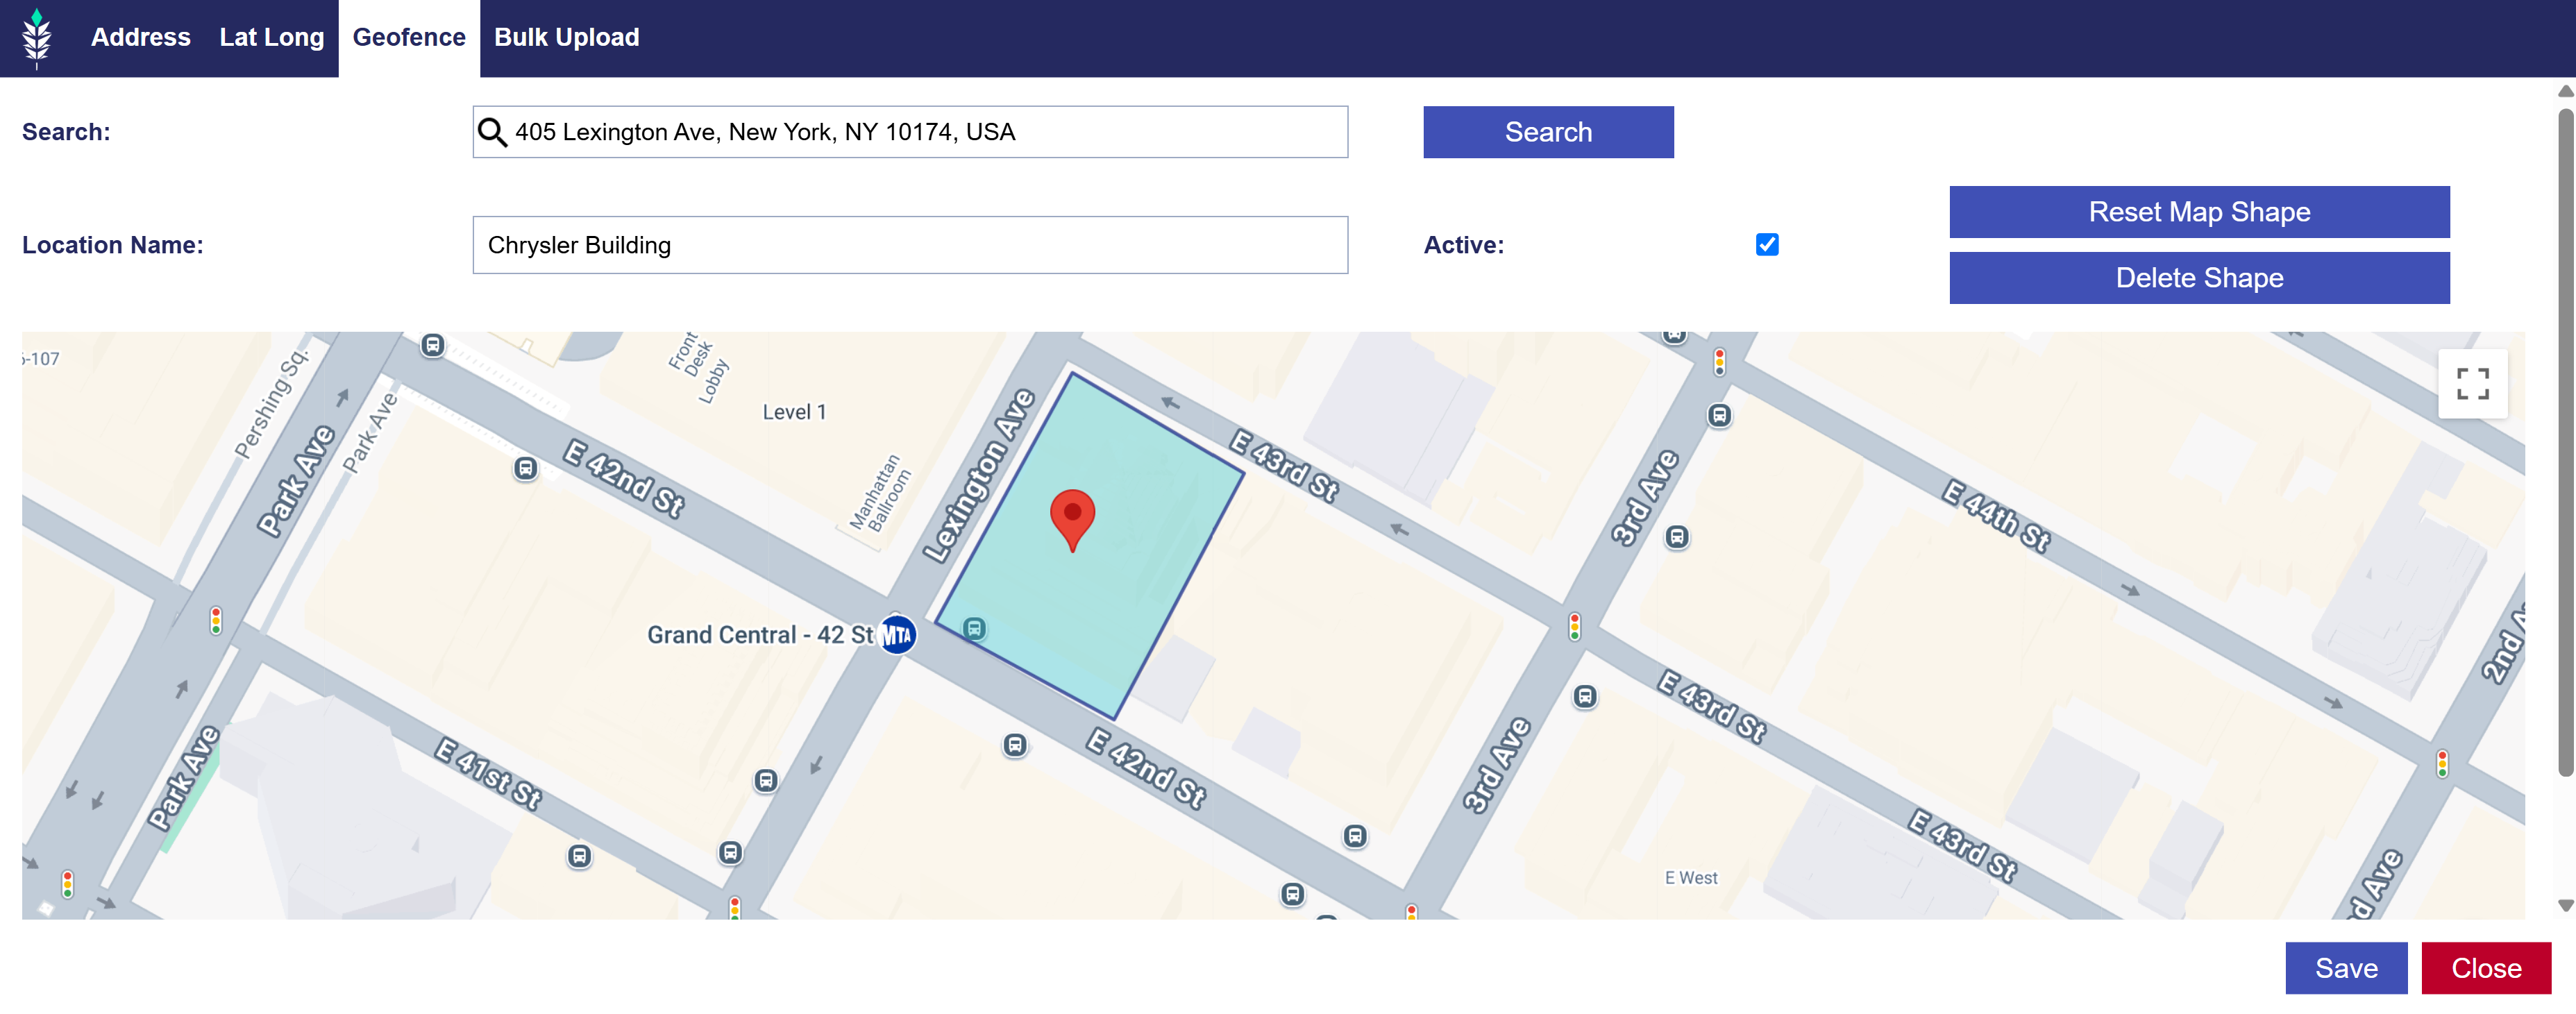
Geofence
Follow these steps to add a location using the Geofence method:
Enable Foot Traffic Reporting in Line Setup.
Navigate to the Foot Traffic Reporting dropdown section.
Select ‘Add Location’.
Click the ‘Geofence’ tab on the window pop up.
Use the Search tool to find address of your desired location.
Give location a name.
Click map to create the shape of your Geofence.
Utilize the ‘Reset Map Shape’ and ‘Delete Shape’ until the Geofence fits your specifications.
Click ‘Save’.
Bulk Upload
The Bulk Upload tab will allow you to upload up to 200 locations at one time.
Please follow the following format:
Name, Building Number, Street Address, City, State, Postal Code, Active, Radius
Example Line: City Grill, 10701, Balls Ford rd, Manassas, VA, 20109,1,117
Note that the fields must be separated by comma’s and the header is optional.
The Line Targeting section is designed to enables buyers to control what they buy through the following:
Deals
Exchanges
Geo
Zip
OLV
Livestream
Site Lists
App Lists
Deal Lists
Device Type
Channel
Network
Publisher
Genre
Series
Title
Multi Field
Privacy
See below for more details for each targeting section.
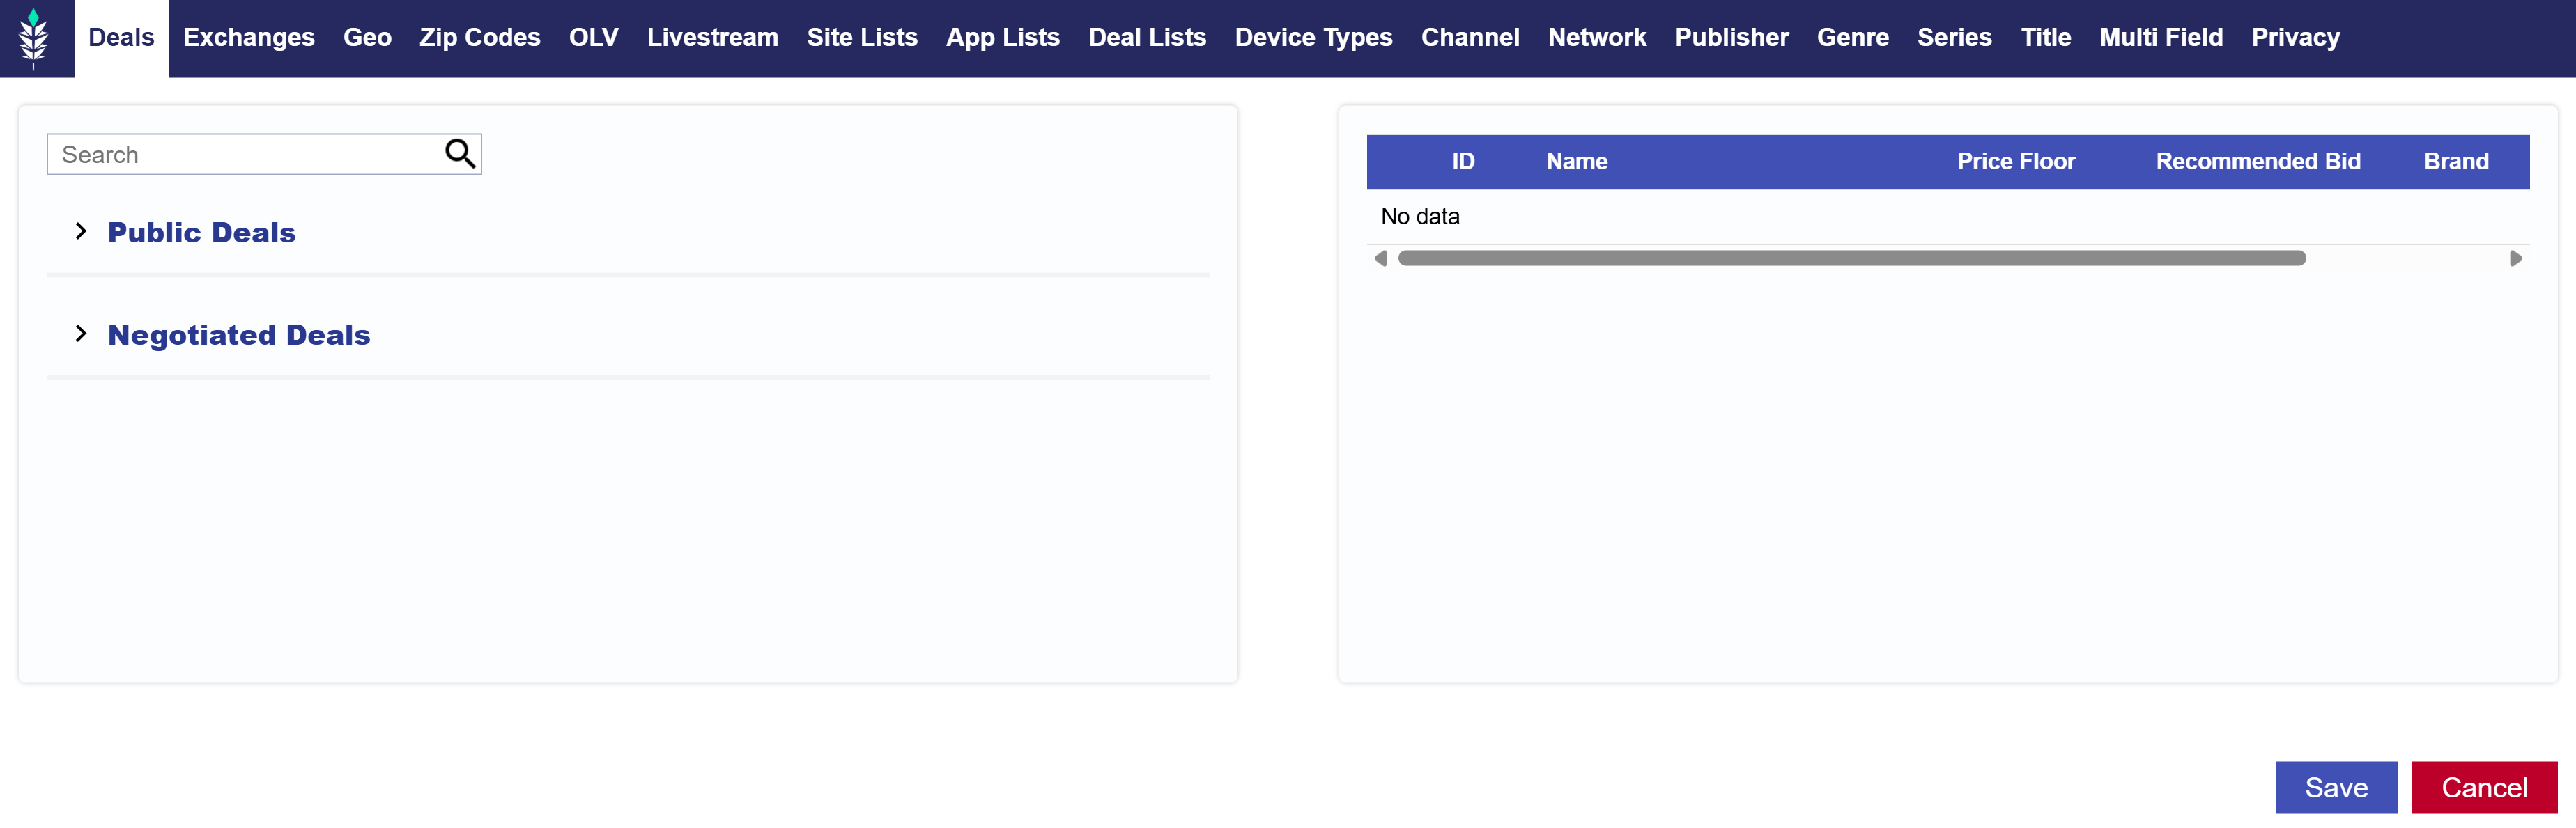
Deals
Public Deals: Pontiac provides pre-negotiated CTV, OTT, OLV and Audio Deals through a wide variety of publishers in all content categories, available directly in the platform. Click the dropdown to see the full list of available public deals.
Negotiated Deals: Click the dropdown to see your Seat’s Negotiated Deals. Reach out to the Pontiac Help Center if the deal you are looking for does not appear here.
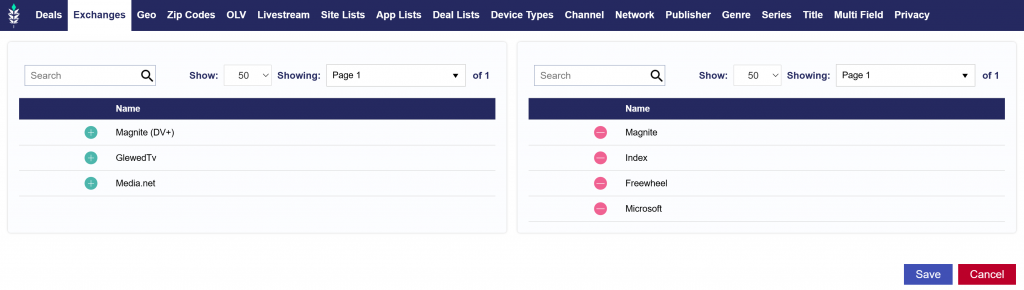
Select the exchanges that you wish to buy media through. These are inventory sources that your ad will run through (also known as Supply Side Platforms). You can select as many or as few exchanges as you would like.
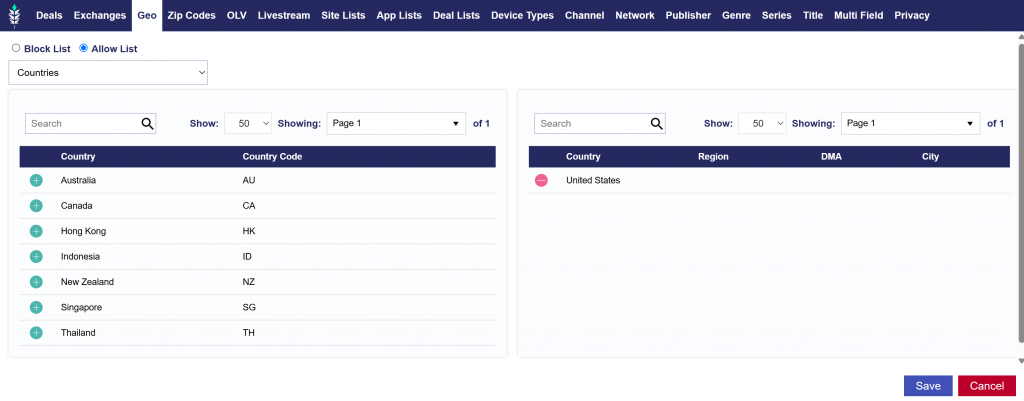
Select Countries, Regions, and DMAs for where your Line will target. Below are the key points to setting up Geo targeting:
Block List vs Allow List: Geo targeting allows advertisers to control where their ads appear using two different approaches: Allow Lists and Block Lists.
Allow List: An allow list is a list of specific geographic locations where ads are allowed to be shown. If an advertiser only wants their Line to run in a particular set of locations (e.g., Countries, Regions, or DMAs), they would use an allow list.
Block List: A block list is a list of geographic locations where ads are not allowed to be shown. If an advertiser wants to target a broad region but exclude specific areas, they would use a block list.
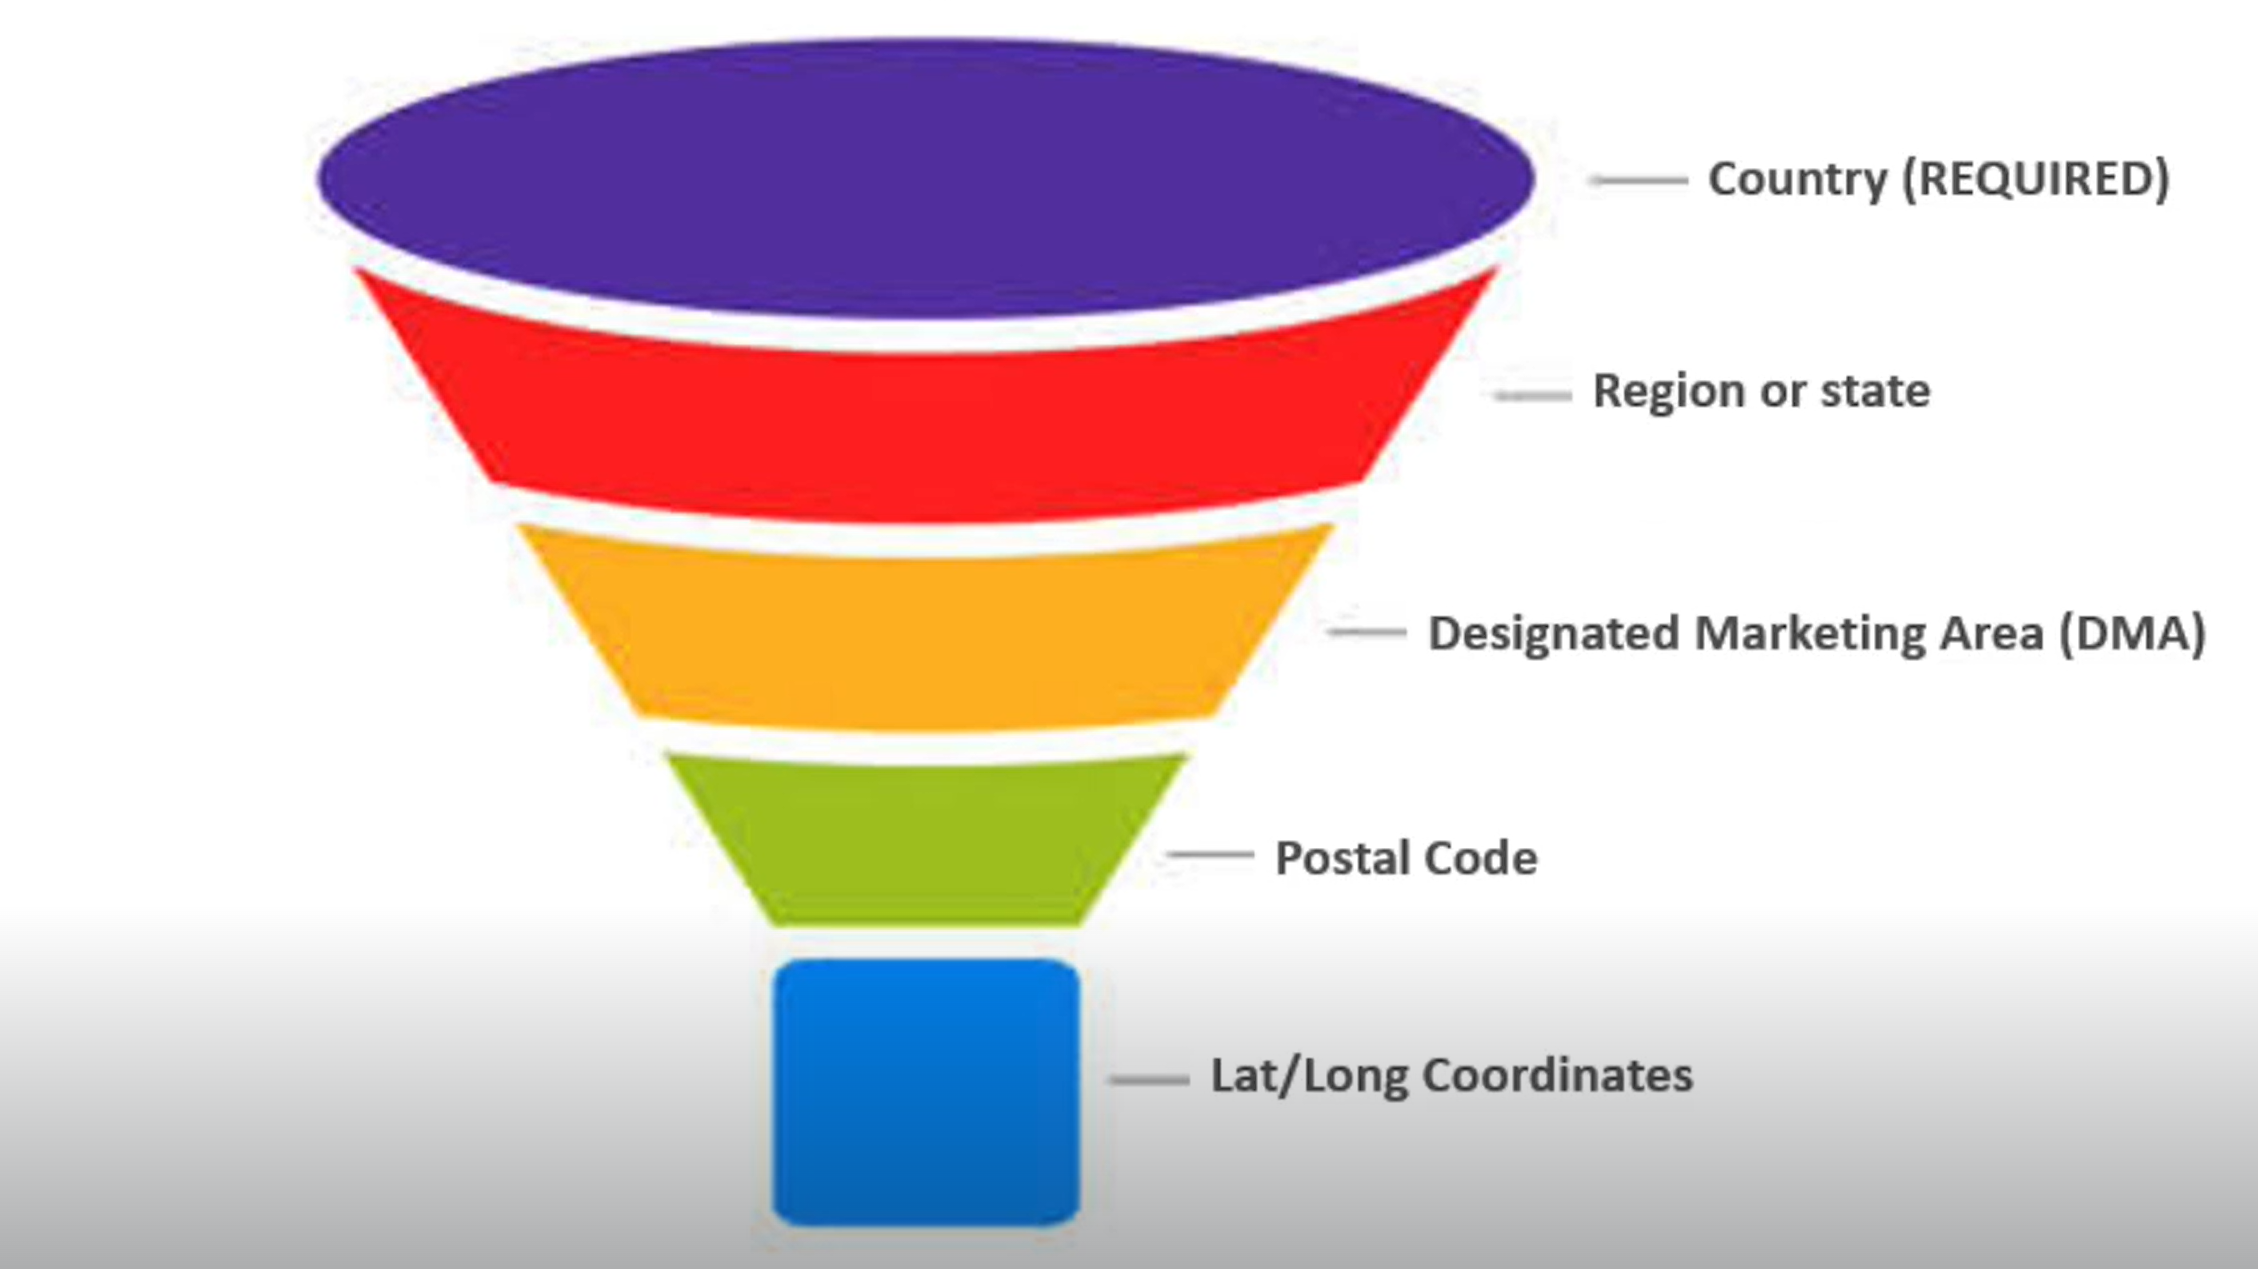
Country Selection: At least one Country must be selected to begin targeting. Once a country is chosen, you can further refine your targeting by adding secondary geographic layers such as Regions, Designated Marketing Areas (DMAs), or Cities. Note that Regions refer to states, provinces, or municipalities.
Targeting Funnel: Geo targeting works like a funnel, where the most granular targeting condition must ALWAYS be met for an impression to be served. For instance, if you select a zip code in Miami, along with the Miami DMA and United States as the country, your Line will only serve in that specific zip code since it’s the most granular level of targeting.
Each layer of Geo targeting must coincide with the previous layers. If there are conflicts, such as selecting the United States, a New York City DMA, and a Florida zip code, the Line will NOT be able to serve because the DMA and Zip Code are geographically inconsistent.
Available DMAs: The following countries support DMAs for targeting.
Aland Islands
Australia
Canada
China (Diji Shi cities)
Finland
France (Departments)
Germany (German Nielsen Metro Codes)
Korea, Republic of (Si/Gun/Gu)
New Zealand
Norway
Russian Federation (Federal Districts)
United Kingdom (ITV Regions)
United States (DMAs)
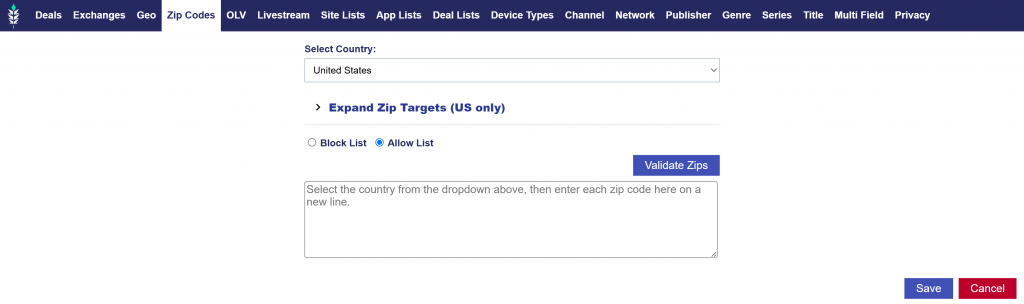
Zip Codes
You can target specific zip codes in the United States or other countries through their regional postal code system. By targeting a set of zip codes, a client’s Line ads will only serve in the most relevant areas. These zip codes can be created in either the ‘Audiences’ tab through the Custom Audience Zips Type or in the Line Item targeting menu.
To create a list of zip codes in the Line Item targeting menu, follow the below steps:
Select the Country: From the dropdown menu, choose the country you want to target.
Enter Zip Codes: Paste the zip codes you wish to target into the textbox, separated by commas.
Allow List (Target): Use this to target specific Zip Codes.
Block List (Anti-target): Use this to avoid specific Zip Codes.
Add a Country: To add a country to the dropdown menu, contact your Account Manager via email
Tip for Better Scale:
Expand Zip Targets: If your zip code targeting isn’t scaling effectively, use the ‘Expand Zip Targets’ feature. In the Targeting menu, open the zip code tab, enter a radius in meters, and select ‘Get Zips’. This will find zip codes within this radius from the center point of the zip code’s entered. A window will open showing you the list of zip codes found within this radius. Select ‘Add Zips’ to add the new zip codes to the targeting on the Line Item.
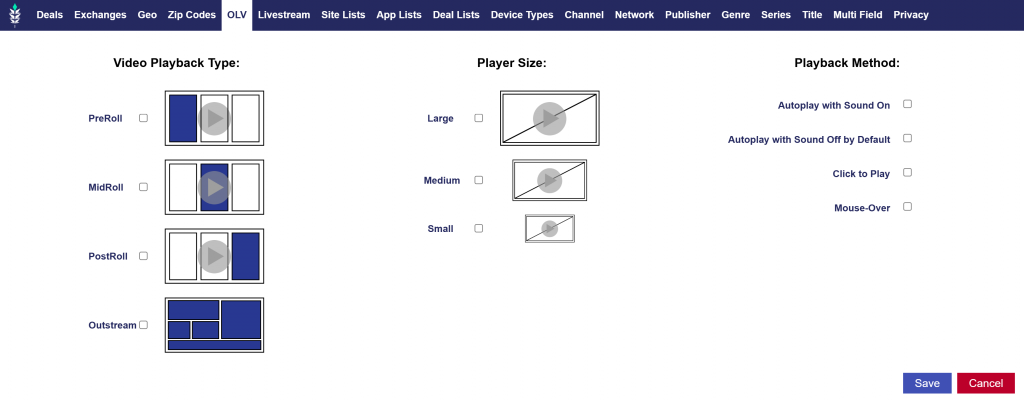
OLV
Video environment targeting can be found in the ‘OLV’ tab of the ‘Targeting’ section on both the Campaign and Line Item levels.
Playback Type:
PreRoll: An instream placement where ad plays before streaming video content.
MidRoll: An instream placement where ad plays during streaming video content.
PostRoll: An instream placement where ad plays after streaming video content.
Outstream: An outstream video is placed in non-video environments among other types of content, ie. web article or mobile game.
Player Size:
Large: Minimum width of 640 pixels
Medium: Minimum width of 320 pixels, maximum width of 639 pixels
Small: Maximum width of 319 pixels
Video Playback Method:
Autoplay with Sound On
Autoplay with Sound Off by Default
Click to Play
Mouse-Over
Livestream
As noted in the figure above, checking the livestream box will filter out any on-demand (VOD) inventory to target only impressions within content being live-streamed. Live content typically includes sports games, news, coverage of live events, etc. Not all publishers and streaming platforms contain live content, so it is recommended to run an Inventory Availability report to verify if live content is available prior to applying this targeting feature.
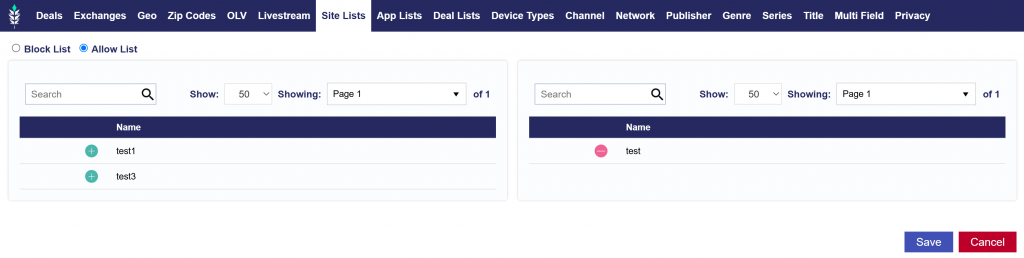
Site Lists
If no site list is attached to your Line, domain targeting will be open by default.
Create Custom Lists:
Navigate to the ‘Inventory’ tab.
Select ‘New Site List’ or ‘New App List’ or ‘New Deal List’.
Once a list is saved, it will automatically appear under the ‘Site Lists’ or ‘App Lists’ or ‘Deal Lists’ section in the ‘Targeting’ menu of the Line.
Premade Lists:
Pontiac also provides premade site lists and app lists for various categories that you can choose from. See the full list and definitions in the following documentation: Site & App Lists
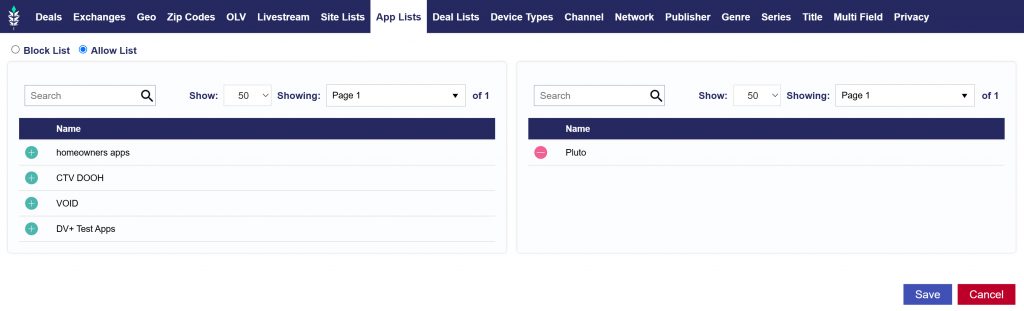
Allow List vs. Block List:
Allow List (Target): Use this to target specific sites or apps.
Block List (Anti-target): Use this to avoid specific sites or apps.
How to Associate Lists:
Go to ‘Edit Targeting’ within your Line.
In the ‘Sites Lists’ or ‘App Lists’ or ‘Deal Lists’ tab, select the ‘Allow List’ or ‘Block List’ bubble, depending on your targeting needs.
Click the green plus sign next to the list you want to target or avoid.
The associated lists will appear on the right side of the screen.
Click ‘Save’ and the list targeting will be applied.
Note, when creating a new Site List you must paste each website on a new line. The URL should include the top-level domain, second-level domain, and subdomains if applicable. URLs should not include the scheme or subdirectories.
App Lists
Follow the directions under the above Site Lists to create and associate App Lists. When creating a new App List, please use the following format on new lines for each app.
Line Format: App name, OS ID
Line Example: com.king.candycrushsaga, 2
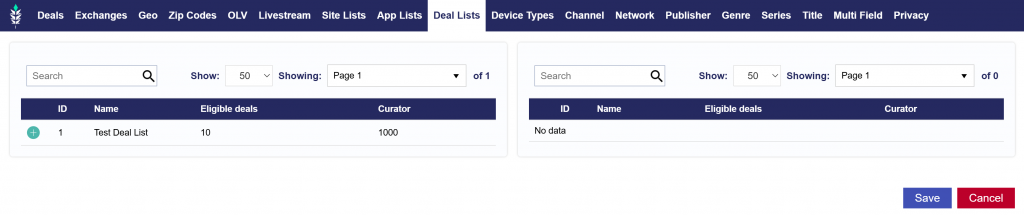
Deal Lists
Follow the directions under the above Site Lists to create and associate Deal Lists.
When creating a new Deal List, all available deals will be shown on the left hand side. To add them to your new Deal List, just click the green plus symbol. Press the red minus symbol to remove the deal.
When adding a Deal List to targeting, click the green symbol to add the Deal List and press the red minus symbol to remove the Deal List.
Device Types
Target based on the following Device Types:
Personal Computer
Connected TV (CTV)
Phone:
Tablet
Connected Device
Set Top Box
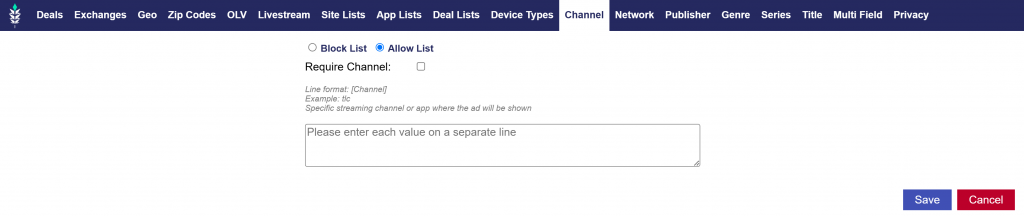
Channel
To Target specific Channels, enter each value on a separate line and follow the following formatting:
Line Format: Channel
Line Example: tlc
Note that you can Require Channel and create a Channel Allow List or Block List.
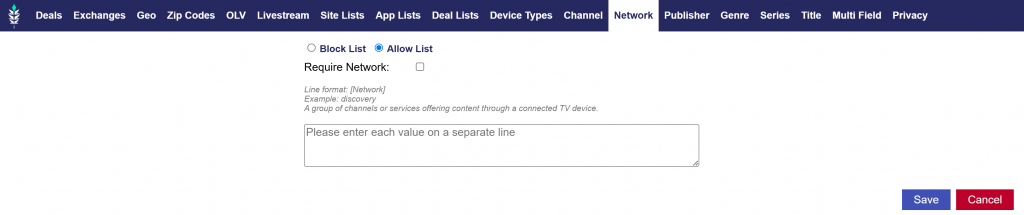
Network
To Target specific Networks, enter each value on a separate line and follow the following formatting:
Line Format: Network
Line Example: discovery
Note that you can Require Network and create a Network Allow List or Block List.
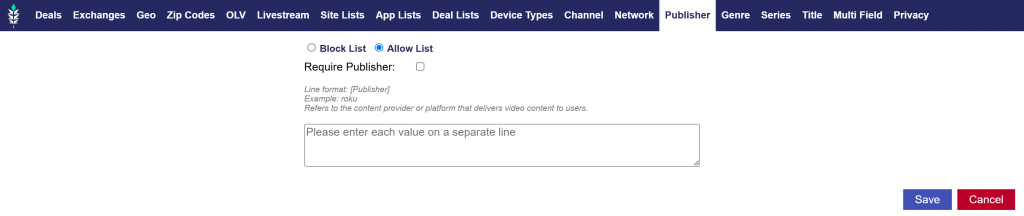
Publisher
To Target specific Publisher, enter each value on a separate line and follow the following formatting:
Line Format: Publisher
Line Example: roku
Note that you can Require Publisher and create a Publisher Allow List or Block List.
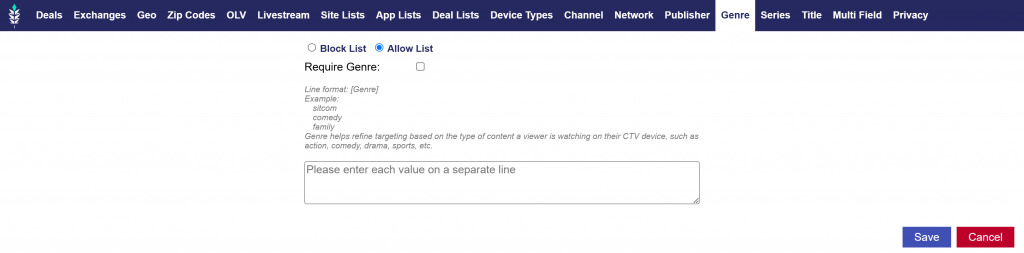
Genre
To Target specific Genres, enter each value on a separate line and follow the following formatting:
Line Format: Genre
Line Example:
sitcom
comedy
family
Note that you can Require Genre and create a Genre Allow List or Block List.
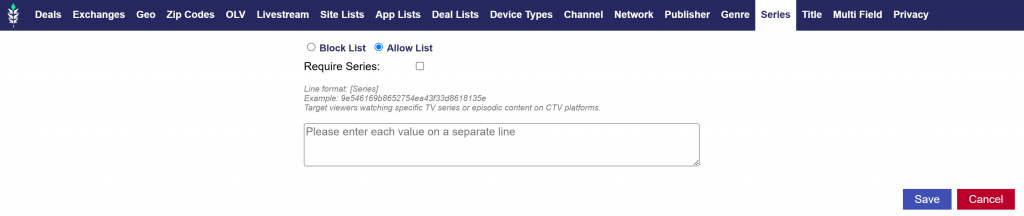
Series
To Target specific Series, enter each value on a separate line and follow the following formatting:
Line Format: Series
Line Example: 9e546169b8652754ea43f33d8618135e
Note that you can Require Series and create a Series Allow List or Block List.
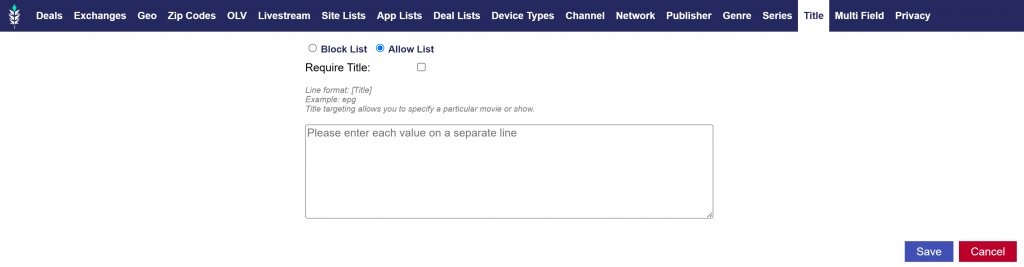
Title
To Target specific Titles, enter each value on a separate line and follow the following formatting:
Line Format: Title
Line Example: epg
Note that you can Require Title and create a Title Allow List or Block List.
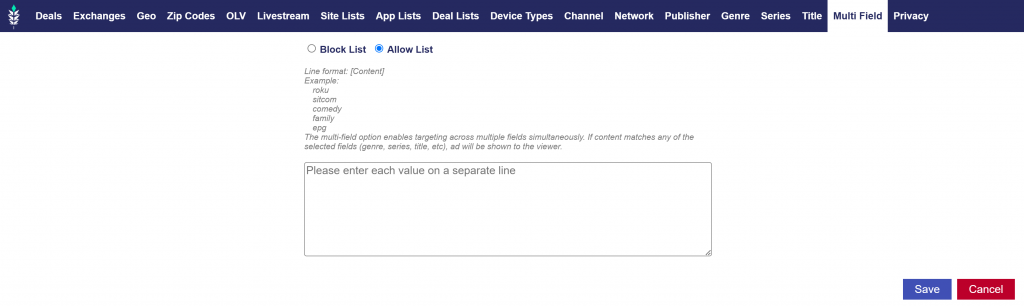
Multi Field
The Multi Field option enables targeting across multiple fields simultaneously. If content matches any of the selected fields (genre, series, title, etc.), the add will be shown to the viewer.
Line Format: Content
Line Example:
roku
sitcom
comedy
family
epg
Note that you can create a Multi Field Allow List or Block List.
Privacy
As noted in the image above, if either of the following options are selected, targeting by any persistent identifiers (e.g., cookies, IDFAs, Google ad IDs, fingerprints), precise geolocation, full IP addresses or full referrer URLs is prohibited. This data will be stripped from the bid request before filtering is applied. In addition, IP address or IFAs cannot be passed back to clients or passed on through pixel/creative macros.
Serve to COPPA: If this box is checked inventory regulated “COPPA” ( Children’s Online Privacy Protection Act) will be purchased.
Serve to DNT: If this box is checked users who have elected not to be tracked will be served to.
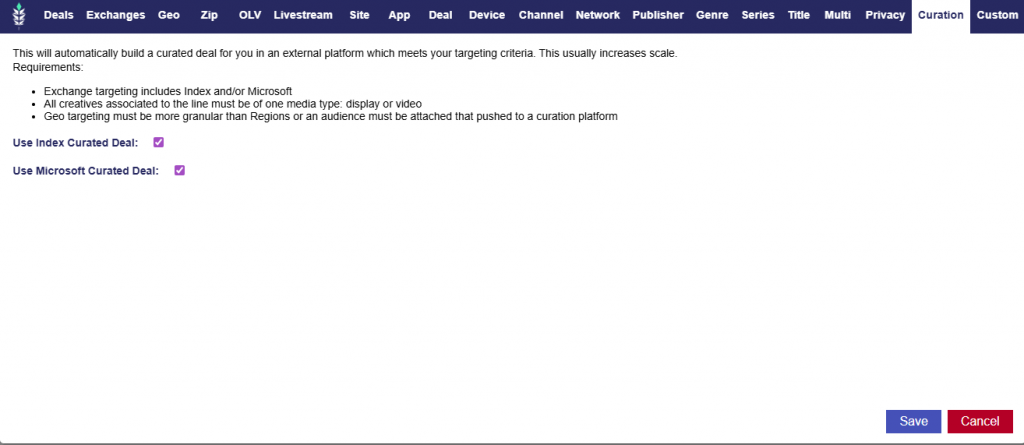
Curation
Index Curation
Users can automatically create an Index Curated Deal, by enabling our Use Index Curated Deal feature! This helps increase scale. This feature enables automatic deal creation in Index Exchange based on a line’s targeting and can be used to run Display or Video Campaigns. When activated, Pontiac builds a curated marketplace deal in Index that mirrors the line’s targeting parameters and associates it directly with that line automatically.
Conditions:
Exchange targeting includes Index
All creatives associated to the line must be of one media type
Geo targeting must be more granular than Regions or an audience must be attached that p0ushed to a curation platform
Miscrosoft Curation
Users can automatically create a Microsoft Curated Deal, by enabling our Use Microsoft Curated Deal feature! This helps increase scale. This feature enables automatic deal creation in Microsoft Exchange based on a line’s targeting and can be used to run Display or Video Campaigns. When activated, Pontiac builds a curated marketplace deal in Microsoft that mirrors the line’s targeting parameters and associates it directly with that line automatically.
Conditions:
Exchange targeting includes Microsoft
All creatives associated to the line must be of one media type
Geo targeting must be more granular than Regions or an audience must be attached that p0ushed to a curation platform
Custom Model
Insights are only as powerful as your ability to act on them. With our new Analytics Suite capabilities, you can now take analytics outputs as an optimization model and apply them directly to your campaigns instantly.
No manual translation. No workflow gaps. Just seamless activation.
The Custom Model tab, available at both the Campaign and Line levels, brings your models directly into the Targeting workflow, giving you greater control over how and where your models are applied to your campaigns.
To learn more about the analytics models and for instructions on how to generate a report/model, see here: Analytics Documentation
From Analysis to Activation:
Generate a Targeting, Audience, Incrementality, or Full Analysis (all three pipelines combined) report
Navigate to the Targeting section at the Campaign or Line level
Select the Custom Model tab
Enable the Use Custom Models feature
Choose a model from the available list
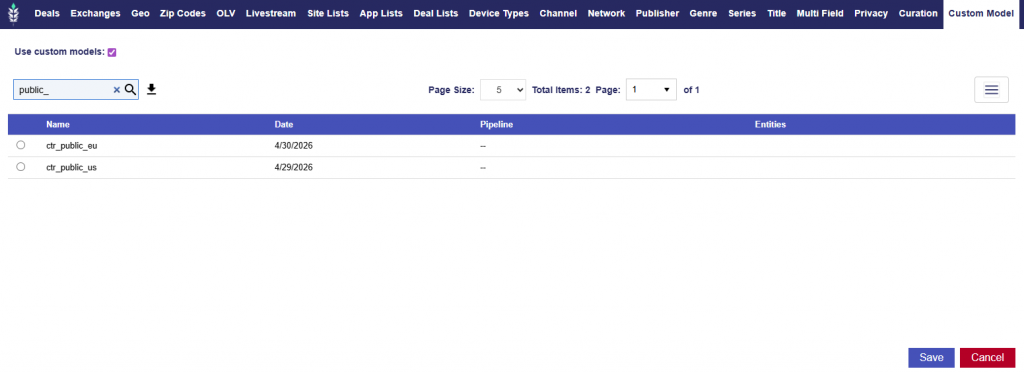
Once enabled, a table will display all available models associated with the advertiser. Each model includes the following information to help guide selection:
Name: The name of the report/model
Date: When the report/model was generated. If you Save & Rerun the original report, the model will automatically update.
Pipeline: The type of analysis used to generate the model (Targeting, Audience, Incrementality, or Full Analysis)
Entities: Indicates whether the model was built at the Advertiser, Campaign, or Line level
This streamlined workflow makes it easy to select the most relevant model and move from insight to action in seconds!
Line Creatives
On the Line Level, users can Associate Creatives. In this window, you can add and remove creatives that are available for association with the Line. Note that Creatives must be uploaded and edited on the Advertiser Level. Additionally, if Manage Creatives is enabled on the Campaign level, you will not be able to associate the creative to the Line level. For more information see the following documentation: Creatives
Line Audiences
Associate Audience Segments to the Line of your choosing through Custom Audiences, Contextual Audiences, or ART Audiences.
Custom Audiences
To create a Custom Audience, go to the ‘Audiences’ tab and select ‘New Custom Audience’. Give the Audience a name and select the type of Audience from the dropdown. Here is a list of Types available and the proper line formatting:
IP Ranges
Line Format: [IP] or [Start IP],[End IP]
Line Example: 63.148.81.24 or 234.123.0.13,234.123.10.15
Zips
Line Format: [Zip Code],[Country Code]
Line Example: 03102,US
Note that if the country code is omitted the US is used by default.
IFA
Line Format: [Device IFA]
Line Example: 735612e1-d4b9-40ec-83da-9ea0d3c5ceb3
Hashed IPs
Line Format: [IP Hash]
Line Example: 225f334d5db5e4c824d49cd7b03fc73ae21d1c715573a7c1a86abb7a11a80364
Full URL
Line format: [Full URL]
Example: www.viki.com/videos/1153464v
Note that the URL should not include the scheme.
Enter the Audience data according to the indicated format. These Audiences will automatically be available to associate to any Campaign.
Important things to note:
Each seat can have a maximum of 50 updatable custom audiences at a time.
These audiences can also only be updated 50 times per day.
Custom Audiences expire after 180 days. If a segment appears in gray and cannot be associated, it is either expired or cannot be used for the selected creative or inventory type.
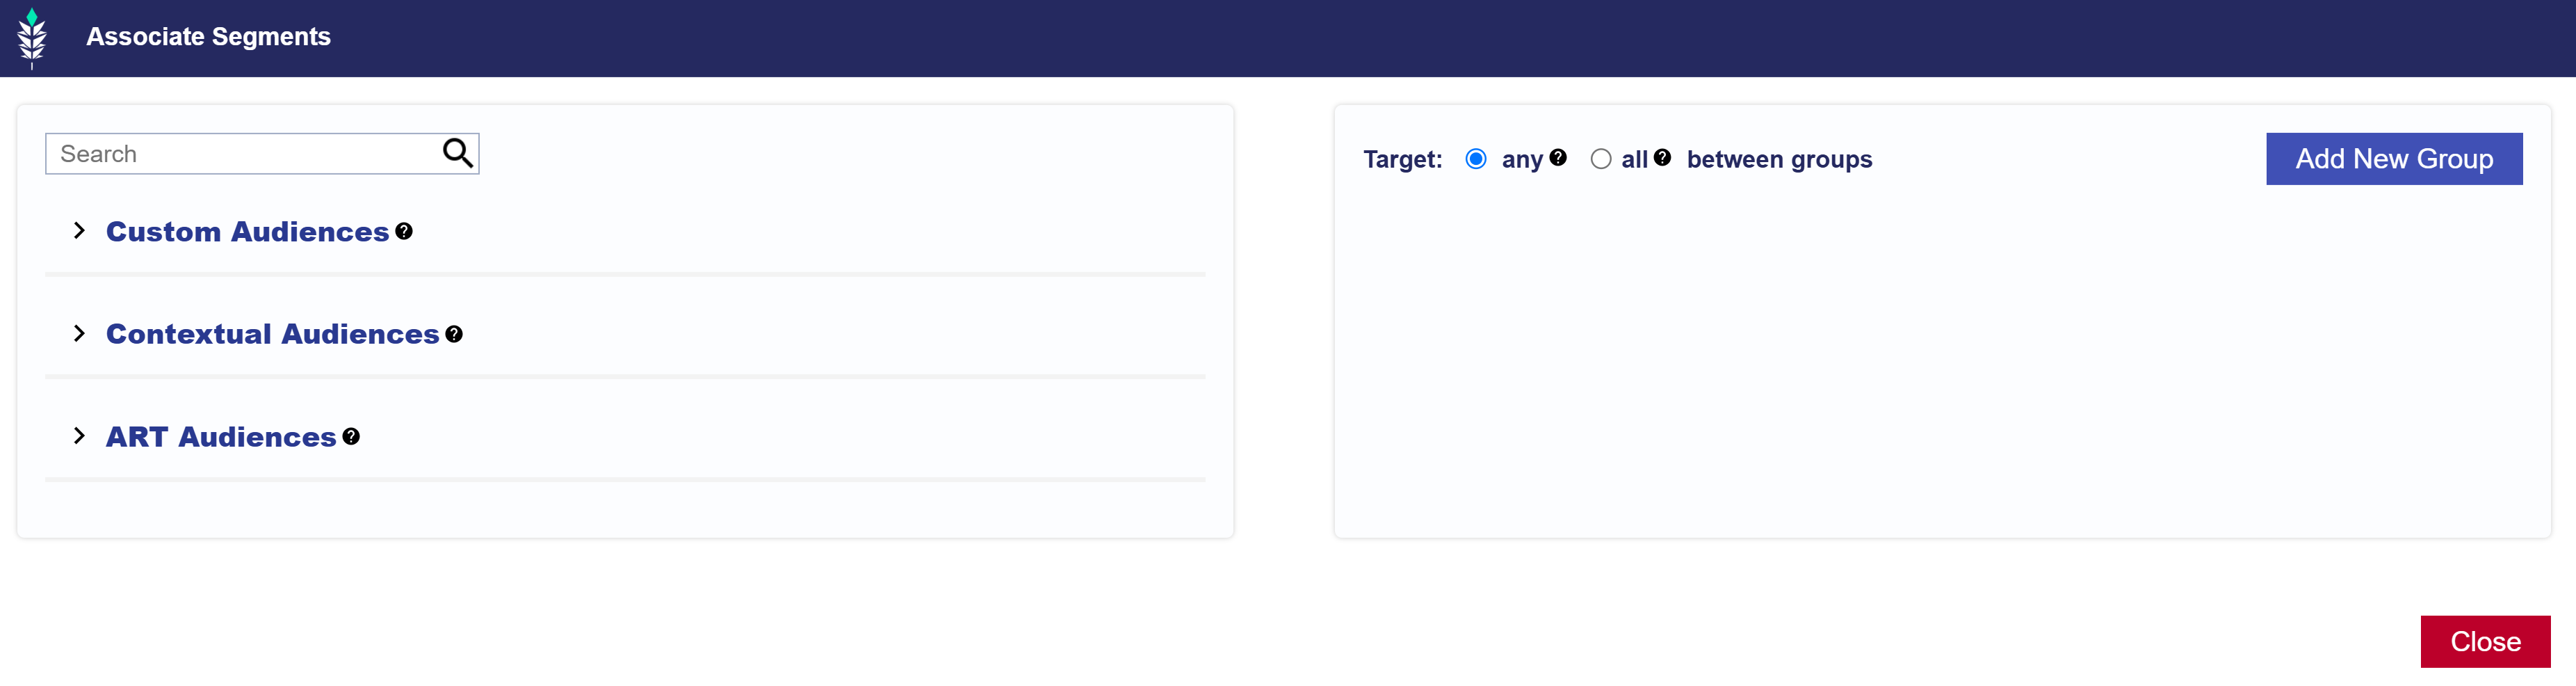
To associate Custom Audience Segments to a Campaign:
Navigate to the ‘Audiences’ section.
Click the ‘Associate Segments’ button. The segment selection window will appear.
Open the ‘Custom Audiences’ dropdown.
Click ‘Add New Group’ on the right hand side and drag and drop the Custom Audience name to the right box.
Contextual AI is an AI-based, custom targeting solution that performs deep content analysis to find the best contextual placements for your ads. The Contextual AI will use the URLs or Text entered in the Audience Input section to build a lookalike model and return a list of the most contextually relevant URLs for targeting.
To create a Custom Contextual Audience, go to the ‘Audiences’ tab and select ‘New Contextual Audience’. Give the Audience a name and select one of the Input Types:
URLs: Enter source sites below that represent your brand’s target content, this should be the Full URL including the scheme, subdomains, and all subdirectories. Sites should be text rich and not behind a paywall. Enter each URL on a new line.
Text: Enter a descriptive paragraph of text about the topic of interest to build a list of contextually relevant URLs for targeting. Text should have a minimum of 50 words and maximum of 500.
Associate a Contextual Audience Segment to your Campaign by following these steps:
Navigate to the ‘Audiences’ section.
Click the ‘Associate Segments‘ button. The segment selection window will appear.
Open the ‘Contextual Audience‘ dropdown to browse over 300 AI segments curated by Pontiac categorized by IAB standards.
Note, these IAB Category segments cannot be edited and they are already available for use across all of your Advertisers at a $0.25 CPM.
To set bids, we recommend adding the average cost of all associated segments to your desired bids for the media.
To add a Custom Contextual Audience Segment, scroll to the bottom, select ‘Custom‘, and find the segment name.
Click ‘Add New Group’ on the right hand side and drag and drop the Custom Contextual Audience name to the right box.
Note: Avoid layering this segment with additional inventory or audience targeting, as it may limit Campaign scale. For more information about Contextual AI, continue to the following documentation page: Contextual AI
ART Audiences
The first step to create an ART audience is to build out an ART report in the ‘ART’ section of the platform under ‘Audience Research’ or ‘Audience Discovery’. Create a lookalike model from an existing audience or build a new audience according to desired demographics or interests.
Build an ART Report:
To create an ART audience, first generate an ART report in the ‘ART’ section under Audience Research or Audience Discovery.
Audience Research Audiences:
Select an existing audience to source key demo & interest data to build custom lookalike models. The existing audience data can be pulled from a Pontiac IP Conversion Pixel placed on the Advertiser’s website, or select key geos to build a lookalike model from the demographics & interests of the selected area.
Audience Discovery Audiences:
Select key demo & interest categories to define, locate & build your brand’s ideal target audience. Create the ‘ideal’ user profile for your brand, then locate key target markets to reach this demographic.
Note that on the ART Report, the field ‘Auto Refresh’ will determine the cadence at which the report data will refresh. Interest & Inventory data are updated every 30 days and new data may change report results. If a report is set to auto refresh and the matched zip codes in the results of the report are updated, this will automatically update any published audiences associated to the report.
Publish the ART Audience
Once you’ve created an Audience Research or Audience Discovery report, you can publish it as a custom audience for cookieless targeting across Pontiac Campaigns.
Open the ART report and select the ‘Publish Audience’ button.
Select the threshold for matched zip codes, choosing from:
All results
Top 10%
Top 20%
Top 50%
Give the Audience a name.
Click the ‘Save’ button.
To add an ART audience to a Campaign:
Navigate to the ‘Audiences’ section and click ‘Associate Segments’.
On the window popup, select the ‘ART Audiences’ dropdown and find your Custom Audiences to target.
Click ‘Add New Group’ on the right hand side and drag and drop the ART Audience name to the right box.
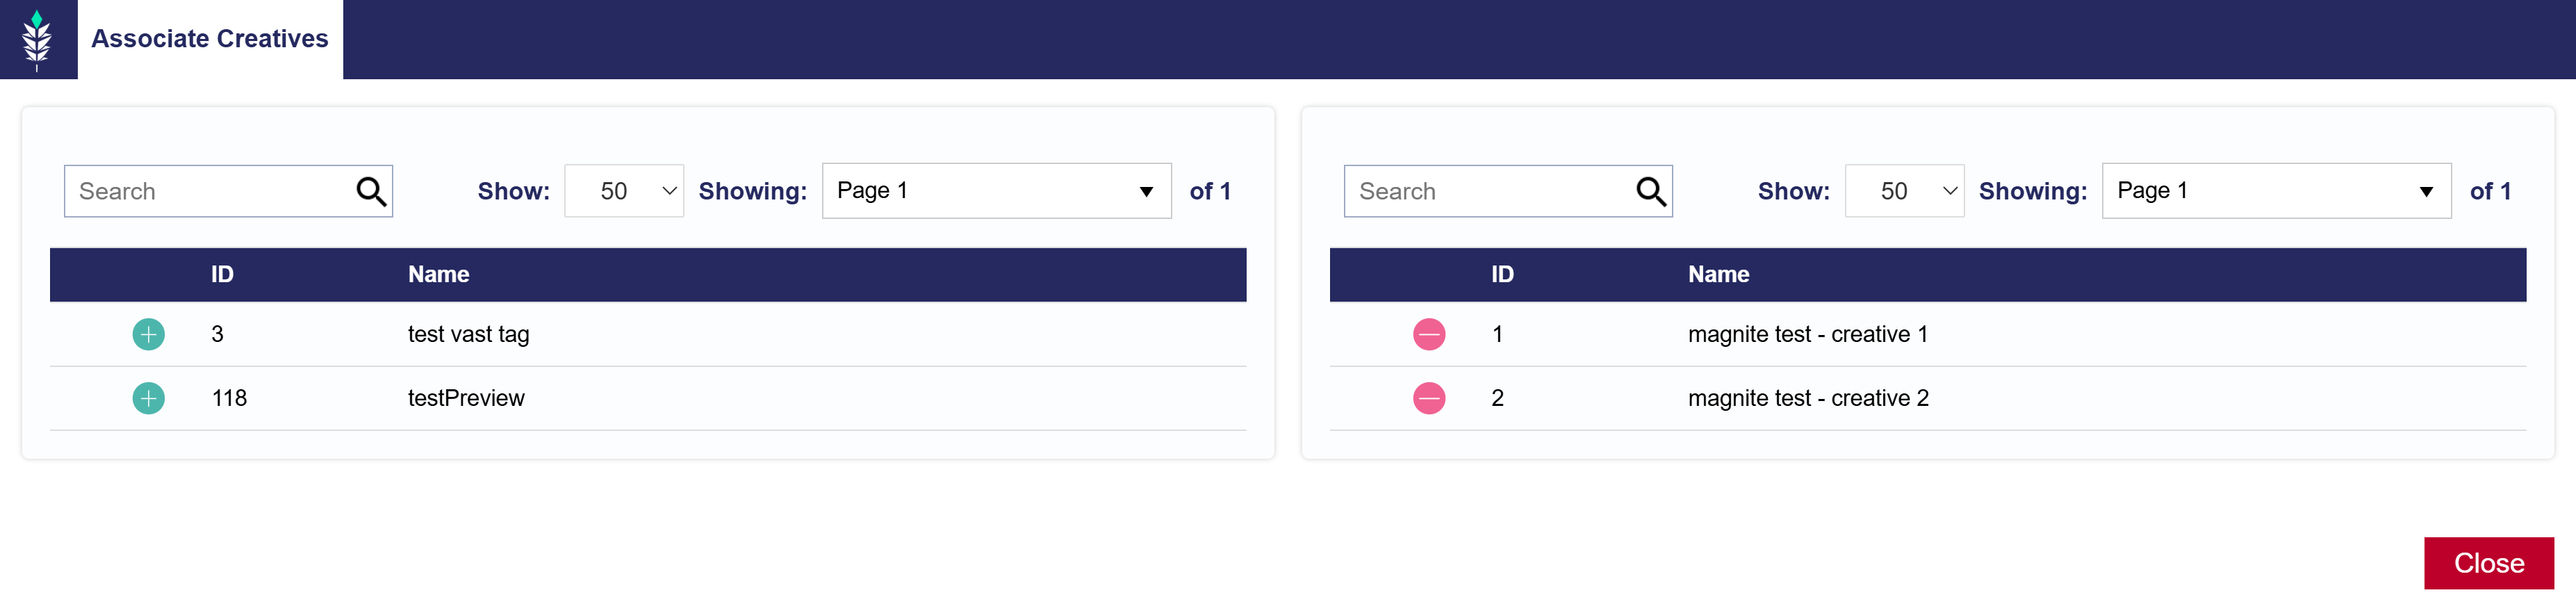
On the Line Level, users can Associate Pixels. Note that Pixels must be created and edited on the Advertiser Level. For more information see the following documentation: Pixels
To Associate a Pixel to a Line:
Navigate to the ‘Pixel’ section of the Line.
Click ‘Associate Pixel’.
The above pop-up window will appear, allowing you to add pixels to the Line.
Click the green plus sign to add pixels to the Line.
Click the red minus sign to remove pixels from the Line.
Note that if Mange Pixel is enabled on the Campaign level, you will not be able to associate a pixel on the Line level.
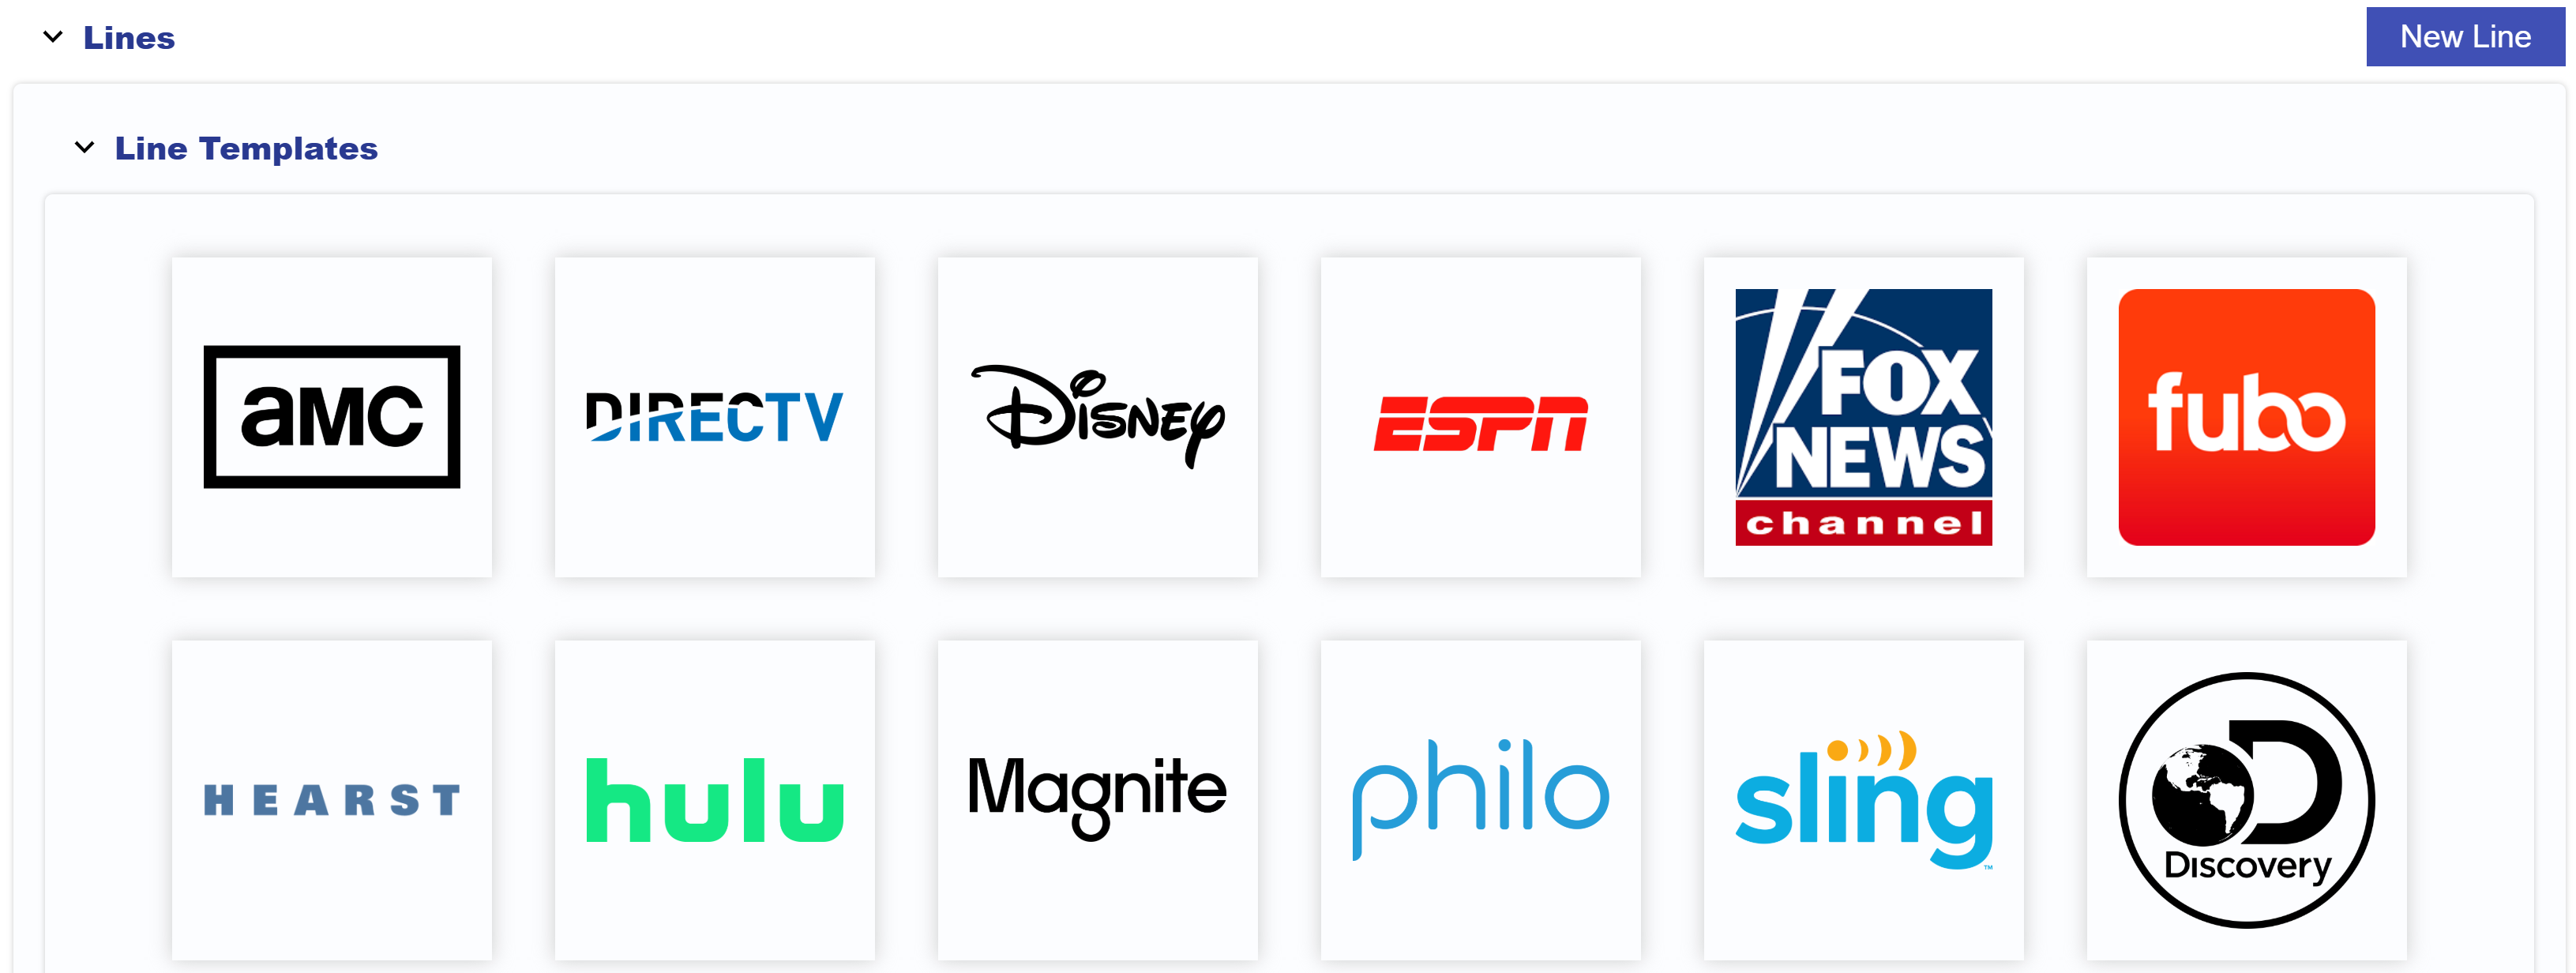
Create Line from Template
To Create a New Line using a Line Template, follow these steps:
Navigate to the Advertiser and Campaign that you want to create the Line under.
Within the Lines section, locate and open the Line Templates dropdown.
Click the image of the desired template you wish to use for your Line creation.
All Line settings will be inherited from the selected Template.
Adjust any Line settings that you need. Refer to the Edit a Line documentation for more details.
Click ‘Submit’ to save and create the new Line based on the selected template.
This process will ensure that you can quickly launch Lines with consistent settings, saving time and maintaining best practices. Follow the steps outline in the following documentation if you need to Create a New Template: Create a New Template
Users can also utilize Pontiac’s Public Line Templates for easy setup: Public Line Templates
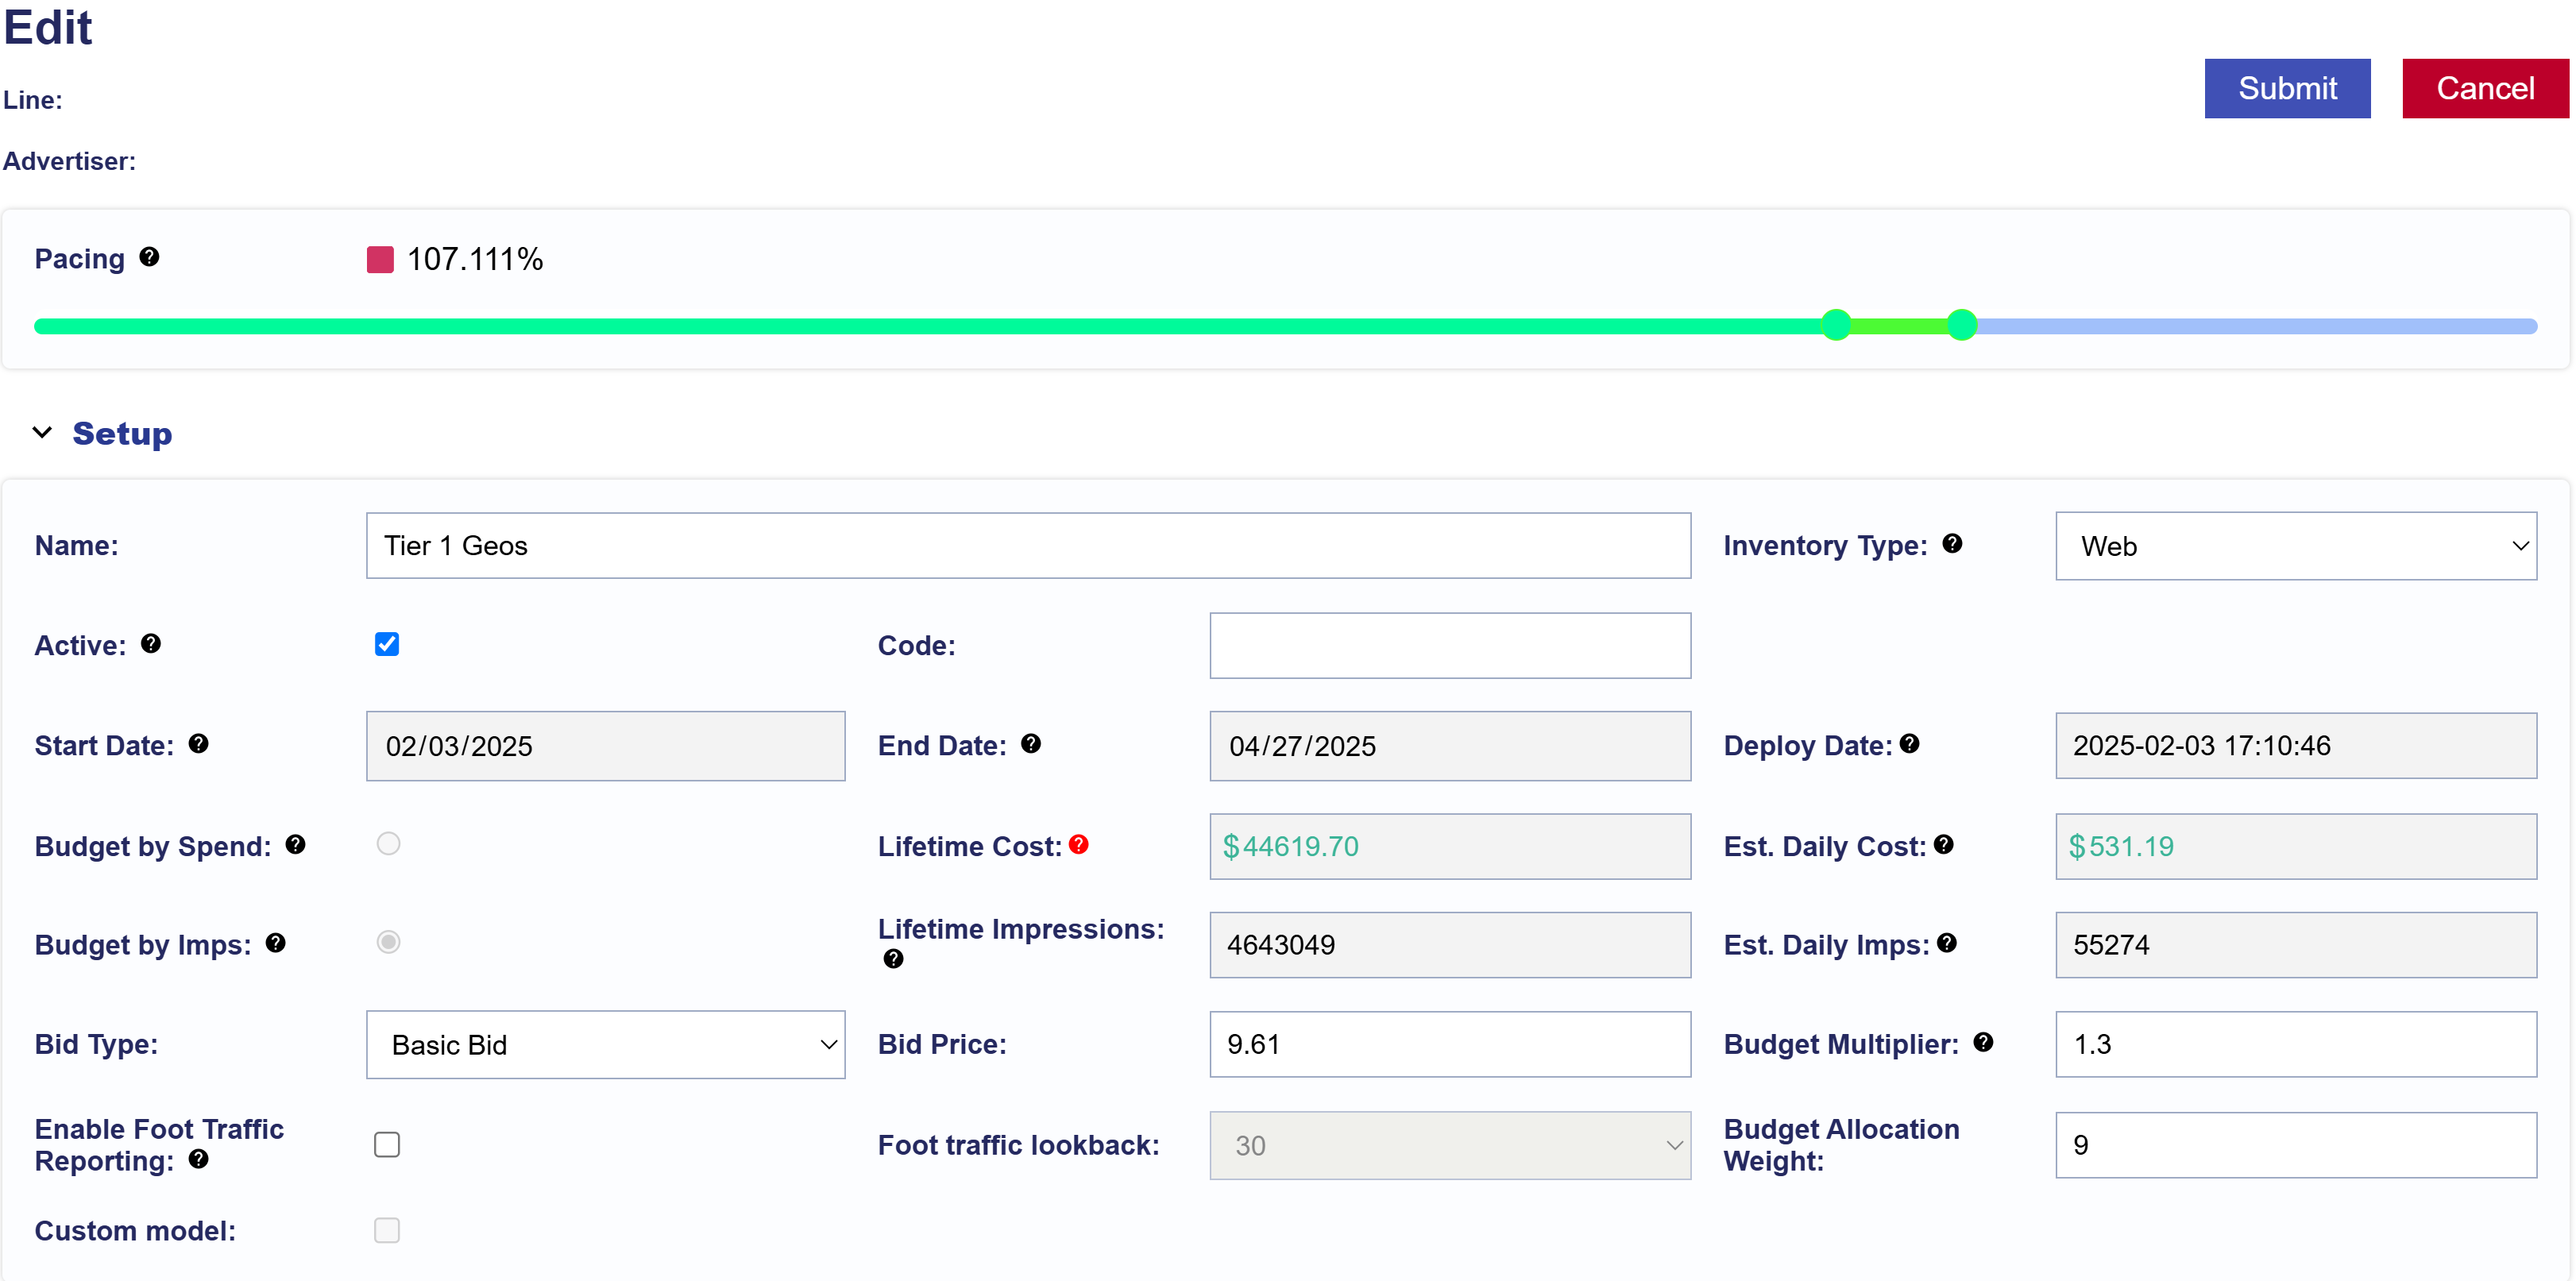
Edit a Line
Setup Section
To edit an existing Line’s Setup section, follow these steps:
Go to the selected Advertiser > Campaign where you want to edit the existing Line.
Navigate to the Lines dropdown section within the Campaign’s dashboard.
Select the name of the Line that you would like to edit.
Press the ‘Edit’ button on the upper right corner of the page to enter Edit Mode.
In the Setup dropdown, the following fields are editable:
Name: Rename your Line.
Inventory Type: Select Web, In-App, or Combined.
Active Status: Check the ‘Active’ to set Line to live and uncheck it if you want to pause the Line.
Note that when ‘Manage Budgets’ box is checked on the Campaign Level, all Lines under that Campaign will be modified to match the Start Date, End Date, and Budget Type of the Campaign, so it is not Editable when the checkbox is selected. Uncheck on the Campaign Level if you want to modify at the Line Level.
If you have finished editing, click the ‘Submit’ button in the top right corner of the page to save and apply all changes. If you do not want to apply the edits, press ‘Cancel’ to discard changes and revert the Line to its previous settings. To continue making edits, proceed to another section.
Pacing & Dayparts Section
If ‘Manage Dayparts’ is enabled NOT on the Campaign Setup section and you want to edit the Pacing & Dayparts section of the Line, follow these steps:
Navigate to the Pacing & Dayparts section within the Line.
Make the necessary changes to the Pacing & Dayparts settings. Refer to the documentation page to review available Pacing & Dayparts options: Line Pacing & Dayparts
If you have finished editing, click the ‘Submit’ button in the top right corner of the page to save and apply all changes. If you do not want to apply the edits, press ‘Cancel’ to discard changes and revert the Line to its previous settings. To continue making edits, proceed to another section.
If ‘Manage Dayparts’ is enabled on the Campaign Setup section and you want to edit the Pacing & Dayparts section of the Line, follow these steps:
Navigate to the Pacing & Dayparts section within the Campaign that the Line belongs to.
Edit the Campaign and uncheck the ‘Manage Dayparts’ box to enable Line Level control.
Once disabled, go to the Line Level and update the Pacing & Dayparts settings. Refer to the documentation page to review available Pacing & Dayparts options: Line Pacing & Dayparts
If you have finished editing, click the ‘Submit’ button in the top right corner of the page to save and apply all changes. If you do not want to apply the edits, press ‘Cancel’ to discard changes and revert the Line to its previous settings. To continue making edits, proceed to another section.
Frequency & Recency Section
If the ‘Enable Line Frequency’ feature is checked in the Line Setup section and you want to edit the Frequency & Recency section of the Line, follow these steps:
Navigate to the Frequency & Recency section within the Line.
Make the necessary changes to the Frequency & Recency settings. Refer to the documentation page to review available Frequency & Recency options: Line Frequency & Recency
If you have finished editing, close the window and click the ‘Submit’ button in the top right corner of the page to save and apply all changes. If you do not want to apply the edits, press ‘Cancel’ to discard changes and revert the Line to its previous settings. To continue making edits, proceed to another section.
Note that if you want to Edit the Campaign Frequency & Recency section, see the following documentation: Campaign Frequency & Recency
Foot Traffic Reporting Section
If the ‘Enable Foot Traffic Reporting’ feature is checked in the Line Setup section and you want to edit the Frequency & Recency section of the Line, follow these steps:
Navigate to the Foot Traffic Reporting section within the Line.
If you have finished editing, close the window and click the ‘Submit’ button in the top right corner of the page to save and apply all changes. If you do not want to apply the edits, press ‘Cancel’ to discard changes and revert the Line to its previous settings. To continue making edits, proceed to another section.
Targeting Section
To edit the Targeting section of a Line, follow these steps:
Navigate to the Targeting section within the Line.
Click ‘Edit Targeting’ to modify targeting settings.
Make the necessary changes to the targeting settings. Refer to the documentation page to review available targeting options: Line Targeting
Click ‘Save’ in the bottom right corner of the popup window to apply all changes. To discard changes and revert to the previous settings, click ‘Cancel’.
If you have finished editing, close the window and click the ‘Submit’ button in the top right corner of the page to save and apply all changes. If you do not want to apply the edits, press ‘Cancel’ to discard changes and revert the Line to its previous settings. To continue making edits, proceed to another section.
Creatives Section
If ‘Manage Creatives’ is NOT enabled in the Campaign Setup section and you want to edit the Creatives section of the Line, follow these steps:
Navigate to the Creatives section within the Line.
Click ‘Associate Creatives’ to add and/or remove Creatives associated to the Line.
Note that you can only Edit a Creative on the Advertiser Level, not here on the Line Level.
If you have finished editing, close the window and click the ‘Submit’ button in the top right corner of the page to save and apply all changes. If you do not want to apply the edits, press ‘Cancel’ to discard changes and revert the Line to its previous settings. To continue making edits, proceed to another section.
If ‘Manage Creatives’ is enabled in the Campaign Setup section and you want to edit the Creatives section of the Line, follow these steps:
Navigate to the Creatives section within the Campaign that the Line belongs to.
Edit the Campaign and uncheck the ‘Manage Creatives’ box to enable Line Level control.
Click ‘Associate Creatives’ to add and/or remove Creatives associated to the Campaign.
Note that you can only Edit a Creative on the Advertiser Level, not here on the Campaign Level.
If you have finished editing, close the window and click the ‘Submit’ button in the top right corner of the page to save and apply all changes. If you do not want to apply the edits, press ‘Cancel’ to discard changes and revert the Line to its previous settings. To continue making edits, proceed to another section.
Audiences Section
To edit the Audience section of a Line, follow these steps:
Navigate to the Audience section within the Line.
Click ‘Associate Segments’ to add and/or remove Audience Segments associated to the Line.
Make the necessary changes to the Audience settings. Refer to the documentation page to review available Audience options: Line Audiences
If you have finished editing, close the window and click the ‘Submit’ button in the top right corner of the page to save and apply all changes. If you do not want to apply the edits, press ‘Cancel’ to discard changes and revert the Line to its previous settings. To continue making edits, proceed to another section.
Pixels Section
If ‘Manage Pixels’ is NOT enabled on the Campaign Setup section and you want to edit the Pixels section of the Line, follow these steps:
Navigate to the Pixels section within the Line.
Click ‘Associate Pixels’ to add and/or remove Pixels associated to the Line.
Note that you can only Create and Edit a Pixel on the Advertiser Level, not here on the Line Level.
If you have finished editing, close the window and click the ‘Submit’ button in the top right corner of the page to save and apply all changes. If you do not want to apply the edits, press ‘Cancel’ to discard changes and revert the Campaign to its previous settings. To continue making edits, proceed to the another section.
If ‘Manage Pixels’ is enabled on the Campaign Setup section and you want to edit the Pixels section of the Line, follow these steps:
Navigate to the Pixels section within the Campaign that the Line belongs to.
Edit the Campaign and uncheck the ‘Manage Pixels’ box to enable Line Level control.
Once disabled, go to the Line Level and update the Pixels.
Click ‘Associate Pixels’ to add and/or remove Pixels associated to the Line.
Refer to the documentation page to review available Pixels options: Line Pixels
If you have finished editing, click the ‘Submit’ button in the top right corner of the page to save and apply all changes. If you do not want to apply the edits, press ‘Cancel’ to discard changes and revert the Line to its previous settings. To continue making edits, proceed to another section.
Clone a Line
To Clone a Line, follow these steps:
Navigate to the Line page of the Line that you want to Clone.
Click the ‘Clone’ button located at the top right corner.
Enter a New Name for the cloned Line.
Adjust the Line settings as needed to match specific requirements. See the edit a line documentation for guidance: Edit a Line
Click ‘Submit’ to finalize and create the cloned Line.
Note that the cloned Line will exist under the same Advertiser and Campaign as the base Line.
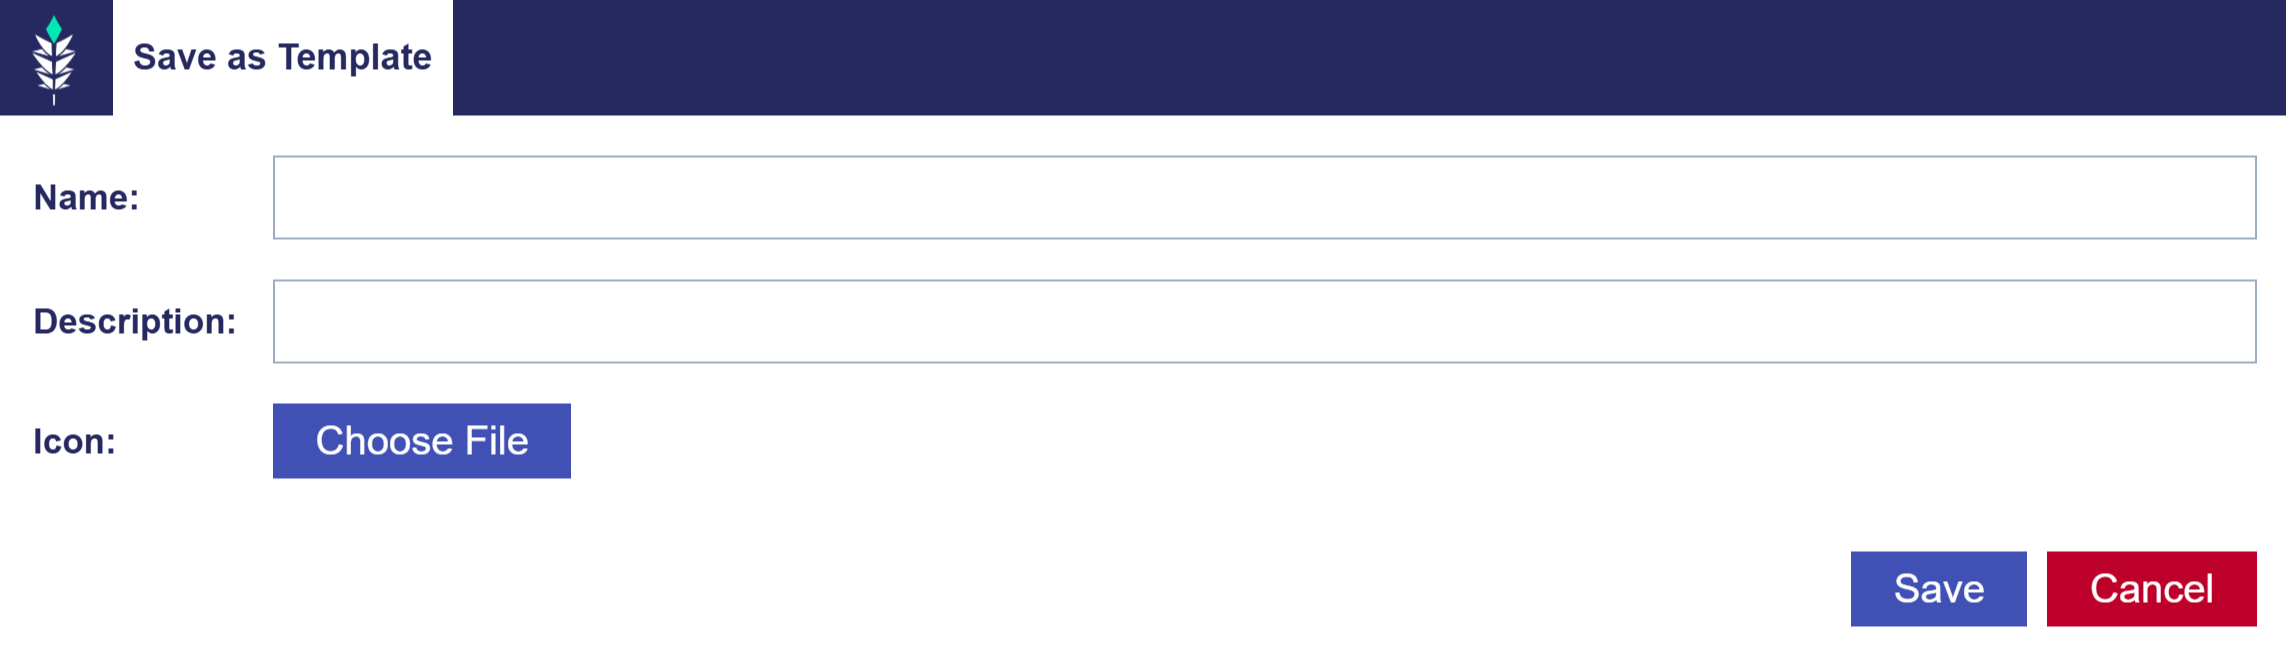
Create a New Template
How to Save a Line as a Template:
Navigate to the Line page of the Line you want to use as a Template or create a new Line.
Click the ‘Save as Template’ button located at the top right corner.
Enter a Name, Description, and Icon for the Line Template.
Click ‘Save’ to save the Line as a template.
You can now use this template later to create a new Line with the same structure. This will help save time, reduce mistakes, and ensure consistency in Line setup. Manage all Campaign and Line Templates on the Seat Level in the Templates tab. For more details, refer to the Create Line from Template documentation.
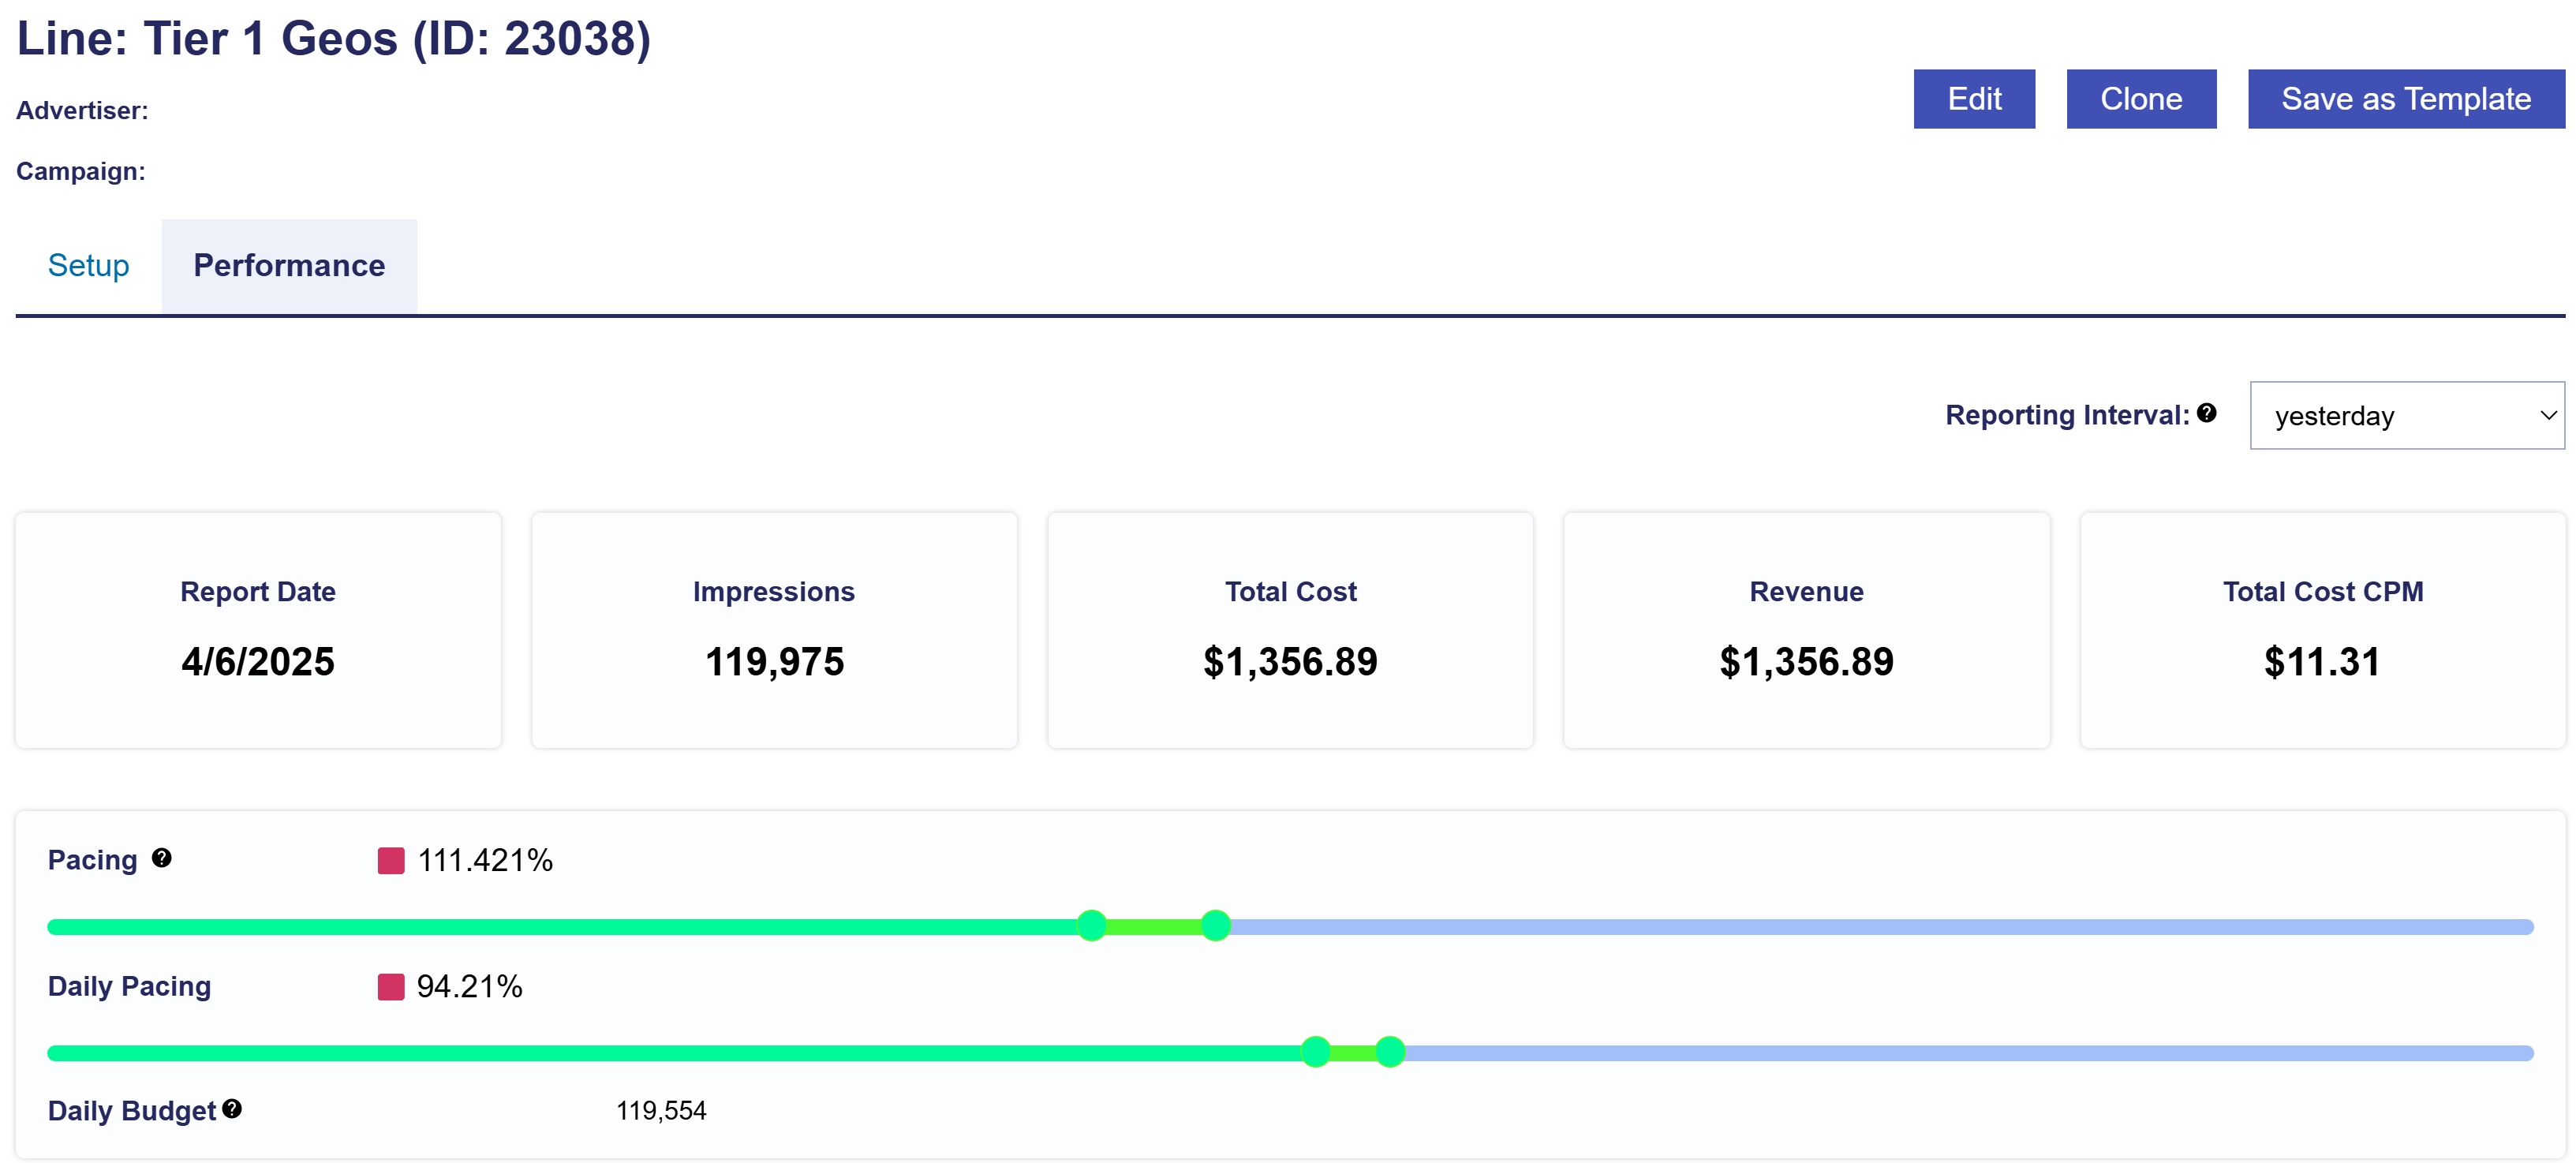
Line Metrics
Looking at the Line Performance tab, you can filter the Reporting Interval to adjust the top tiles section. Note that all intervals with the exception of yesterday, include metrics from today. Today’s metrics update hourly and have a 3 hour delay. The metrics include:
Report Date: Shows the selected report date or date range.
Impressions: The total number of impressions the Line served within the selected reporting interval.
Total Cost: The total Line spend, including media costs and any applicable margins or fees.
Revenue: The total Line revenue.
Total Cost CPM: The total cost per thousand impressions for the Line, calculated as (Total Cost / Impressions) x 1,000.
Line Pacing: The percentage of budget the Line has spent compared to perfect pacing based on flight dates and budget. This will update daily and takes into account spend from start date to ‘yesterday’. Optimal pacing is between 90 – 110%.
The Line Daily Pacing: The percentage of the daily allocated budget the Line has spent compared to the perfect daily pacing target. This will update daily and takes into account spend from start date to ‘yesterday’. Optimal pacing is between 90 – 110%.
Daily Budget: The actual targeted budget for today’s spend, factoring in the budget multiplier and the selected pacing algorithm.
Below the Pacing, this tab provides dropdown insights into Bid Data, Line Daily Performance, and Video Events. Continue to see each section for more details.
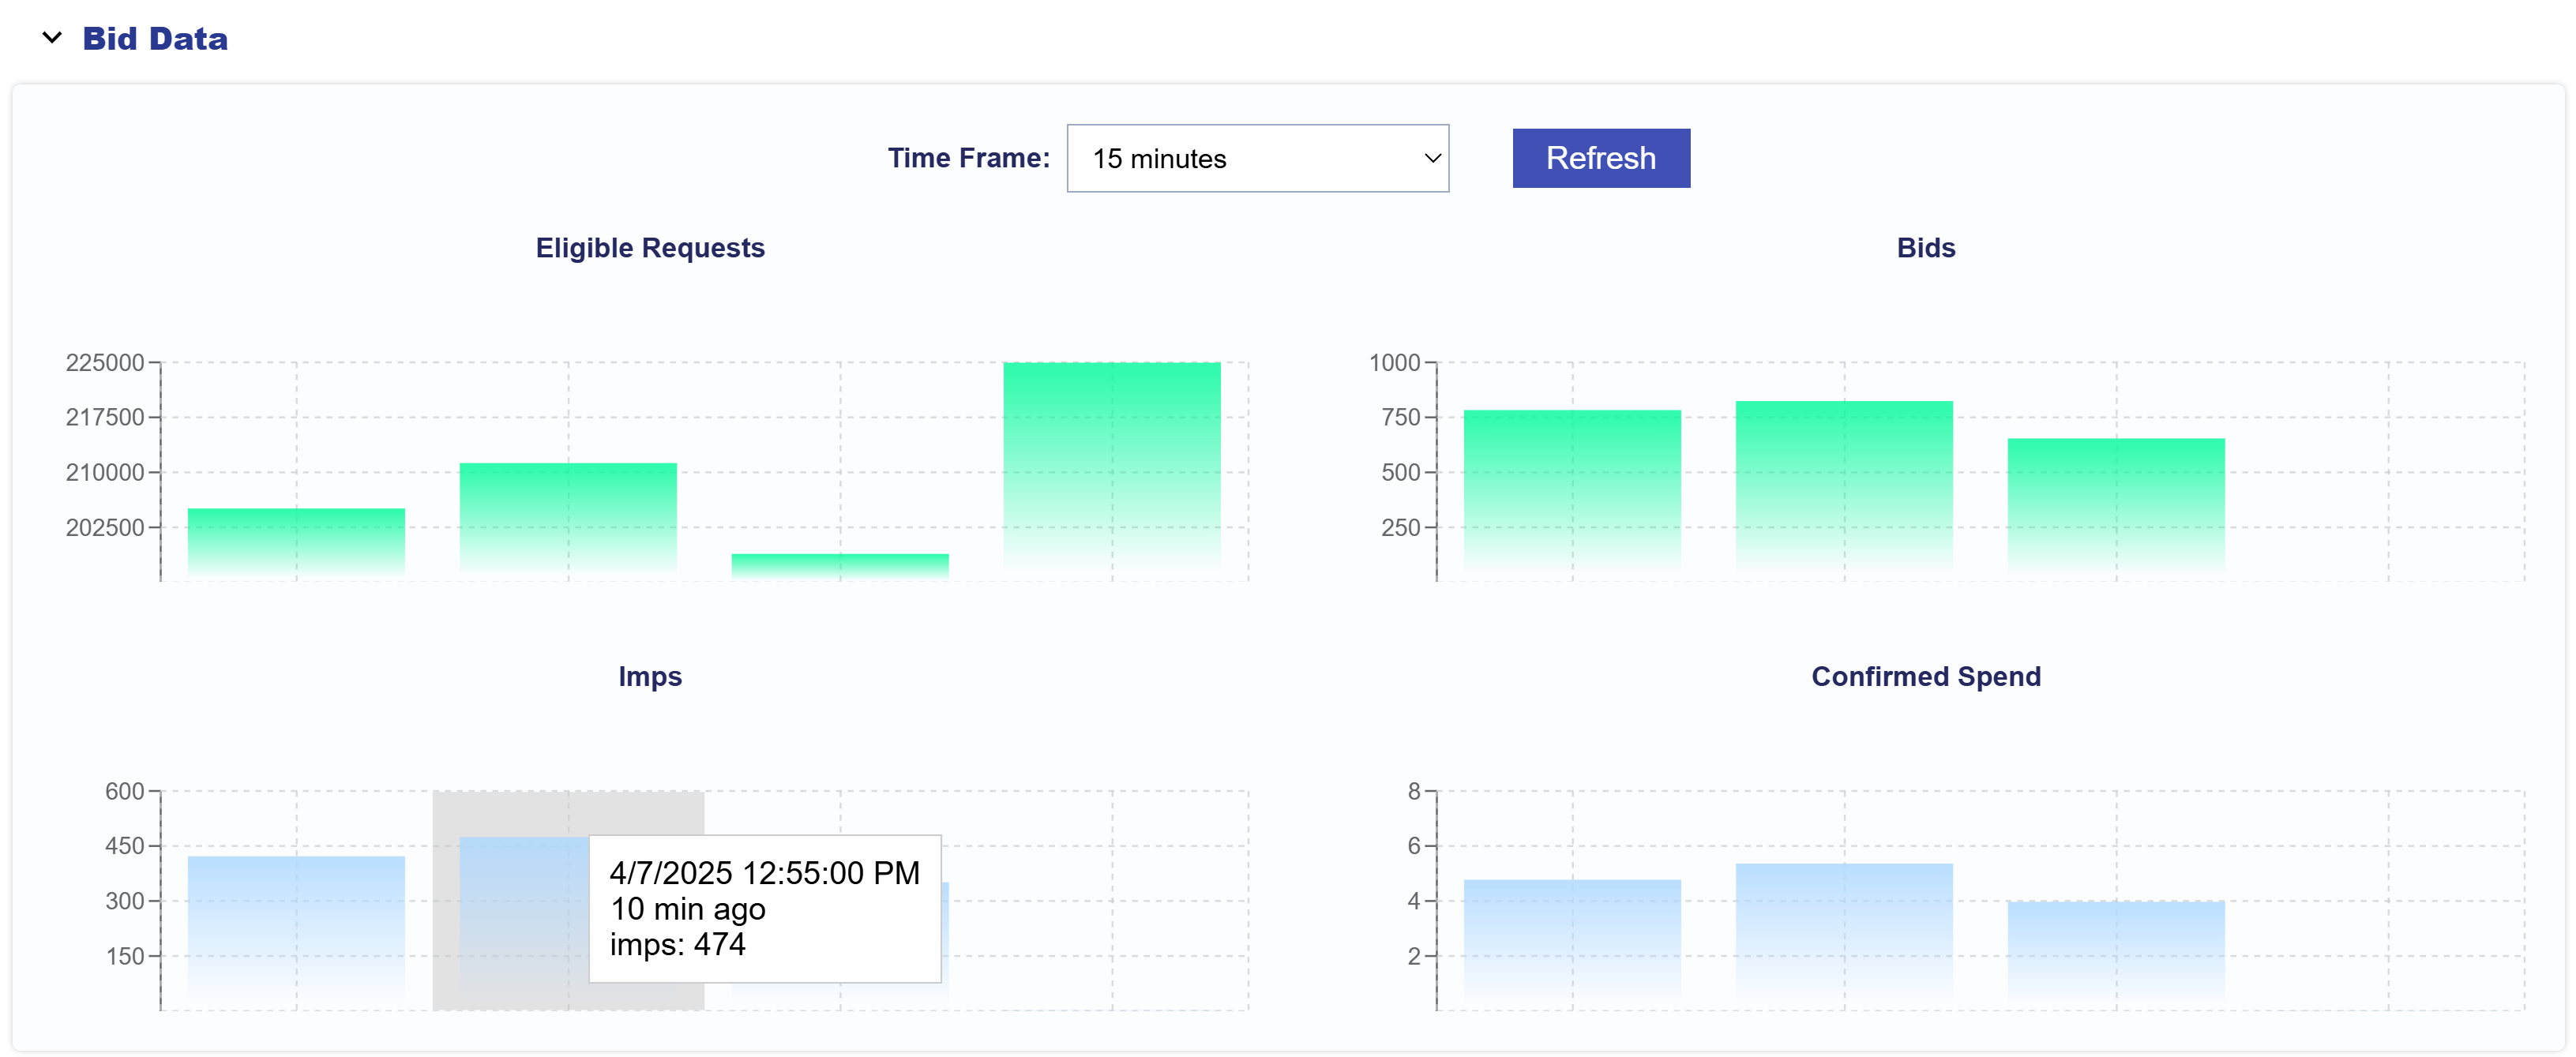
Bid Data
In the Bid Data dropdown section, the Time Frame can be adjusted to display bid data for 15 minutes, 1 hour, 12 hours, or 1 day. This section includes four charts that provide insights into the number of eligible bid requests, bids placed, impressions served, and confirmed spend for the Line. Hover over each bar to view the time of day, time elapsed, and the metric value for more detailed insights.
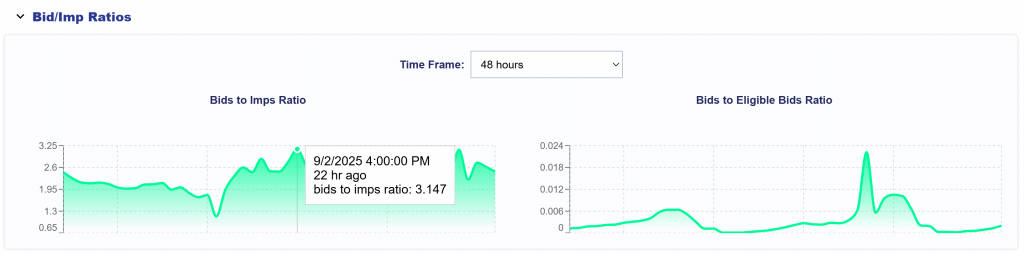
Bid/Imp Ratios
The Bid/Imp Ratios expandable section shows:
Bid-to-Impression ratio – how often bids result in impressions (delivery rate).
Bid-to-Eligible Impressions ratio – how many eligible impressions we bid on (bid rate).
Charts can be viewed in hourly increments with selectable time ranges (6, 12, 24, and 48 hours). This provides improved transparency into campaign bidding efficiency and behavior.
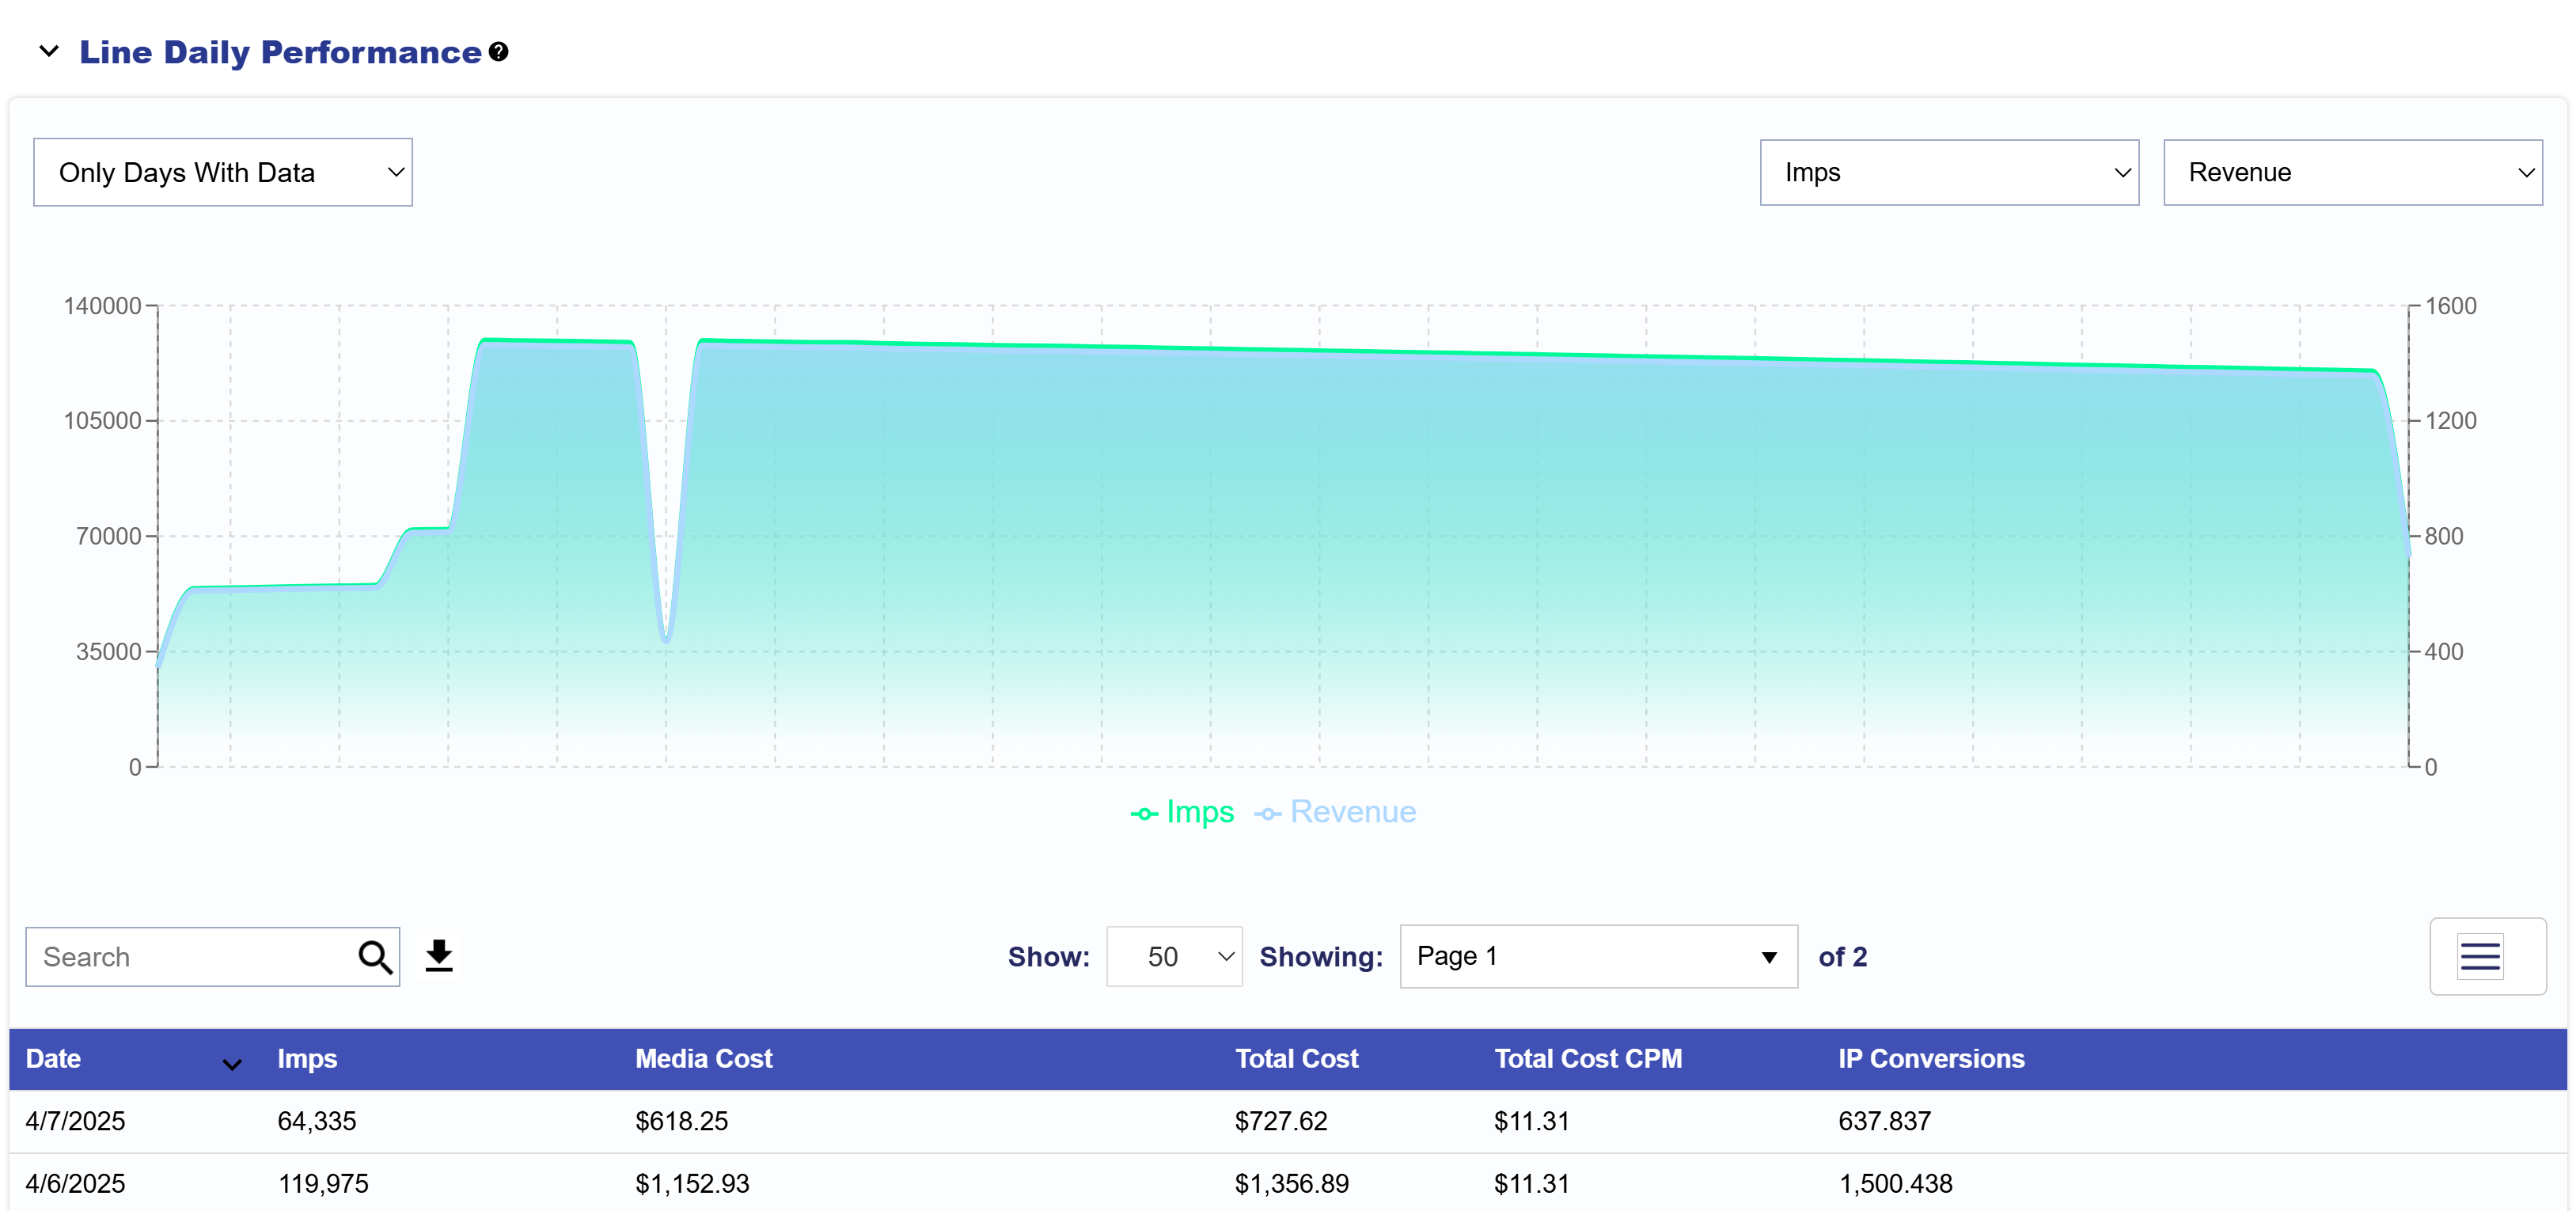
Line Daily Performance
The Line Daily Performance dropdown section includes a chart and table. The Chart can be filtered to show Only Days with Data or All Days. The Chart compares two selected Metrics against each other. Use the dropdowns in the upper right corner to customize view and discover daily metrics about your Line’s performance.
Select from these metrics:
Imps: The total number of impressions the Line served within the selected reporting interval.
Media Cost: The total dollar amount spent on the Line media before additional fees or margins are applied.
Total Cost: The total Line spend, including media costs and any applicable margins or fees.
Total Cost CPM: The total cost per thousand impressions, calculated as (Total Cost / Impressions) x 1,000.
IP Conversions: The number of conversions attributed to users by Line who were served an ad and later converted based on IP tracking.
Chrome Convs: The number of conversions recorded specifically from Chrome users.
Clicks: The total number of times users clicked on an ad.
CTR: The percentage of impressions that resulted in clicks, calculated as (Clicks / Impressions) × 100.
CPC: The average cost per click, calculated as (Total Cost / Clicks).
Transparency Score: A score indicating the level of transparency in reporting and data availability.
Foot Traffic ‘Attributed Visitors’: The number of users who visited a physical location after viewing an ad from the Line.
Revenue: The total revenue generated from the Line.
Media Cost CPM: The media cost per thousand impressions for the Line, calculated as (Media Cost / Impressions) × 1,000.
Data Cost: The cost associated with audience data usage for targeting.
Foot Traffic Cost: The cost incurred for tracking and attributing foot traffic conversions.
Credit Card Fee: Any additional fees applied for processing payments via credit card.
Hosting Fee: The fees associated with hosting Line assets, such as creative files.
ART Fee: A charge related to the ART usage.
Contextual Fee: The cost associated with using Contextual AI services.
Chalice Fee: A fee related to the Chalice service.
To download a CSV file in the Line Daily Performance table, navigate to the Line Daily Performance dropdown and locate the search bar in the Table section. On the right-hand side of the search bar, click the download button to export the Line’s Daily Performance data as a CSV file. All metrics listed above are available for export. To customize the metrics included in the CSV file, click the three lines in the top right corner of the table and select or deselect the Line metrics that matter most to you.
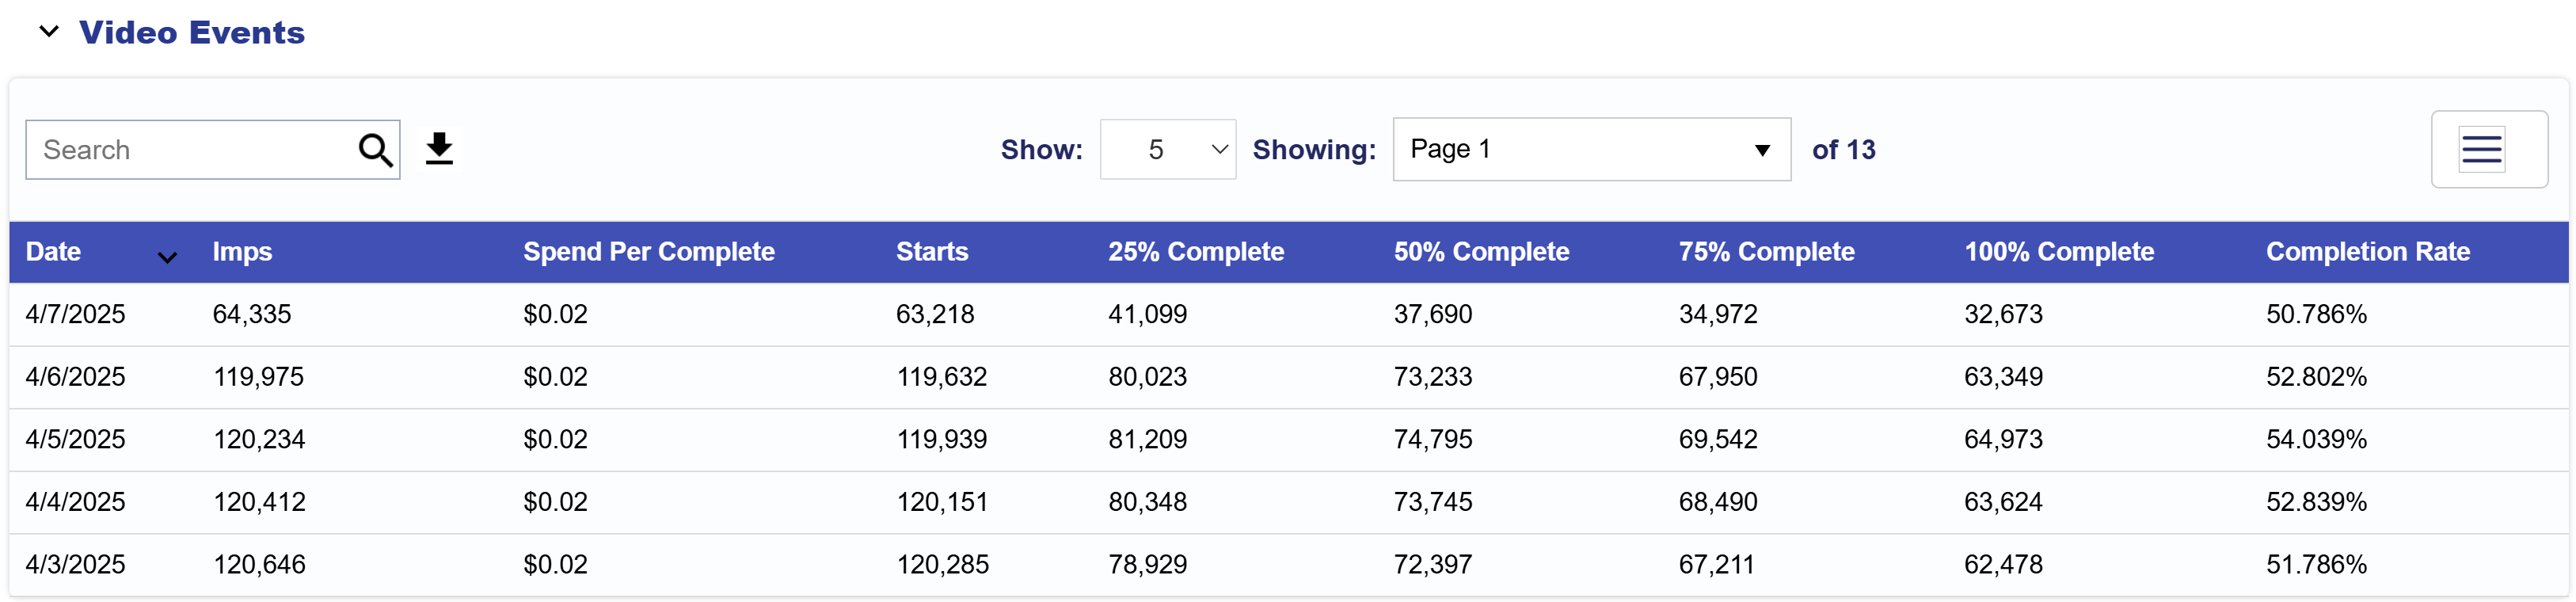
Video Events
The Video Events dropdown section provides a table with detailed video performance metrics for the Line, which can be downloaded as a CSV file.
Below is a list of all metrics:
Date: The reporting date for the video event metrics.
Imps: The number of times the video ad was served.
Spend Per Complete: The cost incurred for each fully completed video view
Starts: The number of times the video ad started.
25% Complete: The number of video ads that were watched at least 25% of the way through.
50% Complete: The number of video ads that were watched at least halfway through.
75% Complete: The number of video ads that were watched at least 75% of the way through.
100% Complete: The number of video ads that were watched entirely.
Completion Rate: The percentage of video ads that were fully completed, calculated as (100% Complete ÷ Starts) × 100.
All metrics listed above are available for export. To customize the metrics included in the CSV file, click the three lines in the top right corner of the table and select or deselect the Line metrics that matter most to you.