An Audience is a group of users, devices, locations, or content that can be used to refine who or what a Campaign or Line is eligible to target.
Audiences are managed at the Seat level, rather than within an individual Advertiser. Once an Audience is available to the Seat, it can be associated with eligible Campaigns or Lines for targeting or anti-targeting.
The Audiences section is organized into the following categories:
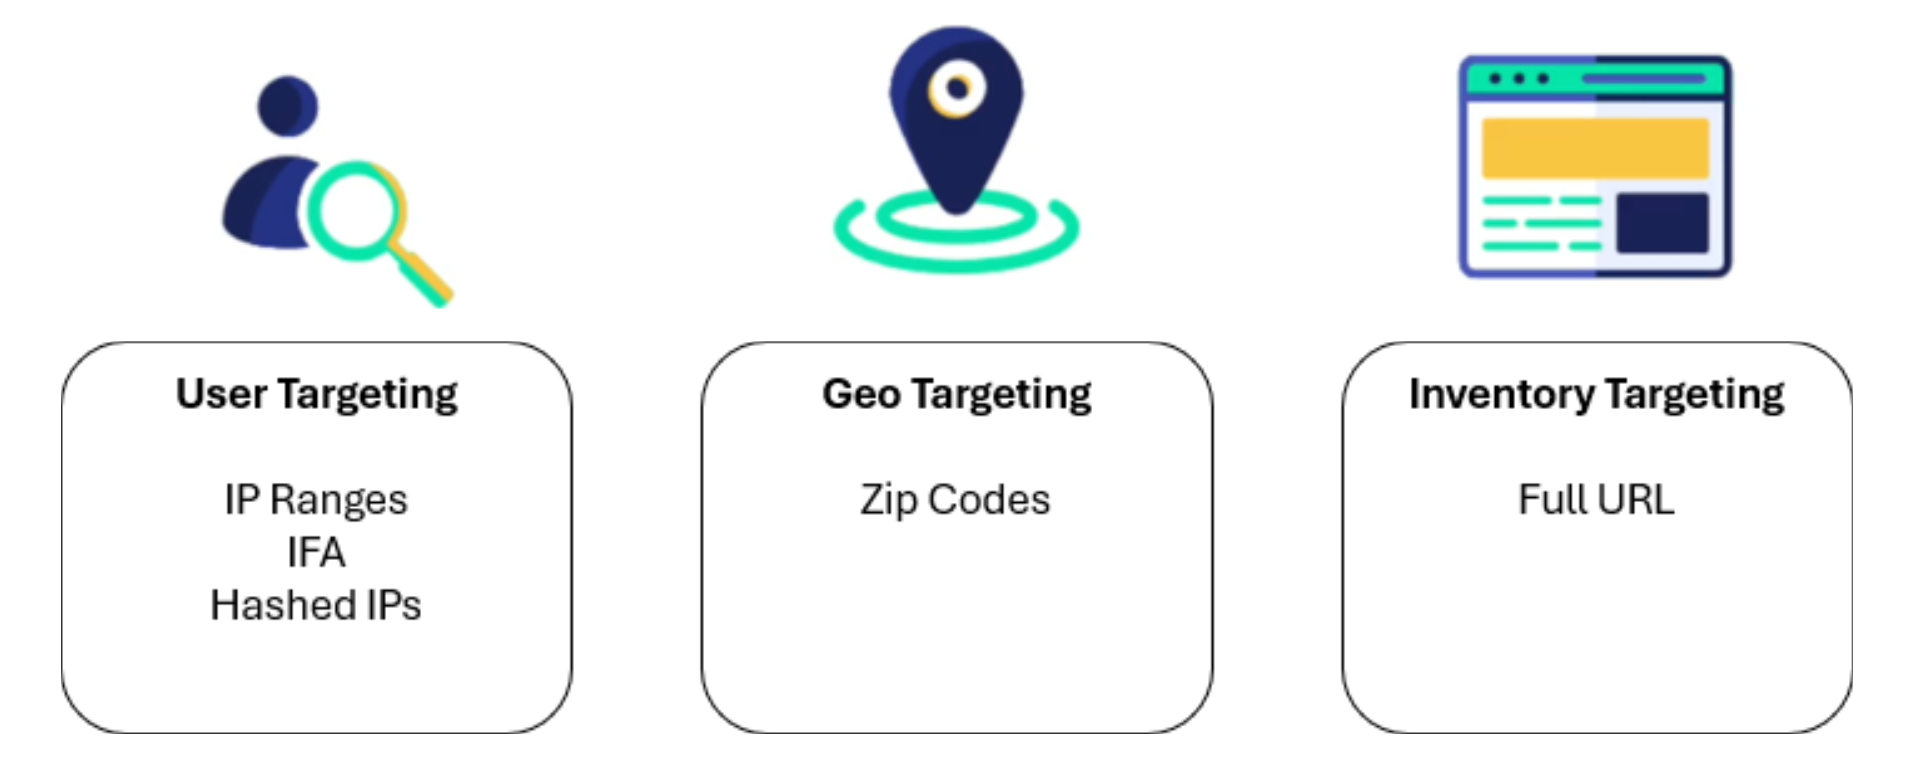
Custom Audiences: First-party audiences created directly in Pontiac using data such as IP Ranges, Zips, IFAs, Hashed IPs, Pixel IPs, or Full URLs.
Pixel IP Audiences: Remarketing audiences automatically created from qualifying Pontiac Pixels added as a Creative Impression Tracker and displayed within Custom Audiences.
Contextual AI: Content-based audiences created from example URLs, descriptive text, or Pontiac-curated contextual segments.
ART Audiences: Public ART Audiences or ART audiences created from Audience Research or Audience Discovery reports.
Third Party Audiences: Audiences provided through external data partners and integrated audience sources.
Third Party: Third-party data segments available through the TransUnion Data Marketplace.
Onboarded / CRM Audiences: First-party customer data onboarded through integrations such as LiveRamp or TransUnion.
Geo Fencing: Geo Fence Audiences use OnSpot data to identify users who have previously visited a specified geographic area. Geo fences can be configured using a custom Geo Fence Shape or a Latitude/Longitude Radius.
Audience availability, supported inventory, pricing, and setup requirements may vary by Audience type.
Audience Hierarchy
For a standard Seat, Audiences are managed alongside Advertisers at the Seat level:
Audiences created at the Master Seat level may be made available to associated Sub Seats for targeting while remaining managed by the Master Seat. Sub Seats can also create and manage their own Audiences.
The sections below explain each Audience type, how it is created or onboarded, and how it can be used for Campaign or Line targeting.
Custom Audiences
Custom Audiences are first-party audiences created or generated within Pontiac using data available to the Advertiser or Seat. They can be used to target users, devices, geographic areas, or specific web content.
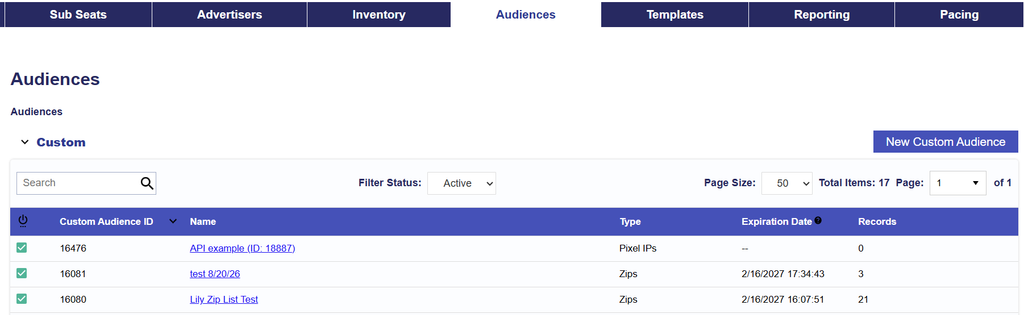
Custom Audiences are managed under Bidder > Audiences > Custom and can be associated with eligible Campaigns or Lines for targeting or anti-targeting.
Custom Audiences include:
IP Ranges
Zips
IFAs
Hashed IPs
Full URLs
Lat Long Audiences
Pixel IP Audiences
Custom Audiences expire 180 days after they are created unless otherwise noted. The expiration date is displayed in the Custom Audiences table. An expired Audience can be reactivated by opening the Audience, selecting Active, and clicking Save.
If an Audience appears in gray and cannot be associated, it may be expired or incompatible with the selected Creative or inventory type.
Create a Custom Audience
To create a new Custom Audience:
Navigate to Audiences > Custom.
Select New Custom Audience.
Enter an Audience Name.
Select the applicable Audience Type.
Enter the Audience data using the required format for that Audience type.
Select Save.
The following Custom Audience types can be created manually:
IP Ranges
Zips
IFA
Hashed IPs
Full URLs
Lat Long
Pixel IP Audiences are remarketing audiences automatically generated from qualifying Pontiac Pixel activity and displayed under Audiences > Custom. See the below section for all of the details.
Enter the Audience data according to the indicated format. These Audiences will automatically be available to associate to any Campaign. To learn how to associate Custom Audience Segments to a Campaign or Line, continue to the following documentation: Associate Segments
IP Ranges
Use IP Ranges to target individual IP addresses or ranges of IP addresses.
Line Format:[IP] or [Start IP],[End IP]
Line Example: 63.148.81.24
Range Example:234.123.0.13,234.123.10.15
Zips
Use Zip Audiences to target specific postal areas. A Zip Audience can contain up to 100,000 records.
Enter one Zip Code per line followed by the Country Code. If the Country Code is omitted, Pontiac defaults to the United States.
Line Format:[Zip Code],[Country Code]
Example: 03102,US
IFA
Use IFA Audiences to target known device advertising identifiers. IFAs may be obtained from Pontiac reporting or log-level data from previous campaigns.
Enter one IFA per line.
Line Format:[Device IFA]
Example:735612e1-d4b9-40ec-83da-9ea0d3c5ceb3
Hashed IPs
Use Hashed IP Audiences to target Pontiac-hashed IPs obtained from Pontiac reporting, including:
Use Full URL Audiences to target specific page URLs, such as individual articles or content pages. These Audiences can be used for eligible web or OLV inventory.
Enter one URL per line and do not include the URL scheme.
Line Format:[Full URL]
Example: www.viki.com/videos/1153464v
Lat Long
Use Lat Long Audiences to target geographic areas surrounding specific Latitude / Longitude coordinates.
A single radius is applied to every coordinate included in the Audience.
Select Lat Long from the Type dropdown.
Select the Radius (meters).
Minimum: 150 meters
Maximum: 1,000 meters
Enter one Latitude / Longitude pair per line using:
If the radius is set to 500 meters, Pontiac applies that 500-meter radius to each coordinate included in the Audience.
Invalid or improperly formatted records must be corrected before the Audience can be saved.
Common use cases include:
Retail locations
Dealerships
Event venues
Campuses
Points of interest
Other known geographic coordinates
Lat Long targeting is useful when a Campaign requires more precise geographic targeting than broader ZIP, DMA, state, or regional targeting.
Viewing & Managing Custom Audiences
Navigate to Audiences > Custom to view and manage Custom Audiences available to the Seat.
The Custom Audiences table provides a summary of each audience and can be used to search, filter, review audience status, and open existing audiences for additional details or edits.
The following information is displayed for each Custom Audience:
Status: Indicates whether the audience is currently Active or Inactive.
Custom Audience ID: Pontiac’s unique identifier for the audience.
Name: The name assigned to the audience. Select the audience name to open and review its configuration.
Type: Identifies the type of audience data, such as Zips, Pixel IPs, or Lat Long.
Expiration Date: Displays the date and time the audience is scheduled to expire, when applicable.
Records: Displays the number of records currently included in the audience. The meaning of a record depends on the audience type. For example, a Lat Long audience with three coordinate rows will display 3 Records.
Use the table controls to:
Use the Search field to locate a Custom Audience by name or other searchable table values.
Use Filter Status to control which audiences are displayed, such as Active, Inactive, or All audiences.
The Page Size control determines how many Custom Audiences are shown on each page. Use the page selector to move between pages when additional audiences are available.
Edit an Existing Custom Audience
To edit an existing Audience:
Navigate to Audiences > Custom.
Select the Audience Name.
Update the Audience as needed.
Select Save.
When editing:
Type cannot be changed after the audience has been created.
The audience can be set to Active or Inactive.
Existing audience records can be updated, added, or removed as applicable for the audience type.
The Records value will update to reflect the currently saved Audience data.
The Records value in the Custom Audiences table will update to reflect the current number of records saved in the audience.
Because Custom Audiences may already be associated with active Campaigns or Lines, review existing targeting before making significant changes.
Pixel IP / Remarketing Audiences
Pixel IP Audiences are remarketing audiences automatically generated from qualifying Pontiac Pixels and displayed under Audiences > Custom.
They can be built from different types of exposure:
Website activity: Place a Pontiac Pixel on an Advertiser’s website, such as the homepage, product page, or checkout page, to build an Audience of qualifying visitors.
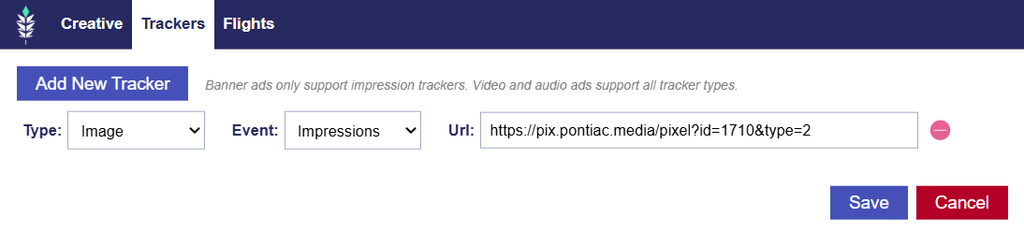
Creative exposure: Add a Pontiac Pixel to a Creative as an impression tracker to build an Audience of users exposed to that Creative. These users can later be retargeted, including through a different media type as part of a cross-channel strategy.
Create a Pixel IP Audience
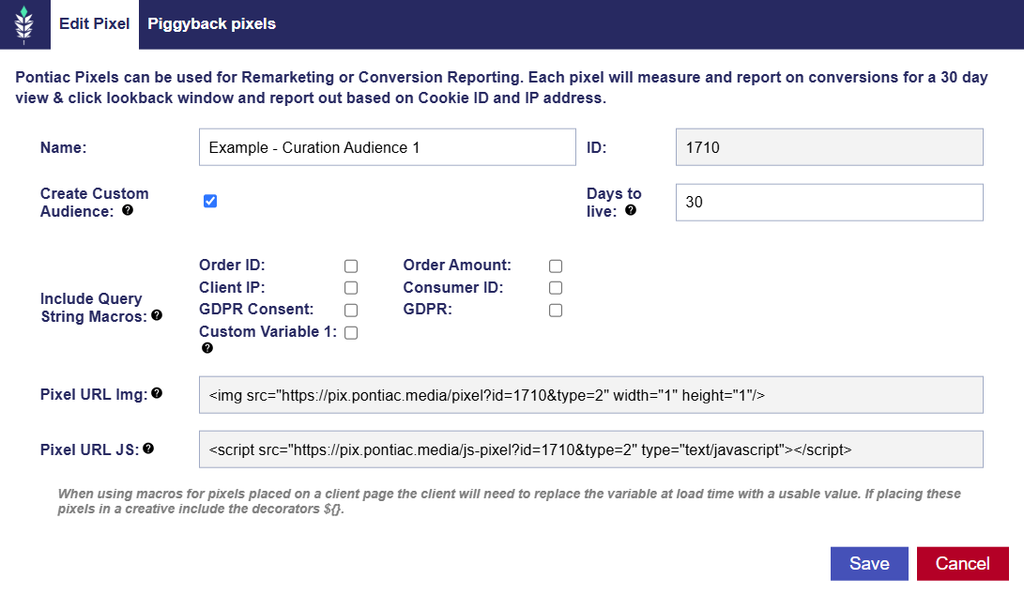
When creating or editing a Pontiac Pixel, the following Audience settings are available:
Create Custom Audience: Creates a Pixel IP Audience from qualifying Pixel fires.
Days to Live: Determines the number of days each record remains active in the Audience.
The default value is 180 days. Common windows include 30, 60, or 90 days.
Updating the Days to Live value applies only to future records added to the Audience.
Pixel placement on a website or as a Creative Impression Tracker.
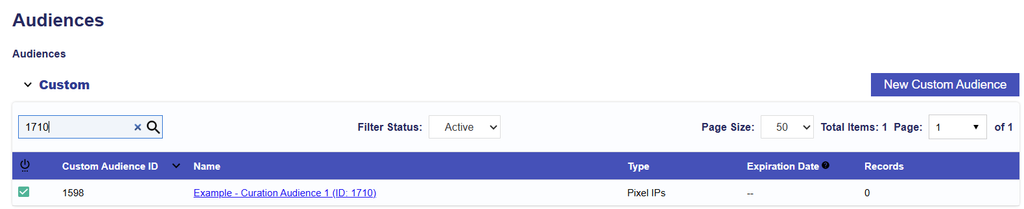
Once generated, the Audience automatically appears under Audiences > Custom using the associated Pixel name and ID. The Audience begins populating as qualifying Pixel activity is recorded.
When viewing the Audience, the displayed IP list is limited to a sample of 30,000 records, while the Records field displays the total Audience record count.
Pixel Placement
The Pixel can be implemented in one of two ways:
Website Remarketing: Place the Pixel on the desired page of the Advertiser’s website, such as:
Homepage
Product page
Checkout page
Thank you page
Users who generate qualifying Pixel activity can be added to the resulting Pixel IP Audience.
Creative Exposure Remarketing: Add the Pixel to a Creative as an Impression Tracker. To build an Audience based on Creative exposure:
Once the Pixel begins firing through either method, the resulting Pixel IP Audience will populate under Audiences > Custom, and the Records count will begin increasing as qualifying activity is captured.
View and Manage a Pixel IP Audience
Pixel IP Audiences can be viewed under Audiences > Custom.
The Records field displays the total Audience record count.
When the Audience itself is opened, Pontiac displays a sample of up to 30,000 IP records rather than the complete Audience membership.
Audience membership is primarily managed through:
Qualifying Pixel activity
The Pixel’s configured Days to Live
The Audience’s Active or Inactive status
Updating Days to Live affects only records added after the change.
Associate a Pixel IP Audience to a Campaign or Line
To use a Pixel IP Audience for targeting or anti-targeting:
Navigate to the applicable Campaign or Line.
Enter Edit mode.
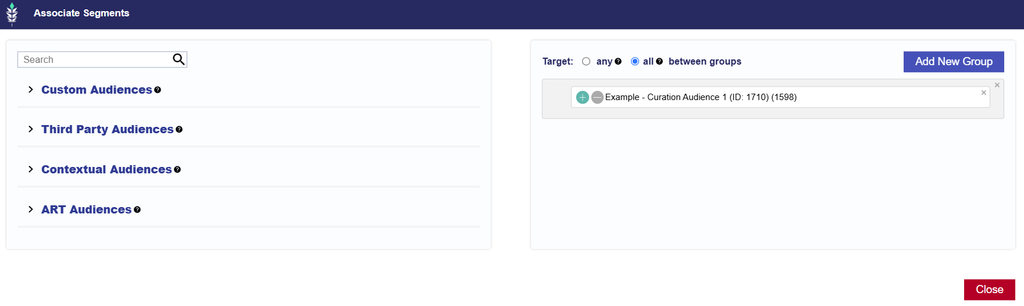
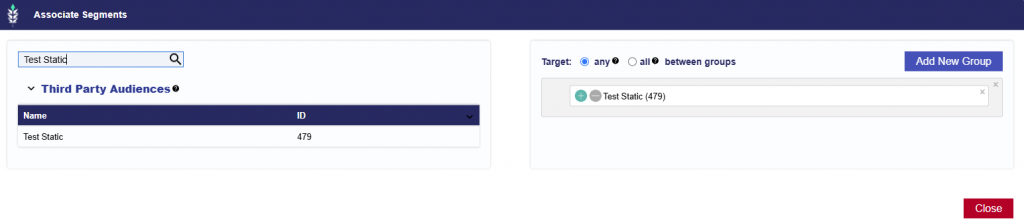
Open Audiences and select Associate Segments.
Select Custom Audiences.
Search for the Pixel IP Audience by Name or ID.
Select Add New Group and add the Audience to the desired targeting group.
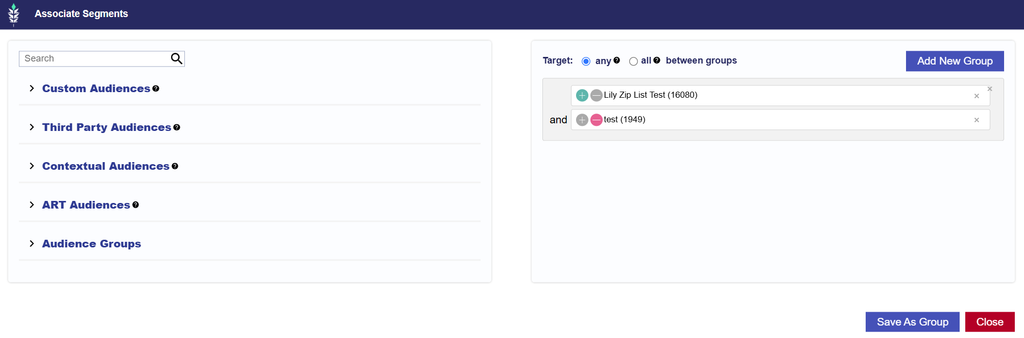
Select the green plus (+) to target the Audience.
Select the red minus (–) to anti-target the Audience.
Configure any additional Audience or Boolean logic as needed.
Close the dialog and select Save.
For more information on combining multiple Audiences or applying Campaign- and Line-level Audience logic, see Associate Segments and Boolean Logic.
Contextual AI
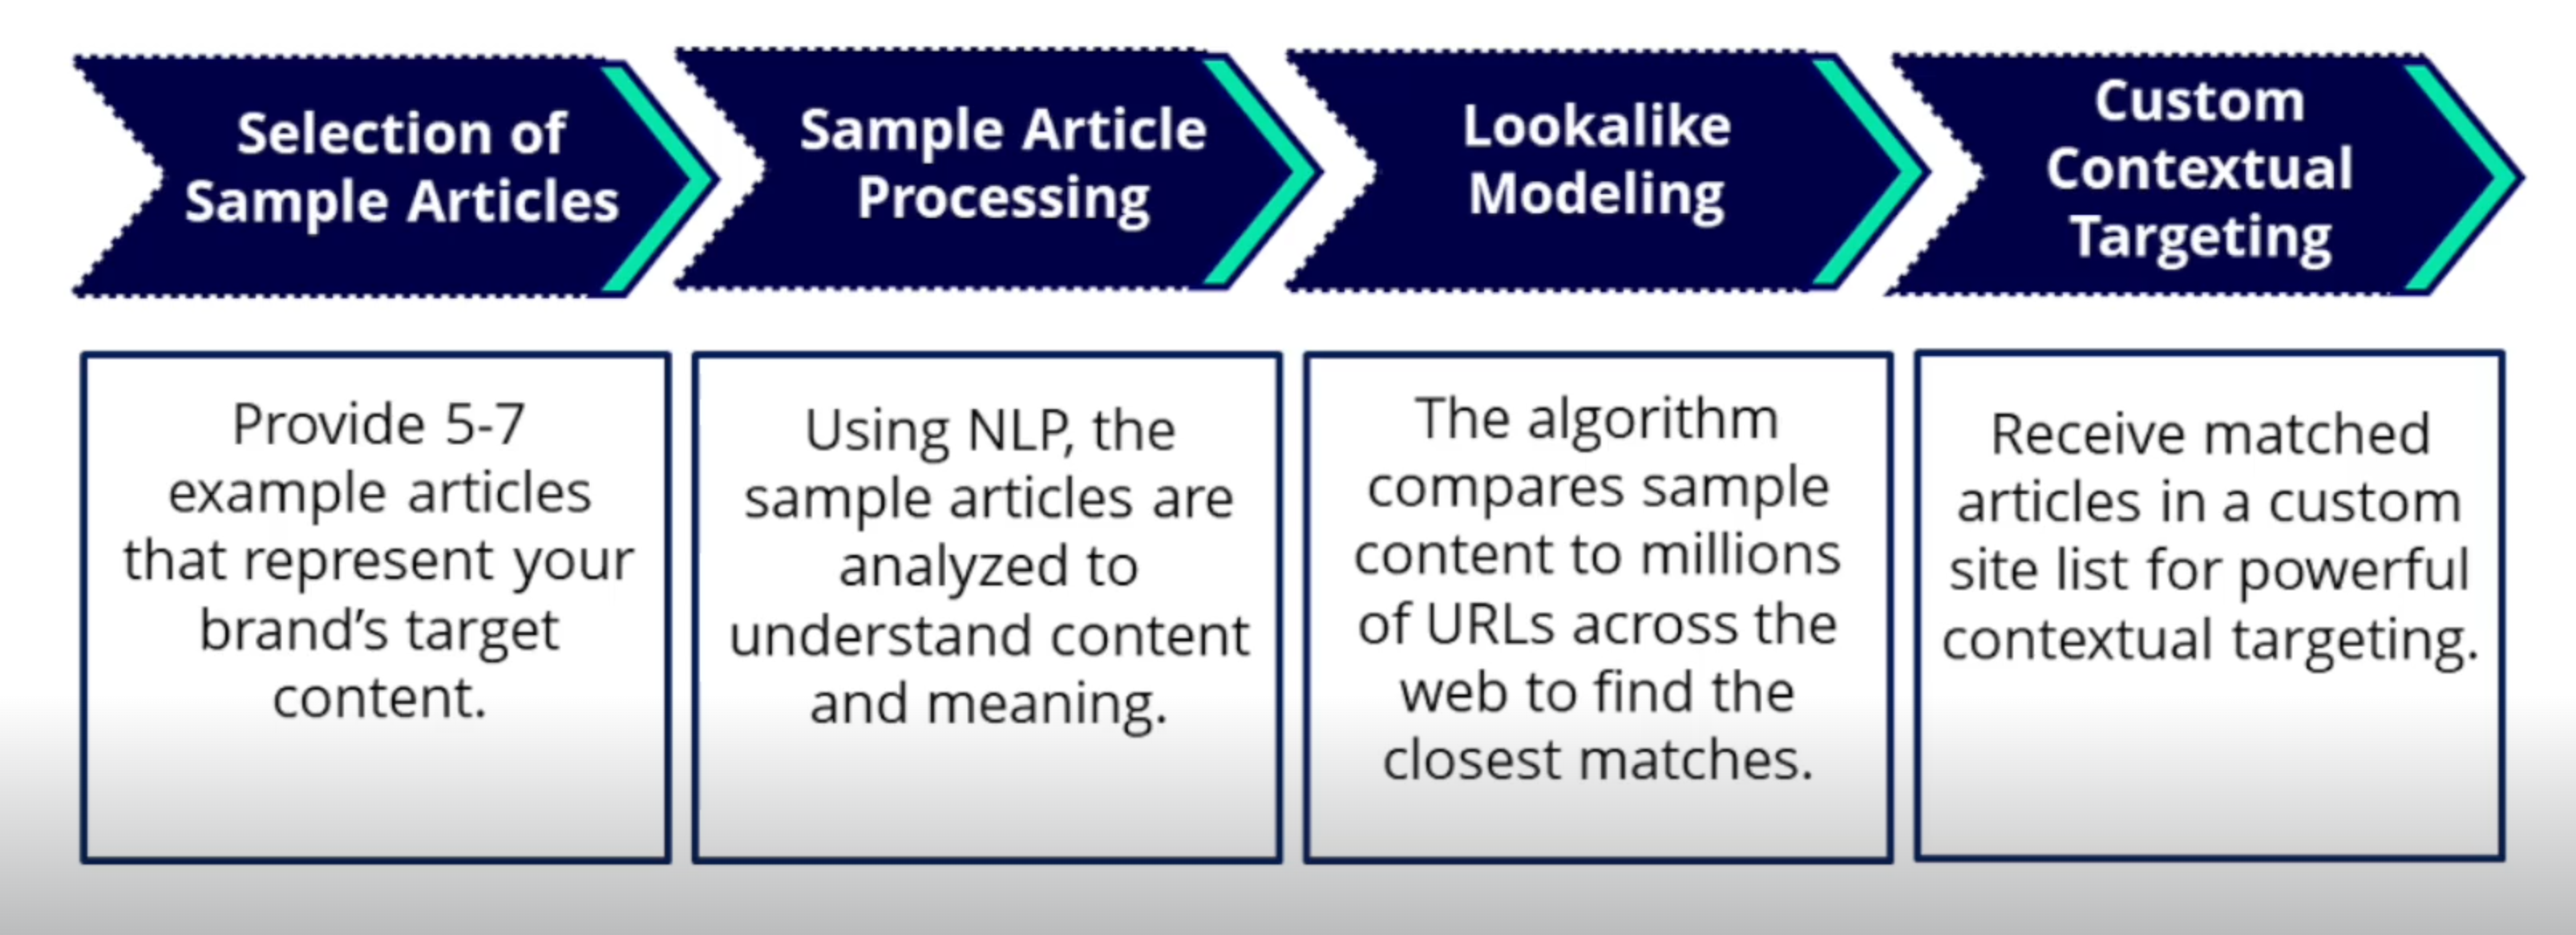
Contextual AI allows Advertisers to target web content based on the meaning and context of a page rather than relying only on individual keywords.
Using Natural Language Processing (NLP), Contextual AI analyzes the content of webpages to identify topics and concepts and find other contextually relevant content. This helps account for words that may have different meanings depending on how they are used. For example, the word “Apple” could refer to the technology company or the fruit.
Contextual AI can be used in two ways:
Custom Contextual Audiences: Build an Audience using representative webpage URLs or a written description of the desired content.
IAB Curated Contextual Segments: Select from more than 300 prebuilt contextual segments curated by Pontiac around IAB content categories.
Contextual AI segments have an additional $0.25 CPM fee that is included in the Total Cost CPM and does not need to be added to the Bid Price. Contextual AI can only be used with Web and Combined inventory types.
Create a Custom Contextual Audience
Navigate to Audiences > Contextual AI.
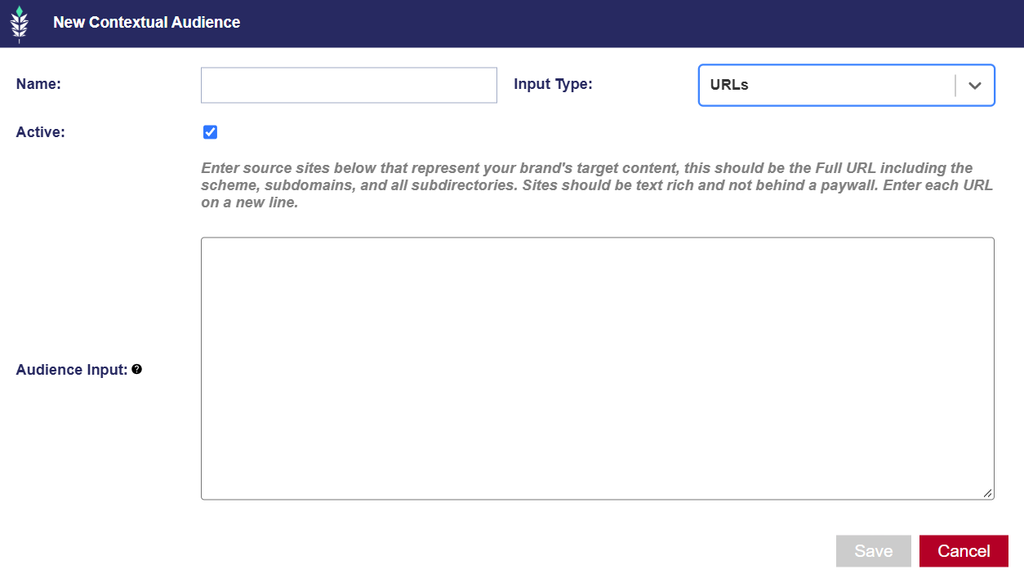
Select New Contextual Audience.
Enter an Audience Name.
Select an Input Type:
URLs: Use URLs when you have representative webpages that reflect the type of content you want to target. Enter one full URL per line, including the scheme, subdomain, and complete URL path.
Text: Use Text when you want to describe the desired content rather than provide example URLs.
Enter the applicable source content.
Save the Audience.
URLs
Use URLs when you have representative webpages that reflect the type of content you want to target.
Enter one full URL per line, including the scheme, subdomain, and complete URL path.
Use at least 3–5 representative pages. Closer to 10 may be useful for broader topics.
Use more examples when defining a broad topic and fewer examples when defining a narrow or specific topic.
Select text-rich pages with at least five sentences.
News articles, blog posts, guides, and other content-heavy pages generally provide stronger source material.
Avoid pages that are primarily images, interactive content, infinite scroll, or located behind a paywall.
For example, a broad Audience focused on current events may benefit from source articles covering several different current-event topics. A narrowly defined Audience, such as 1960s muscle cars, may require fewer examples because the desired context is more specific.
Text
Use Text when you want to describe the desired content rather than provide example URLs.
Enter a descriptive paragraph explaining the topic, subject matter, or type of content you want the Audience to match.
Minimum: 50 words
Maximum: 500 words
The description should provide enough detail for Contextual AI to understand the intended topic and identify contextually relevant webpages.
View and Manage Contextual Audiences
Navigate to Audiences > Contextual AI to review the Contextual Audiences available to the Seat.
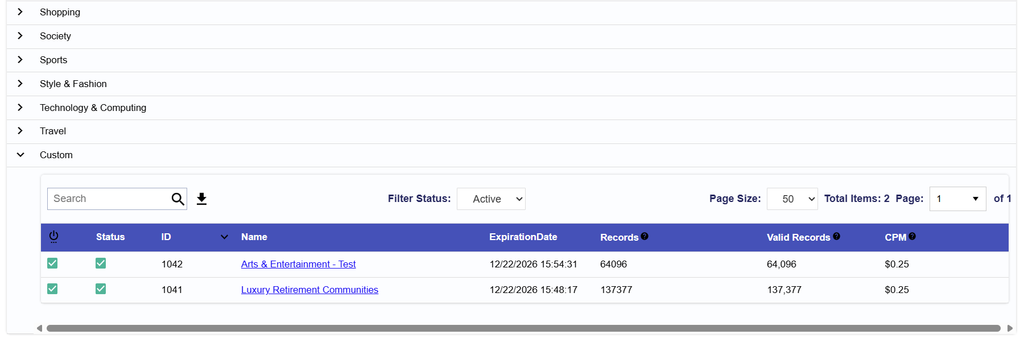
The table includes:
Status: Indicates whether the Audience is Active or Inactive.
ID: Pontiac’s unique identifier for the Audience.
Name: The name assigned to the Audience. Select the name to open and review the Audience.
Expiration Date: Displays when the Audience is scheduled to expire, when applicable.
Records: Displays the number of records associated with the Audience.
Valid Records: Displays the number of records successfully validated for use.
CPM: Displays the applicable Contextual AI data fee.
To view and edit the Custom Contextual AI segments Navigate to Audiences > Contextual AI > Custom.
Edit a Custom Contextual Audience
To edit an existing Custom Contextual Audience:
Navigate to Audiences > Contextual AI > Custom.
Select the Audience Name.
Update the Name, Active Status, or Input Data as needed.
Select Save.
Changes to the source URLs or text may change the content identified as contextually relevant to the Audience. Review existing Campaign and Line targeting before making significant changes to an Audience that is already in use.
Associate a Contextual Audience to a Campaign or Line
Once available, Contextual AI Audiences can be associated with eligible Campaigns or Lines through Audience targeting.
Navigate to the applicable Campaign or Line.
Enter Edit mode.
Open Audiences and select Associate Segments.
Select Contextual Audiences.
Search for the desired Custom or IAB Curated Contextual Audience.
Select Add New Group and add the Audience to the desired targeting group.
Select:
the green plus (+) to target the Audience
the red minus (–) to anti-target the Audience, when applicable
Configure any additional Audience or Boolean logic as needed.
Pontiac provides more than 300 prebuilt Contextual AI segments based on IAB content categories. These Audiences are already available for use across Advertisers and do not need to be created manually. To review a curated segment, select the Audience name. The Audience details include:
Site List: Displays the source articles used to define the intended content for the segment.
Example Audience Data: Displays a sample of webpages identified as contextually relevant to the segment.
Example Audience Data is a sample and does not represent the complete set of URLs contained in the Audience.
IAB Curated Contextual Segments:
Can be associated through Campaign or Line > Audiences > Associate Segments > Contextual Audiences.
Cannot be edited.
Are available across Advertisers.
Have an additional $0.25 CPM fee.
ART Audiences
ART Audiences allow users to turn insights from Audience Research or Audience Discovery reports into targetable geographic Audiences. Published ART Audiences use matched ZIP Codes from the ART report and can be associated with eligible Campaigns or Lines for cookieless targeting.
ART Audiences can be created from:
Audience Research: Analyze an existing Audience or selected geographies to identify demographic and interest characteristics and build a lookalike Audience.
Audience Discovery: Define a desired user profile using demographic and interest criteria, then identify geographic markets that best match that profile.
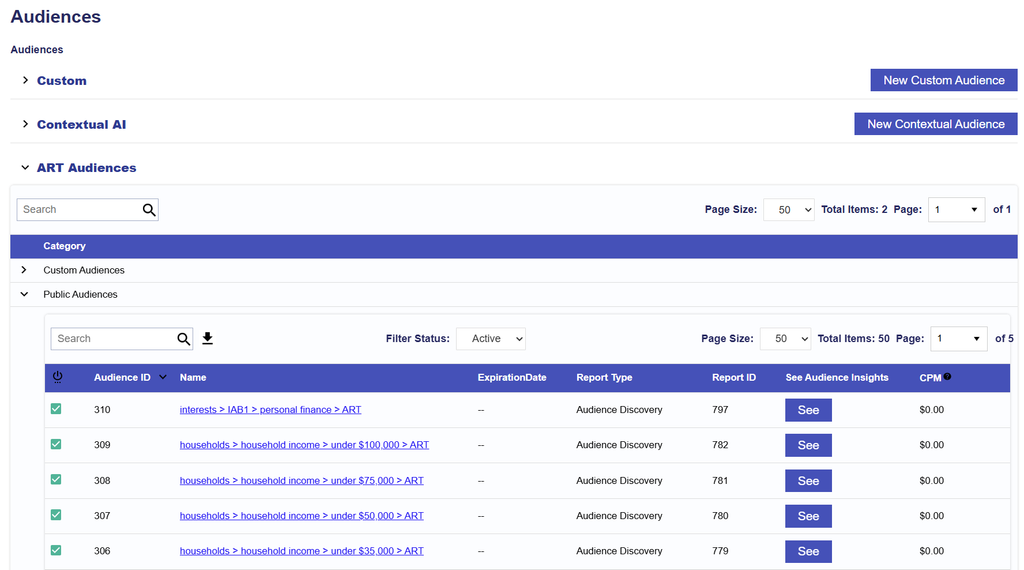
Pontiac also provides Public ART Audiences that are already available for targeting and do not need to be created manually.
Build an ART Report
Before publishing a Custom ART Audience, first create an ART report.
Navigate to ART.
Select either Audience Research or Audience Discovery.
Audience Research: Use Audience Research when you want to build a lookalike model from an existing Audience or geographic area. The source Audience can include data from a Pontiac IP Conversion Pixel placed on an Advertiser’s website, or selected geographies can be used to identify demographic and interest characteristics associated with those areas.
Audience Discovery: Use Audience Discovery when you want to define the demographics and interests of an ideal target Audience and identify geographic markets that best match those characteristics.
Configure and generate the report.
Publish a Custom ART Audience
Once the Audience Research or Audience Discovery report has been generated, it can be published as an Audience for Campaign or Line targeting.
Open the applicable ART Report.
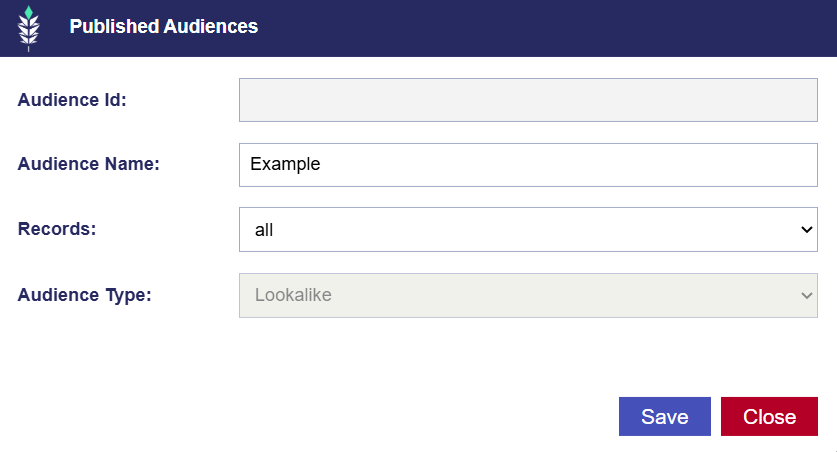
Scroll to the bottom of the report and select Publish New Audience.
Enter an Audience Name
Select the matched ZIP Code threshold:
All Results
Top 10%
Top 20%
Top 50%
Select Save.
The Audience will appear in the following locations:
ART > Audience Research or Audience Discovery Report > Published Audiences and is editable. The Audience Name and threshold can be adjusted.
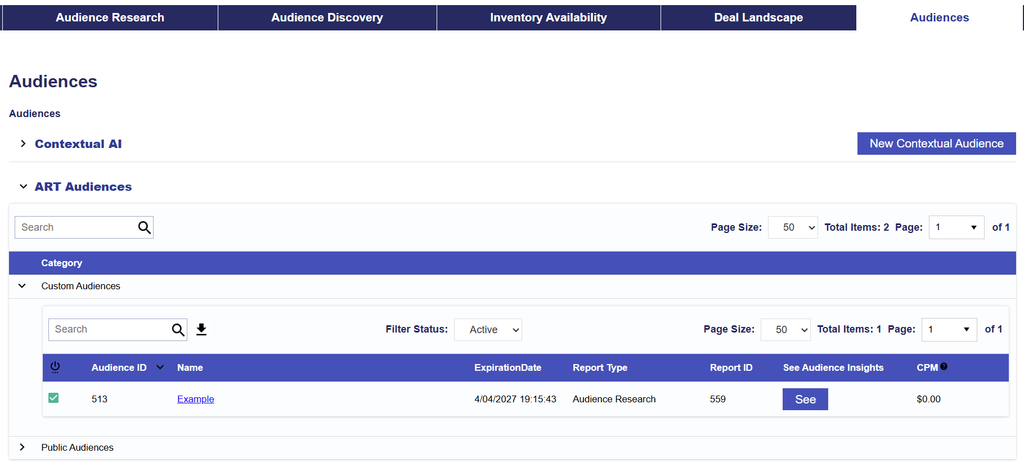
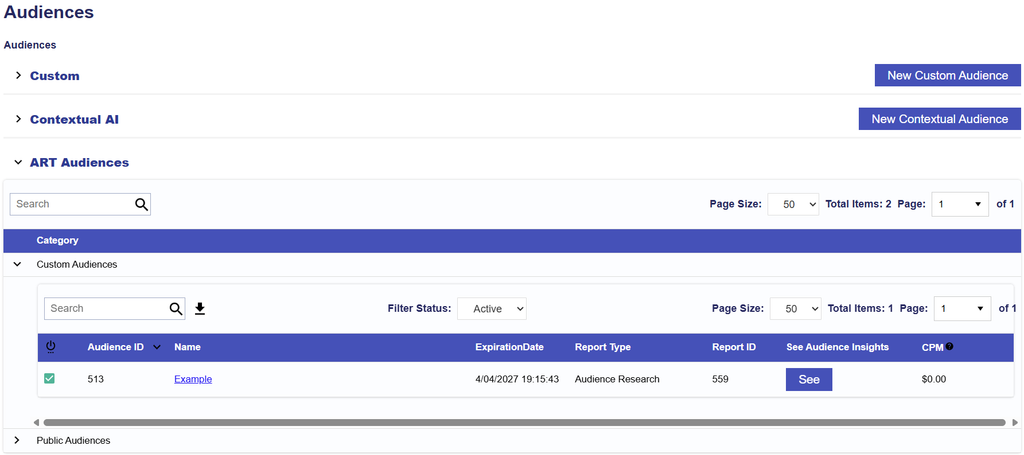
ART > Audiences > ART Audiences > Custom Audiences
Bidder > Audiences > ART Audiences > Custom Audiences
Bidder > Advertiser > Campaign or Line > Associate Segments > ART Audiences > Custom Audiences
View and Manage ART Audiences
Custom ART Audiences are tied to the ART report used to generate them.
The Auto Refresh setting on the source ART Report determines whether the report is refreshed as new data becomes available. Interest and Inventory data are updated every 30 days, and updated report results may change the matched ZIP Codes.
If Auto Refresh is enabled and the matched ZIP Codes in the report change, published Audiences associated with that report will automatically update to reflect the refreshed results.
To make changes to the underlying Audience definition, review the source Audience Research or Audience Discovery report and its refresh settings.
Because changes to an ART report may affect published Audiences already being used by Campaigns or Lines, review existing targeting before making significant changes to the source report.
Public ART Audiences
Pontiac also provides prebuilt Public ART Audiences.
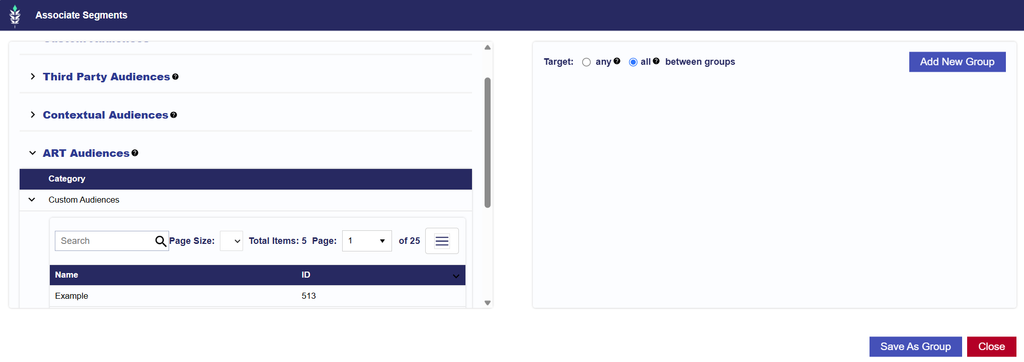
To view available Public Audiences, navigate to the ART Audience selection area and expand Public Audiences.
Public ART Audiences:
Do not need to be created or published manually.
Are available for use through Audience targeting.
Can be reviewed and selected under ART Audiences > Public Audiences.
Associate an ART Audience to a Campaign or Line
Once a Custom ART Audience has been published, or when using an available Public ART Audience, it can be associated with an eligible Campaign or Line.
Navigate to the applicable Campaign or Line.
Enter Edit mode.
Open Audiences and select Associate Segments.
Select ART Audiences.
Search for the desired Custom ART Audience, or expand Public Audiences to browse available Pontiac audiences.
Select Add New Group and add the Audience to the desired targeting group.
Select:
the green plus (+) to target the Audience
the red minus (–) to anti-target the Audience, when applicable
Configure any additional Audience or Boolean logic as needed.
Close the dialog and select Save.
For additional information on creating ART reports, see ART Documentation. For additional information on combining Audiences and configuring targeting logic, see Associate Segments, and Boolean Logic.
Third Party Audiences
Third Party Audiences include audience segments provided through external data partners as well as first-party CRM audiences that have been onboarded for targeting in Pontiac.
These audiences can be used to extend targeting beyond data created directly within Pontiac and may include demographic, behavioral, interest, lifestyle, purchase, household, and other audience attributes.
Within this section, users can:
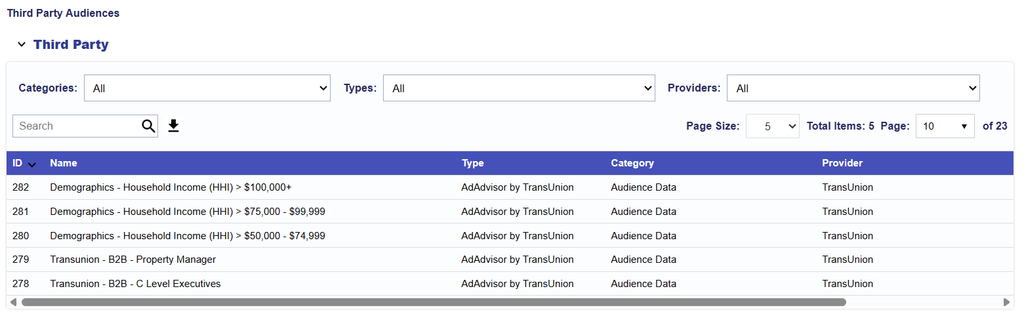
Browse and activate prebuilt audiences from the TransUnion Data Marketplace
See onboarded first-party CRM data through TransUnion
See onboarded first-party CRM data through LiveRamp
Review onboarding requirements, file formats, processing timelines, and audience availability
Once processed, applicable audiences become available under Audiences > Third Party and can be associated with eligible Campaigns or Lines for targeting.
Third-party Audience fees are applied as a CPM and included in the Line’s Total Cost. If multiple paid Audiences are targeted or anti-targeted on the same Line, only the CPM of the highest-priced segment is applied.
TransUnion Data Marketplace
The TransUnion Data Marketplace provides prebuilt third-party audience segments that can be associated with eligible Campaigns or Lines.
Available audiences span categories such as:
Demographics
Interests and lifestyles
Purchase behavior
Auto intenders
Political and consumer attributes
Other behavioral and household characteristics
For assistance finding or activating a TransUnion Audience, reach out through the Pontiac Help Center.
CRM / Onboarded Audiences
Clients can also onboard their own first-party CRM data to create targetable audience segments. Once processed, these audiences appear under Audiences > Third Party and can be associated with eligible Campaigns or Lines. CRM audiences may be onboarded through integrations such as TransUnion or LiveRamp, depending on the desired workflow.
For CRM onboarding, processing requirements and timelines vary by provider. TransUnion onboarding is typically completed within 3–5 business days, while LiveRamp workflows may require additional time for upload, mapping, distribution, and matching.
We cannot handle CRM data in any way other than in this protected inbox.
Files must be at minimum 1,000 customer contacts otherwise the segment cannot be created, and will not be accepted.
The Pontiac team will upload the file to TransUnion, receive the matchback, and push the resulting segment into Pontiac.
Once available, the Audience will appear under Audiences > Third Party.
The typical processing time is 3–5 business days, but we encourage early activation so the segment is ready well before the launch date.
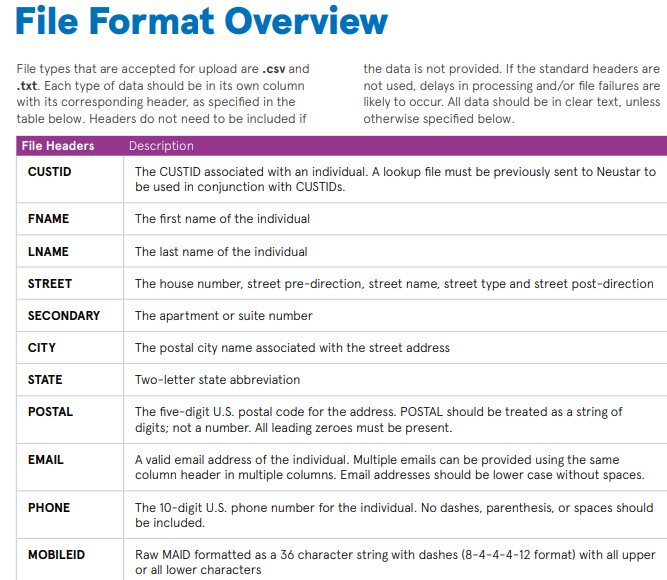
Files should be formatted according to the required TransUnion structure:
LiveRamp
LiveRamp is a data management platform (DMP) that allows you to upload personally identifiable information (PII) that you have about your audience. This can include:
Name and postal addresses (NAP)
Email addresses
Phone numbers
Client customer IDs (your internal customer IDs)
This functions as an audience key that allows LiveRamp to delete duplicates in an uploaded file. If there is no customer ID, LiveRamp will use either the email addresses or NAPs provided.
Turn your CRM data into targetable audience lists in the Pontiac platform to digitally reach users from previous email lists and/or mailing campaigns on the open web.
MEDIA TYPE: Banner, Video
INVENTORY TYPE: Web, Mobile-Web, Mobile In-App
DEVICE TYPES: Desktops & Laptops, Mobile Phones, Tablets
PRICING: $2.00 CPM for Audience Data
You can upload a csv, tsv, or txt file containing information into LiveRamp, which will match the submitted information with cookies and allow you to target these individuals across the Internet through Pontiac.
We recommend clients allow for a two-week lead time when working with LiveRamp. The maximum number of records allowed per seat at any given time is 300,000. Please do no not send any files or screenshots of files containing PII through the Help Center or to anyone on the Pontiac team.
Estimated Schedule:
1-2 days to upload the files:
Once you upload the file there will be a delay in this file showing up in the Audience folder, it may take up to 48 hours to appear.
5-8 days for the files to be mapped:
This is a manual process, so this stage can take some time. Typically, this takes 5-8 days for the first file in an Audience, but it is usually quicker for subsequent files.
1-2 days for distribution to Microsoft:
Once mapping is completed you will get a notification email to distribute the audience. Select the file(s) that you wish to send to Microsoft. After you have selected your desired files, select ‘Add to Distribution’ at the bottom of the page and notify your Account Manager. It will take 1-2 days for the segment to appear in Microsoft.
1-2 days for the file to be onboarded, matched & fully populated in Pontiac:
Once the segment appears in Xandr, your Account Manager will onboard the audience to Pontiac. While the audience will be available to associate to a Line, it may still be in the matching stage and could take an additional 1-2 days to fully populate in Xandr/Pontiac.
Terminology
File: A set or list of PII uploaded to LiveRamp as a CSV, TSV or TXT file. Each file uploaded will be converted into an Onboarded audience in Pontiac.
Audience: In the LiveRamp dashboard, an ‘Audience’ is a folder to which files with the same type of PII and column headers can be uploaded. Your first Audience folder will be created for you when the account is created. The folder will be ‘mapped’ based on the column headers of the first file uploaded. All subsequent files uploaded to an Audience will need to contain the same column headers. Notify your Account Manager if you need a new Audience folder created for a different type of data.
Mapping: This process is done manually by the LiveRamp team to determine which PII identifiers are in each column of the file, allowing the data to be properly ingested.
Matching: The process of matching personally identifiable information (PII) to the cookies for that individual, allowing them to be targeted on the open web.
Distribution: The publishing process through which data is delivered to Xandr and subsequently made available for targeting in Pontiac.
Records: The number of unique individuals in a file. There is a maximum of 300,000 distributed records per LiveRamp account at any given time.
Account Setup
To start using a LiveRamp account, all Pontiac users will need to sign a LiveRamp user agreement. This agreement can be found in the ‘Admin’ tab under ‘Seat Settings’ in the ‘Addendum’ section. To sign this agreement, check the ‘Accept LiveRamp Addendum’ box at the bottom of the contract and click ‘Submit’. By checking this box, you are agreeing to the terms of the agreement.
Once you have completed these steps, reach out through the Help Center with the email address you would like to be used for the account. The Pontiac Team will create an account on your behalf using the email address provided. Once your account is set up, you will receive an email from LiveRamp asking you to follow a link for creating a Password. After establishing your Password, you will be able to sign into LiveRamp with your email address and new password.
You can download and review the LiveRamp addendum here: LiveRamp Addendum
File Format
Files uploaded to LiveRamp must be 500MB or smaller and a CSV, TSV or TXT with no spaces in the File Name. There are 3 types of PII that can be uploaded:
Emails
Phone numbers
Name and Postal address
You can include one, two, or all three of these. But if you want to use Name and Postal address you must include all of the columns listed under ‘Name and postal address’ below (full name and full address). Use the following column headers to identify the type of PII in your file: Name and postal address:
FIRSTNAME
LASTNAME
ADDRESS1
ADDRESS2 (optional)
CITY
STATE
ZIP
ZIP4 (optional)
Plaintext email address:
EMAIL1
EMAIL2
EMAIL3
MD5 hashed email address:
MD5EMAIL1
MD5EMAIL2
MD5EMAIL3
SHA-1 hashed email address:
SHA1EMAIL1
SHA1EMAIL2
SHA1EMAIL3
SHA-256 hashed email address:
SHA256EMAIL1
SHA256EMAIL2
SHA256EMAIL3
Plaintext phone number:
PHONE1
PHONE2
PHONE3
SHA-1 hashed phone number:
SHA1PHONE1
SHA1PHONE2
SHA1PHONE3
Customer ID (used to de-duplicate rows):
CCID
See a sample 100 rows of fake data here: Sample File
Uploading Files to LiveRamp
(1-2 Days)
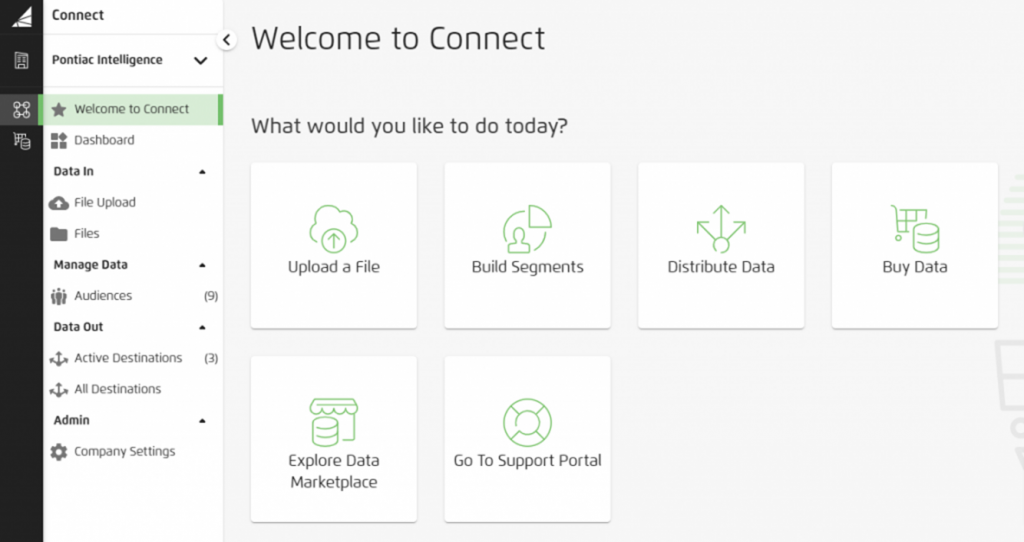
Once you have signed into your account, you should be brought to this page:
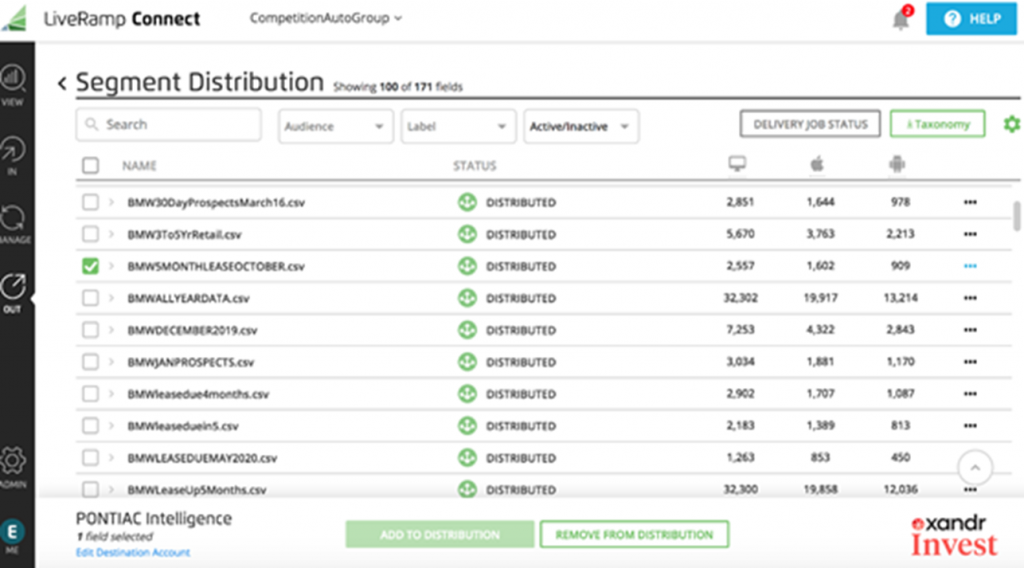
You are now ready to upload data files into the audience your AM created for you. From the Homepage (which you can access by clicking on the triangle symbol next to ‘Connect’ in the upper-left corner, pictured above), select ‘Upload a File’ and follow the prompt.
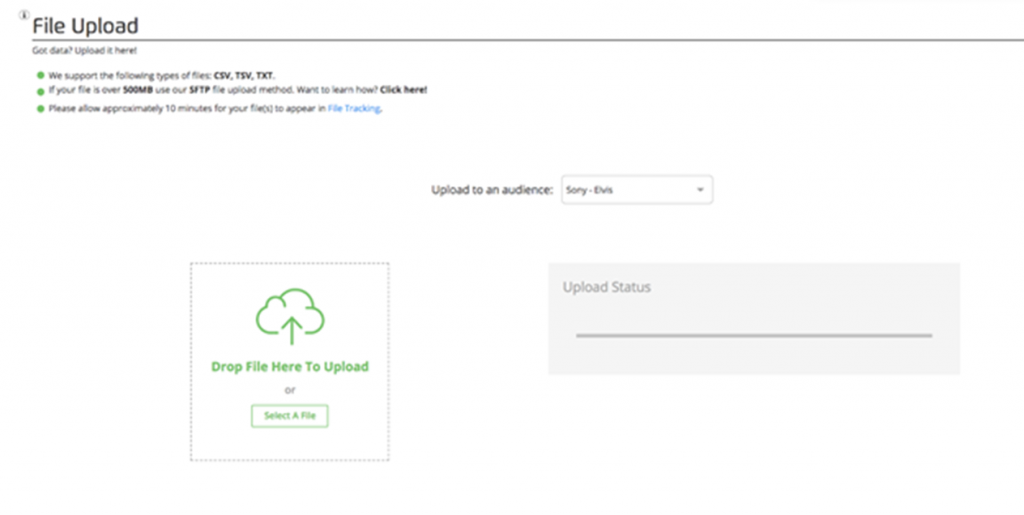
Within the File Upload page, select the name of your audience from the drop-down ‘Upload to an Audience’ menu. Your first Audience folder will be created for you when the account is created. Each file uploaded to an Audience must contain the same data columns, as this is mapped for matching with the first file. If you need to upload files with different columns, your Account Manager can create additional Audience folders for you.
Once you have selected the audience, a box will appear prompting you to either drag in or select the appropriate file. You should proceed to upload the desired csv, tsv, or txt.
Once you select your file, click ‘Upload File’ in the ‘Upload Status’ window to begin processing.
Once ‘Upload Status’ says the file upload is complete, you will have the option to select a button that says, ‘Go to Audience’. If you click this immediately after uploading, another tab will open in your window to bring you to the ‘Manage’ page for that audience. You will likely not see any segments listed within the audience as can take 24-48 hours for the newly uploaded segment to appear.
Mapping Process
(5-8 Days)
The first file uploaded to each audience is mapped to determine which data points are in each column of the document so that the PII can be properly ingested. This is a manual process completed by LiveRamp and it can take up to 5-8 days.
LiveRamp will send you an email when your file has been mapped and is ready for distribution. If you see delays in this process that exceed 8 days, let your Account Manager know and they will contact LiveRamp support to try to expedite this process.
Distributing Files to Xandr
(1-2 Days)
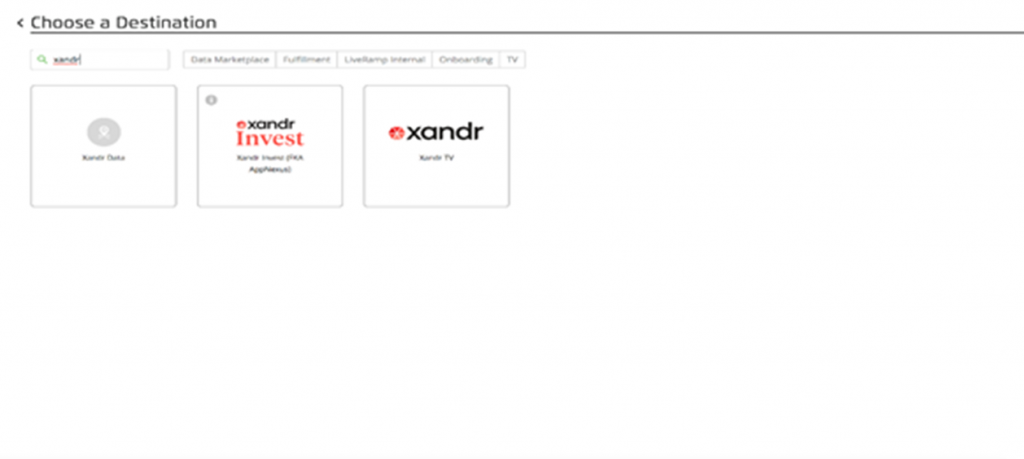
In order to publish your segment(s), you must configure Xandr as a destination. This only needs to happen once. From the menu, select ‘Data Out – ‘Active Destinations’ ‘New Destination Account’.
You will be brought to a page listing many possible destinations. Use the search bar to look up ‘Xandr Invest’.
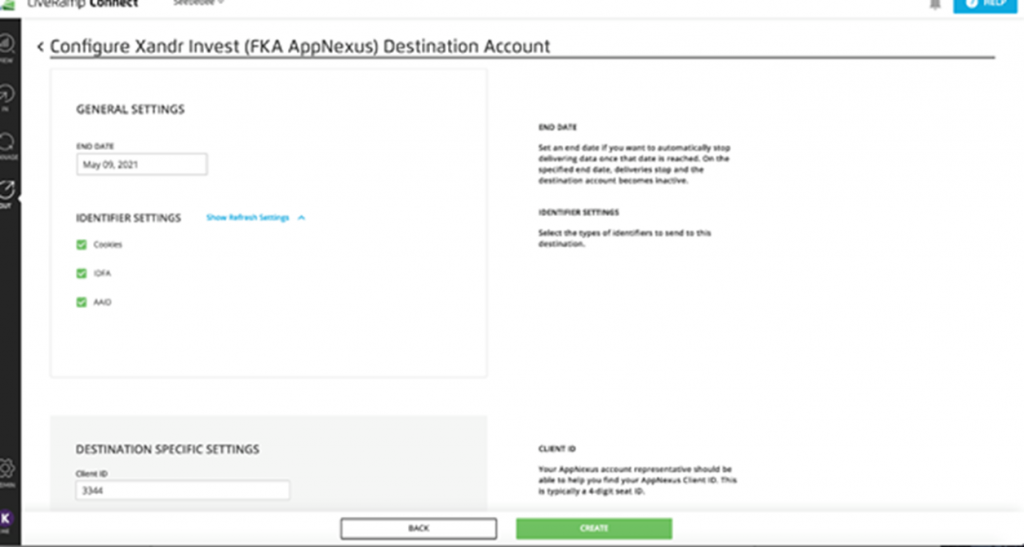
When you hover over the icon, you will be prompted to ‘Activate’ the destination.
You will be brought to a page titled ‘Configure Properties’. In the ‘Destination Specific Settings’, enter the client ID ‘3344’.
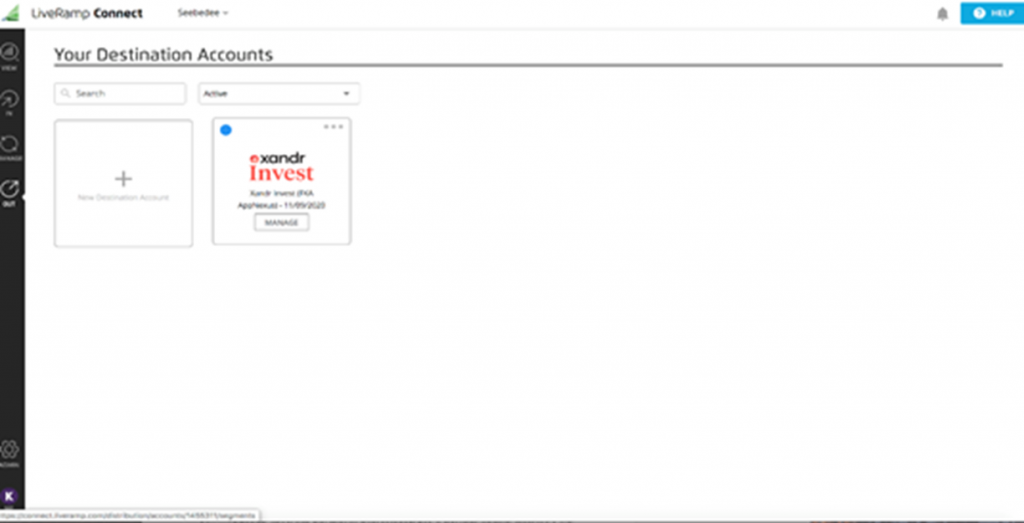
After you have set up Xandr as a destination, you will be able to push your audience segment to distribution. Select ‘Active Destinations’ from ‘Data Out’ in the sidebar.
Select ‘Manage’ from within the Xandr box
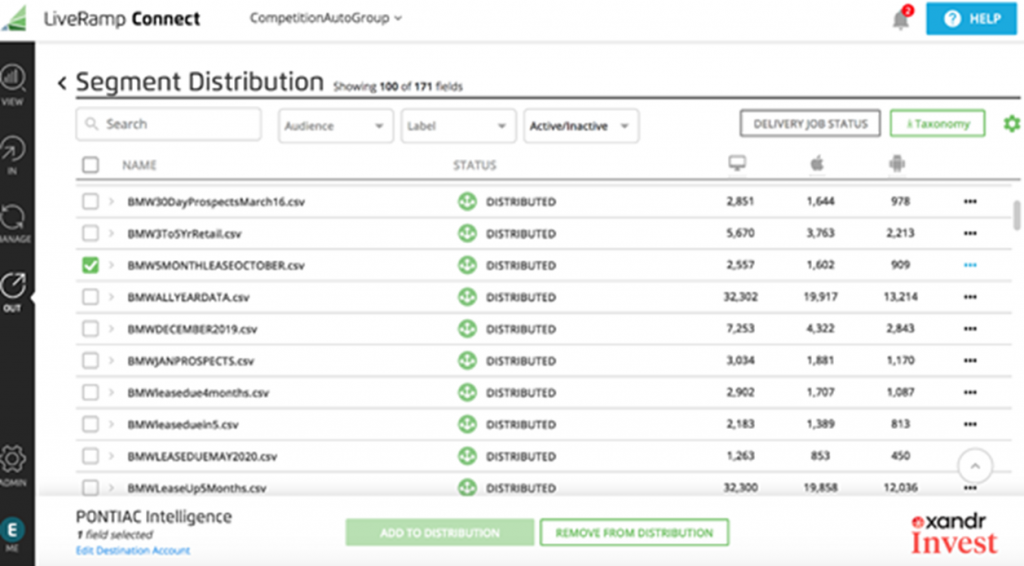
Select the file(s) that you wish to send to Xandr. After you have selected your desired files, select ‘Add to Distribution’ at the bottom of the page. From distribution, it will take 1-2 days for the segment to appear in Xandr.
Audience Onboarding & Matching
(1-2 Days)
Once you have added a segment to distribution for Xandr, reach out to the Pontiac Team through the Help Center to say that you have pushed a segment. Please provide the segment name.
The Pontiac Team will inform you when the file has been onboarded to your Pontiac seat.
You will now have access to your audience Segment within the Pontiac console. Your audience will be located within the Audiences tab under ‘On Boarded.’
Note, while the segment may be available in Pontiac rather quickly, the file may still be in the matching process and the segment may take 1-2 days to fully populate in Xandr/Pontiac.
Removing Segments that are no longer in use
Any segments that are no longer being used in the Pontiac console or in LiveRamp should be removed from distribution. Your Account Manager will send a friendly reminder at the end of each month, reminding you to remove the segments that are no longer being used. The maximum number of records allowed per seat at any given time is 300,000.
To remove the segments from distribution, click on the out section in LiveRamp, and then click the ‘Manage’ button in Xandr Invest. There you will see all your segments that have been uploaded. Click the box next to the segment that you wish to remove from distribution. At the bottom, there will be a green button that states, remove from distribution. Once you click ‘remove,’ the process will be complete.
Geo Fencing Audiences
Geo Fencing Audiences allow users to build location-based audiences using visitation data from defined geographic areas using OnSpot data. Geo Fencing is useful for reaching users based on historical visits to real-world locations such as retail stores, dealerships, event venues, campuses, competitor locations, or other points of interest.
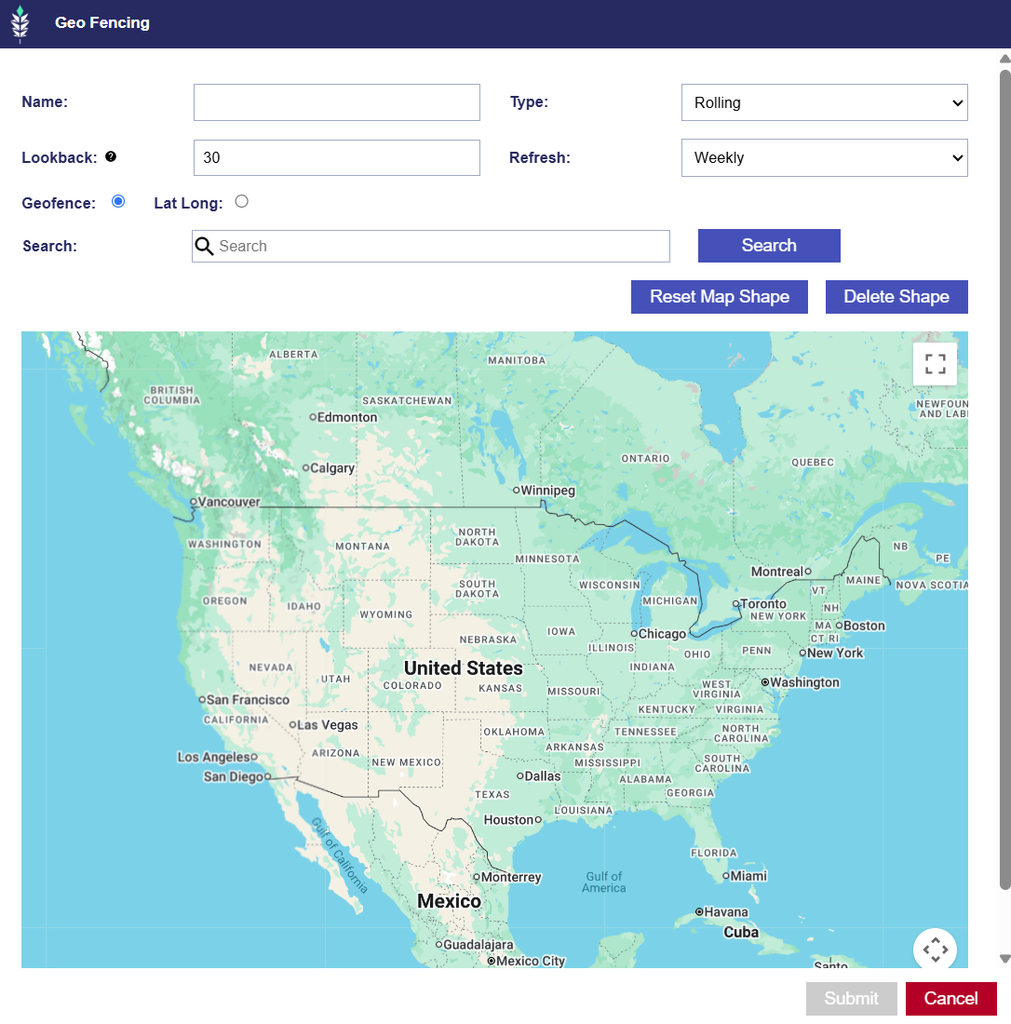
Geo Fencing Audiences are available under Audiences > Third Party Audiences > Geo Fencing and can be created using one of two location methods:
Geo Fence: Draw a custom geographic shape directly on the map.
Lat/Long: Define a location using latitude, longitude, and a radius in meters.
Both methods support Rolling and Static Audience types.
View and Manage Geo Fencing Audiences
Navigate to Audiences > Third Party Audiences > Geo Fencing to view existing Geo Fencing Audiences.
The table includes:
Name: The name assigned to the Audience.
Record Count: The number of qualifying records currently included in the Audience.
Start Date: The beginning of the Audience’s applicable date range.
End Date: The end of the applicable date range.
Expiration Date: Displays when the Audience is scheduled to expire, when applicable.
Type: Indicates whether the Audience is Rolling or Static.
Create a Geo Fencing Audience
Navigate to Audiences > Third Party Audiences > Geo Fencing.
Select New Geo Fence to create a new audience.
Enter the audience Name.
Select one of the following audience types:
Rolling: A Rolling audience continuously refreshes based on a selected lookback period.
Lookback: Select a lookback period of up to 90 days. The default value is 30 days.
Refresh: Choose whether the audience should refresh weekly or monthly.
The audience will be updated as new qualifying location data becomes available.
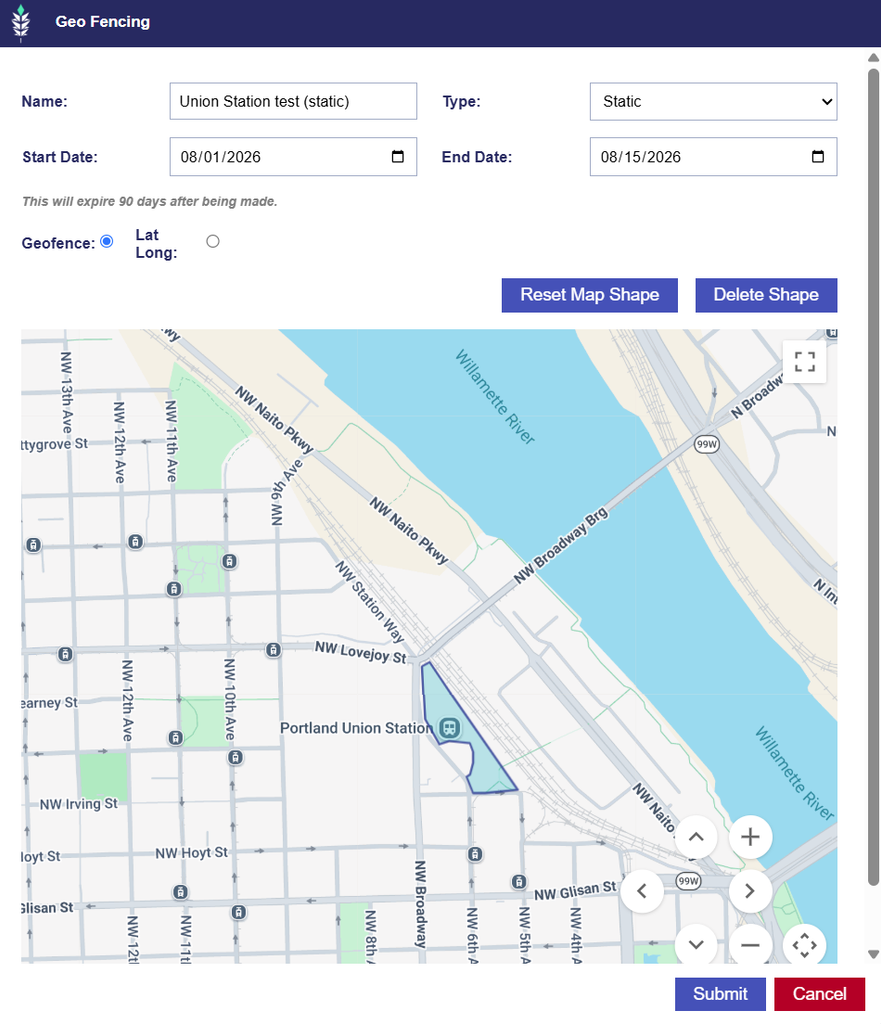
Static: A Static audience is created using a fixed date range.
Start Date
End Date: Must be on or before yesterday (UTC); ex. if today is 2025-05-08 the end date must be on or before 2025-05-07.
Static audiences expire 90 days after they are created.
Enter your Lookback window: the number of days of historical location data to include. The maximum lookback is 90 days.
Define the Geo Fence Audience.
Geo Fence Shape
Lat Long
Geo Fence Shape
Geo Fence is selected by default and allows users to define a custom geographic area by drawing a shape on the map.
To define the Geo Fence:
Use the Search bar to enter a location name or address.
Use the map controls to draw the boundaries of the desired area.
If needed, use the delete shape option to clear the current shape and start over.
Once the desired area has been defined, select Submit.
The Audience will then be submitted for processing using the selected shape and Rolling or Static settings.
Latitude / Longitude Radius Geo Fencing
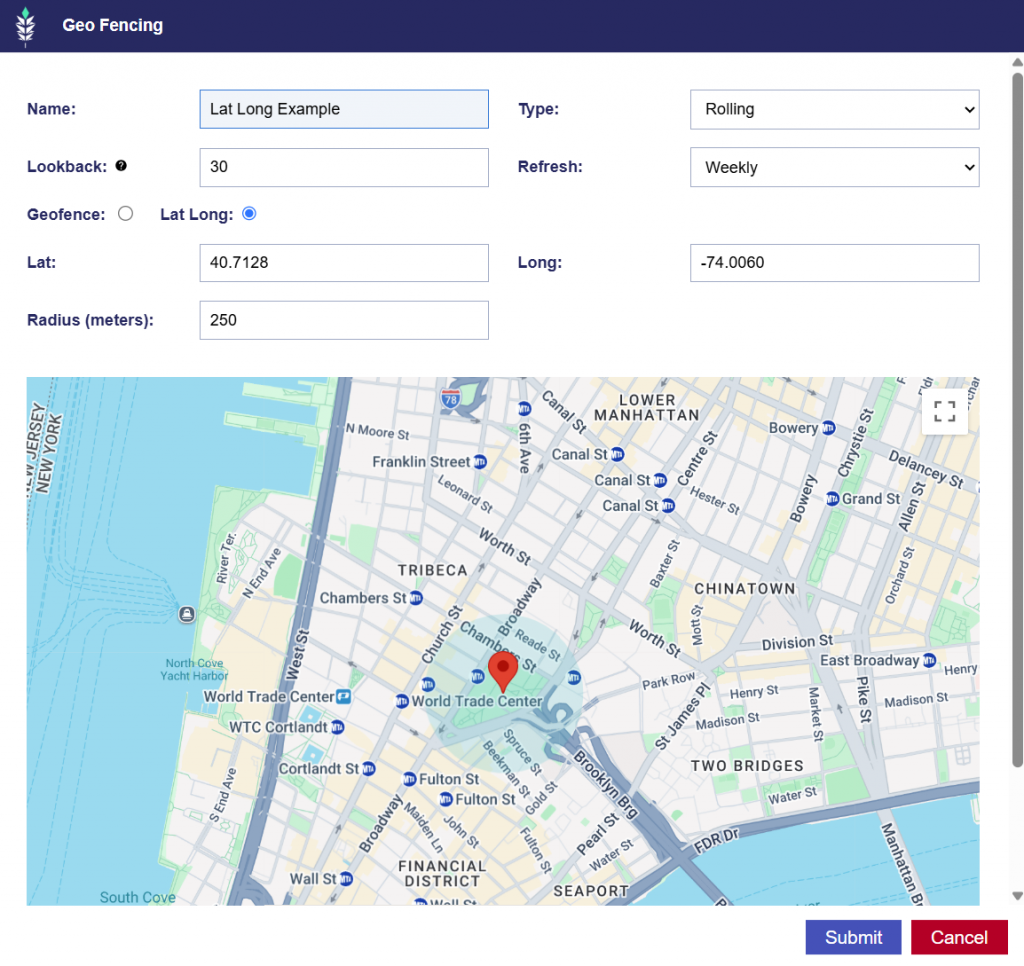
The Lat/Long option allows users to define a geographic area using a specific latitude, longitude, and radius instead of drawing a custom shape.
When Lat/Long is selected, the map shape controls are replaced with the following fields:
Latitude: Decimal latitude value, for example 40.7128
Longitude: Decimal longitude value, for example -74.0060
Radius in Meters: The radius around the selected coordinate, for example 250
Latitude and longitude accept decimal values, and the radius is entered in meters.
The selected coordinates, radius, Audience type, and other settings are saved with the Audience and used when it is submitted for processing.
Edit and Manage a Geo Fencing Audience
Once created, Geo Fencing Audiences can be reviewed from Audiences > Third Party Audiences > Geo Fencing.
Use the Audience table to monitor the Audience’s:
Record Count
Date range
Expiration Date
Rolling or Static type
Associate a Geo Fencing Audience to a Campaign or Line
After the Geo Fencing Audience has been created, it becomes available for Audience targeting and can be associated.
Navigate to the applicable Campaign or Line.
Enter Edit mode.
Open Audiences and select Associate Segments.
Select Third Party Audiences and locate the applicable Geo Fencing Audience.
Search for the Audience by Name or ID.
Select Add New Group and add the Audience to the desired targeting group.
Select:
the green plus (+) to target the Audience
the red minus (–) to anti-target the Audience
Configure any additional Audience or Boolean logic as needed.
Close the dialog and select Save.
The Geo Fencing Audience is now applied to the Campaign or Line.
For additional information on combining Audiences and configuring Any / All logic, see Associate Segments, and Boolean Logic.
Associate Segments
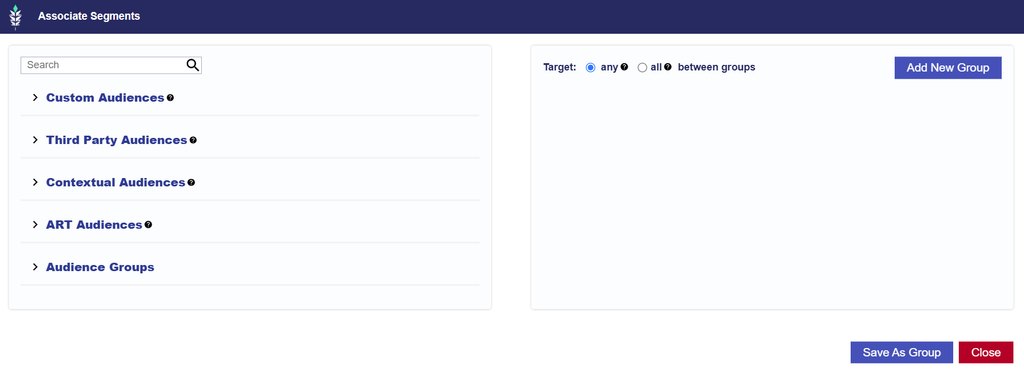
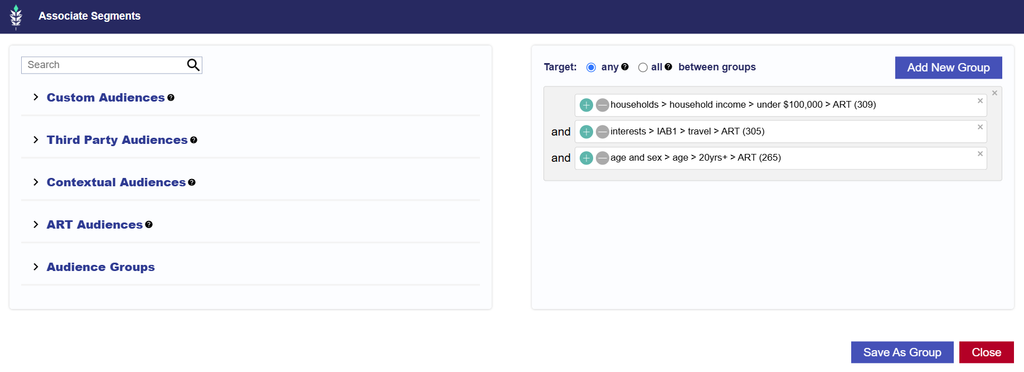
The Associate Segments window allows users to apply Audience Targeting to a Campaign or Line by selecting Audience segments and configuring Boolean logic. Multiple Audiences can be combined into groups to define which Impressions are eligible to serve.
UI Location: Campaign or Line > Audiences > Associate Segments
Available Audience Types
The Associate Segments window provides access to the following Audience types:
ZIP Code Audiences generated through Audience Research or Audience Discovery reports, as well as prebuilt public ART Audiences available in Pontiac.
Associating Audiences
To associate Audience segments with a Campaign or Line:
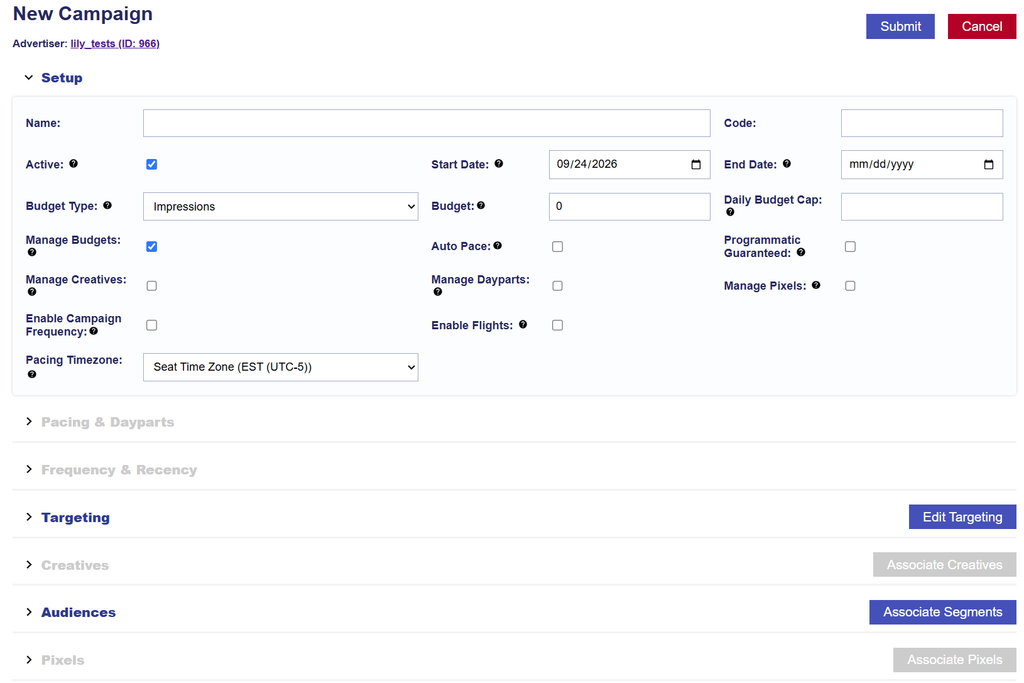
Create a new Campaign or Line, or open an existing one in Edit mode.
Navigate to the Audiences section and select Associate Segments.
Select an Audience type and use the search functionality to find the desired segments.
Select Add New Group to create an Audience group.
Drag the desired Audience segments into the group.
Configure the Any / All Boolean logic to define how the selected Audiences should be evaluated.
Add additional groups as needed and configure the logic between them.
Review the full Audience configuration.
Save the Audience configuration and submit the Campaign or Line changes.
Audience Groups and Boolean Logic
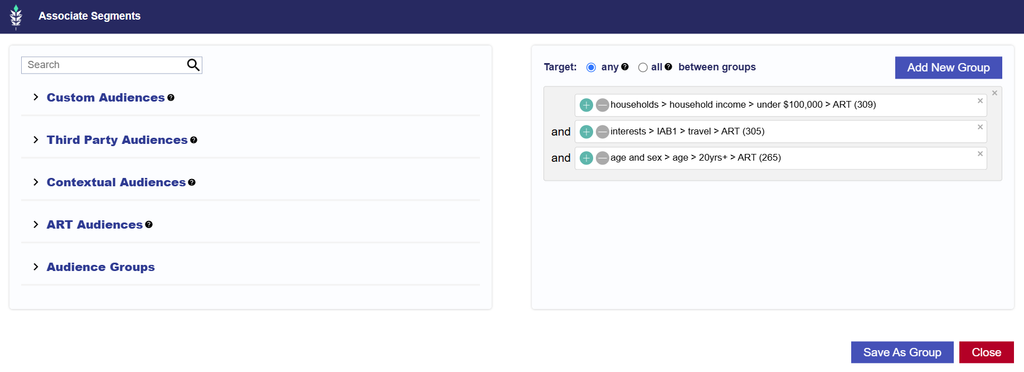
Audience groups allow multiple segments to be combined using Boolean targeting rules. Each group can contain one or more Audience segments, and additional groups can be added to create more complex targeting configurations.
The Any / All options determine how the selected segments or groups are evaluated:
Any (OR): An Impression is eligible if it satisfies at least one of the specified Audience conditions.
All (AND): An Impression must satisfy every specified Audience condition to be eligible.
For example, selecting Any between Audience A and Audience B allows Impressions that match either Audience. Selecting All requires Impressions to match both Audiences.
You can combine multiple groups to build more specific targeting requirements. Review the Boolean logic between and within groups to ensure the final configuration matches your intended targeting strategy.
Important: Boolean logic can significantly affect scale. Using All across Audiences that do not meaningfully overlap can greatly reduce eligible inventory or prevent delivery entirely.
For additional examples and guidance, see Boolean Logic .
Audience Type Compatibility
Audience types may rely on different underlying targeting signals. When multiple Audience types are combined, make sure their targeting requirements are compatible.
For example:
ART Audiences are ZIP Code-based. Combining an ART Audience with ZIP targeting requires the applicable ZIPs to overlap.
Contextual Audiences are based on eligible sites and content. Combining a Contextual Audience with a restrictive Site Allow List requires the eligible sites to overlap.
Other Audience types may depend on identifiers such as IP, IFA, geography, or inventory context. Layering incompatible requirements can reduce or eliminate eligible inventory.
Important: Adding more Audience types does not automatically broaden targeting. Depending on the configured Boolean logic, additional Audiences may further narrow eligibility.
Campaign and Line Audience Targeting
Audience Targeting can be configured at both the Campaign and Line levels.
Campaign level Audiences: Apply shared Audience requirements across all Lines within the Campaign.
Line level Audiences: Apply additional Audience requirements to an individual Line.
Campaign and Line Audience Targeting are evaluated together. An Impression must satisfy the applicable requirements from both levels to be eligible to serve.
If Audiences are associated at both the Campaign and Line levels, the Line does not replace the Campaign Audience configuration. Instead, the Audience requirements from both levels are combined.
For example, if a Campaign targets Audience A and a Line targets Audience B, an Impression must satisfy the applicable Audience requirements from both Audience A and Audience B to be eligible for that Line.
Example Scenario:
Campaign Audience A: A ZIP Code Audience containing ZIP codes in New York City.
Line Audience B: A Lat Long Audience containing Joe’s Pizza locations in New York City.
Because the geographic areas overlap, impressions may still be eligible to serve when they satisfy both Audience requirements.
However, if the Line Audience B instead used a Lat Long Audience containing Domino’s locations in Texas, the geographic requirements would not overlap with the Campaign’s New York City ZIP Code Audience. In that case, there would be no impressions that could satisfy both Audience requirements, preventing the Line from serving.
Important: Review the complete Campaign and Line Audience configuration together. Layering Audiences at both levels can significantly narrow eligible inventory, especially when the selected Audience types or underlying targeting signals do not overlap. A Line may appear to have broad Audience targeting on its own but still be restricted or prevented from serving by Audiences applied at the Campaign level.
Audience Groups
Audience Groups allow users to create, name, save, and reuse Audience targeting configurations across multiple Campaigns and Lines.
A saved Audience Group retains the selected Audience segments, grouping structure, and Any / All Boolean logic, allowing users to quickly reuse common Audience strategies without rebuilding the configuration each time.
Audience Groups can include Audiences from:
Custom Audiences
Third Party Audiences
Geo Fencing
Contextual Audiences
ART Audiences
Saved Audience Groups function as templates. When an Audience Group is applied to a Campaign or Line, the configuration is copied into that Campaign or Line and can be edited independently.
View Audience Groups
Navigate to:
Audiences > Audiences > Audience Groups
The Audience Groups section displays saved Audience Groups in a table containing:
Audience Group ID
Name
Use the table controls to search and navigate through saved Audience Groups and create new audience groups using the New Audience Group button.
Create an Audience Group
Navigate to Audiences > Audiences > Audience Groups.
Select New Audience Group.
Enter the Audience Group Name.
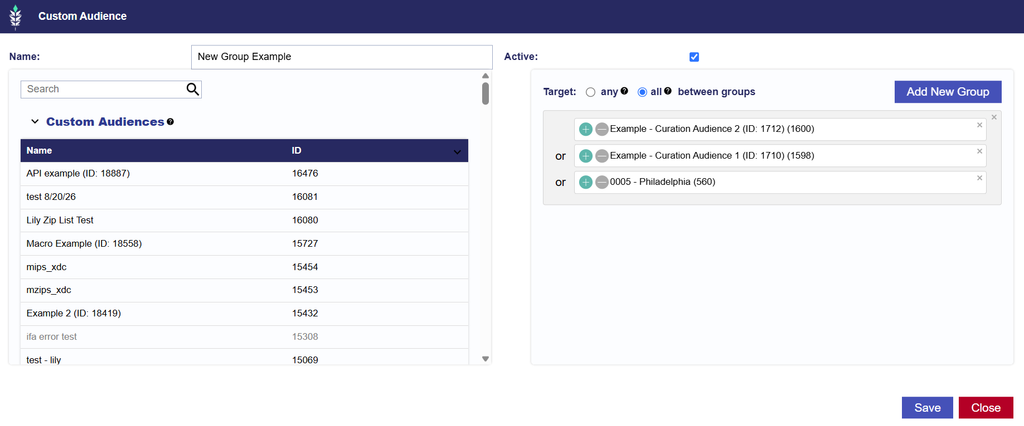
Use the Active checkbox to set the Audience Group as Active or Inactive.
Search for and select the Audiences you want to include.
Add additional Audience groups within the configuration as needed.
Use the existing Any / All options to configure Boolean logic between and within groups.
Remove or rearrange selected Audiences as needed.
Select Save.
When saved, Pontiac assigns the Audience Group a unique Audience Group ID and stores the selected Audiences, group structure, Boolean logic, Name, and status.
The Audience Group is then available for reuse across Campaigns and Lines when associating segments.
Edit an Audience Group
To edit an existing Audience Group:
Navigate to Audiences > Audiences > Audience Groups.
Select the Audience Group Name.
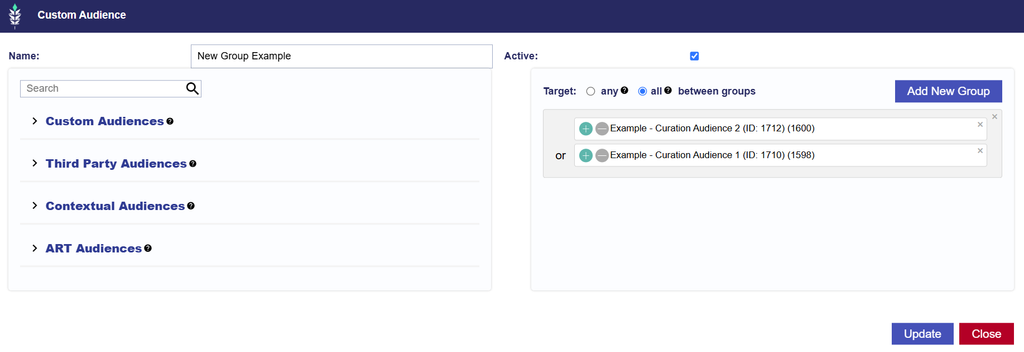
Update the Name, status, selected Audiences, groups, or Boolean logic as needed.
Select Update to save the changes, or Cancel to exit without saving.
Updates to a saved Audience Group apply only when the template is used for new associations.
Campaigns and Lines that were previously populated from the Audience Group retain their existing Audience configuration and are not automatically updated.
Associate an Audience Group with a Campaign or Line
Saved Audience Groups can be applied through the existing Audience targeting workflow.
Navigate to the applicable Campaign or Line.
Open the Audiences section.
Select Associate Segments.
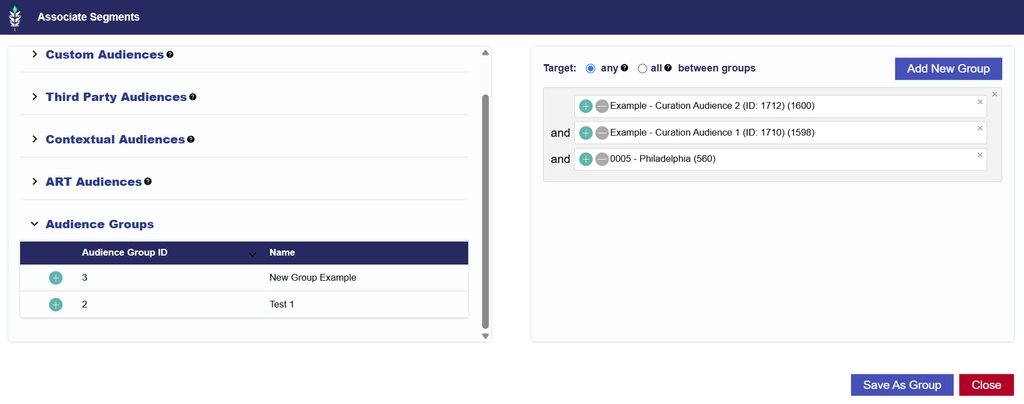
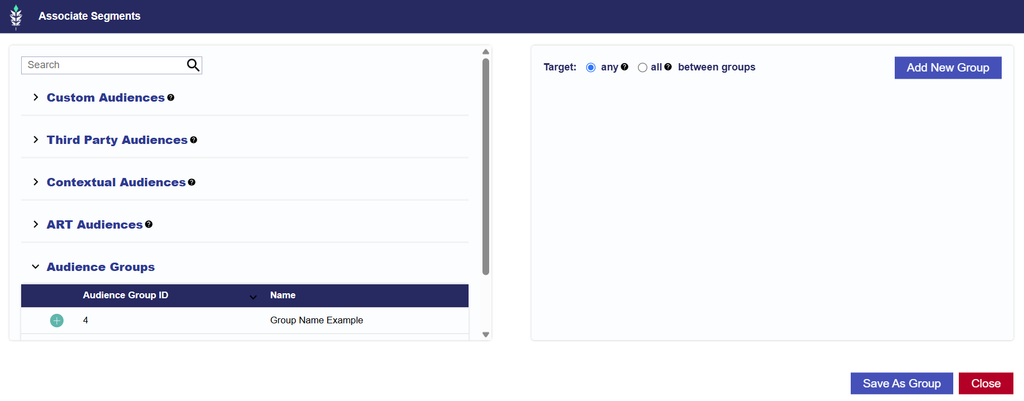
Expand Audience Groups in the selection window.
Search for the saved Audience Group by Audience Group ID or Name.
Select the green + next to the Audience Group.
The saved Audience Group configuration will populate on the right side of the window as though the Audience targeting had been configured manually.
The populated configuration retains:
Selected Audience segments
Audience groupings
Any / All Boolean logic
Once added, the configuration can be edited for that Campaign or Line.
Changes made at the Campaign or Line level do not update the saved Audience Group template.
Boolean Logic Warning
If the saved Audience Group uses different Boolean logic than the logic currently configured in the Associate Segments window, a warning will appear before the Audience Group is added.
Users can:
Select Accept to add the Audience Group while retaining the current Boolean logic.
Select Cancel to close the warning without adding the Audience Group.
After the Audience Group is added, the resulting configuration remains fully editable for that Campaign or Line.
Save Campaign or Line Targeting as an Audience Group
Users can also create a reusable Audience Group from an Audience configuration that has already been built on a Campaign or Line.
Navigate to the applicable Campaign or Line.
Open Audiences > Associate Segments.
Configure the desired Audience targeting.
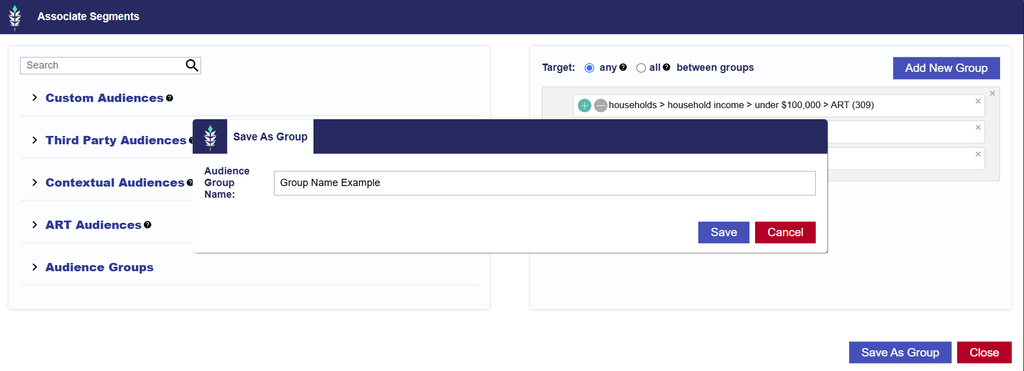
Select Save As Group.
Enter an Audience Group Name.
Select Save.
The current configuration is saved as a new Audience Group, including:
Selected Audience segments
Audience groupings
Any / All Boolean logic
The new Audience Group is assigned an Audience Group ID and becomes available under:
Audiences > Audiences > Audience Groups
Campaign and Line level > Audiences > Associate Segments > Audience Groups
It can then be reused on other Campaigns and Lines.
Boolean Logic
If you are targeting multiple Audience segments they can be layered together in groups through Boolean logic. To choose ‘Any’ or ‘All’ between groups read the following descriptions of each.
‘All, between segment groups’
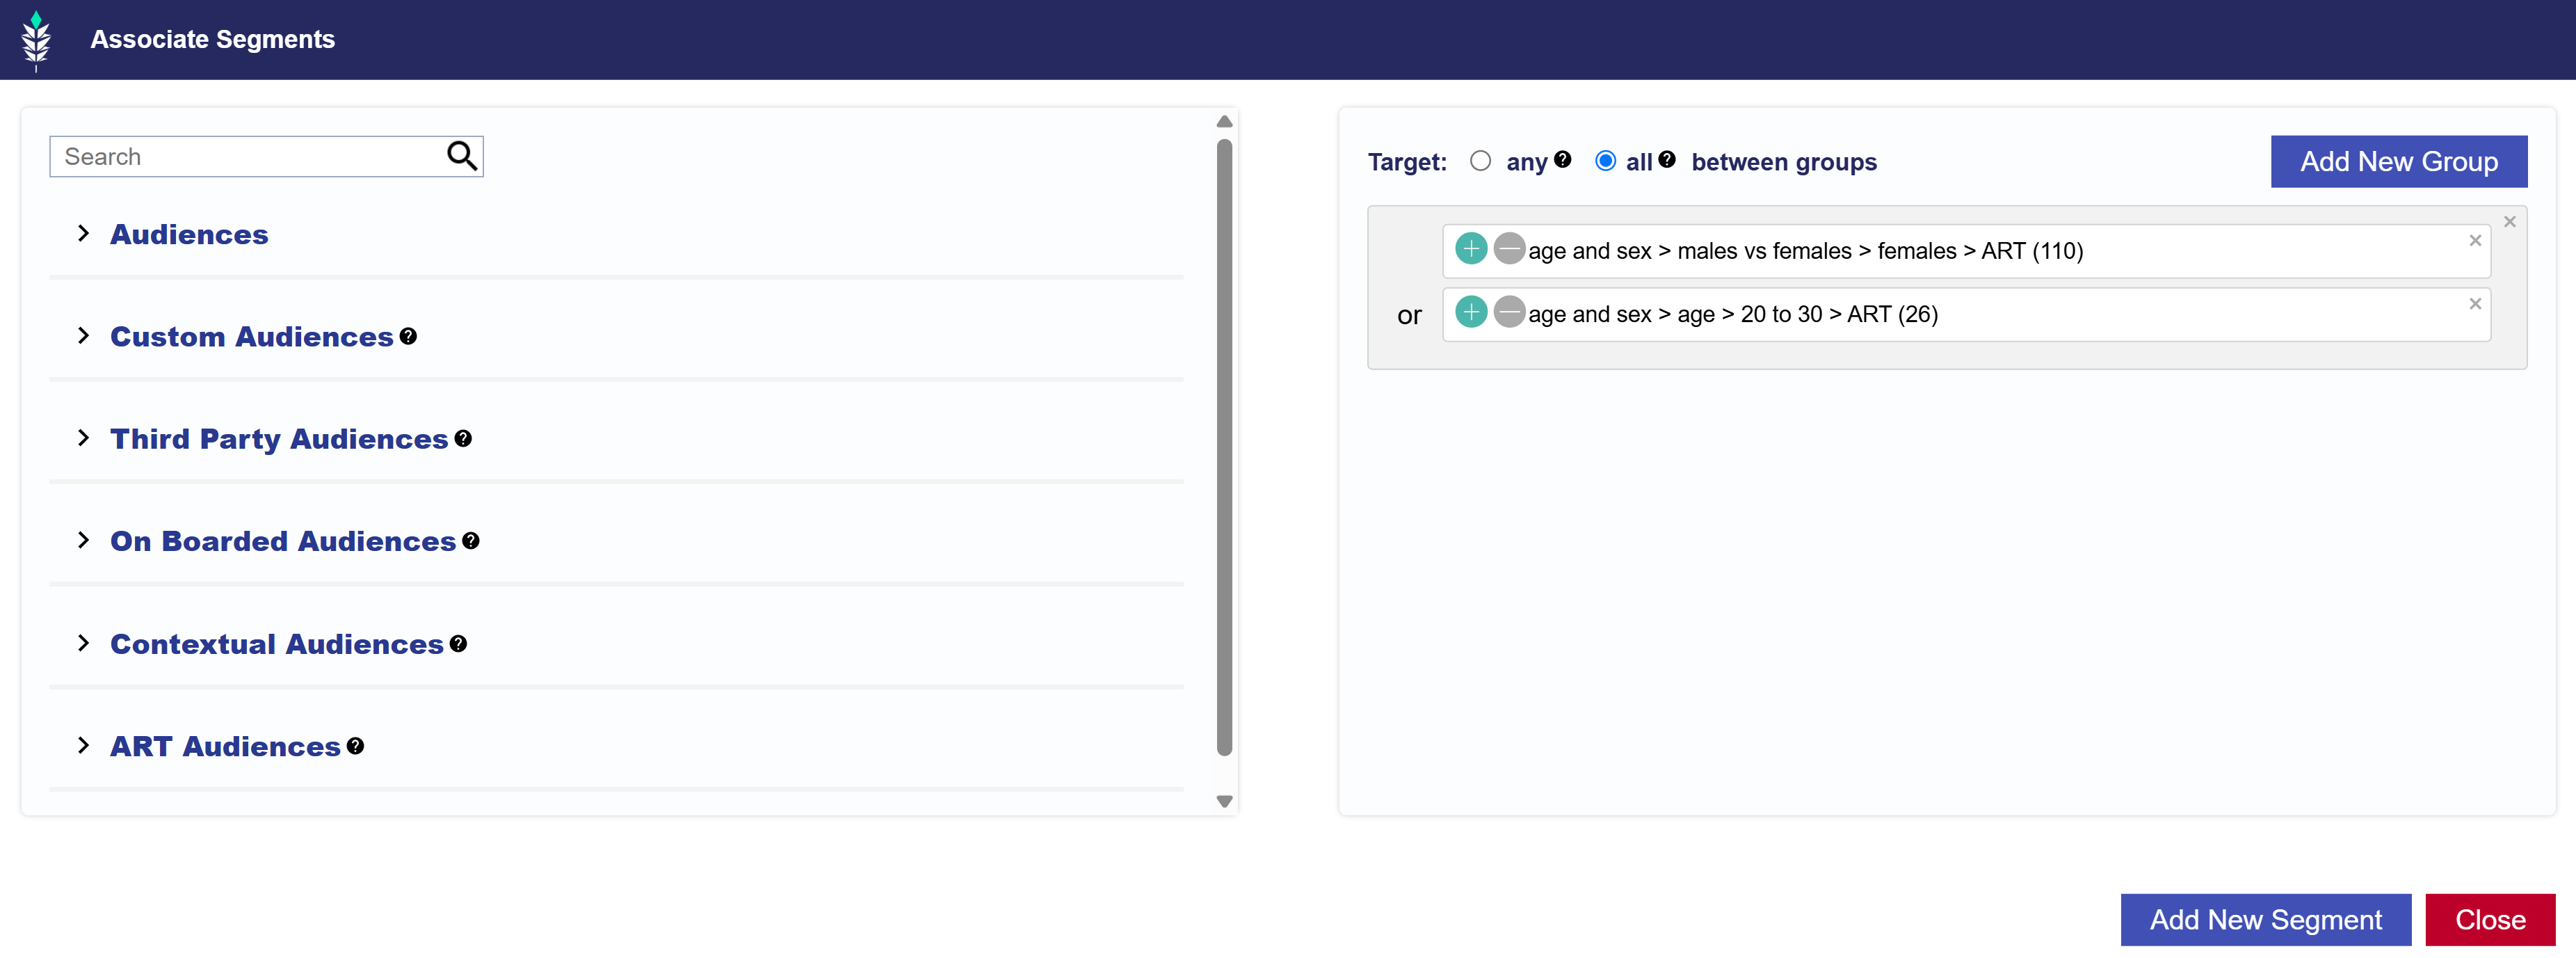
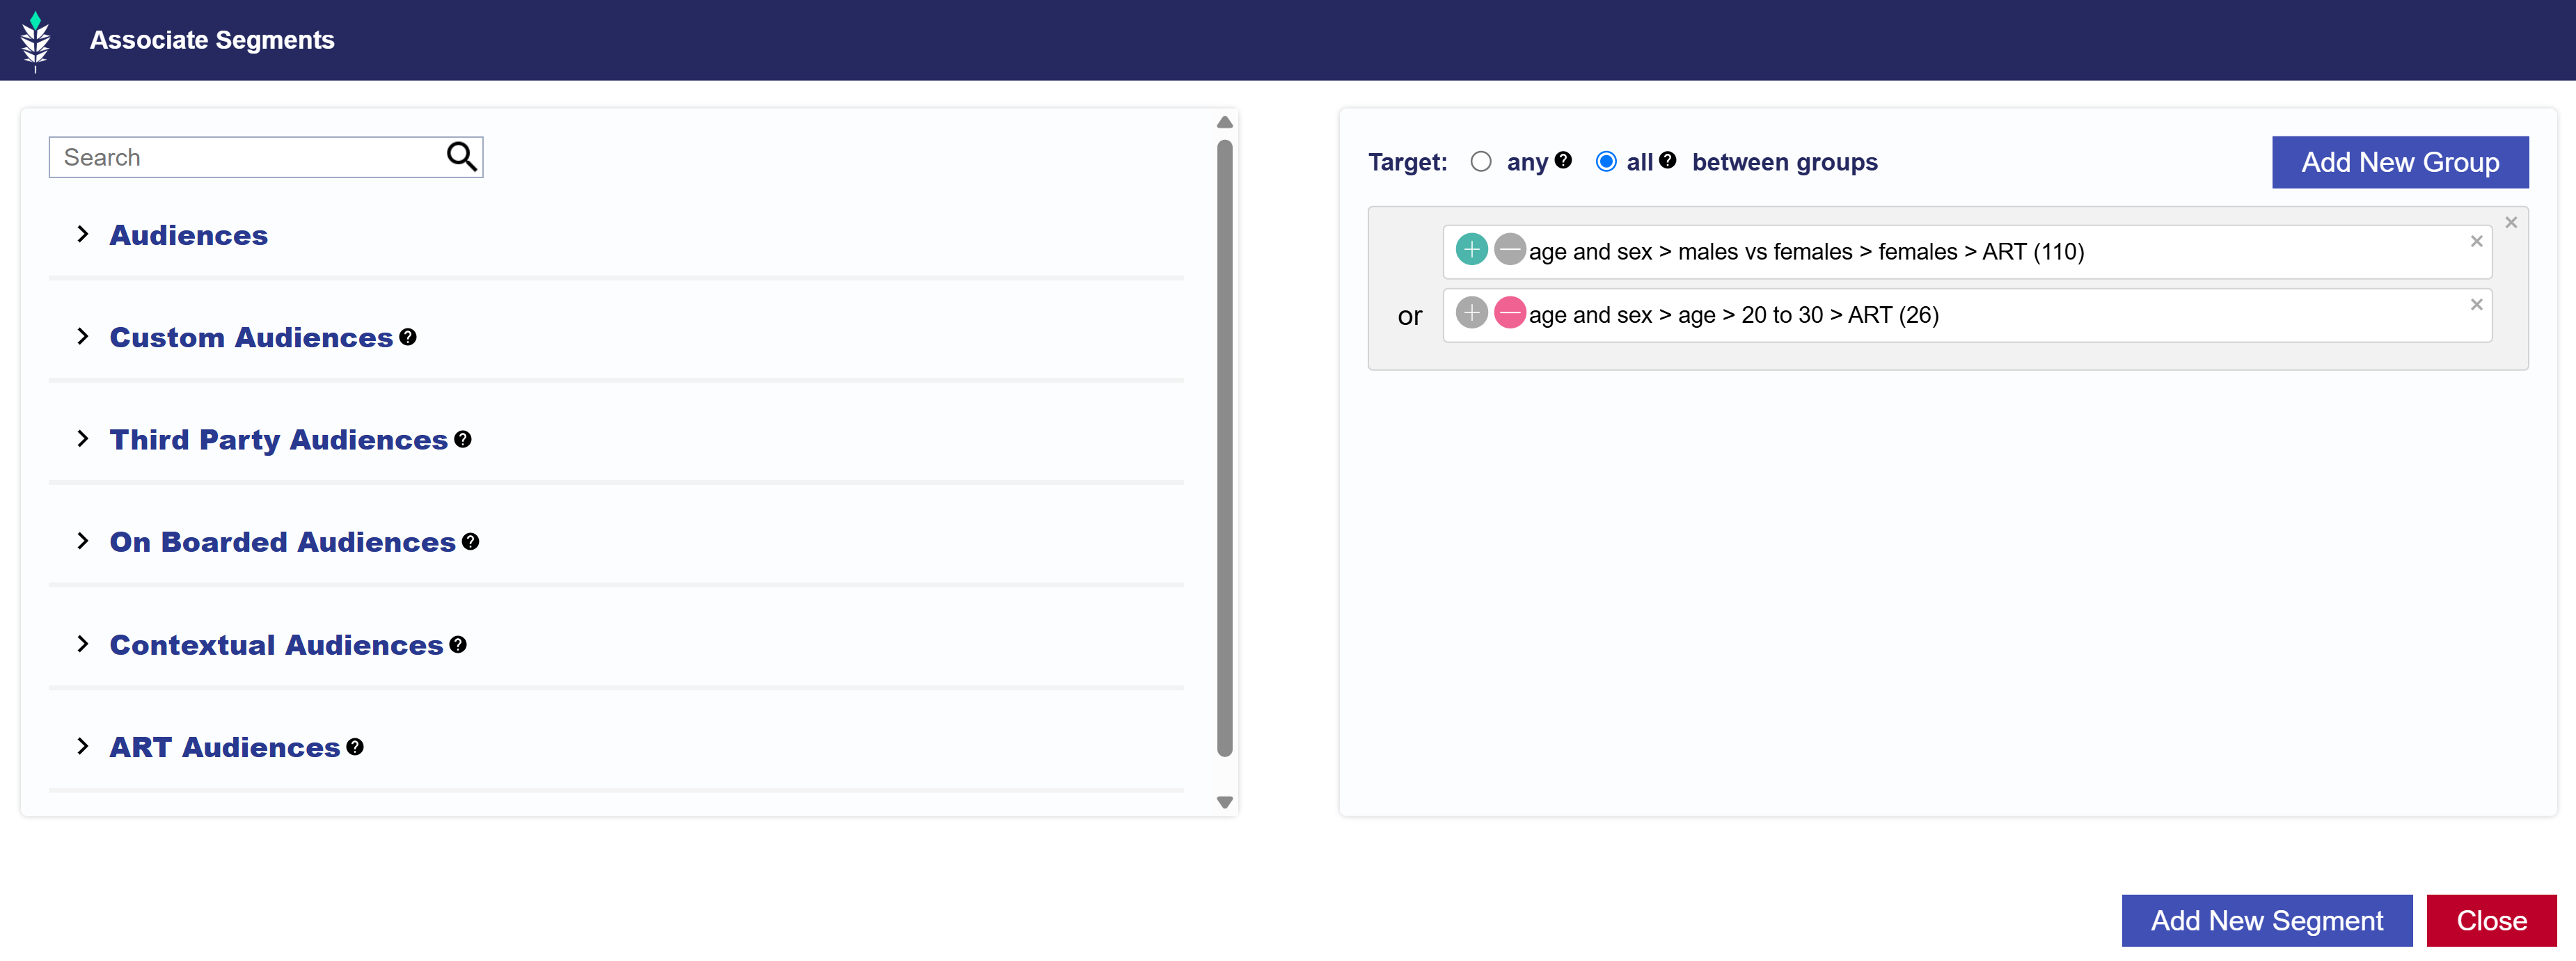
If you only have one segment group, the internal group logic will default to OR, meaning that if ANY of the conditions within the group are met the impression will be eligible to serve. For example, below is targeting users found in the ‘Female’ Audience OR ‘Age 20 to 30′.
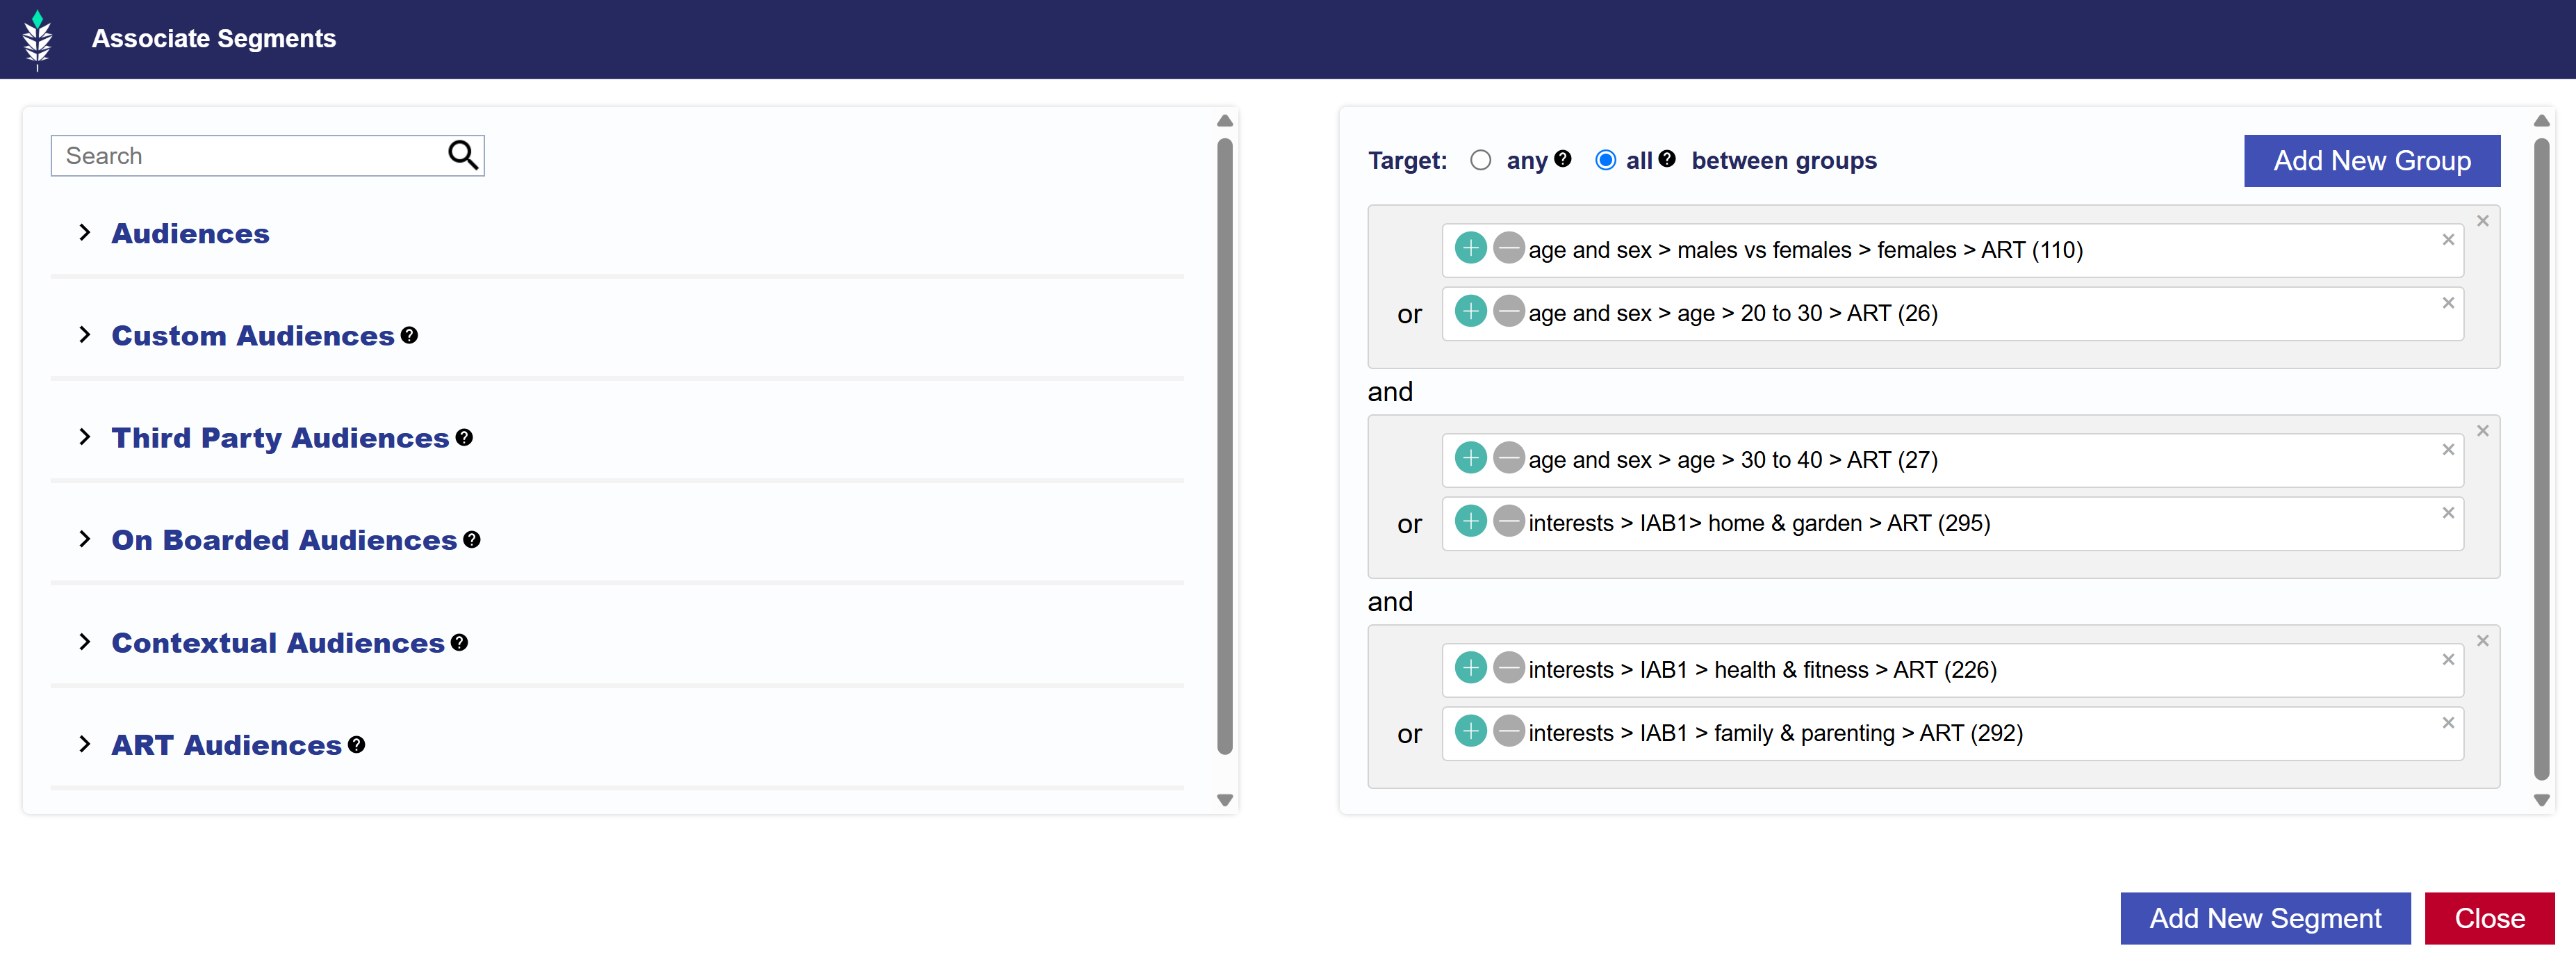
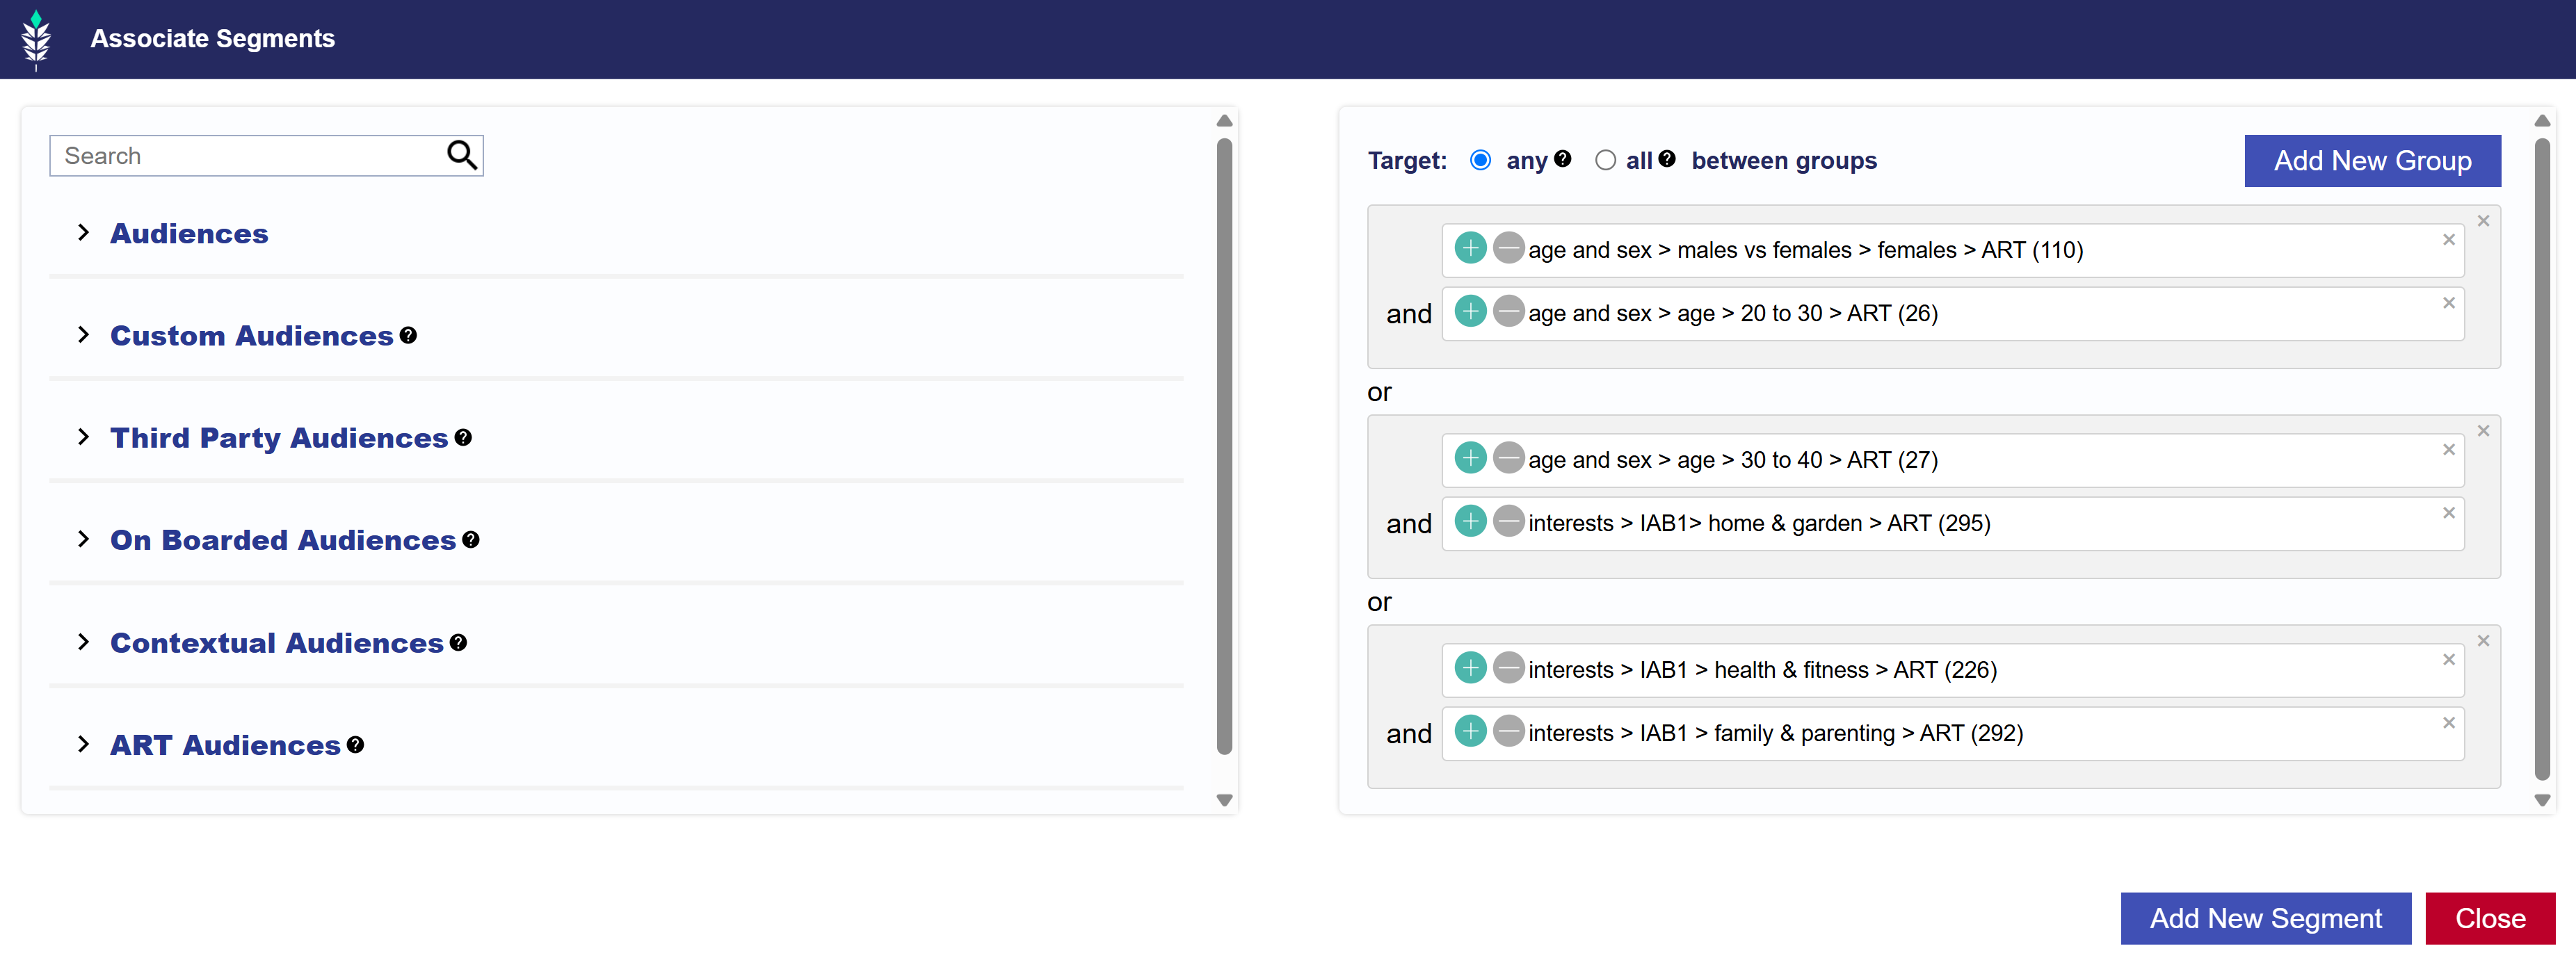
If you have created multiple segment groups, the intergroup logic will automatically default to AND, meaning that at least one condition must be met in ALL segment groups. For example, below a user would need to be found in one of the two segments in the first grouping AND would need to be found in one segment in each of the other segment groups associated.
‘Any, between segment groups’
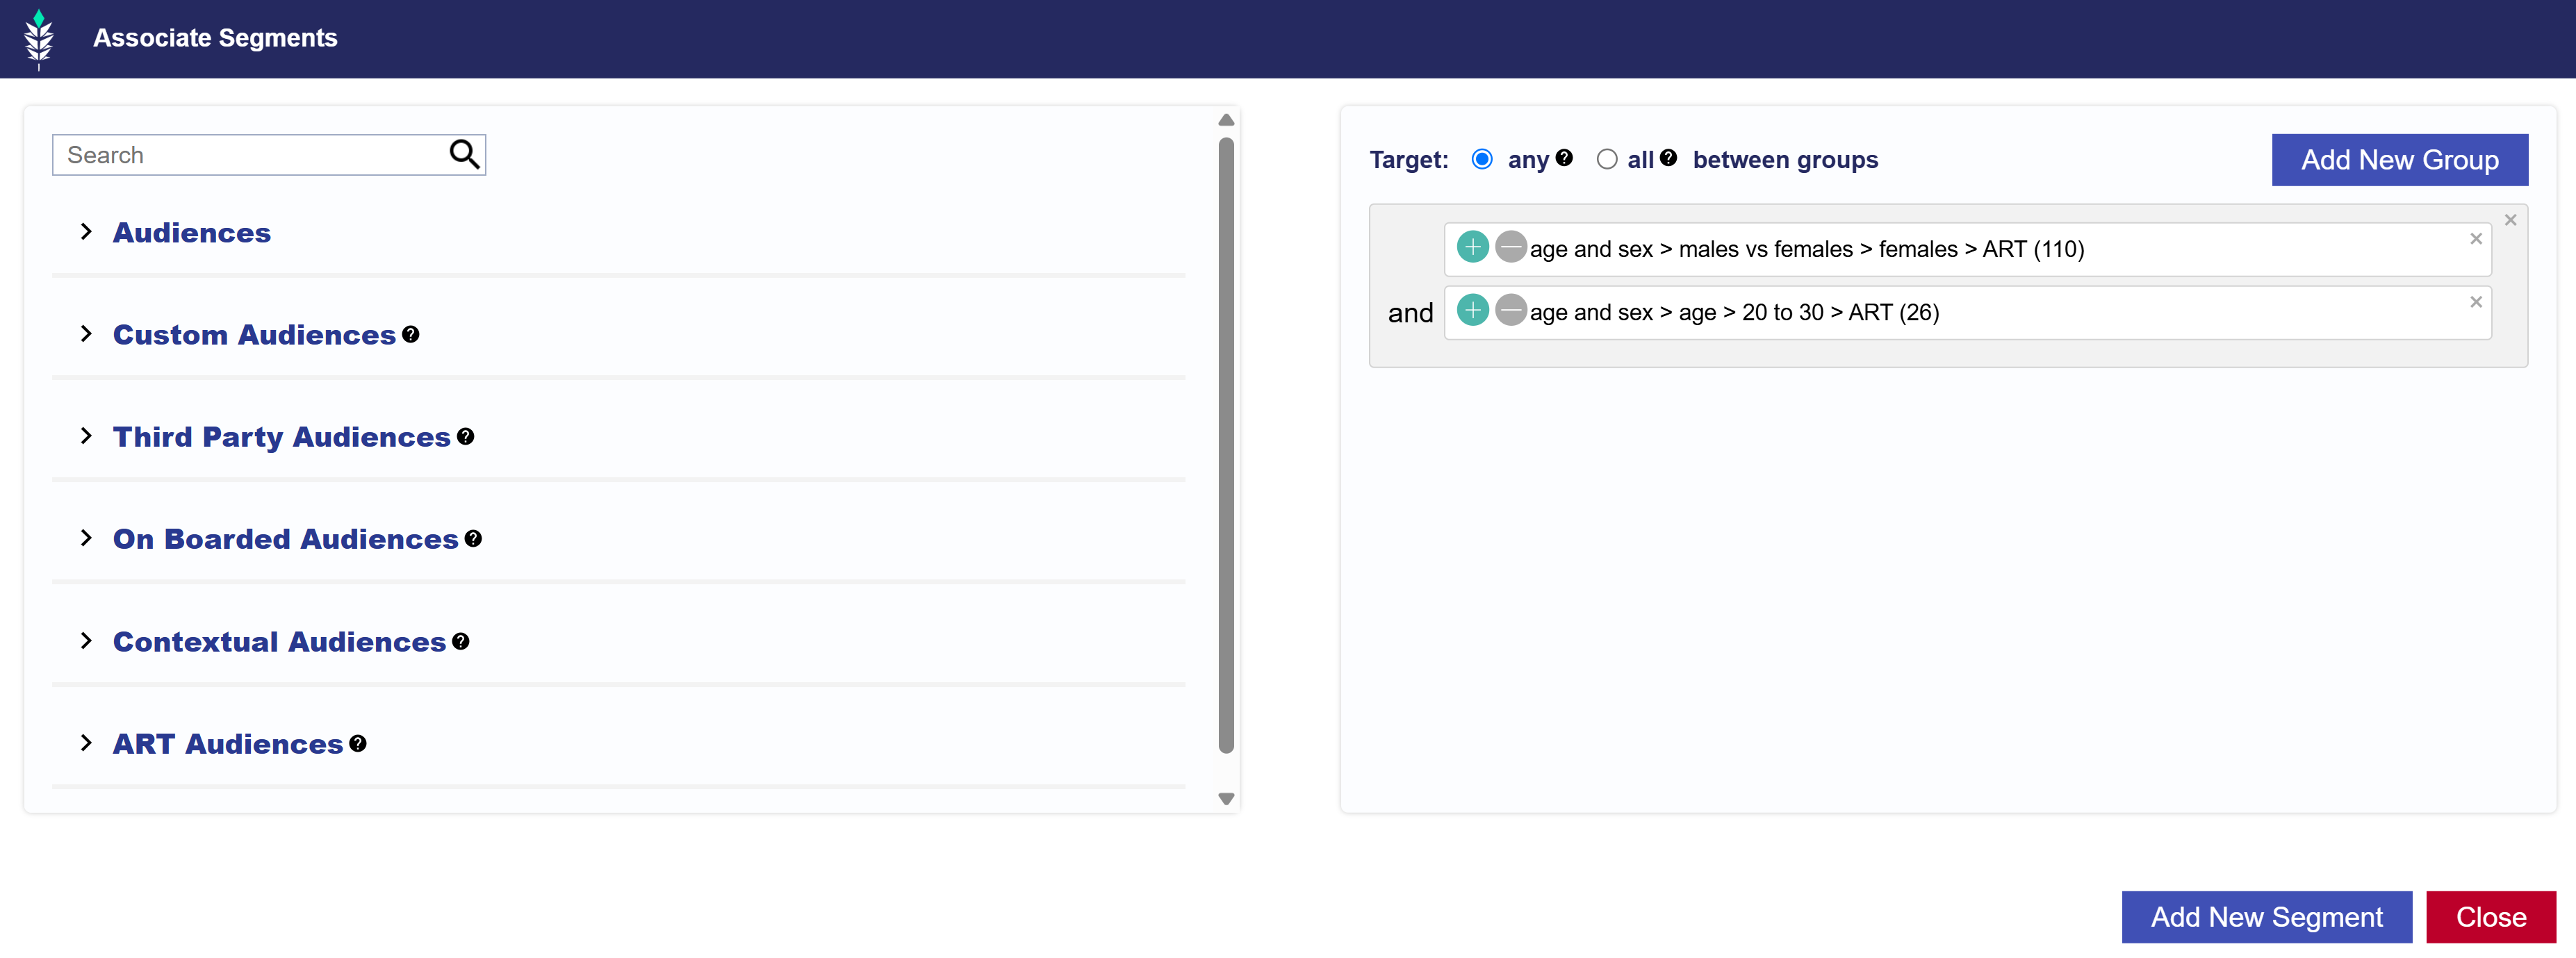
If you only have one segment group, the internal logic will default to AND, meaning that ALL the conditions within the group must be met for the creative to be eligible to serve. For example, a user must be found in ‘Female’ AND ‘Age 20 to 30’ for an impression to be served.
If you have created multiple segment groups, the intergroup logic will automatically default to OR, meaning that the conditions of one segment group are to be met OR the conditions of the second group are to be met.
Anti-Targeting: ‘All, between segment groups’
By selecting the ‘All’ between segment groups and using the ‘exclude’ feature with multiple Audiences the internal group logic will default to OR. For example, below an impression could server to any user found in the ‘Female’ OR NOT FOUND in the ‘Age 20 to 30’ Audience
Anti-Targeting: ‘Any, between segment groups’
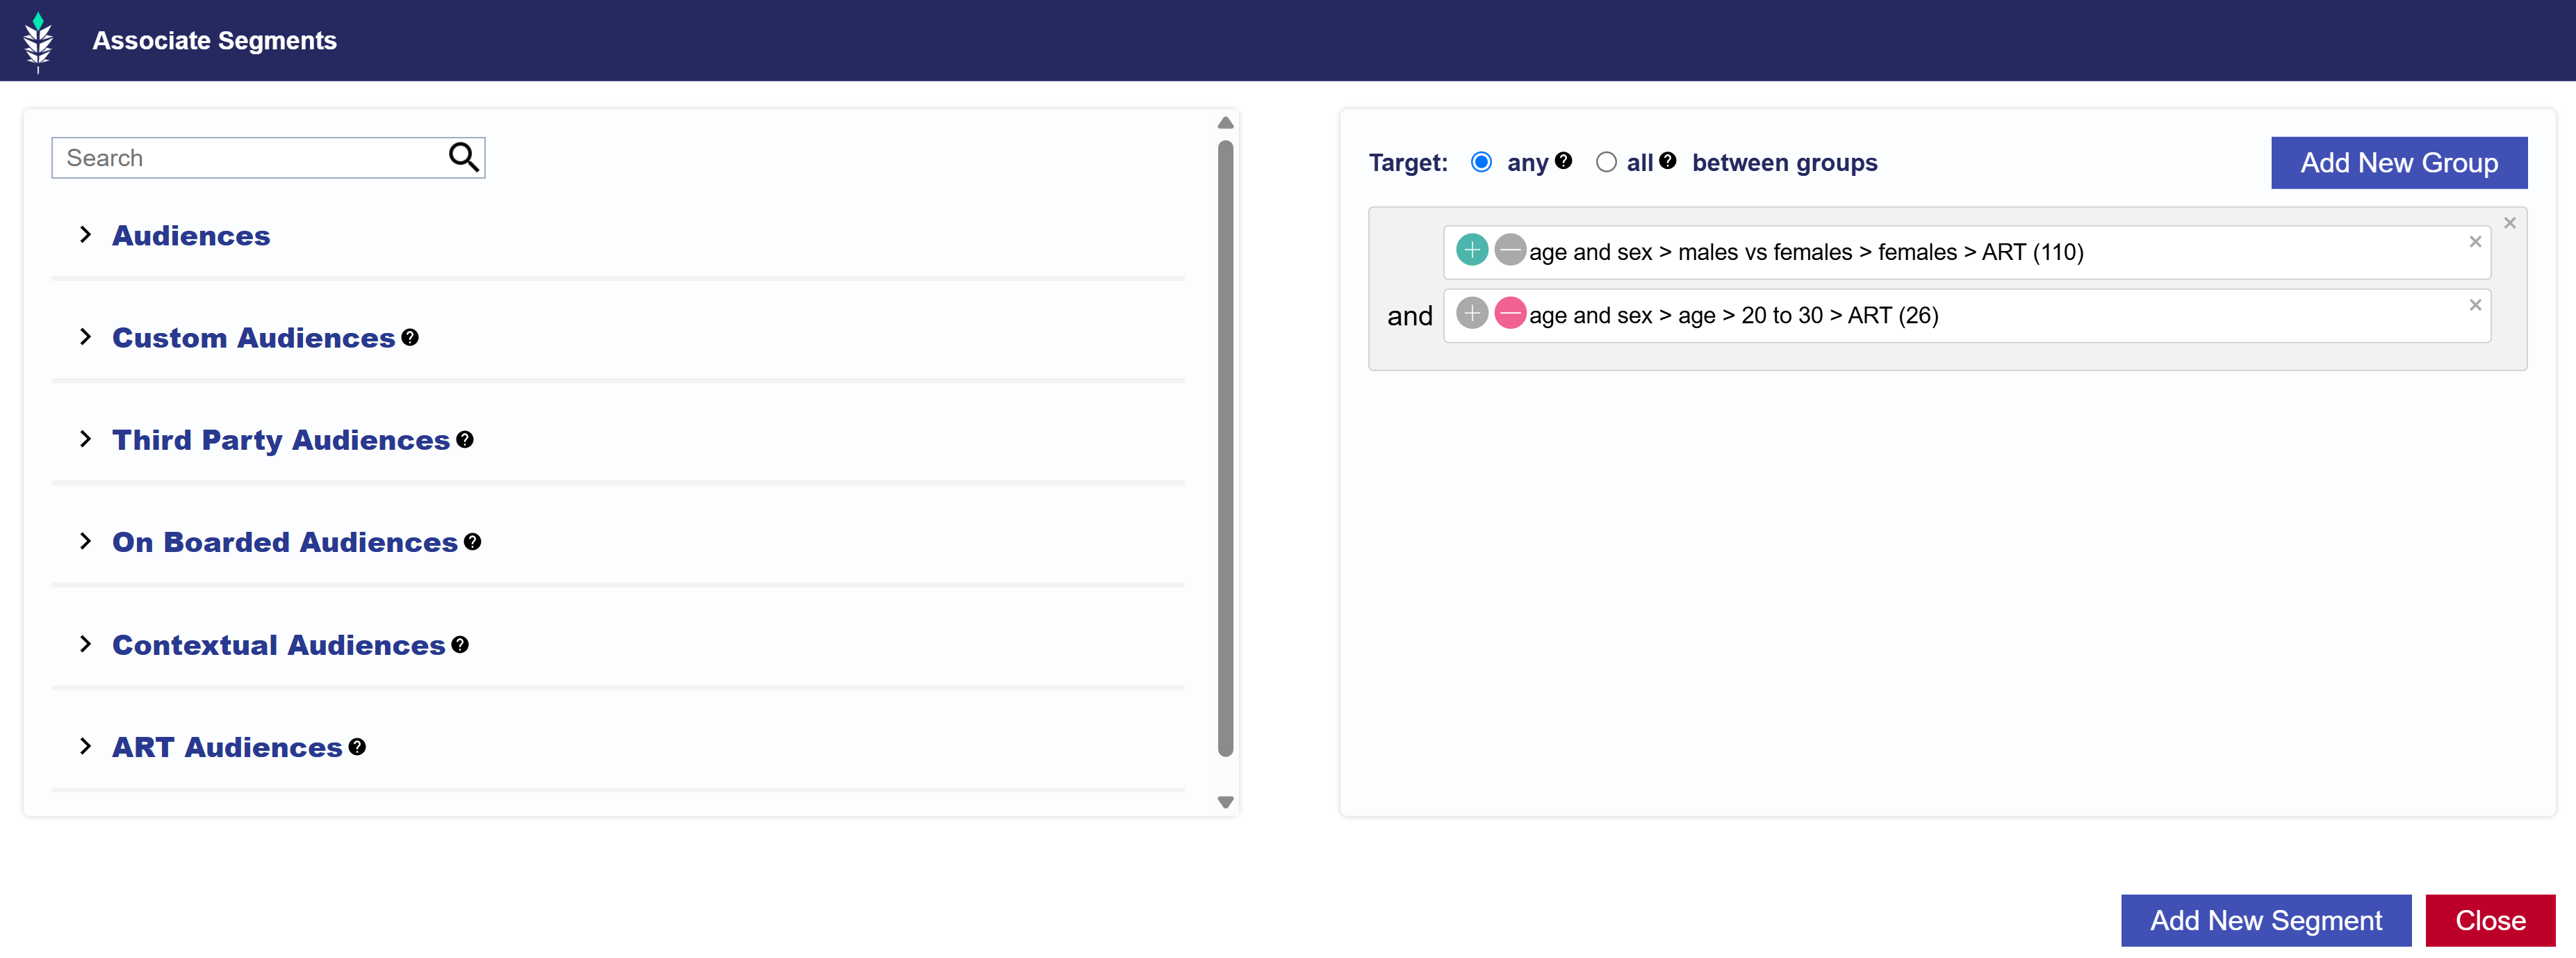
By selecting the ‘All’ between segment groups and using the ‘exclude’ feature with multiple Audiences, the internal logic will default to AND, meaning that ALL the conditions within the group must be met for the creative to be eligible to serve. For example, a user must be found in ‘Female’ AND NOT FOUND in ‘Age 20 to 30’ to be served.