New Report Set Up
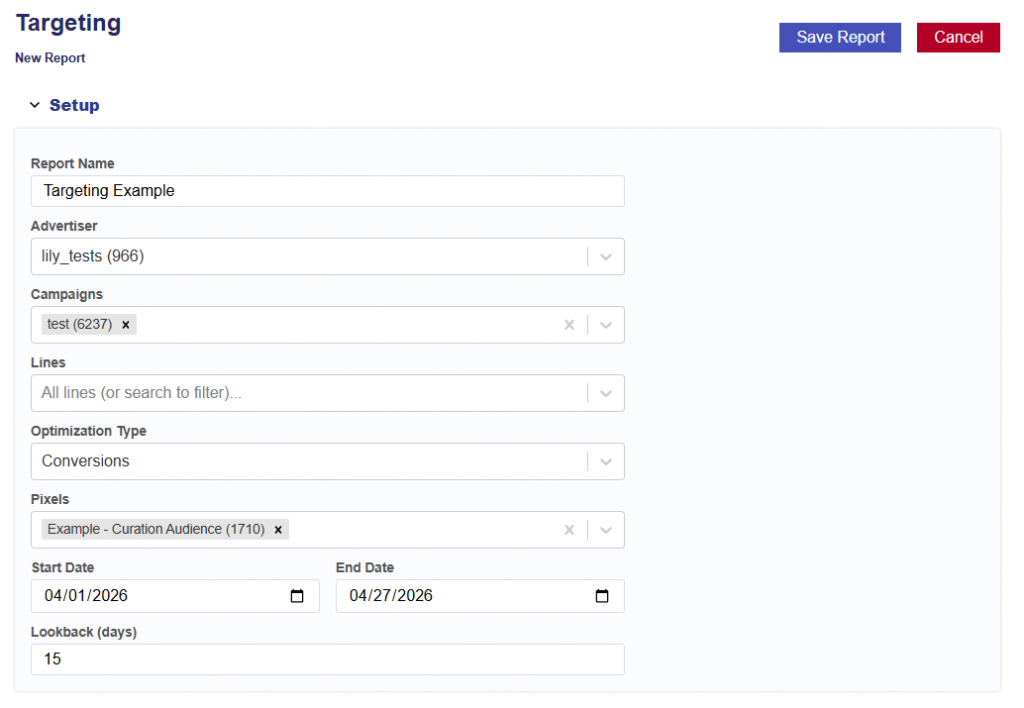
Instructions for generating a Targeting Report/Model. Follow the steps below:
- Navigate to the Targeting Tab.
- Click New Report button.
- Give the report/model a name.
- Select the Advertiser to run the analysis on.
- Select the Campaign(s) within the chosen Advertiser.
- If no campaigns are selected, all campaigns will be included.
- Select the Line(s) within the chosen Campaign(s).
- If no lines are selected, all lines will be included.
- Select the Optimization Type:
- Conversions
- If selected, choose the conversion pixel to be used for optimization.
- Clicks
- Conversions
- Select the analysis Start Date.
- Select the analysis End Date.
- Enter the desired lookback window (in days).
- Default is 30 days.
- This defines how far back the model will attribute conversions or clicks to ad exposure.
- Select what Bid Request Fields are used.
- Only the checked fields are considered when the model is built. Unchecking one removes it from the regression entirely, so it can never influence a bid.
- All are checked by default, but users can make it customizable.
- Fields list:
- Geography:
- Region / State
- ZIP Code
- Inventory:
- Publisher
- App Bundle
- Deal ID
- Site Domain
- Exchange
- Content
- Channel
- Series
- Title
- Genre
- Network
- Livestream
- Device
- Device Type
- Time
- Day of Week
- Hour
- Operating System
- Browser
- Geography:
- Select what the Inventory Scope is.
- This looks at which impressions the model learns from. This is different from the fields above: unchecking a field removes it from the model, while unchecking inventory here removes those impressions from the analysis entirely — they influence no score, and the campaign average every score is compared against is calculated without them. No filter = the model trains on all inventory.
- Exchanges
- Display / App
- Index
- Microsoft
- DV+
- Video / CTV
- Magnite
- Freewheel
- Audio
- Triton
- Adswizz
- Display / App
- Device Types
- Desktop
- Personal Computer
- Mobile
- Phone
- Mobile / Tablet (generic)
- Tablet
- TV
- Connected TV
- Set Top Box
- Other
- Connected Device
- Unknown / Not Provided
- Desktop
- Choose whether the report should run once or repeat on a schedule.
- Run once builds a single report.
- Schedule re-runs it on the chosen cadence — each run retrains the model, replaces the live model in S3 when Replace the live model each run is enabled, and is saved as a new run grouped under this report.
- Rerun Interval:
- Weekly
- Every 2 Weeks
- Monthly
- Rerun Day of Week:
- Monday
- Tuesday
- Wednesday
- Thursday
- Friday
- Saturday
- Sunday
- Replace the live model each run checkbox
- On: each run’s new model overwrites the live model so it goes live automatically.
- Off: runs still produce reports and archived models, but the live model is left untouched.
- Rerun Interval:
- Click the Save Report button.
Additional Notes
- Ensure selected campaigns and lines have sufficient data for reliable analysis.
- Recommended: ~2,000 conversions for stable model performance.
- The lookback window should align with typical user conversion behavior.
- Once the report and model are generated, view the results. Users can also edit the report and models setup and rerun the report.