To apply audiences to a campaign or line item, you will fist need to select ‘Add New Group’, then drag the audience and drop it into the group. Audiences can be layered in multiple groups using boolean expressions.
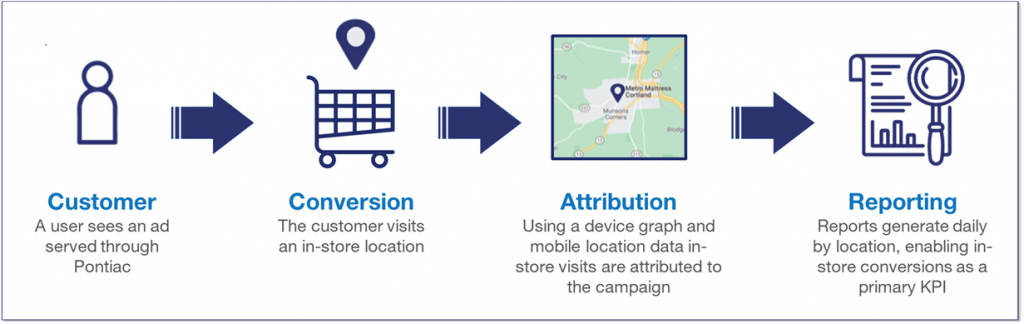
Foot Traffic Attribution is a type of Conversion reporting powered by OnSpot, that allows advertisers to track how many users were served an ad unit through Pontiac and then visited a commercial location. Utilizing Mobile Advertising IDs and the GPS systems of these mobile devices, OnSpot registers the users who were served your ad and their mobile device subsequently is seen at the location that you are tracking.
MEDIA TYPE: Banner, Native, Audio, Video, CTV
INVENTORY TYPE: Web, Mobile-Web, Mobile In-App, CTV
PRICING: $1.50 CPM for Banner, Native, Audio & Video creatives and $4.00 CPM for CTV creatives
When ads are served across CTV inventory, a household extension that utilizes the IP addresses is used to connect the TVs, Desktops, Laptops etc., with the mobile devices from the same household. The GPS systems of mobile devices from that household will then be used to register users from a household that saw your ad, then subsequently visited the location that you are tracking. Each line can track up to 200 locations.
In the Pontiac platform you can opt to receive Foot Traffic Attribution reporting when setting up a Line Item. Check the ‘Enable Foot Traffic’ box then proceed to the section below under ‘Foot Traffic Reporting’ and select the ‘Add Location’ button to start adding the locations you would like to track.
A $1.50 CPM for Display, Audio & Video creatives and a $4.00 fee is added to the CTV Line Items with Foot Traffic enabled.
Ways to Add Locations for Foot Traffic Reporting
There are 4 methods by which you can add locations to a Line Item for Foot Traffic Attribution. Once you have enabled Foot Traffic Attribution and set the lookback window, click the ‘Add Location’ button that appears under the Foot Traffic section of the menu.
The location can be added through one of these methods:
Address
Lat Long
Geofence
Bulk Address Upload
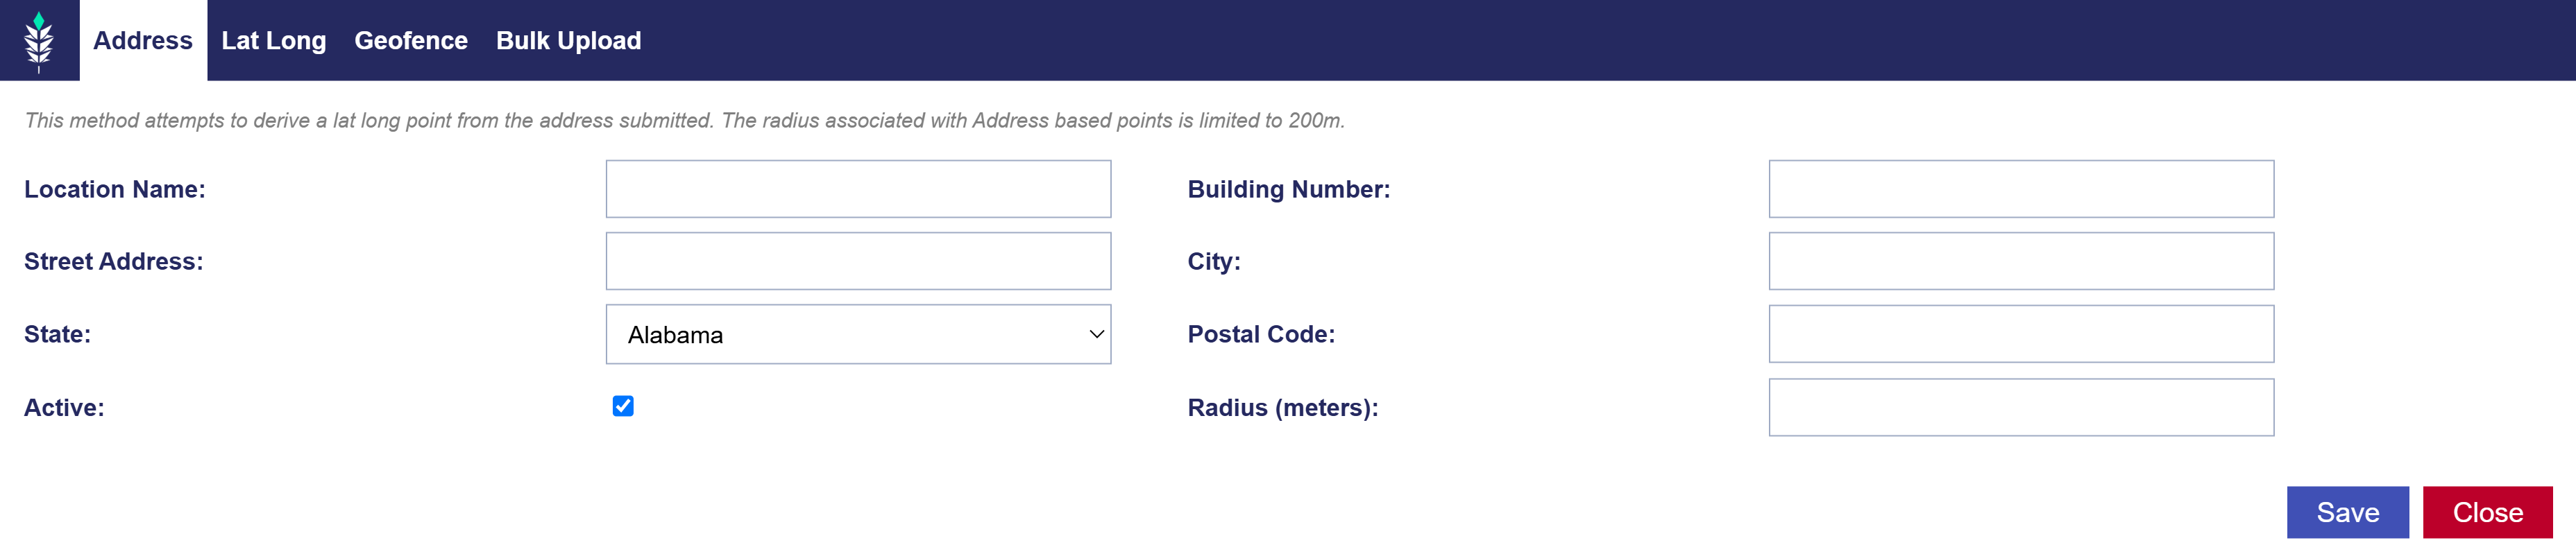
Address
Enter a commercial address that you would like to monitor for Foot Traffic Conversions and include a custom radius in meters. The Address based method will convert the commercial address to a lat/long coordinate, then utilize this radius to create an area around that coordinate that will be utilized to track Foot Traffic. Once you save, the address will be validated by Google Maps. If the validation status appears as ‘Invalid’, try using one of the other methods to add the location.
The Address method is best for Foot Traffic Areas that are defined by a single commercial address. In commercially dense locations, or to track a ‘unit’ within a larger building this method is not recommended. The Geofence method will allow for more accurate definition and control of the desired area. This will ensure that other buildings, or sections of the building in proximity to the desired location are not captured in the Foot Traffic Area.
If an Address is showing 0 ‘Average Daily Visitors’ after several days on the Line, this may indicate that the address is invalid, and Foot Traffic cannot be registered via the Address method. It is recommended to de-activate this location and to add the location via Geofence.
Lat Long
Use the map to find the desired location, then click to drop the pin on the map. Give the location a name and enter a custom radius in meters. This radius will be used to create an area around that coordinate to track Foot Traffic.
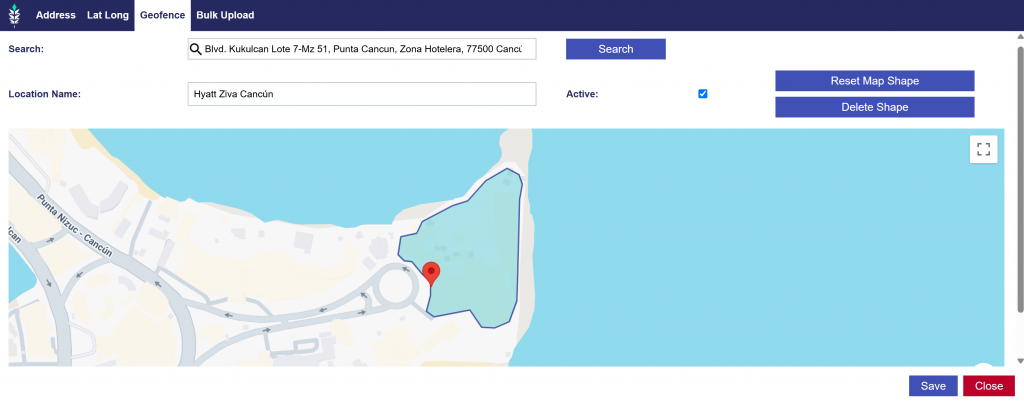
Geofence
The Geofence method enables maximum customization of the area to be tracked for Foot Traffic Studies. Give the location a name. Enter the address in the search bar, or navigate on the map to find the desired location. The area to be tracked can then be drawn as a polygon. Click on the map to create each end point of the polygon and define the area to be tracked. This is great for buildings with odd shapes, or in cases where the location cannot be defined by the building. For example, a car dealership with an extra-large parking lot can create a custom geofence that includes both the building and all their car lots to ensure that all relevant traffic is captured.
If you make a mistake in drawing the polygon, use the ‘Reset Map Shape’ button to erase any points drawn on the map.
Bulk Upload
Bulk Upload is available to enter locations as commercial addresses. This method is recommended for Line Items with many locations that can each be defined by a commercial address. Up to 200 addresses can be uploaded through the Bulk Upload at one time.
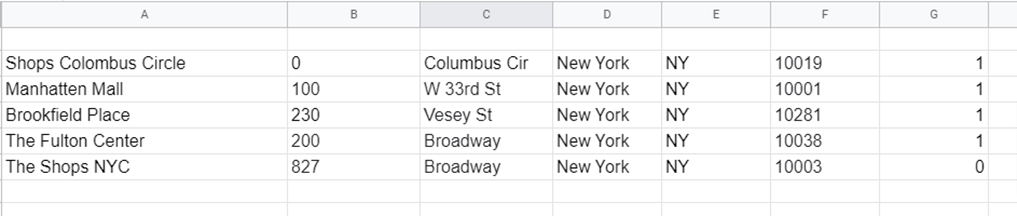
To Bulk upload addresses you will need to create a CSV file. The addresses must be entered in the following format with no column headers:
Name, Building Number, Street Address, City, State, Postal Code, Active, Radius
If you would like the location to be Active the ‘Active Status’ column should have a 1. If you would like the location to be Inactive the ‘Active Status’ should have a 0. In this example shown below, all of the addresses will be active except ‘The Shops NYC’.
Save the file as a CSV with no column headers and upload it by clicking the ‘Bulk Upload’ button under ‘Foot Traffic Reporting’. Double check before submitting the Line Item that all the addresses look correct.
If an Address is showing 0 ‘Average Daily Visitors’ after several days on the Line, this may indicate that the address is invalid, and Foot Traffic cannot be registered via the Address method. It is recommended to de-activate this location and to add the location via Geofence.
Editing and De-activating Locations
Foot Traffic Addresses cannot be edited once the Line Item has been submitted. If you need to change the details of the address you will need to deactivate the address and enter the new address as a separate entry.
To deactivate a location previously entered for Foot Traffic Reporting, open the Line Item and expand the ‘Foot Traffic Reporting’ section to view the entered addresses. The ‘Location Name’ should appear as a hyperlink. Click on the Location Name to open the Location Settings window and un-check the ‘Active’ box, then click ‘Save’ and ‘Submit Changes’ to the Line Item.
Foot Traffic Metrics
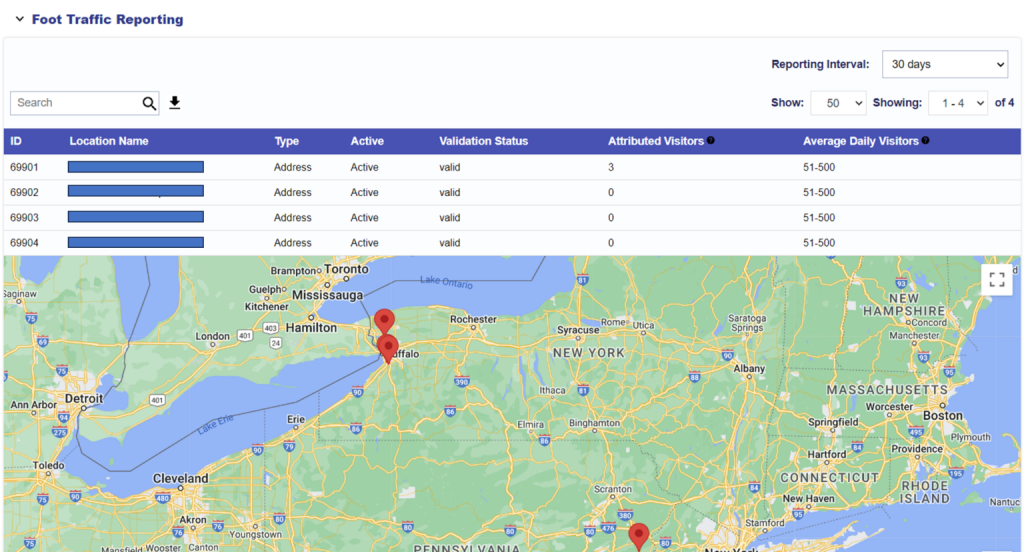
At the Line Item & Campaign levels the Foot Traffic reporting section will display two metrics, ‘Attributed Visitors’ and ‘Average Daily Visits’.
Attributed Visitors will display the number of users who were served an ad from this campaign and subsequently visited this location during the selected reporting interval. These are Foot Traffic Conversion driven by this campaign. The ‘Foot Traffic Lookback’ is 30 days and metrics are updated on a 3-day delay. The visitor count displayed in these reports is ‘unique’ visitors. Multiple visits by the same Device ID will only be registered once on a given day, but may be registered if they return on a different day.
Average Daily Visitors will display the average number of total visitors recorded at this location per day within selected reporting interval. This is used to indicate if the address entered is correct and tracking visitors and will be displayed as a range. In the above example this metric indicates that in the last 30 days there were on average 50-500 visitors at this location each day. If 0 visitors are seen at this location, there may be an issue with tracking devices at this address. If this location was added using the ‘Address’ method, it is recommended to try adding this location as a Lat/Long coordinate or custom Geofence.
If the location was added as a Lat/Long coordinate or custom Geofence and the location is registering 0 ‘Average Daily Visitors’, reach out through the Help Center for assistance in troubleshooting this issue.
Geo Targeting
Geo targeting can be applied to either the Campaign or the Line Item. Geo targeting should only be applied at the Campaign level if all the associated Line Items are running in the same Geo. Geos can be applied as either ‘block listed’ or ‘allow listed’. In the targeting window on the Campaign, select the ‘block list’ or ‘allow list’ bubble, then add the Geos you wish to exclude or target on the Campaign or Line.
The following are the methods for geo targeting:
Country: the CTV platform is currently available in the United States, Canada, and EU.
Note that Canada can only be targeted through zip codes, not DMAs.
Region: states, departments or districts
DMAs: designated marketing areas or metro codes
Zip Codes: Zip codes can be applied in the ‘Targeting’ section of a campaign or line item, or they can be associated to either as an audience. If you frequently use a set of zip codes, you may want to create an audience to save this list to your account & make it easier to quickly apply the list to any line. In the ‘Audiences’ section of the platform, a zip list can be saved as a ‘Zip Code’ Custom Audience.
If multiple geo-targeting conditions are applied to a Line and/or Campaign, an impression must meet the criteria for each geo type in order to be eligible. For this reason, it is recommended to only select the geo targets at the lowest level required. For example, if you apply state-level targeting and zip code-level targeting, an impression will need to be in one of the selected states AND one of the selected zip codes.
If a Line or Campaign has conflicting geo parameters, the Line will not serve. For example, if you apply only ‘Alabama’ under region and only ‘Detroit’ under DMA, the impression will need to meet both conditions for the ad to be eligible to serve. Since a user cannot be within the Detroit DMA and Alabama region at the same time, there would be no eligible impressions and this Line would not be able to serve.
Inventory Targeting
All inventory targeting can be applied at either the campaign level or on the line Item. Targeting parameters should only be applied on the campaign level if they apply to all line item strategies associated to the campaign. An impression must meet both the targeting criteria of the line and the campaign it is associated to in order to be eligible.
Inventory Type
At the Line Item level, the inventory type can be set to Web, In App, or combined. This will filter impressions based on whether they are running on a web domain in a browser, inside an application – for example a mobile app or smart TV app, or allow for both.
Deals
Private-Marketplace (PMPs) Deals or Programmatic Guaranteed (PG) Deals can be used on the Pontiac platform as supply sources.
Private Marketplace (PMPs): These are private, invite-only auctions that provide higher priority access to inventory than the open exchange. PMPs are one to many deals and in most cases do not require minimums or spend commitments. These deals have a price floor or minimum bid required to enter the auction, but closing prices are determined by real time bidding.
Programmatic Guaranteed (PG): PG deals are a form of programmatic direct deal that are created between a publisher and one advertiser with a fixed rate and guaranteed volume of impressions. There is no auction and the advertiser is required to purchase all of the impressions coming through the deal id, all targeting must be applied on the supply-side. This is the highest priority for programmatic deals.
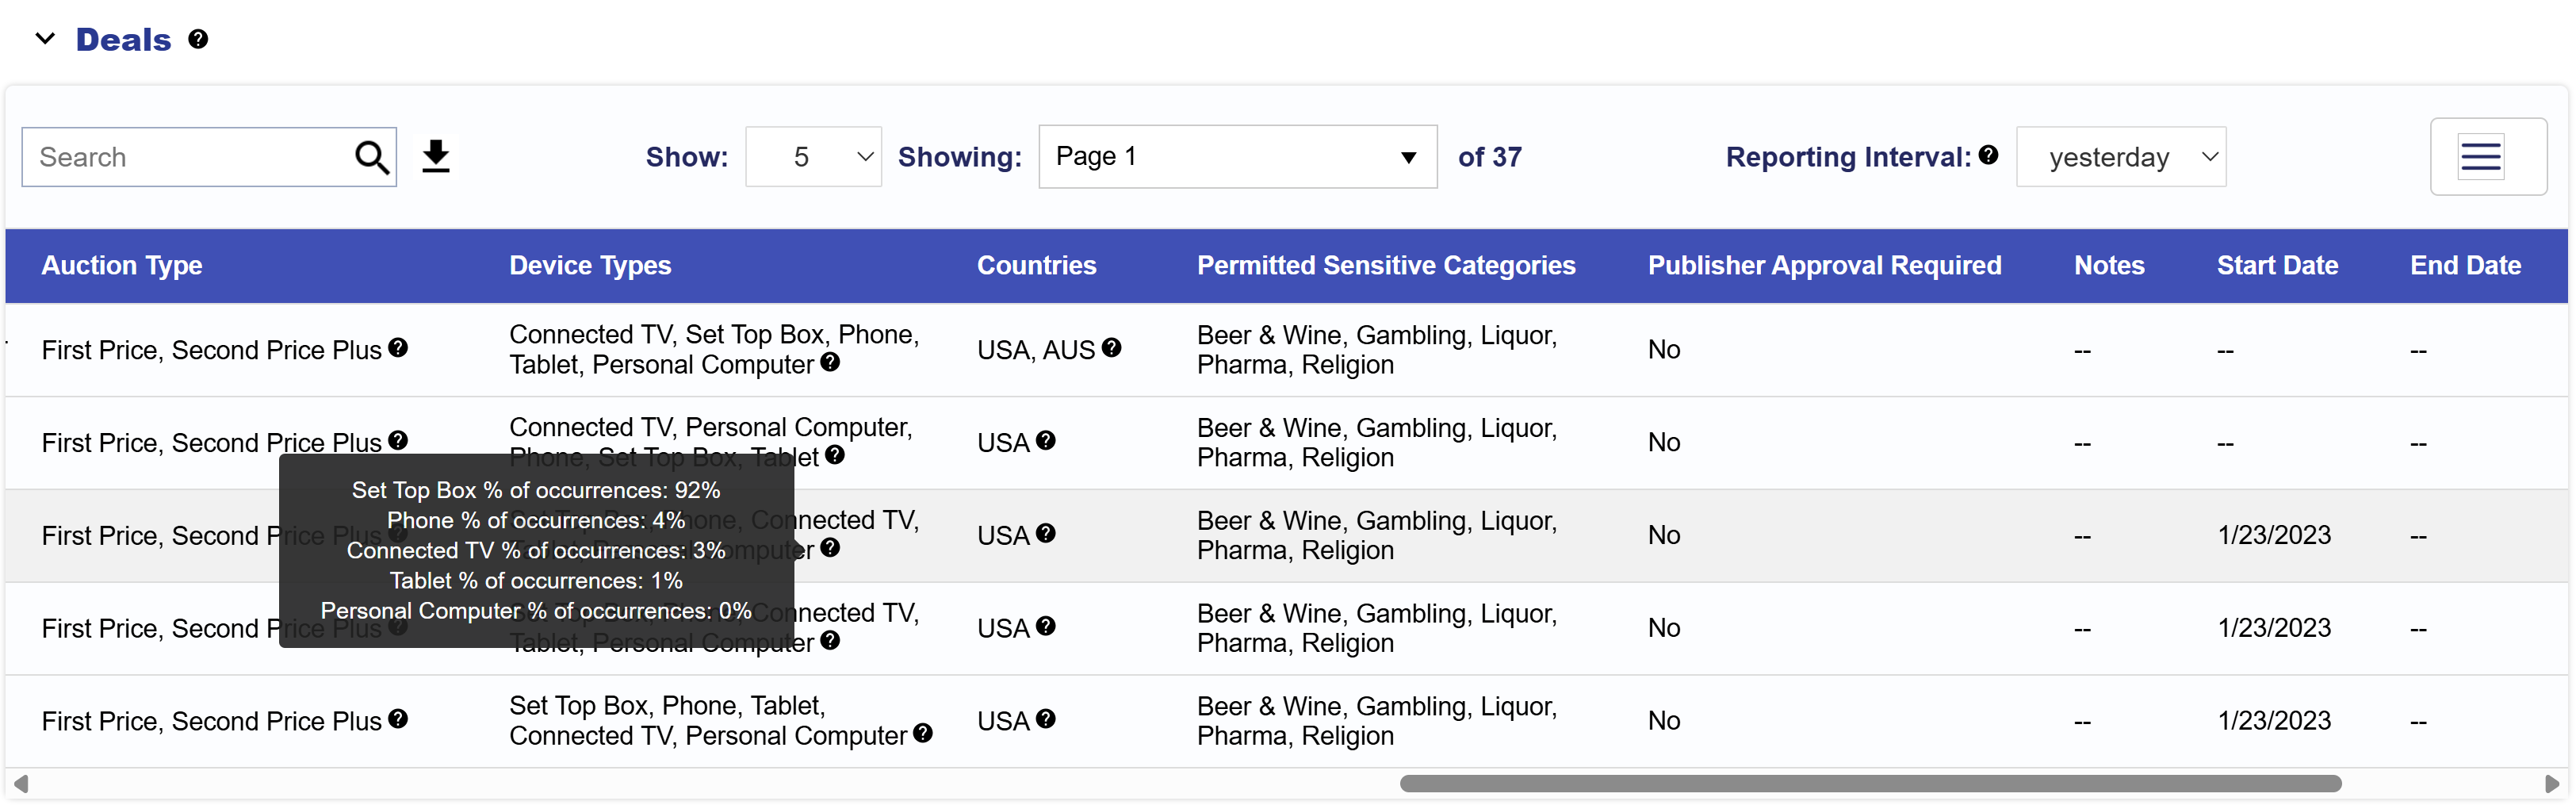
In the ‘Inventory’ tab of the platform, under ‘Deals’ you can see and request access to any of the public deals that Pontiac has negotiated directly with publishers.
Exchanges
The exchanges are supply-side platforms (SSPs) that give publishers and media owners the ability to send Pontiac requests for ads. If a deal is targeted on the line, then it will only serve on the selected deal, it will not serve on the open exchange. The line must include both the deal and the exchange the deal is on in order to serve. In the ‘Deals’ table in the Inventory tab you can find the exchange listed for each deal.
Magnite: the magnite exchange provides access to streaming TV content across all device types
DVplus: the DV+ exchange provides access to online video content (non streaming-TV), including both web & in app video placements
Freewheel: the Freewheel exchange provides access to streaming TV content across all device types
Index: the Index exchange provides access to streaming TV content across all device types (CTV & OTT) as well as online video content for both web and in-app placements
Media.net: the Media.net exchange provides access to online video content (non streaming-TV), including both web & in app video placements
To run on open exchange inventory, selected the desired exchanges and do not select any deals.
Site List
Sit List Targeting allows you to choose the domains you want your ads to serve on. Custom Site Lists can be created with any number of sites, but only using top level domains.
KPI: Click Through Rate (CTR)
Media Type: Display, Native, Video
Use Case: Site List Targeting is best used when you have an idea of your target audience, and that audience frequents certain websites or types of websites. If your audience frequently visits a domain, serving ads there allows you to reach your audience without paying for Third-Party audience data.
Placement: Ads targeting a site list will run across the domains specified in the site list.
Bid Structure: This targeting tool follows the bid ranges for the campaign’s media type, but bids may vary.
Audience Data Targeting: First and Third-Party data segments are available for targeting but can limit the campaign’s ability to serve.
Site lists can be created to target or block a list of web domains on your campaign or lines. In the ‘Inventory’ tab of the platform, select ‘New Site List’, then enter the list of the domains and ‘Save’. This can then be added as an ‘allow’ or ‘block’ list on any campaign or line item.
App List
App List targeting allows you to pick and choose the apps you want your ads to serve in. Custom App Lists can be created with any number of apps.
KPI: Click Through Rate (CTR)
Media Type: Display, Native, Audio, Video, CTV
Use Case: Best used when you have an idea of the audience you are targeting and the apps that they use. If you audience frequently uses an app, serving ads there allows you to reach your audience without paying for Third-Party data segments.
Placement: Ads targeting an App List will serve on mobile devices and tablets in the apps specified in the lists.
Bid Structure: Bids depend on the apps chosen. For standard apps we recommend starting around $3.75, noting that premium apps will need to be significantly higher.
Audience Data Targeting: First and Third-Party data segments are available for targeting but can limit the campaign’s ability to serve.
App lists can be used to target or block specific applications. In the ‘Inventory’ tab of the platform, select ‘New App List’, then enter the list of app bundle ids and ‘Save’. This can then be added as an ‘allow’ or ‘block’ list on any campaign or line item. App Bundle IDs can be found in custom reporting from previous or existing campaigns, in the Inventory Availability tool and in sample log reports under the CTV Landscape. Note, the same app may have different bundle ids for every operating system, device type etc.
Connected Television (CTV)
Connected Television is a premium placement that sees Video Completion Rates over 90%.
KPI: Video Completion Rate (VCR)
Media Type: Video
Use Case: CTV ads are best for driving brand awareness. By serving non-skippable, premium video ads, users are more likely to view the ad in its entirety.
Placement: CTV ads run as video placements in either the pre-roll or mid-roll settings. These are non-skippable and run across Smart TV’s, game consoles, tablets and more.
Bid Structure: CTV campaigns can run through a PMP Deal or through the Open Exchange. PMP rates are negotiated with Publishers and offered at a fixed CPM floor. CTV placements on the Open Exchange may sell at a lower CPM, but we recommend using PMP’s as they guarantee fraud-free inventory. The typical prices for CTV placements range from $28-40, with premium inventory available at prices over $40.
Audience Data Targeting: Use Audience data specifically designed for CTV ads by Tru-Optik and AT&T. Targeting these data segments could restrict delivery because it will limit the size of your audience.
CTV Inventory Targeting Parameters
For CTV inventory Pontiac provides the capabilities to target the following parameters in either an ‘allow’ or ‘block’ list. These lists can be added directly in the ‘Targeting’ section of the campaign or line item:
Publisher
Network
Channel
Series
Title
Genre
The ‘Multi Field’ targeting section can be used for allowing or blocking values that may be passed through multiple content fields. For example, ESPN may sometimes come through Publisher, other times Network, or Channel. Enter ‘ESPN’ in the multi-field section to target across any of the content fields where this value is seen in the bid request.
The value in the allow or block list must be an exact match for the value in the bid request (except capitalization). For example, if you enter ‘Fox News’ in the Network list and the media owner passes ‘fox_news’ in the Network field, this would not be an eligible impression. If applied as an allow list, your line would not serve on this impression. If applied as a block list, your line would be able to serve on this impression.
Due to inconsistencies in both the naming conventions and usage of each of the fields listed above, it is recommended to do some preliminary research via the Inventory Availability and Inventory Discovery tools to verify the viability of any CTV inventory targeting on the platform. When and how these fields are used can vary greatly by partner, media owner, SSP etc.
OLV Video Environment Targeting
Video environment targeting can be found in the ‘OLV’ tab of the ‘Targeting’ section on both the Campaign and Line Item levels.
Video Playback Type:
Pre-Roll: instream placement where ad plays before streaming video content
Mid-Roll: instream placement where ad plays during streaming video content
Post-Roll: instream placement where ad plays after streaming video content
Outstream: placement in non-video environments among other types of content, ie. web article or mobile game
Video Player Size:
Large: minimum width of 640 pixels
Medium: minimum width of 320 pixels, maximum width of 639 pixels
Small: maximum width of 319 pixels
Video Playback Method:
Autoplay with Sound On
Autoplay with Sound Off by Default
Click to Play
Mouse-Over
Zip Code Targeting
Zip Code Targeting allows you to target only users in the predetermined list of zip codes. You can target as many or as few zip codes as you want, and it is a great tool to target relevant areas for local campaigns.
KPI: Click Through Rate (CTR)
Media Type: Display, Native, Audio, Video, CTV
Use Case: This is a great tactic for local businesses looking to target users in and around their store location(s). Campaigns with Zip Code Targeting deliver high CTRs, excellent conversion rates, and drive efficient ROIs for small budgets.
Placement: Available across all media types.
Bid Structure: This targeting tool follows the Bid ranges for the Campaign’s media type. Some zip codes are less populated than others, and the smaller the audience, the more the bids will need to be increased.
Audience Data Targeting: : First and Third-Party data segments are available for targeting but can limit the Campaign’s ability to serve.
Note that there are two places in the Pontiac Platform to implement zip code targeting:
In the Audience tab
Under New Custom Audience
Build an audience of zip codes to be used on by ANY Line
Line Item Level
Available in the Targeting menu, under the Zip Codes tab
Specific to this Line Item
Device Targeting
Device type targeting can be applied at either the campaign or the line item level, but is not required on either. If the device type targets are all unchecked, the campaign or line can serve impressions on any device type. The following are the device type options:
Computer/Desktop
Connected TV
Mobile Phone
Tablet
Connected Device
Set Top Box
Note that in the ‘Inventory’ tab of the platform you can find more information on all of the available deals including the % of requests for each device type. If a deal includes all OTT inventory and you would like to run strictly CTV, you can apply device type targeting to only Smart TVs & set top boxes.