Scheduled Reports
Custom reports can be automatically delivered to your email, FTP or S3 bucket, or Google Cloud Storage on the schedule of your choice. When creating a custom report, select the ‘Schedule Automated Report’ box, then open the ‘Scheduled Reports’ tab to choose the schedule and configure the delivery method.
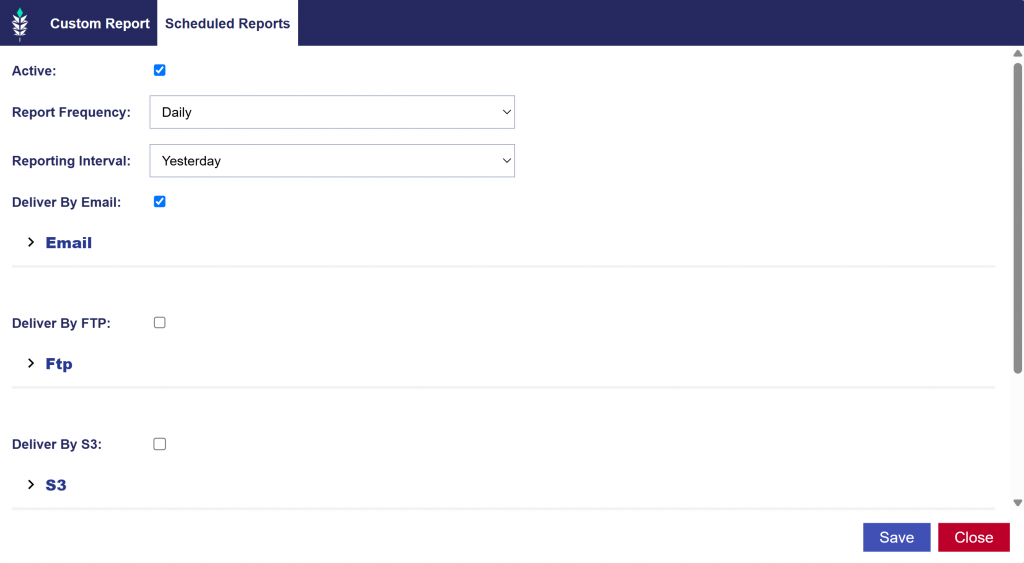
When creating a new Custom Report and selecting Schedule Automated Report, the Scheduled Reports tab becomes editable. Complete the setup by selecting the following:
- Report Frequency:
- Daily: Reports will be sent each morning for the previous day.
- Weekly: Reports will be delivered on Monday mornings for the previous week.
- Monthly: Reports will be delivered on the first of each month for the previous month.
- Custom:
- Set a specific day frequency. For example, every 2 days.
- Set a specific week frequency on a specific day. For example, every 2 weeks on Monday.
- Reporting Interval: Yesterday, Last 7 days, Last 30 days, Month to Date, Previous Month, Custom
- Custom: Last __ Days
- Deliver by: Choose delivery method by selecting the checkbox for each.
- Email
- Email addresses should be separated by comma.
- FTP
- FTP Server
- FTP Path
- FTP Port
- FTP Username
FTP Password
- AWS S3
- Bucket: This is the name of the bucket, e.g. example.bucket. Bucket name does not contain a leading backslash or the s3:// prefix.
- Creating a bucket in AWS S3:
- In AWS S3 click Create Bucket
- Chose a bucket name that is available and the desired AWS Region.
- Change Object Ownership to ACLs enabled.
- Uncheck Block all public access field and check “I acknowledge that the current settings might result in this bucket and the objects within becoming public”.
- Click Create bucket.
- Navigate to the newly created bucket and click Create folder with the output path that we chose in Pontiac (“output-path”). Confirm to create the folder.
- Setting up the report in Pontiac:
- Go to Reporting tab and then click New Custom Report.
- Select Log Level Report from the Report Type Drop Down
- Go to Scheduled Reports tab and check Deliver by S3 box.
- In the expandable section fill out the Bucket field with the AWS S3 Bucket name. Example: S3-test-bucket.
- Fill out the Path field with a desired output path location and file name (To include the date macro use dateInt (YYYYMMDD) like xxx/filename-%dateInt% otherwise your file will be overwritten each day). Example: output-path/Pontiac-reports.csv or output-path/Pontiac-reports-%dateInt%.csv
- Click View security policy and copy the full text area.
- Go to Amazon AWS S3 and modify permissions for the bucket we chose earlier. In the Permissions tab click Edit and paste the policy text from earlier and Save.
- Back in Pontiac reports screen click Verify and wait for a successful confirmation message.
- Creating a bucket in AWS S3:
- Path: This will be the full location that the report is saved to. To include the date macro use dateInt (YYYYMMDD) like xxx/filename-%dateInt% otherwise your file will be overwritten each day.
- View Security Policy
- Verify your configured bucket policy.
- Bucket: This is the name of the bucket, e.g. example.bucket. Bucket name does not contain a leading backslash or the s3:// prefix.
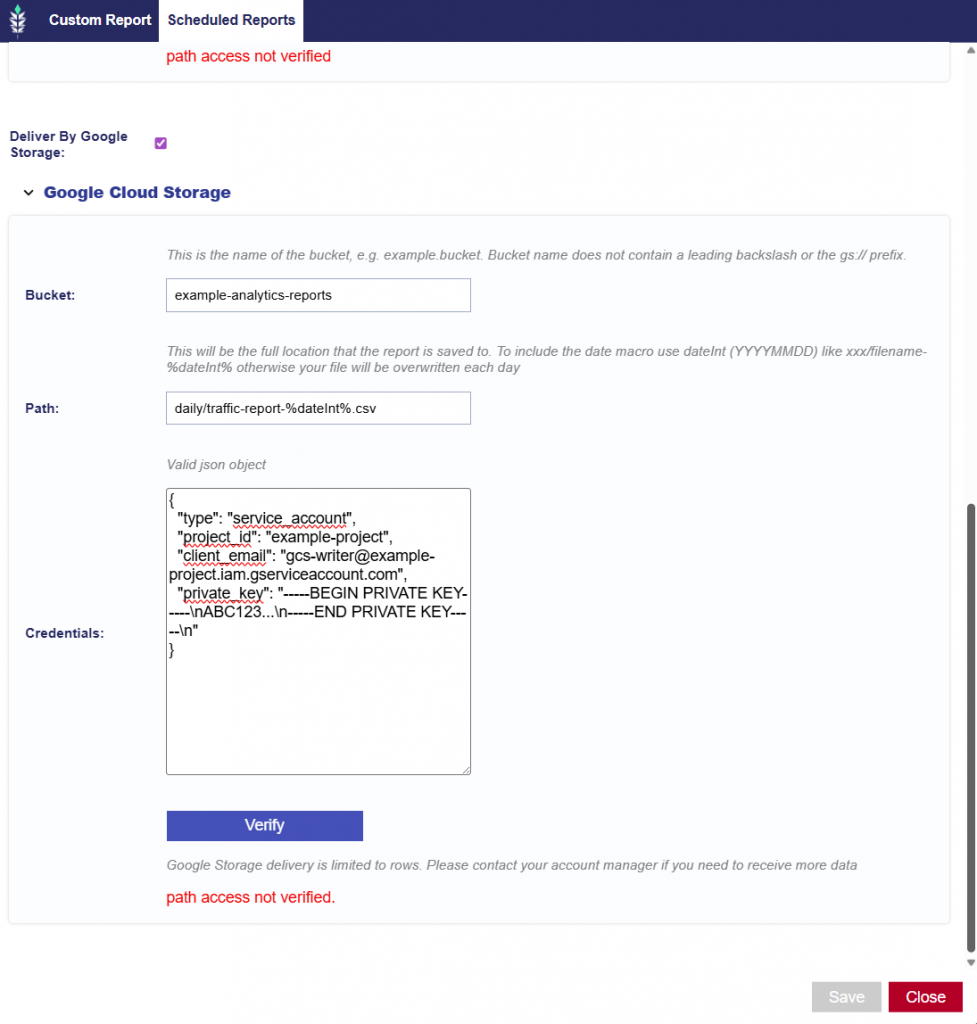
- Google Cloud Storage
- Bucket: This is the name of the bucket, e.g. example.bucket. Bucket name does not contain a leading backslash or the gs:// prefix.
- Path: This will be the full location that the report is saved to. To include the date macro use dateInt (YYYYMMDD) like xxx/filename-%dateInt% otherwise your file will be overwritten each day.
- Credentials: Valid json object.
- Email
S3 Example

- Once your bucket and path are input, click the ‘View security policy’ button and copy and paste the JSON.
- Go to S3
- Click bucket
- Go to Permissions tab
- Scroll to Bucket Policy
- Click Edit
- Paste the JSON security policy
- Click Save
Google Storage Example