Edit a Line
Setup Section
To edit an existing Line’s Setup section, follow these steps:
- Go to the selected Advertiser > Campaign where you want to edit the existing Line.
- Navigate to the Lines dropdown section within the Campaign’s dashboard.
- Select the name of the Line that you would like to edit.
- Press the ‘Edit’ button on the upper right corner of the page to enter Edit Mode.
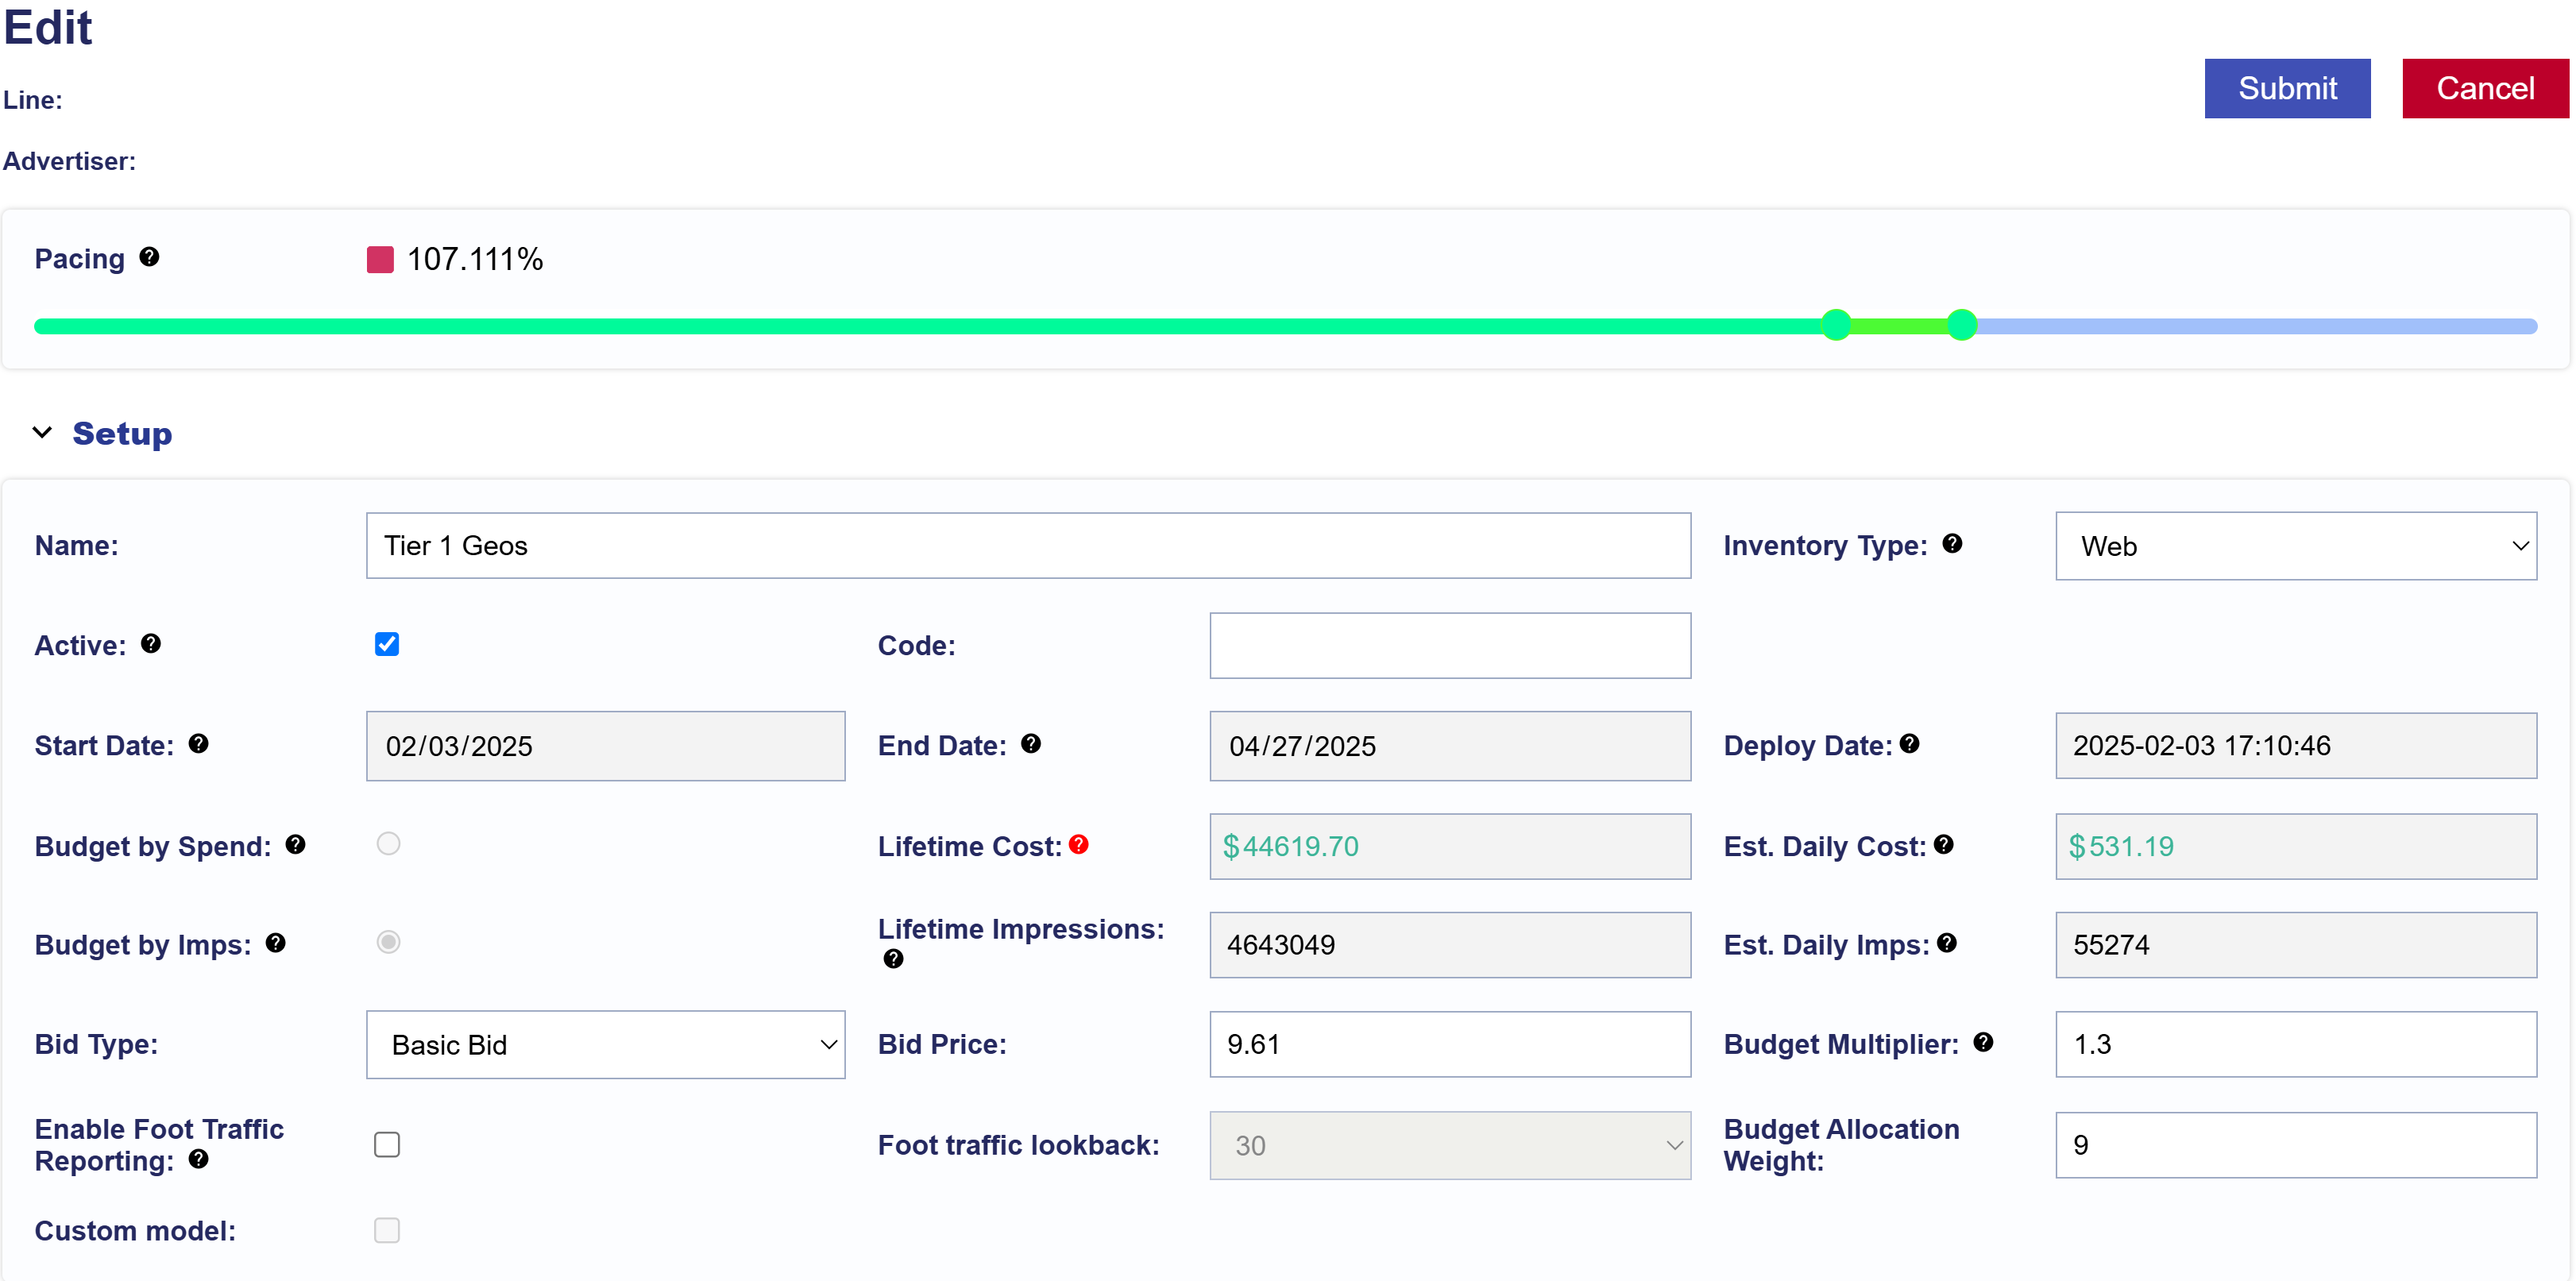
In the Setup dropdown, the following fields are editable:
- Name: Rename your Line.
- Inventory Type: Select Web, In-App, or Combined.
- Active Status: Check the ‘Active’ to set Line to live and uncheck it if you want to pause the Line.
- Code: Optional and for reporting purposes.
- Bid Type: Select Basic Bid, Bid at Floor, Advanced Bid Controls
- Bid Price
- Budget Multiplier
- Enable Foot Traffic Reporting
- Foot Traffic Lookback if the above is enabled
- Budget Allocation Weight
Note that when ‘Manage Budgets’ box is checked on the Campaign Level, all Lines under that Campaign will be modified to match the Start Date, End Date, and Budget Type of the Campaign, so it is not Editable when the checkbox is selected. Uncheck on the Campaign Level if you want to modify at the Line Level.
If you have finished editing, click the ‘Submit’ button in the top right corner of the page to save and apply all changes. If you do not want to apply the edits, press ‘Cancel’ to discard changes and revert the Line to its previous settings. To continue making edits, proceed to another section.
Pacing & Dayparts Section
If ‘Manage Dayparts’ is enabled NOT on the Campaign Setup section and you want to edit the Pacing & Dayparts section of the Line, follow these steps:
- Navigate to the Pacing & Dayparts section within the Line.
- Make the necessary changes to the Pacing & Dayparts settings. Refer to the documentation page to review available Pacing & Dayparts options: Line Pacing & Dayparts
- If you have finished editing, click the ‘Submit’ button in the top right corner of the page to save and apply all changes. If you do not want to apply the edits, press ‘Cancel’ to discard changes and revert the Line to its previous settings. To continue making edits, proceed to another section.
If ‘Manage Dayparts’ is enabled on the Campaign Setup section and you want to edit the Pacing & Dayparts section of the Line, follow these steps:
- Navigate to the Pacing & Dayparts section within the Campaign that the Line belongs to.
- Edit the Campaign and uncheck the ‘Manage Dayparts’ box to enable Line Level control.
- Once disabled, go to the Line Level and update the Pacing & Dayparts settings. Refer to the documentation page to review available Pacing & Dayparts options: Line Pacing & Dayparts
- If you have finished editing, click the ‘Submit’ button in the top right corner of the page to save and apply all changes. If you do not want to apply the edits, press ‘Cancel’ to discard changes and revert the Line to its previous settings. To continue making edits, proceed to another section.
Frequency & Recency Section
If the ‘Enable Line Frequency’ feature is checked in the Line Setup section and you want to edit the Frequency & Recency section of the Line, follow these steps:
- Navigate to the Frequency & Recency section within the Line.
- Make the necessary changes to the Frequency & Recency settings. Refer to the documentation page to review available Frequency & Recency options: Line Frequency & Recency
- If you have finished editing, close the window and click the ‘Submit’ button in the top right corner of the page to save and apply all changes. If you do not want to apply the edits, press ‘Cancel’ to discard changes and revert the Line to its previous settings. To continue making edits, proceed to another section.
Note that if you want to Edit the Campaign Frequency & Recency section, see the following documentation: Campaign Frequency & Recency
Foot Traffic Reporting Section
If the ‘Enable Foot Traffic Reporting’ feature is checked in the Line Setup section and you want to edit the Frequency & Recency section of the Line, follow these steps:
- Navigate to the Foot Traffic Reporting section within the Line.
- Add or Remove Locations. See this documentation for further detail: Line Foot Traffic Reporting
- If you have finished editing, close the window and click the ‘Submit’ button in the top right corner of the page to save and apply all changes. If you do not want to apply the edits, press ‘Cancel’ to discard changes and revert the Line to its previous settings. To continue making edits, proceed to another section.
Targeting Section
To edit the Targeting section of a Line, follow these steps:
- Navigate to the Targeting section within the Line.
- Click ‘Edit Targeting’ to modify targeting settings.
- Make the necessary changes to the targeting settings. Refer to the documentation page to review available targeting options: Line Targeting
- Click ‘Save’ in the bottom right corner of the popup window to apply all changes. To discard changes and revert to the previous settings, click ‘Cancel’.
- If you have finished editing, close the window and click the ‘Submit’ button in the top right corner of the page to save and apply all changes. If you do not want to apply the edits, press ‘Cancel’ to discard changes and revert the Line to its previous settings. To continue making edits, proceed to another section.
Creatives Section
If ‘Manage Creatives’ is NOT enabled in the Campaign Setup section and you want to edit the Creatives section of the Line, follow these steps:
- Navigate to the Creatives section within the Line.
- Click ‘Associate Creatives’ to add and/or remove Creatives associated to the Line.
- Note that you can only Edit a Creative on the Advertiser Level, not here on the Line Level.
- If you have finished editing, close the window and click the ‘Submit’ button in the top right corner of the page to save and apply all changes. If you do not want to apply the edits, press ‘Cancel’ to discard changes and revert the Line to its previous settings. To continue making edits, proceed to another section.
If ‘Manage Creatives’ is enabled in the Campaign Setup section and you want to edit the Creatives section of the Line, follow these steps:
- Navigate to the Creatives section within the Campaign that the Line belongs to.
- Edit the Campaign and uncheck the ‘Manage Creatives’ box to enable Line Level control.
- Click ‘Associate Creatives’ to add and/or remove Creatives associated to the Campaign.
- Note that you can only Edit a Creative on the Advertiser Level, not here on the Campaign Level.
- If you have finished editing, close the window and click the ‘Submit’ button in the top right corner of the page to save and apply all changes. If you do not want to apply the edits, press ‘Cancel’ to discard changes and revert the Line to its previous settings. To continue making edits, proceed to another section.
Audiences Section
To edit the Audience section of a Line, follow these steps:
- Navigate to the Audience section within the Line.
- Click ‘Associate Segments’ to add and/or remove Audience Segments associated to the Line.
- Make the necessary changes to the Audience settings. Refer to the documentation page to review available Audience options: Line Audiences
- If you have finished editing, close the window and click the ‘Submit’ button in the top right corner of the page to save and apply all changes. If you do not want to apply the edits, press ‘Cancel’ to discard changes and revert the Line to its previous settings. To continue making edits, proceed to another section.
Pixels Section
If ‘Manage Pixels’ is NOT enabled on the Campaign Setup section and you want to edit the Pixels section of the Line, follow these steps:
- Navigate to the Pixels section within the Line.
- Click ‘Associate Pixels’ to add and/or remove Pixels associated to the Line.
- Note that you can only Create and Edit a Pixel on the Advertiser Level, not here on the Line Level.
- If you have finished editing, close the window and click the ‘Submit’ button in the top right corner of the page to save and apply all changes. If you do not want to apply the edits, press ‘Cancel’ to discard changes and revert the Campaign to its previous settings. To continue making edits, proceed to the another section.
If ‘Manage Pixels’ is enabled on the Campaign Setup section and you want to edit the Pixels section of the Line, follow these steps:
- Navigate to the Pixels section within the Campaign that the Line belongs to.
- Edit the Campaign and uncheck the ‘Manage Pixels’ box to enable Line Level control.
- Once disabled, go to the Line Level and update the Pixels.
- Click ‘Associate Pixels’ to add and/or remove Pixels associated to the Line.
- Refer to the documentation page to review available Pixels options: Line Pixels
- If you have finished editing, click the ‘Submit’ button in the top right corner of the page to save and apply all changes. If you do not want to apply the edits, press ‘Cancel’ to discard changes and revert the Line to its previous settings. To continue making edits, proceed to another section.