Creatives can be uploaded in the Advertiser details screen by selecting the ‘New Creative’ button. At this time the platform supports Video: 3rd Party (VAST tags from reputable Ad Servers), Videos: Hosted, Audio: 3rd Party, Audio: Hosted, Banner: 3rd Party, Banner: Hosted, HTML5, and Native (Format A) creatives. If you do not have access to an ad server to create VAST tags, Pontiac Bidder offers hosting services at an additional charge via Kevel. This additional CPM fee is applied to the Line Item for each impression served and is a part of the total line and campaign budgets. Reach out through the Help Center or your account manager for more information.
To upload a Creative, go to the Advertisers tab and click on the name of the Advertiser under which you would like to upload the Creative. Select ‘New Creative’ and select the type of Creative that you will be uploading. A preview of the Creative should appear in the green ‘Preview’ box. Ensure that the Creative does not extend outside this preview box and loads as expected. Complete all relevant fields, then click ‘Save’.
Please note that Creatives can only be edited at the Advertiser Level. Please navigate to the Advertiser Level to modify your creatives.
Please thoroughly review all Creative Policies before uploading Creative. All Creative units uploaded will be subject to the Pontiac Intelligence creative audit process as well as any additional SSP, publisher, media owner or other creative approval processes that may apply in the acquisition of ad space.
Pontiac Intelligence reserves the right to reject any creative unit at its discretion, and subsequently suspend the account without advanced warning. If your account is suspended, you will be notified in writing and an investigation will take place within three business days. If at any point your ad tags are flagged as malicious, your account balance will be forfeited to Pontiac and will not be refundable.
In addition to Pontiac Intelligence’s content policies, certain sellers have additional policies that apply to buyers of those sellers’ inventory and certain data providers have additional policies that apply to buyers of those data providers’ data. Pontiac Intelligence clients wishing to purchase such inventory or data are responsible for understanding and adhering to any such additional policies. Pontiac shall have no liability or responsibility of any kind if a third-party declines to serve any Ads proposed by a Pontiac user, regardless of whether the ads meet the Pontiac Ad Standards or are approved by Pontiac, and users agree to indemnify and hold harmless Pontiac from any losses arising from a third-party’s decision not to serve a user’s ads.
New Creative Tab
Creatives are managed on the Advertiser level. Navigate to the desired Advertiser and select the New Creative button to upload and configure creatives across video, display, audio, and native formats.
Getting Started
Click New Creative.
Select a Creative Type:
Banner/Display:
Banner: Hosted
First Party Banner
Banner: 3rd Party
Ad Server Tag Banner
HTML5
Native
Audio
Audio: Hosted
First Party Audio
Audio: 3rd Party
Ad Server Tag Audio
Video
Video: Hosted
First Party Videos. Pontiac hosting fee will be applied and VAST tag will be created using Kevel.
Video: 3rd Party
Ad Server Tag Video (VAST) tags from reputable Ad Servers
Enter a Creative Name.
Set the creative to Active or Inactive (default is Active).
Continue below for detailed setup instructions and examples for each creative type.
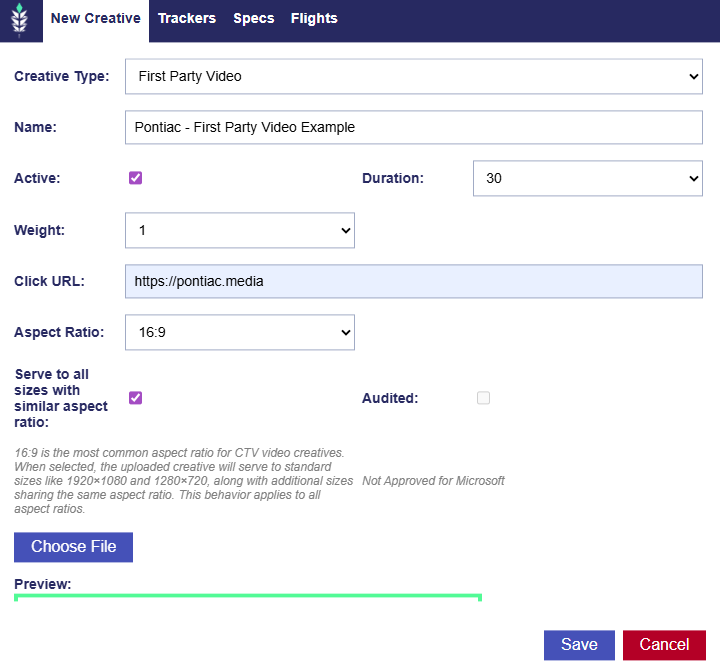
Video: Hosted
Upload Steps:
Start by clicking New Creative, then:
Select Creative Type: First Party Video
Name the creative.
Choose Active or Inactive. Creatives are automatically set to Active.
Select the creative’s duration. The default value is 30 seconds.
Supported Durations:
5, 10, 15, 30, 45, 60, 75, and 90.
Select the creative’s weight. The default value is 1.
Click URL: The Click URL will automatically populate with the Advertiser’s URL. The field remains editable if it needs to be edited.
If previously audited, editing the Click URL will force a reaudit of this creative and the creative will stop serving until the reaudit is completed.
Select the Aspect Ratio: 16:9 is selected by default.
16:9 is the most common aspect ratio for CTV video creatives. When selected, the uploaded creative will serve to standard sizes like 1920×1080 and 1280×720, along with additional sizes sharing the same aspect ratio.
All Supported Aspect Ratios:
16:9: Best for CTV and most desktop/mobile video placements. Standard for long-form and streaming content.
1:1: Square and common for feeds and mobile as it takes up more screen space than horizontal video.
9:16: Ideal for mobile, full screen experiences and OLV placements.
4:5: Common for mobile feeds.
Serve to all sizes with similar aspect ratio (recommended, enabled by default): When enabled, creatives run across more placements that support the same aspect ratios, increasing available inventory and campaign scale without distortion or cropping.
Click the Choose File button and upload the creative video file.
Preview the creative to ensure it is rendering correctly and there are no issues.
Click Save, which will send the creative to audit.
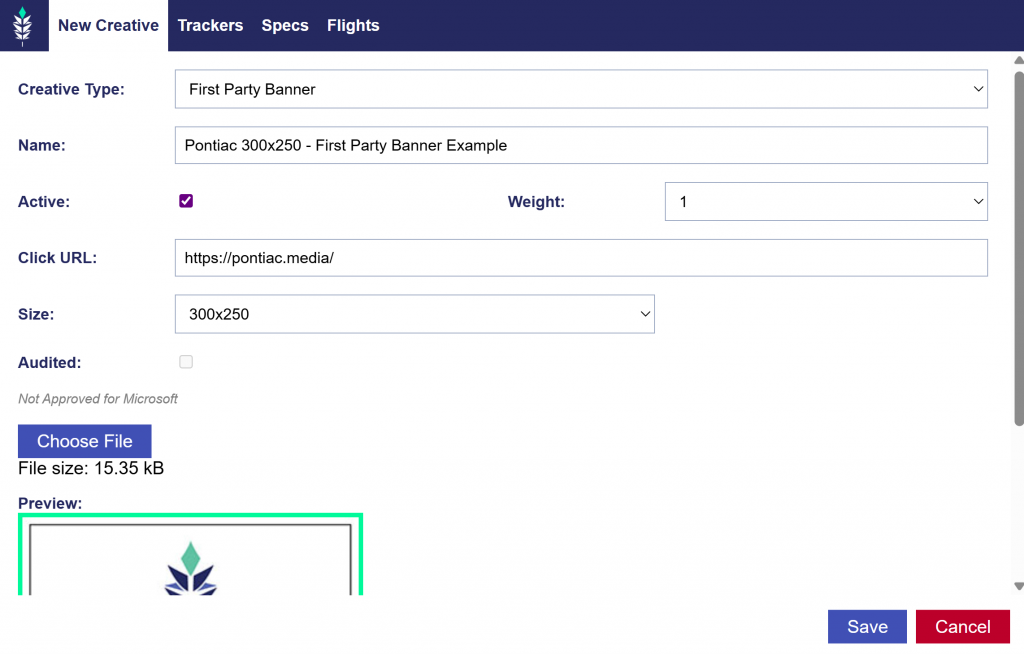
Banner: Hosted
Upload Steps:
Start by clicking New Creative, then:
Select Creative Type: First Party Banner
Name the creative.
Choose Active or Inactive. Creatives are automatically set to Active.
Select the creative’s weight. The default value is 1.
Click URL: The Click URL will automatically populate with the Advertiser’s URL. The field remains editable if it needs to be edited.
If previously audited, editing the Click URL will force a reaudit of this creative and the creative will stop serving until the reaudit is completed.
Click the Choose File button and upload the creative banner file.
Preview the creative to ensure it is rendering correctly and there are no issues.
Click Save, which will send the creative to audit.
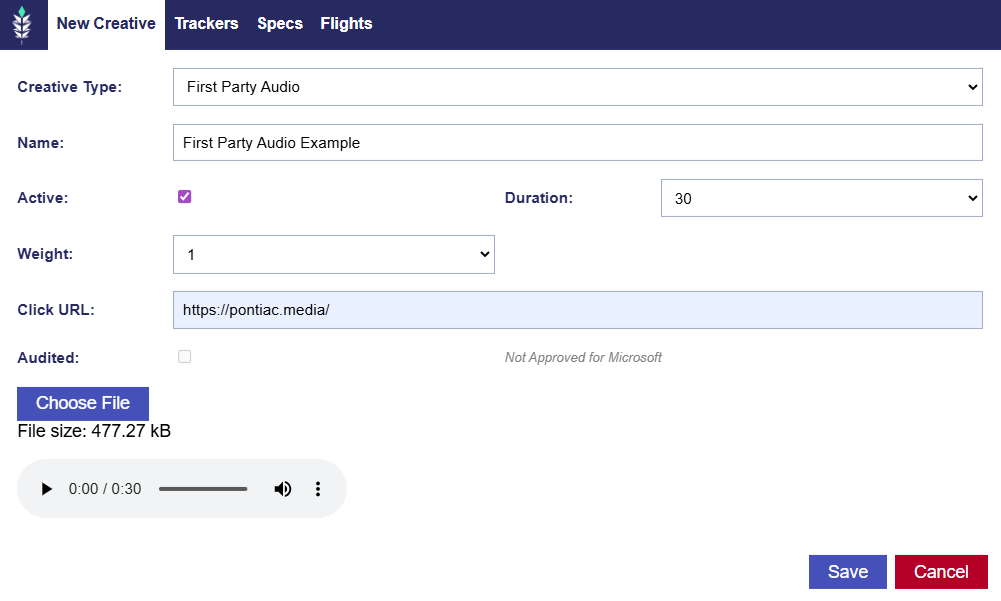
Audio: Hosted
Upload Steps:
Start by clicking New Creative, then:
Select Creative Type: First Party Audio
Name the creative.
Choose Active or Inactive. Creatives are automatically set to Active.
Select the creative’s duration. The default value is 30 seconds.
Supported Durations:
5, 10, 15, 30, 45, 60, 75, and 90.
Select the creative’s weight. The default value is 1.
Click URL: The Click URL will automatically populate with the Advertiser’s URL. The field remains editable if it needs to be edited.
If previously audited, editing the Click URL will force a reaudit of this creative and the creative will stop serving until the reaudit is completed.
Click the Choose File button and upload the creative audio file.
MP3 audio file
Preview the creative to ensure it is rendering correctly and there are no issues.
Click Save, which will send the creative to audit.
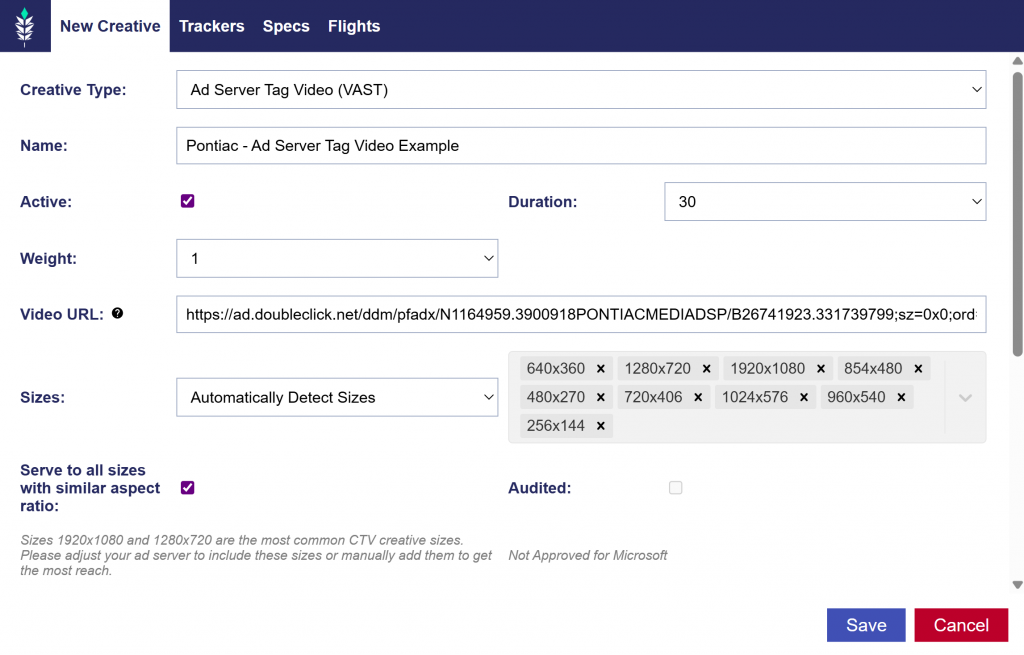
Video: 3rd Party
Upload Steps:
Start by clicking New Creative, then:
Select Creative Type: Ad Server Tag Video (VAST)
Name the creative.
Choose Active or Inactive. Creatives are automatically set to Active.
Select the creative’s duration. The default value is 30 seconds.
Supported Durations:
5, 10, 15, 30, 45, 60, 75, and 90.
Select the creative’s weight. The default value is 1.
Enter the Video VAST Tag URL
VAST 2, 3, and 4 are currently accepted
Select how the creative’s sizes are uploaded:
Automatically Detect Sizes
All sizes detected from the VAST tag will populate the box.
Manually Set Sizes
Select sizes from the right hand side drop down menu.
Serve to all sizes with similar aspect ratio (recommended, enabled by default): When enabled, creatives run across more placements that support the same aspect ratios, increasing available inventory and campaign scale without distortion or cropping.
Preview the creative to ensure it is rendering correctly and there are no issues.
Click Save, which will send the creative to audit.
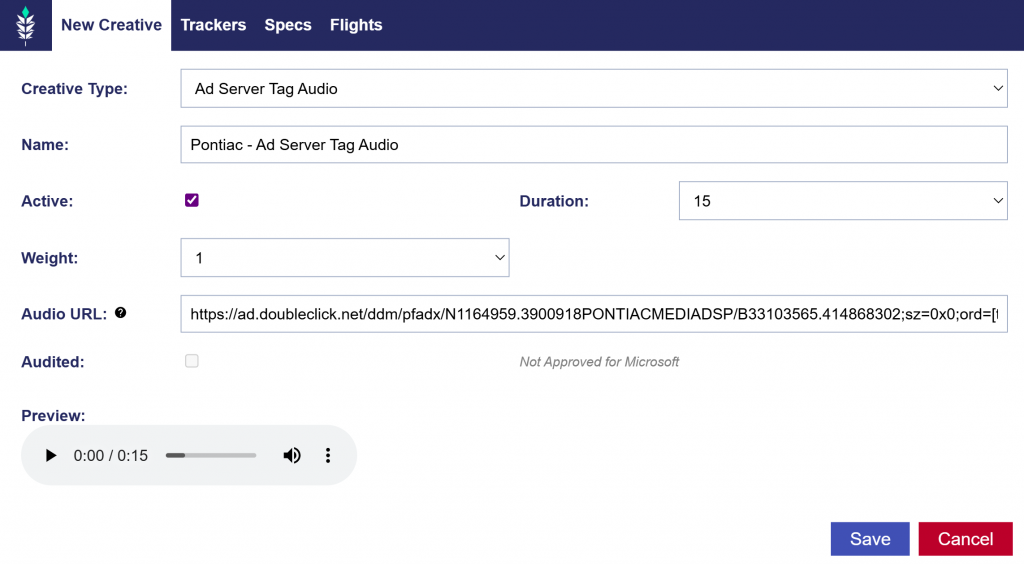
Audio: 3rd Party
Upload Steps:
Start by clicking New Creative, then:
Select Creative Type: Ad Server Tag Audio
Name the creative.
Choose Active or Inactive. Creatives are automatically set to Active.
Select the creative’s duration. The default value is 30 seconds.
Supported Durations:
5, 10, 15, 30, 45, 60, 75, and 90.
Select the creative’s weight. The default value is 1.
Enter the Audio VAST tag URL: Vast versions 2, 3 and 4 are currently accepted.
Preview the creative to ensure it is rendering correctly and there are no issues.
Click Save, which will send the creative to audit.
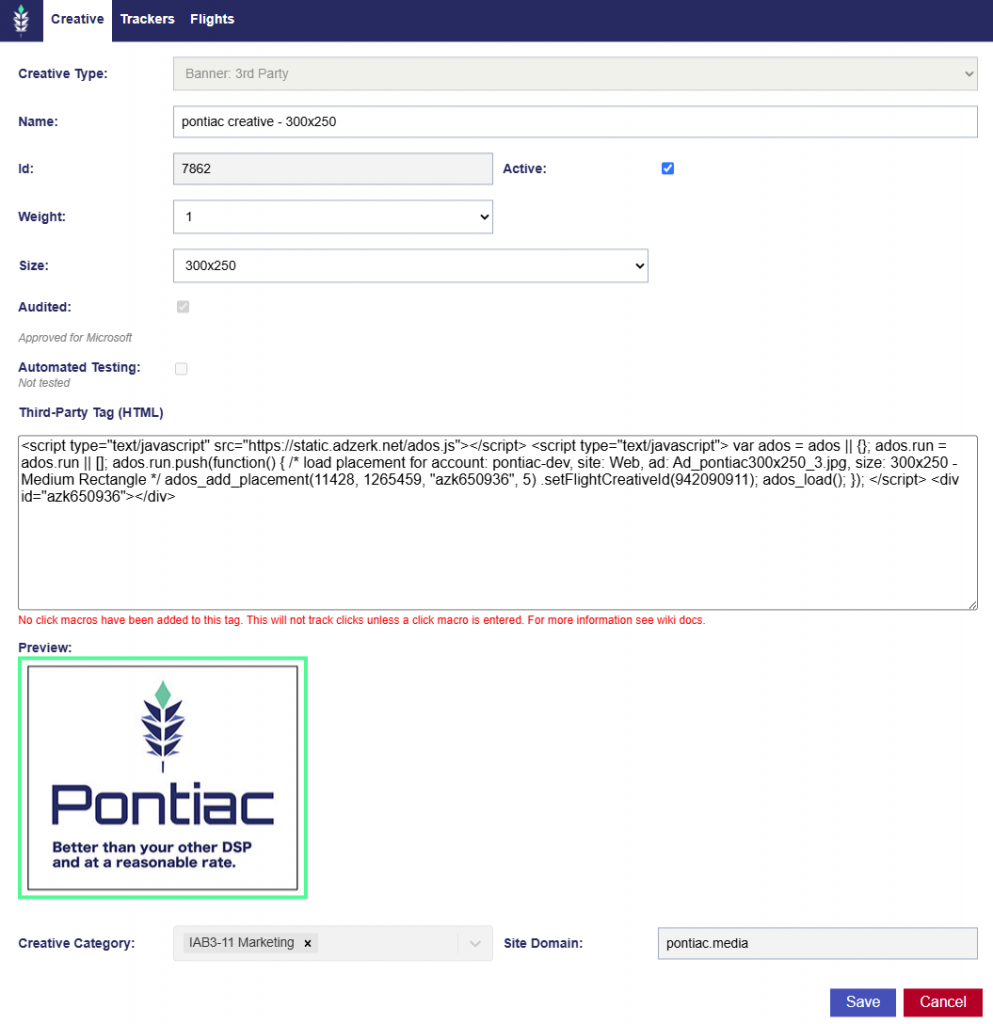
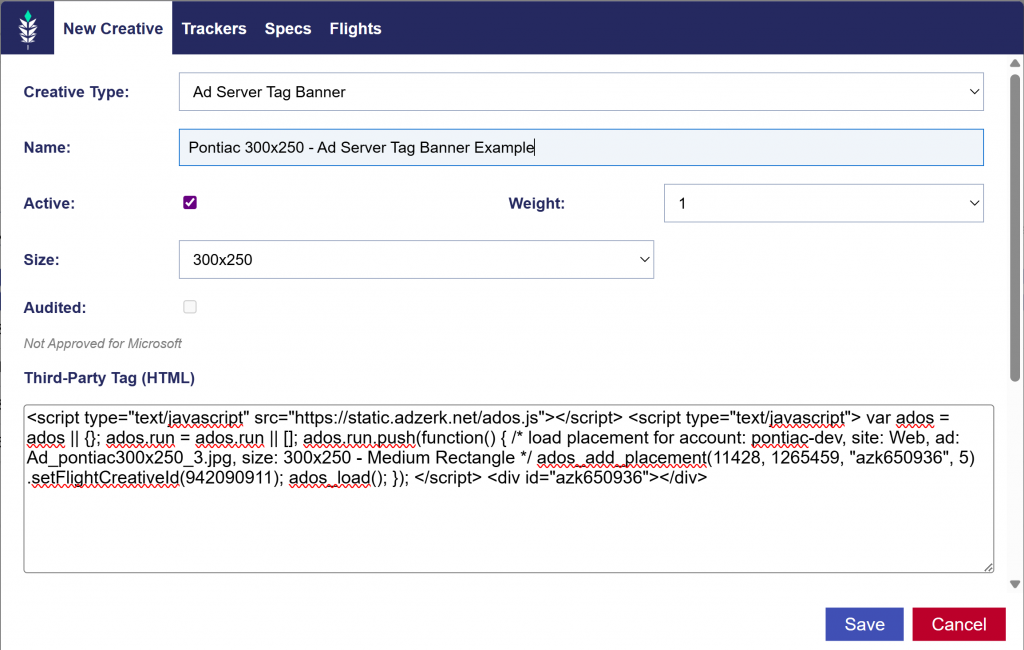
Banner: 3rd Party
Upload Steps:
Start by clicking New Creative, then:
Select Creative Type: Ad Server Tag Banner
Name the creative.
Choose Active or Inactive. Creatives are automatically set to Active.
Select the creative’s weight. The default value is 1.
Preview the creative to ensure it is rendering correctly and there are no issues.
Click Save, which will send the creative to audit.
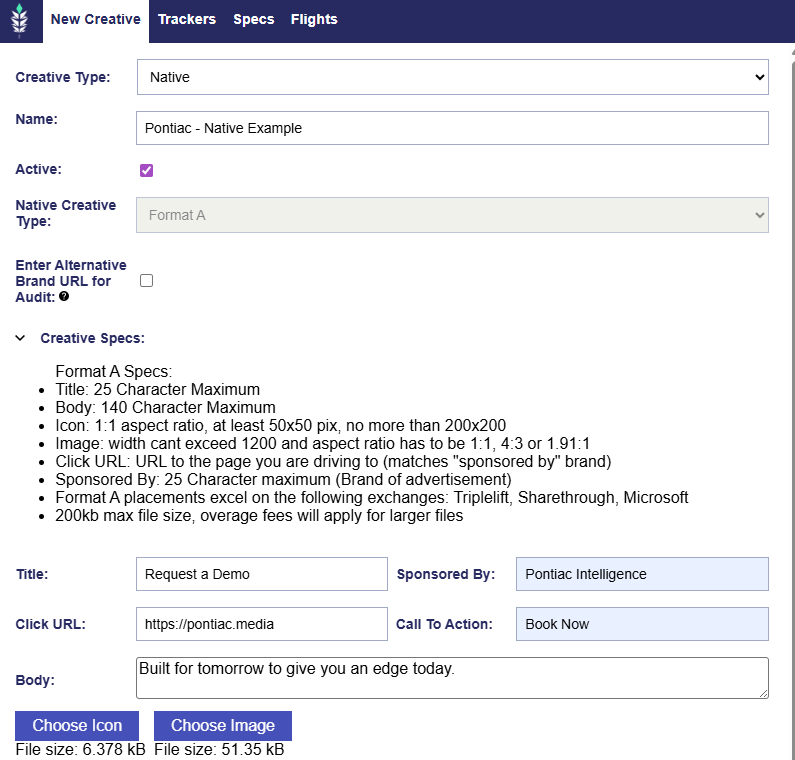
Native
Upload Steps:
Start by clicking New Creative, then:
Select Creative Type: Native
Name the creative.
Choose Active or Inactive. Creatives are automatically set to Active.
Native Creative Type: Format A is selected by default and currently the only supported version.
Enter Alternative Brand URL for Audit (if applicable): Applicable if you are using a Click URL to a site that does not represent your branding, such as Amazon, enter a URL that contains the same branding represented in your ad. The audit team will use this URL to validate the branding represented in the creative. This will not be used as the landing page for the creative.
Creative Specs: Expand this section to view the Native Format A requirements.
Title: 25 Character Maximum
Body: 140 Character Maximum
Icon: 1:1 aspect ratio, at least 50×50 pix, no more than 200×200
Image: width cant exceed 1200 and aspect ratio has to be 1:1, 4:3 or 1.91:1
Click URL: URL to the page you are driving to (matches “sponsored by” brand)
Sponsored By: 25 Character maximum (Brand of advertisement)
Format A placements excel on the following exchanges: Triplelift, Sharethrough, Microsoft
200kb max file size, overage fees will apply for larger files
Enter the required fields: Title, Sponsored By, Call to Action, and Body.
Click URL: The Click URL will automatically populate with the Advertiser’s URL. The field remains editable if it needs to be edited.
If previously audited, editing the Click URL will force a reaudit of this creative and the creative will stop serving until the reaudit is completed.
Upload the Icon.
Upload the Image.
Preview the creative to ensure it is rendering correctly and there are no issues.
Click Save, which will send the creative to audit.
Example Preview:
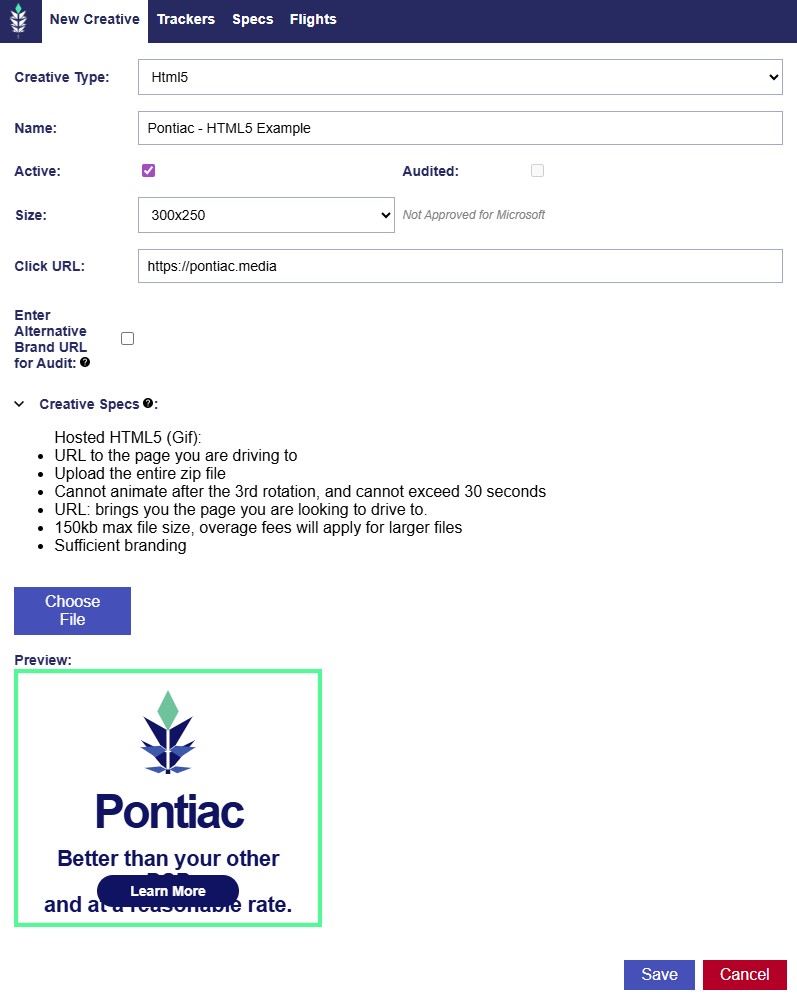
HTML5
Upload Steps:
Start by clicking New Creative, then:
Select Creative Type: Html5
Name the creative.
Choose Active or Inactive. Creatives are automatically set to Active.
Click URL: The Click URL will automatically populate with the Advertiser’s URL. The field remains editable if it needs to be edited.
If previously audited, editing the Click URL will force a reaudit of this creative and the creative will stop serving until the reaudit is completed.
Enter Alternative Brand URL for Audit (if applicable): Applicable if you are using a Click URL to a site that does not represent your branding, such as Amazon, enter a URL that contains the same branding represented in your ad. The audit team will use this URL to validate the branding represented in the creative. This will not be used as the landing page for the creative.
Creative Specs: Expand this section to view the html5 requirements.
Hosted HTML5 (Gif):
URL to the page you are driving to
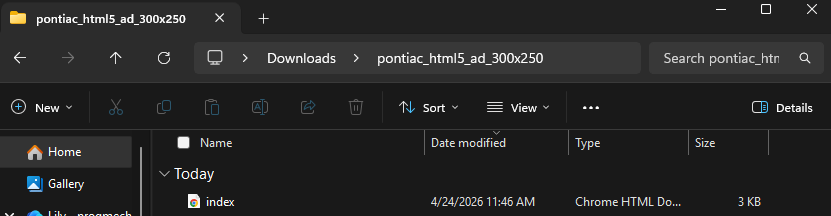
Upload the entire zip file
Cannot animate after the 3rd rotation, and cannot exceed 30 seconds
150kb max file size, overage fees will apply for larger files
Sufficient branding
Click Choose File to upload the zip file.
The zip file must contain an index.html, specifically called index.html, which much reside in the root of the zip file and not in a subfolder. Index.html should be complete and valid HTML document and not an HTML fragment. All external resources must be secure (https).
9. Preview the creative to ensure it is rendering correctly and there are no issues.
10. Click Save, which will send the creative to audit.
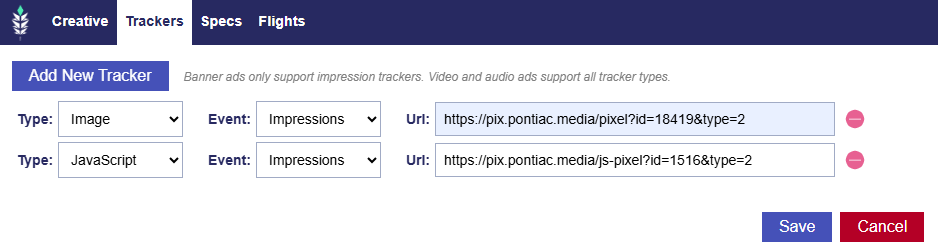
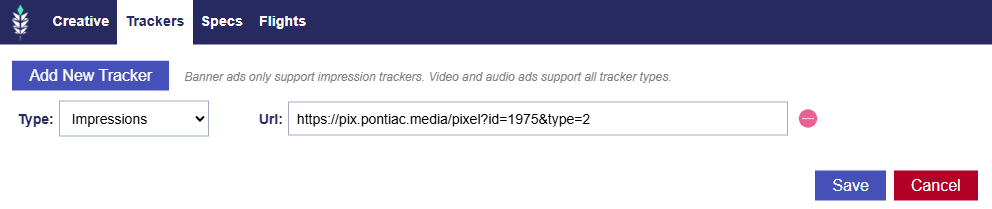
Trackers Tab
1×1 third party trackers can be added to creatives in Pontiac on upload or in the edit creative screen. In the creative window, open the Tracker tab and click Add New Tracker to enter the third-party tracking URL.
Image trackers are simple pixel URLs that fire when the creative loads. They are usually preferred because they are lightweight, broadly compatible, and less likely to be blocked by creative environments.
JavaScript trackers are used when the tracking provider requires script logic to run, such as setting additional parameters, firing multiple calls, or supporting more complex measurement behavior.
For most standard impression tracking, Image is the better default.
Additional Information:
Banner ads support impression trackers only.
Video and audio ads support all tracker types.
Third-party click trackers should be configured in your ad server as the creative’s click URL.
Please refer to the Pontiac Macros here: Creative Macros which can be used to pass additional information when the tracker fires.
Pontiac macros must be implemented using the exact macro format within the tracker URL to pass data correctly. Incorrect formatting will result in missing data.
For additional assistance, please reach out to your account manager or the Help Center.
Using Trackers for Audience Building:
In addition to measurement, trackers can be used to support audience creation.
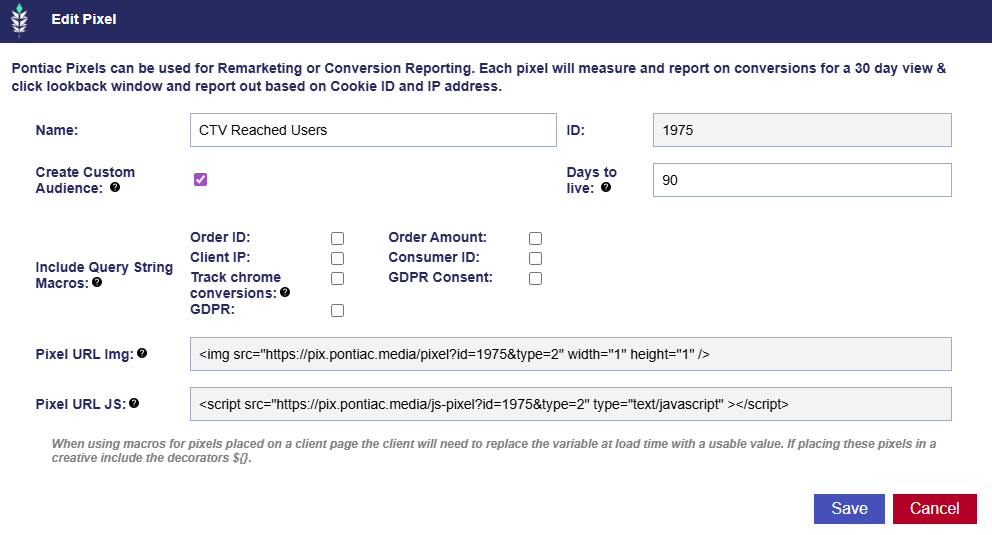
By adding a Pontiac pixel img as a tracker to a creative, you can capture exposed users and automatically build a custom audience based on IP data when the tracker fires.
Follow the following setups:
Create a pixel and check the Create Custom Audience feature and set days to live.
2. Add the Pixel URL Img to your desired creative (CTV, Display, Audio, etc.) to the trackers tab as an impression tracker.
3. Check that the audience has started collecting records in the Audience tab > Custom section. If there are records proceed to the next step. If not, ensure that the campaign has been live long enough to collect data.
4. On the Campaign or Line level associate the custom audience.
This enables workflows such as:
Building audiences from users exposed to ads
Applying those audiences to future campaigns
Retargeting across different media types (e.g., video, display, audio)
This approach allows you to extend campaign impact across channels and scale retargeting strategies.
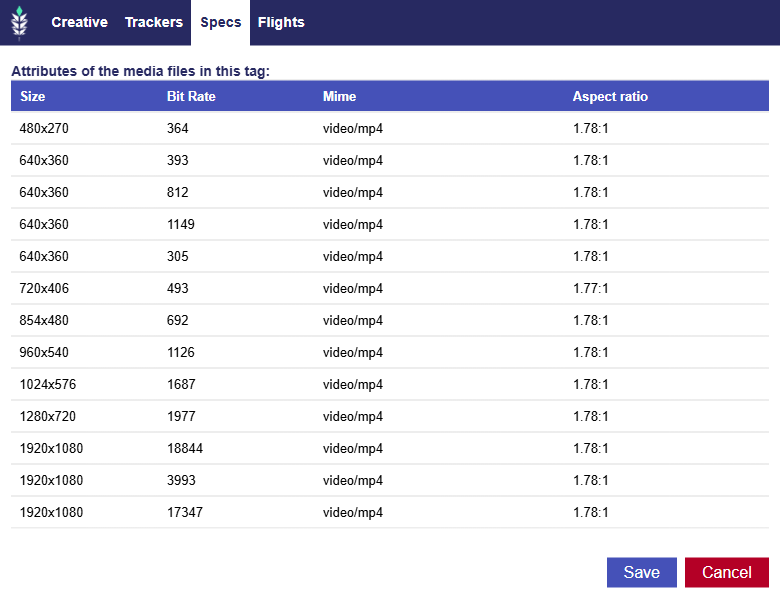
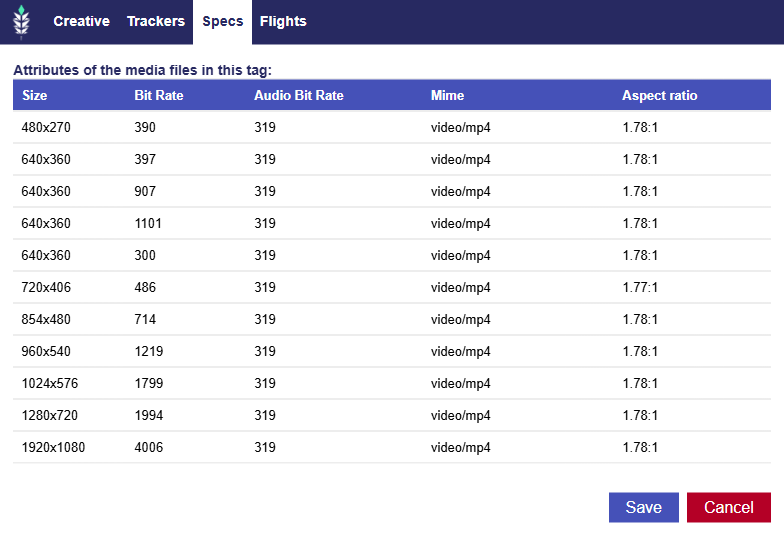
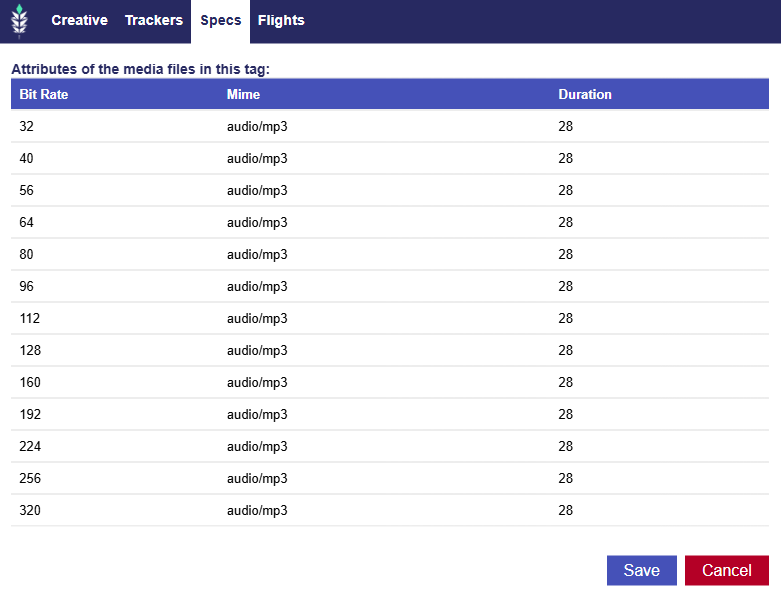
Specs Tab
The Specs tab displays technical details for supported creative types, including creative size, bit rates, MIME type, aspect ratio, and duration where applicable.
Creative types without a Specs tab
The following creative types do not have a Specs tab because their details are available in the main creative dialog window:
Banner: Hosted
Banner: 3rd Party
HTML5
Native
Video: 3rd Party
Size
Bit Rate (Video and Audio Combined)
Mime
Aspect Ratio
Video: Hosted
Size
Bit Rate (Video)
Audio Bit Rate
Mime
Aspect Ratio
Audio: 3rd Party
Bit Rate (Audio)
Mime
Duration
Flights Tab
On the Flights tab, choose to have the Creative Always On or Active for a specific Flight.
Flight dates can be applied on each creative to easily schedule and facilitate creative swaps on a Line or Campaign. For example, if you have a new creative for each week of a Campaign, you can associate all of the creatives to the Campaign, and set flight dates accordingly so that you do not have to edit the Campaign and swap creatives each week. The creative will only be eligible to serve during the date intervals selected unless the creative is set to ‘Always On’, in which case it will be eligible to serve whenever it is assigned to a Line or creative with current flight dates.
In the creative upload or edit window, under the ‘Flights’ tab, you can change the creative dates setting to ‘Flights’ then configure the dates when you would like the creative to serve. To add multiple flights, select the ‘Add Flight’ button.
To remove a flight, click the red circle next to the selected dates. If a creative is switched from ‘Flights’ to ‘Always On’, all existing flights will be removed.