Edit a Campaign
Setup Section

To edit an existing Campaign’s Setup section, follow these steps:
- Go to the selected Advertiser where you want to edit the existing Campaign.
- Navigate to the Campaigns dropdown section within the Advertiser’s dashboard.
- Select the name of the Campaign that you would like to edit.
- Press the ‘Edit’ button on the upper right corner of the page to enter Edit Mode.
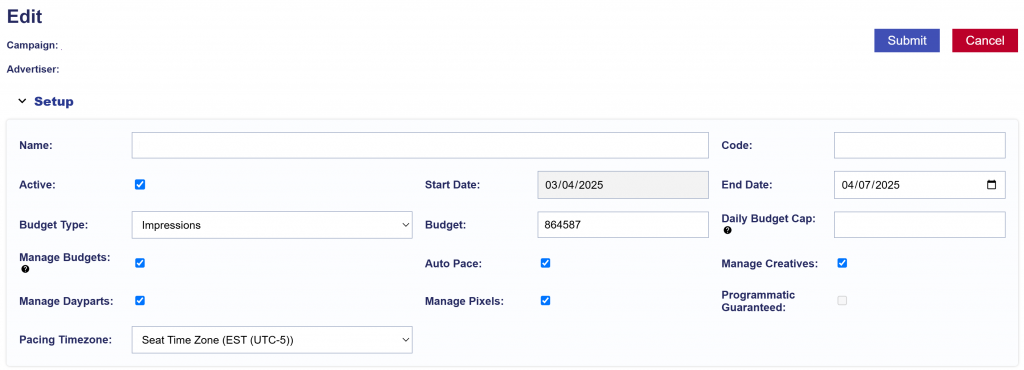
In the Setup dropdown, the following fields are editable:
- Name: Rename the Campaign.
- Code: Optional and for reporting purposes.
- Active Status: The ‘Active’ box is automatically checked, but uncheck it if you want to create an Inactive Campaign.
- Start Date (if not started yet)
- End Date (if not ended yet)
- Budget Type: Spend or Impressions
- Budget: Set based on your selected Budget Type, enter the total budget for your Campaign.
- Set a Daily Budget Cap: This is an optional field. If ‘Managed Dayparts’ is checked and the pacing time zone is set at the Campaign level, this time zone will be used to define the ‘day’ and apply the cap. If the pacing time zone is controlled by the Lines, the seat time zone will be used. When the daily budget cap is reached, all Lines under the Campaign will stop bidding, regardless of Line budget and pacing. It’s not recommended to enable catch-up pacing if the daily budget cap is set, as this may cause erratic behavior.
- Manage Budgets:
- Applying ‘Manage Budgets’ will update Line Items flight dates to align with Campaign Start Date, End Date, and Budget Type.
- Line budgets will be converted from the lifetime dollar or impression amount to a weight according to the percentage of the total Campaign budget currently allocated to the line.
- Uncheck if you do not want to modify the Lines’ budgets.
- Auto Pace: Select this option if you want the system to automatically pace your Campaign.
- Manage Creatives: Select this option to associate creatives with the Campaign.
- Manage Dayparts: This option allows you to manage pacing and dayparts at the Campaign level and will override pacing and dayparts that are set on any associated Line Items.
- Manage Pixels:
- This allows you to associate pixels to the Campaign for tracking purposes.
- For all Lines under the Campaign, any Pixels associated at the Line Level will be removed and replaced by Pixels selected on the Campaign Level.
- Enable Flights:
- This option allows you to add flight dates for the Campaign. You can input a Start Date, End date, Budget, and define whether Rollover Budgets will be used.
- If Rollover is selected, you can define the Rollover Type: either ‘even’ or ‘next flight’.
- Pacing Timezone: Select the desired seat time zone for pacing purposes.
- Enable Campaign Frequency: This option sets a frequency cap for your Campaign, determining how often an ad is shown to the same individual user within a specified time frame. You can set the recency, which controls the minimum amount of time between ads shown to the same user.
If you have finished editing, click the ‘Submit’ button in the top right corner of the page to save and apply all changes. If you do not want to apply the edits, press ‘Cancel’ to discard changes and revert the Campaign to its previous settings. To continue making edits, proceed to another section.
Targeting Section
To edit the Targeting section of a Campaign, follow these steps:
- Navigate to the Targeting section within the Campaign.
- Click ‘Edit Targeting’ to modify targeting settings.
- Make the necessary changes to the targeting settings. Refer to the documentation page to review available targeting options: Campaign Targeting
- Click ‘Save’ in the bottom right corner of the popup window to apply all changes. To discard changes and revert to the previous settings, click ‘Cancel’.
- If you have finished editing, close the window and click the ‘Submit’ button in the top right corner of the page to save and apply all changes. If you do not want to apply the edits, press ‘Cancel’ to discard changes and revert the Campaign to its previous settings. To continue making edits, proceed to another section.
Audiences Section
To edit the Audience section of a Campaign, follow these steps:
- Navigate to the Audience section within the Campaign.
- Click ‘Associate Segments’ to add and/or remove Audience Segments associated to the Campaign.
- Make the necessary changes to the Audience settings. Refer to the documentation page to review available Audience options: Campaign Audiences
- If you have finished editing, close the window and click the ‘Submit’ button in the top right corner of the page to save and apply all changes. If you do not want to apply the edits, press ‘Cancel’ to discard changes and revert the Campaign to its previous settings. To continue making edits, proceed to another section.
Flights Section
If the ‘Enable Flights’ feature is checked in the Campaign Setup section and you want to edit the Flights section of the Campaign, follow these steps:
- Navigate to the Campaign with the Flights that you want to edit.
- Click the ‘Edit’ button to enter edit mode.
- Refer to the documentation page to review available Flight options: Campaign Flights. The following fields are editable:
- Add and/or delete Flights
- Active Status
- Start Date (if not started yet)
- End Date (if not ended yet)
- Flight Budget
- Rollover Budgets Option
- Rollover Type: Even or Next Flight
- Make the necessary changes to the Flight settings.
- If you have finished editing, close the window and click the ‘Submit’ button in the top right corner of the page to save and apply all changes. If you do not want to apply the edits, press ‘Cancel’ to discard changes and revert the Campaign to its previous settings. To continue making edits, proceed to another section.
Lines Section

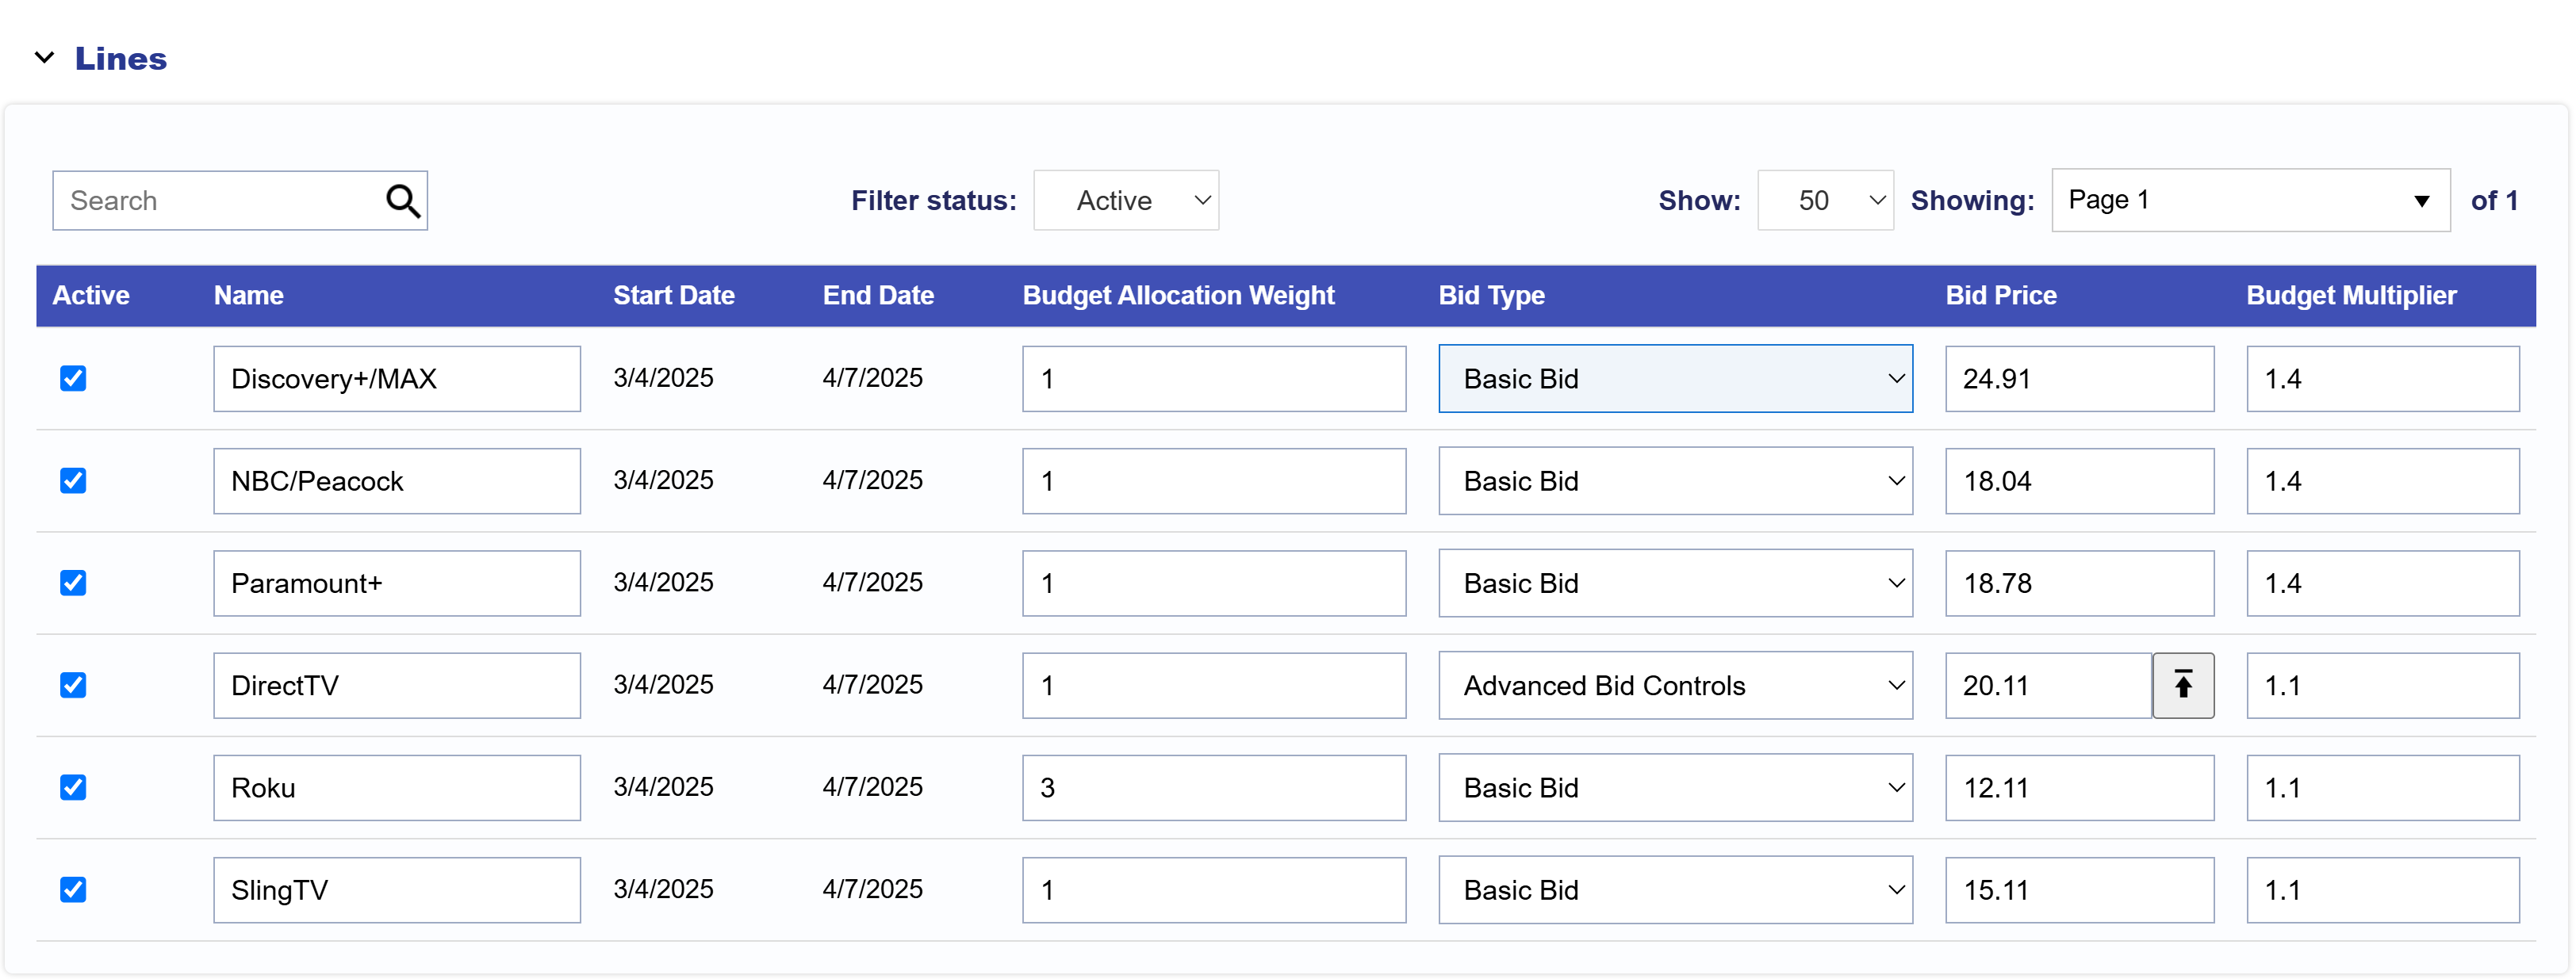
In the Lines dropdown section, the following fields are editable:
- Active Status
- Line Name
- Budget Allocation Weight
- Bid Type: Basic Bid, Bid at Floor Price, Advanced Bid Controls
- Bid Price
- Budget Multiplier
If you have finished editing, click the ‘Submit’ button in the top right corner of the page to save and apply all changes. If you do not want to apply the edits, press ‘Cancel’ to discard changes and revert the Campaign to its previous settings. To continue making edits, proceed to another section.
Pacing & Dayparts Section
If ‘Manage Dayparts’ is enabled on the Campaign Setup section and you want to edit the Pacing & Dayparts section of the Campaign, follow these steps:
- Navigate to the Pacing & Dayparts section within the Campaign.
- Make the necessary changes to the Pacing & Dayparts settings. Refer to the documentation page to review available Pacing & Dayparts options: Campaign Pacing & Dayparts
- If you have finished editing, click the ‘Submit’ button in the top right corner of the page to save and apply all changes. If you do not want to apply the edits, press ‘Cancel’ to discard changes and revert the Campaign to its previous settings. To continue making edits, proceed to another section.
Frequency & Recency Section
If the ‘Enable Campaign Frequency’ feature is checked in the Campaign Setup section and you want to edit the Frequency & Recency section of the Campaign, follow these steps:
- Navigate to the Frequency & Recency section within the Campaign.
- Make the necessary changes to the Frequency & Recency settings. Refer to the documentation page to review available Frequency & Recency options: Campaign Frequency & Recency
- If you have finished editing, close the window and click the ‘Submit’ button in the top right corner of the page to save and apply all changes. If you do not want to apply the edits, press ‘Cancel’ to discard changes and revert the Campaign to its previous settings. To continue making edits, proceed to another section.
Creatives Section
If ‘Manage Creatives’ is enabled in the Campaign Setup section and you want to edit the Creatives section of the Campaign, follow these steps:
- Navigate to the Creatives section within the Campaign.
- Click ‘Associate Creatives’ to add and/or remove Creatives associated to the Campaign.
- Note that you can only Edit a Creative on the Advertiser Level, not here on the Campaign Level.
- If you have finished editing, close the window and click the ‘Submit’ button in the top right corner of the page to save and apply all changes. If you do not want to apply the edits, press ‘Cancel’ to discard changes and revert the Campaign to its previous settings. To continue making edits, proceed to another section.
Pixels Section
If ‘Manage Pixels’ is enabled on the Campaign Setup section and you want to edit the Pixels section of the Campaign, follow these steps:
- Navigate to the Pixels section within the Campaign.
- Click ‘Associate Pixels’ to add and/or remove Pixels associated to the Campaign.
- Note that you can only Create and Edit a Pixel on the Advertiser Level, not here on the Campaign Level.
- If you have finished editing, close the window and click the ‘Submit’ button in the top right corner of the page to save and apply all changes. If you do not want to apply the edits, press ‘Cancel’ to discard changes and revert the Campaign to its previous settings. To continue making edits, proceed to another section.