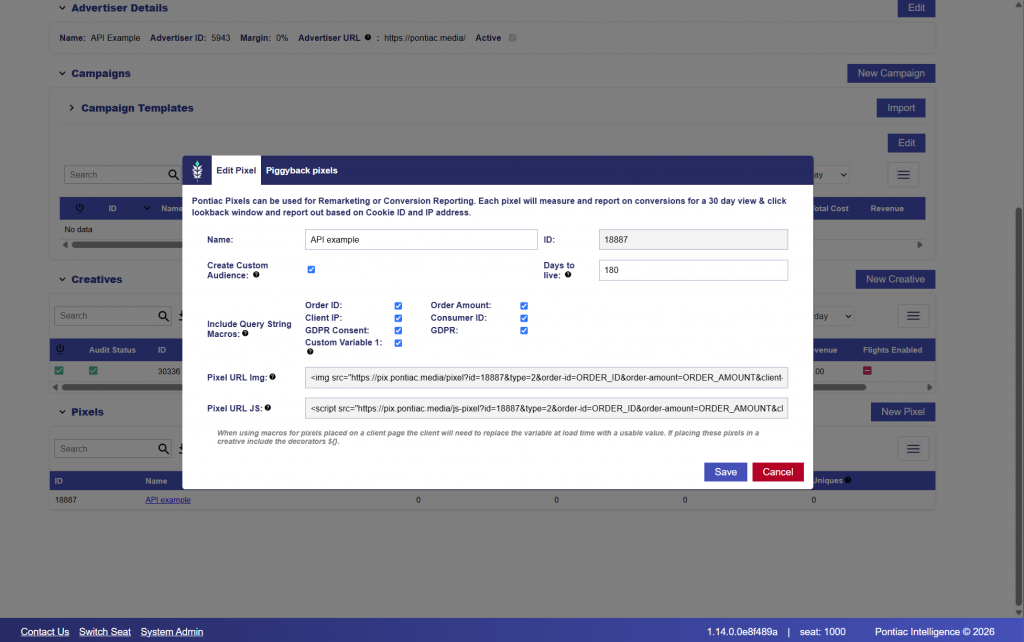
Creating a Pixel
Pixels are created at the Advertiser level using: POST /rtb/pixels/ip-conversion-pixel
IP Conversion Pixels track user actions, such as purchases or sign-ups, after ad exposure. They can also be configured to create an RTB retargeting audience for use in Campaign and Line targeting.
In this example, we will create a conversion Pixel for the Advertiser (ID: 5943) created earlier.
Pixel Settings
The Pixel request includes the following core fields:
- name: Pixel display name.
- pixelType: Pixel implementation type.
- advertiserId: Parent Advertiser ID.
- seatId: Seat ID associated with the Pixel.
Additional tracking and audience options can also be enabled:
- createRtbAudience: Creates an RTB retargeting audience from users captured by the Pixel.
- daysToLiveRTB: Number of days users remain in the associated RTB audience.
- orderIdMacro: Enables an Order ID macro.
- orderAmountMacro: Enables an Order Amount macro.
- clientIpMacro: Enables a Client IP macro.
- consumerIdMacro: Enables a Consumer ID macro.
- gdprConsentMacro: Enables a GDPR Consent macro.
- gdprMacro: Enables a GDPR flag macro.
- customVariableMacro: Enables a Custom Variable macro.
Request
The following example creates an IP Conversion Pixel and enables an RTB retargeting audience with a 180-day audience duration.
curl -X 'POST' \
  'https://api.pontiac.media/rtb/pixels/ip-conversion-pixel' \
  -H 'accept: application/json' \
  -H 'auth: YOUR_AUTH_TOKEN' \
  -H 'Content-Type: application/json' \
  -d '{
    "name": "API example",
    "pixelType": 1,
    "advertiserId": 5943,
    "seatId": 1000,
    "createRtbAudience": true,
    "orderIdMacro": true,
    "orderAmountMacro": true,
    "clientIpMacro": true,
    "consumerIdMacro": true,
    "gdprConsentMacro": true,
    "gdprMacro": true,
    "daysToLiveRTB": 180,
    "customVariableMacro": true
  }'
Response
A successful request returns the newly created Pixel and its stored configuration.
{
  "timestamp": "2026-09-01 16:55:00",
  "response": {
    "pontiacPixelId": 18887,
    "name": "API example",
    "pixelType": "2",
    "advertiserId": 5943,
    "seatId": 1000,
    "createRtbAudience": 1,
    "orderIdMacro": 1,
    "orderAmountMacro": 1,
    "clientIpMacro": 1,
    "consumerIdMacro": 1,
    "gdprConsentMacro": 1,
    "gdprMacro": 1,
    "daysToLiveRTB": 180,
    "customVariableMacro": 1,
    "piggybackPixels": []
  },
  "accountStatus": 1,
  "seatId": 1000
}
From the response, save the pontiacPixelId. This ID can be used later when associating the Pixel with the applicable Campaign or Line.
In this example: Pixel ID: 18887
Because createRtbAudience is enabled, the Pixel can also be used to build an RTB retargeting audience from captured users.
The response also includes a piggybackPixels array. If additional third-party tracking Pixels are associated with the Pontiac Pixel, they are returned in this field.
Pontiac Bidder UI Validation